In my previous post, we briefly covered how to publish a Helm chart to ACR using Azure DevOps. In this post we will use GitHub actions to build and publish Helm chart to ACR using GitHub Actions. We will also take a sneak peak how GitHub environments work.

Pre-requisites
I am going to assume ACR instance is setup using repository scoped tokens. Since we already covered setting up of ACR this way in the earlier post, I will not include the steps here.
Setting up secrets at GitHub
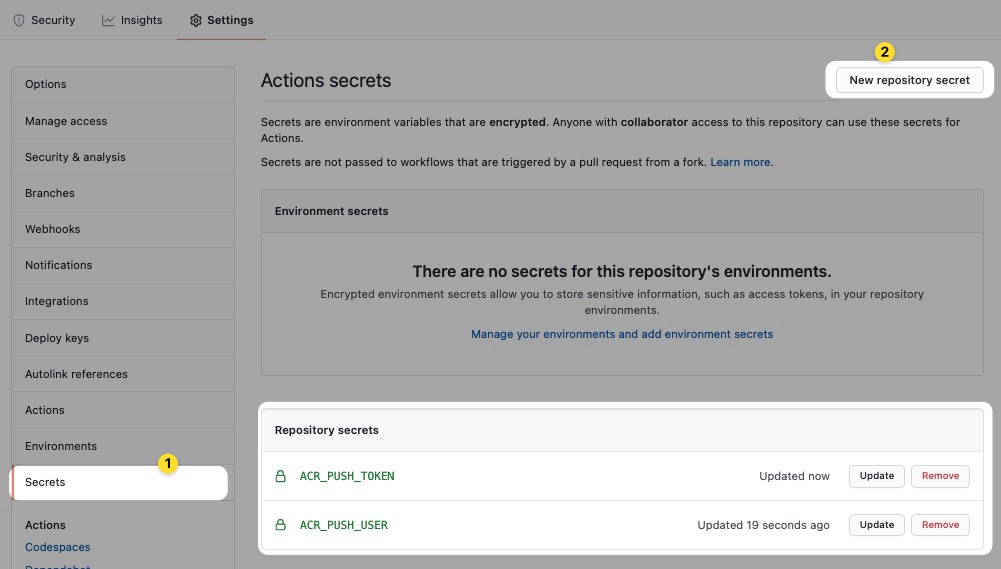
We would like store Azure Container Registry’s tokens as GitHub repository level secrets. To do that, click on Settings on the repository page and head to Secrets tab. Finally click on New repository secret and add the token name and the password. I have stored token name as ACR_PUSH_USER and token password as ACR_PUSH_TOKEN.
Creating the workflow in GitHub Actions
Publish chart to ACR
The first step is to create an yaml file under .github\workflows folder and setup a basic structure. The first things (see the yaml below) are defining name for the action, currently set to trigger via manual trigger using workflow_dispatch and define few environment variables which we are going to use later in the action.
name: ci

on:
  workflow_dispatch:

env:
  HELM_EXPERIMENTAL_OCI: 1
  HELM_VERSION_TO_INSTALL: 3.5.0
  ACR_NAME: acrdemoutkarsh
  ACR_REPO_NAME: helmdemo/vote-app
The first environment variable conveys to ACR that we are going to publish a OCI package. Next couple of variables just define version of Helm we need on the runner, our ACR name to which we are going to publish this chart and finally to the repository we are publishing this chart to (used in below sections).
Installing Helm 3 on the agent
Now that we have all the variables defined, we need add jobs and steps to build our workflow to publish charts to ACR. We then need to install Helm tool on the agent before we can run the Helm commands. We do that using yaml below.
jobs:
build:
name: publish acr
runs-on: ubuntu-latest
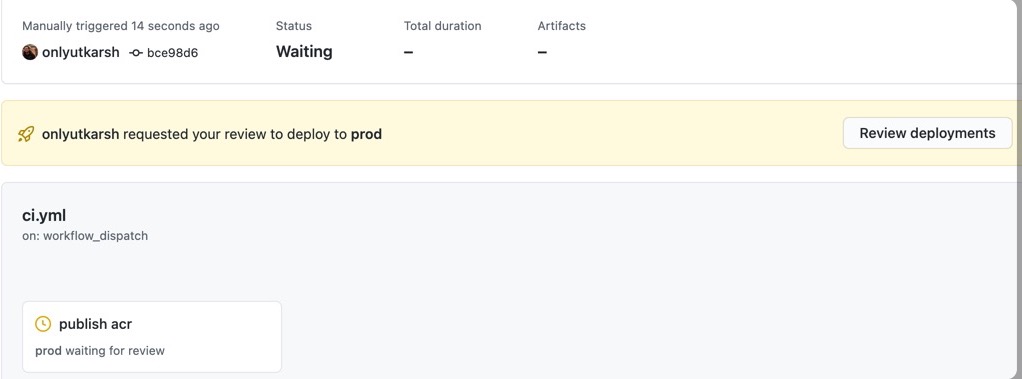
environment: prod
steps:
- uses: actions/checkout@v2
name: checkout repo
- name: install helm
uses: Azure/setup-helm@v1
with:
version: ${{ env.HELM_VERSION_TO_INSTALL }}# default is latest
As you can see, we have one job named build (which will be displayed as publish acr – see screenshot below) which runs on ubuntu-latest agent. We also are targeting our deployment to an environment prod. Environments in GitHub are cool because you can have approvers, additional protection rules for environments and environment specific secrets. In the screenshot below, notice how the flow is waiting for review.
Next, we checkout the repository and using setup-helm task from Azure repo we install the specific version (3.5.0) of Helm.
Login to the ACR using Helm
Next, we need to login to ACR registry using Helm tool.
- name: login to acr using helm
  run: |
    echo $ | helm registry login $.azurecr.io --username $ --password-stdin
Save and push the chart to ACR
Next we need to save the chart directory to local cache and publish it to ACR.
- name: save helm chart to local registry
  run: |
    helm chart save $/src/azure-vote-helm-chart/ $.azurecr.io/$:latest

- name: publish chart to acr
  run: |
    helm chart push $.azurecr.io/$:latest
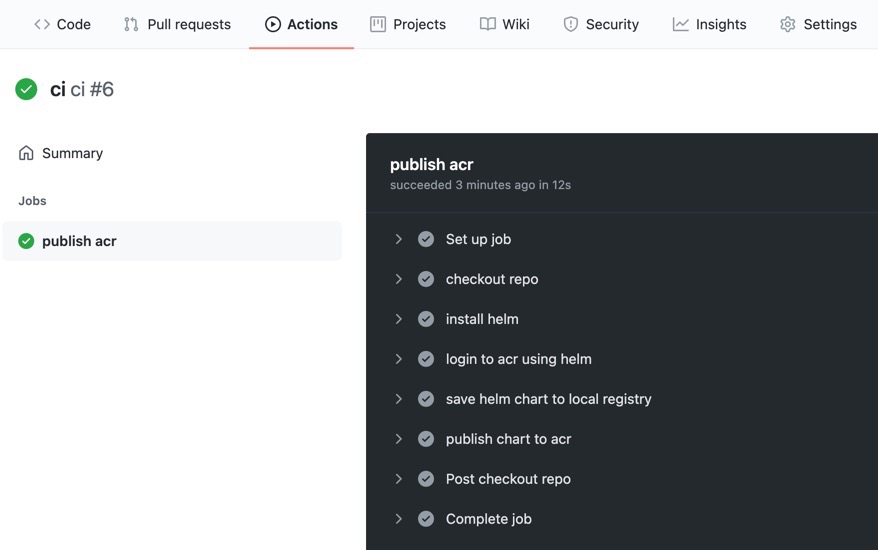
Run the workflow, and you will see output as below.
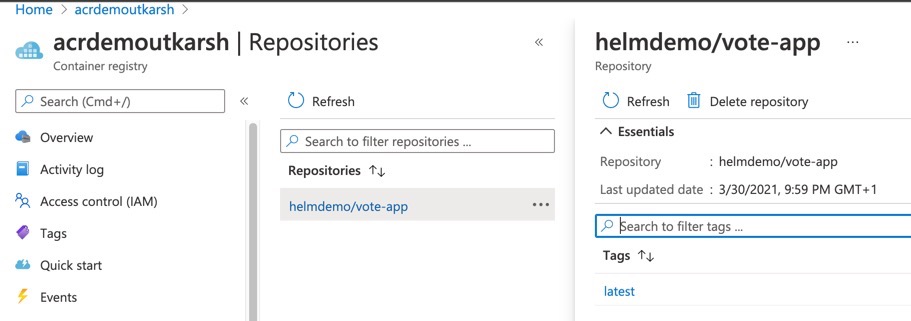
Go to ACR and you will see char correctly published to helmdemo/vote-app repository as declared in the env section above.
Conclusion
In this post, you saw how easily we can deploy a OCI package (helm3 chart) to ACR using GitHub actions. We also saw how GitHub environments help you approve changes to the environment. Hope you enjoyed reading this post.