Apache Cassandra obviously can’t tell the future. It can only enable you to organize data storage (or at least make it as organized as it can get in a distributed system). But how good is Cassandra at it? Find all the needed details below so that Cassandra performance is not all Greek to you anymore.
Terms you may not know yet
Down below, our Cassandra specialists use quite a lot of specific terms that you may encounter for the first time. Here, you may find all these terms briefly explained.
Token is a somewhat abstract number assigned to every node of the cluster in an ascending manner. All the nodes form a token ring.
Partitioner is the algorithm that decides what nodes in the cluster are going to store data.
Replication factor determines the number of data replicas.
Keyspace is the global storage space that contains all column families of one application.
Column family is a set of Cassandra’s minimal units of data storage (columns). Columns consist of a column name (key), a value and a timestamp.
Memtable is a cache memory structure.
SSTable is an unchangeable data structure created as soon as a memtable is flushed onto a disk.
Primary index is a part of the SSTable that has a set of this table’s row keys and points to the keys’ location in the given SSTable.
Primary key in Cassandra consists of a partition key and a number of clustering columns (if any). The partition key helps to understand what node stores the data, while the clustering columns organize data in the table in ascending alphabetical order (usually).
Bloom filters are data structures used to quickly find which SSTables are likely to have the needed data.
Secondary index can locate data within a single node by its non-primary-key columns. SASI (SSTable Attached Secondary Index) is an improved version of a secondary index ‘affixed’ to SSTables.
Materialized view is a means of ‘cluster-wide’ indexing that creates another variant of the base table but includes the queried columns into the partition key (while with a secondary index, they are left out of it). This way, it’s possible to search for indexed data across the whole cluster without looking into every node.
Data modeling in Cassandra
Cassandra’s performance is highly dependent on the way the data model is designed. So, before you dive into it, make sure that you understand Cassandra’s three data modeling ‘dogmas’:
Disk space is cheap.
Writes are cheap.
Network communication is expensive.
These three statements reveal the true sense behind all Cassandra’s peculiarities described in the article.
And as to the most important rules to follow while designing a Cassandra data model, here they are:
Do spread data evenly in the cluster, which means having a good primary key.
Do reduce the number of partition reads, which means first thinking about the future queries’ composition before modeling the data.
Data partitioning and denormalization
To assess Cassandra performance, it’s logical to start in the beginning of data’s path and first look at its efficiency while distributing and duplicating data.
Partitioning and denormalization: The process
While distributing data, Cassandra uses consistent hashing and practices data replication and partitioning. Imagine that we have a cluster of 10 nodes with tokens 10, 20, 30, 40, etc. A partitioner converts the data’s primary key into a certain hash value (say, 15) and then looks at the token ring. The first node whose token is bigger than the hash value is the first choice to store the data. And if we have the replication factor of 3 (usually it is 3, but it’s tunable for each keyspace), the next two tokens’ nodes (or the ones that are physically closer to the first node) also store the data. This is how we get data replicas on three separate nodes nice and easy. But besides that, Cassandra also practices denormalization and encourages data duplication: creating numerous versions of one and the same table optimized for different read requests. Imagine how much data it is, if we have the same huge denormalized table with repeating data on 3 nodes and each of the nodes also has at least 3 versions of this table.
Partitioning and denormalization: The downside
The fact that data is denormalized in Cassandra may seem weird, if you come from a relational-database background. When any non-big-data system scales up, you need to do things like read replication, sharding and index optimization. But at some point, your system becomes almost inoperable, and you realize that the amazing relational model with all its joins and normalization is the exact reason for performance issues.
To solve this, Cassandra has denormalization as well as creates several versions of one table optimized for different reads. But this ‘aid’ does not come without consequence. When you decide to increase your read performance by creating data replicas and duplicated table versions, write performance suffersa bit because you can’t just write once anymore. You need to write the same thing n times. Besides, you need a good mechanism of choosing which node to write to, which Cassandra provides, so no blames here. And although these losses to the write performance in Cassandra are scanty and often neglected, you still need the resources for multiple writes.
Partitioning and denormalization: The upside
Consistent hashing is very efficient for data partitioning. Why? Because the token ring covers the whole array of possible keys and the data is distributed evenly among them with each of the nodes getting loaded roughly the same. But the most pleasant thing about it is that your cluster’s performance is almostlinearly scalable. It sounds too good to be true, but it is in fact so. If you double the number of nodes, the distance between their tokens will decrease by half and, consequently, the system will be able to handle almost twice as many reads and writes. The extra bonus here: with doubled nodes, your system becomes even more fault-tolerant.
The write
Write: The process
After being directed to a specific node, a write request first gets to the commit log (it stores all the info about in-cache writes). At the same time, the data gets stored in the memtable. At some point (for instance, when the memtable is full), Cassandra flushes the data from cache onto the disk – into SSTables. At the same moment, the commit log purges all its data, since it no longer has to watch out for the corresponding data in cache. After a node writes the data, it notifies the coordinator node about the successfully completed operation. And the number of such success notifications depends on the data consistency level for writes set by your Cassandra specialists.
Such a process happens on all nodes that get to write a partition. But what if one of them is down? There’s an elegant solution for it – hinted handoff. When the coordinator sees that a replica node is not responding, it stores the missed write. Then, Cassandra temporarily creates in the local keyspace a hint that will later remind the ‘derailed’ node to write certain data after it goes back up. If the node doesn’t recover within 3 hours, the coordinator stores the write permanently.
Write: The downside
Still, the write is not perfect. Here’re some upsetting things:
Append operations work just fine, while updates are conceptually missing in Cassandra (although it’s not entirely right to say so, since such a command exists). When you need to update a certain value, you just add an entry with the same primary key but a new value and a younger timestamp. Just imagine how many updates you may need and how much space that will take up. Moreover, it can affect read performance, since Cassandra will need to look through lots of data on a single key and check whichever the newest one is. However, once in a while, compaction is enacted to merge such data and free up space.
The hinted handoff process can overload the coordinator node. If this happens, the coordinator will refuse writes, which can result in the loss ofsome data replicas.
Write: The upside
Cassandra’s write performance is still pretty good, though. Here’s why:
Cassandra avoids random data input having a clear scenario for how things go, which contributes to the write performance.
To make sure that all the chosen nodes do write the data, even if some of them are down, there’s the above-mentioned hinted handoff process. However, you should note that hinted handoff only works when your consistency level is met.
The design of the write operation involves the commit log, which is nice. Why? If a node goes down, replaying the commit log after it’s up again will restore all the lost in-cache writes to the memtable.
The read
Read: The process
When a read request starts its journey, the data’s partition key is used to find what nodes have the data. After that, the request is sent to a number of nodes set by the tunable consistency level for reads. Then, on each node, in a certain order, Cassandra checks different places that can have the data. The first one is the memtable. If the data is not there, it checks the row key cache (if enabled), then the bloom filter and then the partition key cache (also if enabled). If the partition key cache has the needed partition key, Cassandra goes straight to the compression offsets, and after that it finally fetches the needed data out of a certain SSTable. If the partition key wasn’t found in partition key cache, Cassandra checks the partition summary and then the primary index before going to the compression offsets and extracting the data from the SSTable.
After the data with the latest timestamp is located, it is fetched to the coordinator. Here, another stage of the read occurs. As we’ve stated here, Cassandra has issues with data consistency. The thing is that you write many data replicas, and you may read their old versions instead of the newer ones. But Cassandra doesn’t ignore these consistency-related problems: it tries to solve them with a read repair process. The nodes that are involved in the read return results. Then, Cassandra compares these results based on the “last write wins” policy. Hence, the new data version is the main candidate to be returned to the user, while the older versions are rewritten to their nodes. But that’s not all. In the background, Cassandra checks the rest of the nodes that have the requested data (because the replication factor is often bigger than consistency level). When these nodes return results, the DB also compares them and the older ones get rewritten. Only after this, the user actually gets the result.
Read: The downside
Cassandra read performance does enjoy a lot of glory, but it’s still not entirely flawless.
All is fine as long as you only query your data by the partition key. If you want to do it by an out-of-the-partition-key column (use a secondary index or a SASI), things can go downhill. The problem is that secondary indexes and SASIs don’t contain the partition key, which means there’s no way to know what node stores the indexed data. It leads to searching for the data on all nodes in the cluster, which is neither cheap nor quick.
Both the secondary index and the SASI aren’t good for high cardinality columns (as well as for counter and static columns). Using these indexes on the ‘rare’ data can significantly decrease read performance.
Bloom filters are based on probabilistic algorithms and are meant to bring up results very fast. This often leads to false positives, which is another way to waste time and resources while searching in the wrong places.
Apart from the read, secondary indexes, SASIs and materialized views can adversely affect the write. In case with SASI and secondary index, every time data is written to the table with an indexed column, the column families that contain indexes and their values will have to be updated. And in case with materialized views, if anything new is written to the base table, the materialized view itself will have to be changed.
If you need to read a table with thousands of columns, you may have problems. Cassandra has limitations when it comes to the partition size and number of values: 100 MB and 2 billion respectively. So if your table contains too many columns, values or is too big in size, you won’t be able to read it quickly. Or even won’t be able to read it at all. And this is something to keep in mind. If the task doesn’t strictly require reading this number of columns, it’s always better to split such tables into multiple pieces. Besides, you should remember that the more columns the table has, the more RAM you’ll need to read it.
Read: The upside
Fear not, there are strong sides to the read performance as well.
Cassandra provides excitingly steady data availability. It doesn’t have a single point of failure, plus, it has data stored on numerous nodes and in numerous places. So, if multiple nodes are down (up to half the cluster), you will read your data anyway (provided that your replication factor is tuned accordingly).
The consistency problems can be solved in Cassandra through the clever and fast read repair process. It is quite efficient and very helpful, but still we can’t say it works perfectly all the time.
You may think that the read process is too long and that it checks too many places, which is inefficient when it comes to querying frequently accessed data. But Cassandra has an additional shortened read processfor the often-needed data. For such cases, the data itself can be stored in a row cache. Or its ‘address’ can be in the key cache, which facilitates the process a lot.
Secondary indexes can still be useful, if we’re speaking about analytical queries, when you need to access all or almost all nodes anyway.
SASIs can be an extremely good tool for conducting full text searches.
The mere existence of materialized views can be seen as an advantage, since they allow you to easily find needed indexed columns in the cluster. Although creating additional variants of tables will take up space.
Cassandra performance: Conclusion
Summarizing Cassandra performance, let’s look at its main upside and downside points. Upside: Cassandra distributes data efficiently, allows almost linear scalability, writes data fast and provides almost constant data availability. Downside: data consistency issues aren’t a rarity and indexing is far from perfect.
Obviously, nobody’s without sin, and Cassandra is not an exception. Some issues can indeed influence write or read performance greatly. So, you will need to think about Cassandra performance tuning if you encounter write or read inefficiencies, and that can involve anything from slightly tweaking your replication factors or consistency levels to an entire data model redesign. But this in no way means that Cassandra is a low-performance product. If compared with MongoDB and HBase on its performance under mixed operational and analytical workload, Cassandra – with all its stumbling blocks – is by far the best out of the three (which only proves that the NoSQL world is a really long way from perfect). However, Cassandra’s high performance depends a lot on the expertise of the staff that deals with your Cassandra clusters. So, if you choose Cassandra, nice job! Now, choose the right people to work with it.
We’ve been making our way through The Legend of Zelda: Majora’s Mask the past few weeks for our weekly Replay stream, but this week Marcus Stewart is busy on assignment, so Brian Shea joined me for a look at a different Zelda sequel. The Legend of Zelda: Phantom Hourglass released in 2007 for DS and is controlled entirely by touchscreen. Back in 2017 while speaking with longtime Zelda producer Eiji Aonuma for our Breath of the Wild cover story, he cited Phantom Hourglass as his personal favorite Zelda game saying that his wife is a fan of that entry, and it was the first time he was in the role of producer. “I have a lot of sentiment for it,”Aonuma said.
Check out the video below for an hour Phantom Hourglass gameplay below.
If you enjoy our livestreams but haven’t subscribed to our Twitch channel, know that doing so not only gives you notifications and access to special emotes. You’ll also be granted entry to the official Game Informer Discord channel, where our welcoming community members, moderators, and staff gather to talk games, entertainment, food, and organize hangouts! Be sure to also follow our second YouTube channel, Game Informer Shows, to watch other Replay episodes as well as Twitch archives of GI Live and more.
Discover the game-changing innovation unveiled at NAB 2024 as Shawn Lam from Streaming Media sits down with Atomos CEO Jeromy Young to discuss the Atomos Ninja Phone. This revolutionary device transforms an iPhone 15 Pro or Pro Max into an advanced 1600nit, 10-bit, 2,000,000:1 contrast ratio, 460ppi, HDR OLED, ProRes monitor-recorder compatible with any professional HDMI camera. The conversation delves into the technical specifications, compatibility, and future implications of this groundbreaking tool, highlighting its potential to revolutionize video production workflows and creative possibilities. With its seamless integration of smartphone technology and professional-grade features, the Atomos Ninja Phone emerges as a must-have for videographers and content creators seeking unparalleled versatility and performance.
como se explica en la parte de arriba, tengo un proyecto en visual studio con formularios conectados a una base de datos local Access y quiero que se cree un archivo pdf donde se muestren los datos de las tablas mediante un botón.
La verdad no puedo decir que he probado algo, realmente no tengo idea de como hacerlo aunque ya intentado investigar
So, you want to launch a business but you need a step-by-step guide to become a freelance writer? No problem! We’ve got it covered for you.
This ultimate guide to becoming a freelance writer will go in-depth to reveal exactly what you need to learn about how to get started.
Each chapter of this 7,000+ word guide covers an important topic for getting started plus an FAQ to answer the biggest questions on the subject.
You’ll learn the basics about starting your freelance career and get actionable advice and sound strategies that successful freelancers are using right now to succeed.
We’ll also cover how to evaluate your skills, how to price your work, how to land your first paying job, and more!
A Quick Word Before We Get into the Step-by-Step Guide to Become a Freelance Writer
Before we get started, it’s important to understand that everyone will have a slightly different path towards success in freelance writing.
Freelancing can be an incredibly rewarding and flexible career path, or even just a great side hustle. Unfortunately, getting started can feel intimidating.
Before you even learn how to become a freelance writer, you have to find your why. Why should you get into freelance writing? What’s the scenario that tends to lead to success?
Key factors:
You love writing with a passion
You are willing to write about topics that aren’t your personal favorites
You’re willing to aggressively market your services
You’re game to learn new writing tools, types, and skills to keep up with market needs
You are realistic about how much work it will take, how long it will take to launch this, and how tough the competition is
In our experience, these factors are the basis for building a successful freelance writing business. This isn’t a lark, or a fill-in project, or something you can do in 10 minutes a day.
It takes talent, dedication, and a commitment to seeing it through. If you’ve got that, you can build a freelance writing business that will give you the financial rewards you want, and the personal freedom we all seek.
The steps below are a basic guideline based on our own personal experiences, and the experiences of hundreds of writers in the Freelance Writer’s Den community. This guide is intended for beginners looking for the very first steps they should take.
For more experienced writers who already know how to be a freelance writer, feel free to explore the rest of this site, or check out the Den, for more advanced tactics.
Chapter 1: Evaluate Your Skills and Specialties
Before looking for your first writing job, it’s wise to take an honest look at your own skills and relevant experiences. This will help you carve out a niche for yourself as a freelance writer.
Some questions to ask yourself might include:
Are you a good writer?
Do you have examples to prove it?
Do you need some training before confidently saying that you are a skilled writer?
Do you have any topics that you are a true expert in?
Do you have any topics that you are genuinely interested in writing about?
Do you know how to create original content?
Equally important is to consider what niche or type of writing you may be interested in. The best method to become a freelance writer may be somewhat different for writers looking to blog than it will be for those looking to become copywriters, as an example. It also may be slightly different for those looking to get into healthcare writing than finance writing.
FAQ
Q: Do I need to choose a niche for my business?
A: Only if you’d like to make this launch process quick and easy. It’s hard to market yourself as a freelance writer, because that’s so broad, and that’s a common mistake many make when learning how to start freelance writing. Clients aren’t searching for that—they’re searching for a freelance technology writer, or a Dallas healthcare writer, or something similar.
They want to know if you write their type of thing, so the broad approach often attracts zero clients. Being a generalist also makes it harder to build expertise and raise your rates.
Q: What is a niche?
A: Good question—what we mean is an industry, such as healthcare, software, finance, marina management, metal-smithing. Think of these as niche verticals.
You could also niche horizontally, meaning you specialize in one type of writing, like only case studies or blog posts. We don’t recommend going this route, as a newbie. It’s much harder to get enough clients when you limit yourself to a single type of writing, and easier when you’re a utility player with knowledge of a particular industry sector.
Once you’re established and are turning away offers, you can become someone who does only one type of writing if you so desire. Until then, focus on industries of interest and write whatever clients need—that’s the quickest way to become a freelance writer and get this going.
Q: How do I know what a good niche for me would be?
A: Your easiest, best-earning niches generally lie where your experiences and interests intersect with a lucrative topic or industry.
Not sure whether your niche idea would work? Ask yourself, “Who would the big-money clients (or publications) be in this niche, that would pay great rates and have steady work?”
If that question is hard to answer, it’s probably not a great niche. If you’re unfamiliar with the writing marketplace, you’ll want to join a writer community where you can ask around and learn from working pros.
Q: Do I just choose one niche?
A: Actually, we advise choosing two or three. Staying a bit diverse will help keep your business thriving as the economy and individual industries wax and wane.
Q: Isn’t it bad to turn away clients who aren’t in my niche, when I’m just starting out?
A: Weirdly, it isn’t. Writing for everyone and anyone makes your career very scattered, and it’s hard to get any traction. Like they say, the riches are in the niches. Focusing your writing on a few topics will help you quickly gain expertise and impress clients.
Q: What if I super-hate the idea of choosing niches, and I want to stay a generalist?
A: Hey, it’s your business to run—we’re just trying to make this succeed quickly.
One other way to niche your business is by geography. For example, you can market yourself as a Dallas Freelance Writer. If you’re in a mid to larger-sized city this can also work, if you like working with local clients.
Chapter 2: Understand the Basics
If you are new to freelance writing, you’ll want to learn the basics of how to be a freelance writer before going after a paid job.
The Freelance Writer’s Den is a membership community that helps freelance writers find better-paying jobs, hone their writing skills, and level up their freelance careers. There are 300+ hours of video and audio trainings, tons of forum resources, excellent networking opportunities, quarterly bootcamps, and so much more. For newcomers and experts alike, the service is well worth the cost of admission.
For absolute beginners, understanding the essential elements of freelancing is vital. The tips below provide a crash-course.
Pricing FAQs
Q: How do I know what to charge my first clients?
A: There are a few ways to figure this out. First off, if you’re writing for a publication, they may have set rates and tell you what they are.
If not, you can ask clients what their budget is—and sometimes, they’ll tell you.
If their lips are zipped on that, you can ask around that network you’re building, to learn about typical rates. You can also calculate your daily rate, and simply charge what you need to, to pay your bills and maintain the lifestyle you want.
Tip: Don’t worry a lot about pay rates in your early days. It’s more important that you get to work for good clients in your niches, and build your portfolio. You can just keep raising your rates as you go, until they’re where they need to be.
Q: Should I charge by the word, hour, page, or project?
A: Ideally, you want to charge by the project. Project rates are especially great for newbies, because then your client won’t be penalized if it takes you longer to write than a more experienced writer. They’re what pros do—we’re not hourly clerks, as writers.
When you work on project rates, you will automatically increase your hourly rate over time, as you become more efficient and take less time to write. And your client will never be the wiser. So yeah. Project rates all the way.
Q: What’s a good average hourly rate my freelance writing should work out to?
A: If you’re in the West, try to aim for at least $25 to $35 USD per hour with first clients as a newbie. Less will mean you’ll never earn enough to stay afloat. Aim to rapidly raise that into the $50 to $75 USD an hour range, and keep moving up from there. Experienced freelance writers earn $75 to $100 USD an hour and more.
Q: How do I know how long it will take me to do projects?
A: By tracking your time, there is lots of free software out there for that. Figure out how long it takes you, and then challenge yourself to get it done faster on the next project. Keep improving!
Process
Writers can find work by applying for jobs/projects, or by pitching publications
Pitching a specific project or article idea gets a way better response than “Hi, do you need a writer for anything?”
The most common types of work available are blog posts, how-to guides, product reviews, and buying guides
Other great ideas for beginner jobs include rewriting local small business websites, contributing community newspapers and magazines, writing for local marketing and ad agencies (have them outsource their client work to you!), and more. Check out our full guide to entry-level writing jobs for more ideas
Clients will typically supply topics, and often keywords that should be used
Clients will generally have an expectation for article length (in number of words)
It is up to the writer to research the topic and cover it appropriately
Depending on the client, drafts may be delivered via Word documents, Google Docs, or uploaded directly to a website via WordPress or another website backend
Revisions (edits) will often be necessary, particularly when starting out. You likely won’t be paid for revisions, as the rate is calculated based on the final word count
Chapter 3: Collect (or Create) Writing Samples
To land a project, you will almost always need to show examples of your writing. At first, you can get away with simply sending samples to positions you are applying for—but eventually, you will want to have a website to display your work (see step 5 for details).
You will want to choose samples that show off your skills as a writer. Ideally, they should be relevant to the actual topics you want to be paid to write about, although this is not always possible.
There are different “tiers” of writing samples that you can use. Here are some examples:
Ideal: A published article or blog post on an authoritative website, on a topic relating to the project you are applying for
Good: A published article or blog post on an authoritative website
Decent: A published article on a random website, a college paper, a detailed Amazon product review
Avoid: Personal essays, high school papers, etc.
Once you have your samples, it’s time to move on to finding an actual paid writing job!
Samples FAQ
Q: How can I get clients when I don’t have any samples yet?
A: The easiest way is to go out and get some samples. This is also known as working pro bono. You’ll want to choose publications or companies to work with that will give you great samples in your chosen niches.
Define a limited project, and get a testimonial to go with your sample. Boom! Once you have four to six, you’re ready to impress paying customers.
Q: Is guest posting a good way to get samples?
A: It can be, especially if it’s on a popular site. If you’re posting free for exposure, be sure to choose your sites carefully, and appear where your clients might see your byline.
Q: What about writing for content mills, as a way to get first clips? A: We don’t recommend it, even for those struggling to land their first writing jobs. The requirements of mill work are very different from what you’ll be asked to do in well-paid client work, so it doesn’t serve as a very effective training ground. Often, you don’t end up with clips you can use—they’re ghostwritten for an end client who isn’t identified. Also, mills can be capricious about who they ban or give crummy ratings to. You’re basically not in control of your career.
Meanwhile, the tiny pay makes you wonder if you could actually make money writing very fast on there…and the answer is no, you usually can’t. But writers get stuck writing for tiny pay in mills, for years on end. Mill work is also fading away, as there’s less call for short, dashed-off, SEO-keyword-stuffed content, because Google doesn’t like that anymore. So it’s increasingly a dead-end street.
By contrast, doing pro bono work for small publications or small businesses for your first samples gives you clips that impress, and keeps clarity that you can’t earn this way and will need to move up. It also gives you real-world experience writing for the exact types of clients you want.
Q: What about using posts from my own blog as samples?
A: It’s better than nothing, but not ideal. Clients know you didn’t have to please an editor or marketing manager and could publish whatever you wanted, so it doesn’t exactly impress. But if you write kick-ass headlines and get a lot of comments and shares on your blog posts, it could help you lure those first clients.
Q: Does it matter if the sample I do is for a relative or friend?
A: Not really. If they’ve got a small business, an e-commerce site, or edit the hometown paper, go for it!
Chapter 4: Find Your First Gig
It’s almost time to start writing!
Now, you just have to find your first paid writing job.
When you’re just starting out, try to keep your expectations in check. Are you going to land your dream client right off the bat? Almost certainly not. However, any project will give you valuable experience that you can use to build towards securing the type of work that you truly want.
How do you find freelance gigs? Make a Living Writing maintains a huge database of paying markets for writers. Here you can find websites that pay writers to submit articles and blog posts. Each website will have different requirements and pay rates. Some are beginner-friendly, while others require a solid portfolio.
Our own lists of paying markets are a great place to start when learning how to be a freelance writer. We highly recommend checking out those markets (find one that fits your desired niche) and start pitching!
Alternatively, there are a variety of job boards and forums made specifically for freelance writers and bloggers. On these boards, clients post online writing jobs and projects that writers can apply for. Some examples include:
The downside of job boards is that they can be competitive, with potentially hundreds of applications for a single position. That’s why we recommend pitching those publications in our market lists. Having said that, many projects are quick to apply for, so it’s still worthwhile to send out applications for roles you are interested in.
Lastly, you have sites like Upwork, Fiverr, and others which are basically platforms to connect freelancers and clients. In general, we recommend avoiding these platforms. They are extremely competitive, and often pay poorly. We also recommend avoiding “content mills”, which are businesses that sell content to clients, and pay writers a small fraction of the revenue to actually write the content.
Client FAQs
Q: How do I find my first clients?
A: There are two basic approaches—you can look in your town for clients in your niche, or you can look online. Look at the online presence of businesses you like, go talk to owners, and propose a project to help get them more clients.
If you’re in a small town or not in the same country as your prospective clients, you’ll be looking online. There are plenty of blogs that offer unpaid guest posts, and many that pay for guest posts.
You can also target small business websites in your niches—most business owners are overwhelmed, not good writers, and will really appreciate the help.
Q: What is the one best, free, fastest way to market my services?
A: There isn’t a single answer to that question, because it depends a lot on you. (We warned you up top some answers would be it depends!) There are many free and low-cost ways to market your writing.
We’re marketing-method agnostic—meaning we don’t care how you do it, as long as you do lots of it. Think in terms of 100 pieces of freelance marketing per month, to get launched.
You could send customized marketing emails, do in-person networking events, pick up the phone and cold call, work your LinkedIn network, send direct-mail packages out. It’s all good, and more. We’ve actually taught 40 Ways to Market Your Writing. Lots of ways to skin the freelance marketing cat.
Think about your personality and the types of clients you want and how they do marketing—you may want to use a similar mode to how they reach out to clients. Then, study the best practices in that form of marketing and feedback from your writer network, so you know how to crush it.
Q: Who do I pitch at businesses?
A: In a small company, it may be the CEO. Beyond there, look for a marketing manager. The guy whose name is on the press release is often a good pick.
Q: Which editor should I try at a magazine?
A: Managing editor is my default, if there isn’t an articles, features, or editor in my specific topic, i.e. “health editor.” Above the managing editor, those editors aren’t really editing the paper.
Q: What if I don’t have enough article ideas to get assignments regularly?
A: Then don’t write articles. There’s a ton of paid writing for businesses, where they will dictate the topics. Alternatively, learn about how to be a story idea machine.
Q: What about responding to online job ads?
A: Most mass online job boards such as Craigslist are a waste of your time. All those postings will get hundreds of responses, so your statistical odds of getting hired through them are tiny. Look for niche boards that aren’t as widely circulated, or boards where either job-seekers or employers have to pay to participate, such as FlexJobs or LinkedIn Jobs.
Q: How do I know if an online offer of writing work is a scam?
A: Try Googling: “Is <site name> a scam?” and see what comes up. That’ll usually help. For instance, there’s this classic scam. You can also use the “if it sounds too good to be true, it probably is” test.
Q: I found this site, Master Writing Jobs—do you think I should sign up?
A: Actually, the consensus is that Master Writing Jobs is a scam. To build a thriving freelance business, you’re going to need to develop a good nose for what’s a legit offer. Any site that makes you join and pay a fee before you can see any testimonials or info about what the platform offers, you wanna run.
One of the biggest ways new freelance writers waste time is signing up on various platforms that promise to give them loads of great-paying writing jobs. Know that There. Is. No. Such. Platform. Finding your own clients is what’s for dinner, if you want to pay your bills with freelance writing.
Q: Do I need a contract?
A: Only if you want to get paid to write. There are plenty of examples online. Your freelance contract doesn’t have to be long or complicated—a brief email your client responds to with ‘I agree’ that outlines the deadline/wordcount/pay terms will work. You can also use online-signature solutions for a full-blown contract, such as DocuSign, or attach a Word Doc. Having a good contract in place will go a long way to making your invoicing process smoother.
Q: Should I get an up-front deposit to start working?
A: With business clients, absolutely yes. Fifty percent up-front deposit to begin work is typical. Publications don’t work that way, they will pay on acceptance or publication. Strive for the former.
Q: What if clients want me to be available on nights or weekends, when I want time off?
A: It’s your business to run. You set the parameters of when you’ll be available. Usually, it’ll work out fine, but you may occasionally turn down a client who wants you available 24/7.
Q: What if I’m in a different time zone than my clients, will that be a problem?
A: Mostly no. Beyond a first (virtual) meeting, most clients don’t need a lot of real-time contact.
Q: What if I invoice my client but they’re not paying me?
A: You have a range of options to get flaky freelance clients to pay up. If it happens a lot, realize that you need to change where and how you prospect for clients. Check out our full freelancer invoicing guide for more useful tips.
Chapter 5: Create a Portfolio Website and Online Presence
To come across as more professional, and to land higher-tier clients, you will want to create a writing portfolio website. Not only does this lend you credibility, it can also help clients find you, rather than the other way around.
Most writers will be best served by creating a relatively simple portfolio website. This can feel intimidating, but it doesn’t have to be!
For beginners, the easiest way to set up a portfolio site is with Squarespace.
You don’t have to be tech savvy or a designer to create a beautiful portfolio website for your freelancing business. Squarespace makes it really easy to create a site with tons of beautiful templates to choose from.
You’ll also want to expand your online presence by being active on social media. LinkedIn is a particularly great online neighborhood for writers to hang out in.
Portfolio FAQ
Q: I know I need somewhere online people can find me—but as a broke newbie, what can I do?
A: Once you get rolling, a writer website will is very important to have. In addition, you can also use your LinkedIn profile (here’s my tip-sheet on how to optimize your profile). You can go a long way putting your portfolio on LinkedIn. You can add clips to Experience entries, and also in your Summary.
Q: Why not just put clips on Contently or an Upwork profile, or somewhere like that?
A: Mass writer sites have a reputation for low rates—and their platform makes it easier to browse through others’ portfolios than to find your contact info. By contrast, LinkedIn is a huge platform where great companies are searching for freelancers, every day. We think it’s a better place to look pro.
Q: What if I don’t have a byline on my clips, like with copywriting work?
A: You can still use your clips in your portfolio, as long as you didn’t sign a nondisclosure agreement that swore you to secrecy that you authored the work.
Q: What if my clips are too old?
A: There’s actually no such thing. You’ll be surprised how seldom prospects care about the age of your clips—they just want to read your work. If you have old print clips that aren’t online, see if a good print shop can create a PDF for you, where the article is readable.
Q: What if I want to do a writer website now, as a newbie?
A: Great idea! Makes you look more professional. And the secret is, the copy you write on your writer website is a writing sample. It can be your first clip. You can get good web-copy jobs from writing your own terrific site copy!
Q: What if I have a blog—can I use that as my writer website?
A: It’s not ideal, unless your blog is very successful and popular. Then, you can put a hire me tab up and solicit writing jobs there. A writer website is a stronger way to present yourself, where the home page is all about your client and the services you offer, rather than an ever-changing set of blog post headlines.
Q: I’m not very technical. How can I get up a good writer website?
A: Squarespace offers the easiest way to create a portfolio site for your writing business. You don’t really need any special knowledge or tech skills to get a website that looks professional and stylish. Squarespace has a ton of great templates to choose from, and makes it easy to just plug in your content and publish your own website.
Chapter 6: Improve Your Skills
Your first few months as a freelance writer will likely feature a steep learning curve. Once you get familiar with the basics, you should continue to improve your skills in order to further your career and increase your earning potential.
One of the best ways to level up your skills as a freelance writer is to sign up for the Freelance Writer’s Den. This subscription will get you access to over 300 hours of exclusive boot camps and classes, eBooks and other learning materials. Plus, you will enjoy ongoing access to a friendly community of 500+ freelance writers!
The Freelance Writer’s Den covers all the bases. It can help make you a better writer, but it will also teach you practical skills such as how to price your work, how to pitch clients, and how to remain productive while working from home.
Q: What’s the best way to make sure I do a great job on my assignment?
A: Study the publication, the blog, or the company materials you are writing for. Really take it apart. How do they start their articles, quote their sources, how long are paragraphs, what sort of experts do they use? How do they conclude? Then, you do that.
Q: I’m scared to turn in my writing to my client. What should I do?
A: Have a writer-friend give it a read and make suggestions. Or consider trading services with an editor for a while, while you build confidence.
Q: What if my article gets killed?
A: Like the old song says: Pick yourself up, dust yourself off, start all over again. Can’t let any little setbacks get in the way of your freelance dreams!
Q: My client hated my first draft, and I’m devastated. How can I prevent this problem?
A: Ask more questions up-front. Learn about the tone, style, and content the client needs. Pros ask a lot of questions. Here are some key questions to ask copywriting clients.
Chapter 7: Handle Your Housekeeping
It’s easy to get caught up in the excitement of a new side hustle or career path, and lose sight of the basic tasks you need to do to run your business. As a freelancer, here are just a few of the “housekeeping” items that you’ll want to keep in mind:
Keeping accurate records of income and expenses
Invoicing clients
Setting aside money to pay for taxes (as a freelancer, taxes are not withheld from your payments, so you must set aside money yourself)
Seeking out new projects (even if you have work right now)
Following up with old clients to gauge their interest in working together again
Learning and improving your skills
Pitching your dream clients
Adding new samples to your portfolio website
Networking with other writers, business owners, and marketing professionals
Remember that as a freelancer, you are really a business. This means you need to take routine tasks like bookkeeping seriously, and continue seeking out new clients in order to keep your schedule full.
So there you have it: Our step-by-step How to become a freelance writer in just seven steps. This guide will help you get off on the right foot on your new journey into a successful freelance business. As you hone your skills and gain confidence, you will be able to improve your earning potential, land better clients, and enjoy your work more.
Business FAQs
Q: Do I need to register my business?
A: No one can make you, but it’s a good idea. In the United States, if you want to write off your business expenses, being registered with state and city tax authorities helps convince the IRS (or your national tax body) you’re a real business.
Q:What should I name my business?
A: Just starting out, your own name is fine. You can always choose another name later, or “do business as” (DBA) another name.
If you want to be fancy and have serious branding for your freelance writing biz, we recommend choosing a name with keywords that would help clients find you, like: “Healthcare Writer Dana.” Avoid meaningless words and phrases such as “communications” or “solutions,” that don’t really say what you do.
Q: Can I use a fake name in freelance writing?
A: Not usually, no. Noms de plume are for fiction authors. You’ll need to reveal your real name when you get paid to write, anyway—and having a fake identity will make editors wonder what you’re hiding. There’s a legit exception to this if you’re a woman with a stalker…we’ve known people in that sitch, and editors do understand. But otherwise, not ideally.
Q: Do I need a separate checking account for my business?
A: Yes. Just get one. You can thank me later for sparing you endless hours trying to keep your business and personal expenses/income separate.
Q: Do I need to become an LLC or corporation to be a freelance writer?
A: No, it’s not 100% necessary. An LLC does provide a layer of liability protection between your personal assets such as a home or car, and your business. But if you don’t lie or make stuff up, you’ll likely never be sued, so it’s not a big concern, especially just starting out.
Q: What tools do I need for running my business?
A: Beyond a computer and the Internet, the rest is optional. If you want to be more pro, choose a solution such as Freshbooks (free 30-day trial) for tracking your income and expenses. Most would-be freelance writers spend way too much time wondering if they need a grammar app, and not enough time trying to find clients.
Q: What do I need to know about taxes?
A: Not much, the first year. You’ll just pay what you owe, end of the year. Set aside a portion of your freelance income for taxes that’s similar to the tax bracket you had last year, as a guesstimate. In the U.S., once you hit the level of owing $1,000 or more in annual tax as a self-employed person, you’ll make estimated quarterly tax payments, based on the previous year’s income.
Q: What about health insurance?
A: If you’re leaving a job and taking the plunge into freelancing, you’ll want to make sure you have health insurance. The good news is there are numerous viable self-employed health insurance plans available for freelancers.
5 Major Lessons Learned Over Many Years of Freelancing
We’ve learned a LOT over the years. Reflecting on my experiences, these are the key lessons that we wish we’d known when starting out:
Charge more when you are qualified. Once you reach a certain level of skill and experience, your time is simply worth more. It may seem absurd that someone would pay you $50, $75, $100 or more per hour just to write articles, but the reality is that quality content is in very high demand. Know your worth, and don’t be afraid to ask for more money—even from existing clients. On the flip side, recognize that as a beginner, you may not be paid much, and that’s okay when first starting out.
Create value. The best way to charge more for your work is to truly create value for your clients. Ultimately, a project that you charge $1,000 for should create more than $1,000 in value for the client. In many cases, this requires understanding your client’s business, making suggestions, and going out of your way to deliver excellent content.
Cultivate specialties. Landing high-tier projects often requires samples that are directly related to the topic. Because of this, one of the most impactful things you can do for your career as a freelancer is to find and cultivate topic specialties. Selecting two to three topics will usually be the best strategy. You may have to start out with lower-paying jobs just to establish yourself in an industry, but ultimately this will be worth the time investment.
Learn the industry. Understanding the business models of your clients is incredibly helpful. For many writers, this means learning about affiliate marketing. By truly understanding the why behind your work, you can offer substantially more value to your clients—and to your readers.
Be a business. For sustainable success as a freelancer, you need to think of yourself as a business. Ditch the working habits and expectations of a traditional employee, and start thinking about yourself as an entrepreneur. Practically speaking, this means figuring out an efficient and cost-effective invoicing and payment system, drafting basic contracts to protect yourself from scams, and marketing your services appropriately. This is not a switch that you can make overnight, but in my opinion, it’s important to work on for your long-term success.
7 Terrible Reasons to Become a Freelance Writer
Here’s a question for you: Why do you want to become a freelance writer?
It’s worth taking a minute to ponder that. Because pursuing freelance writing for the wrong reasons can spell big problems.
Here are the seven most common reasons we hear from people for why they want to become a freelance writer—and why these wrongheaded motivations often doom those freelance-writing dreams. The items in quotes are all compiled directly from our email inbox:
1. Temporary panic. “I was laid off recently and haven’t been able to find another job, so I thought I’d try this while I keep looking.”
No one wants to hire a writer who is just on a temporary visa to the land of freelance writing. Who’s sticking one toe in the freelance waters.
Editors and business owners want to hire stable freelancers who are dedicated to working in this mode. Also, dividing your energy between trying to land the next day job and freelancing doesn’t often bring a good outcome for either pursuit.
As Yoda said, there is no “try” in freelance writing. That implies half an effort—and that’s not going to make it happen. There is only making a wholehearted commitment to it, and doing it.
2. You think you’ve got no other options. “I have a disability/must stay home to care for my disabled child/spouse/parent, so I can’t do anything else.”
There are many work-from-home jobs that are easier to ramp up and do than freelance writing. Be a virtual assistant, for instance. Be a remote-based employee for a company—call centers hire lots of personnel that way now. Freelance writing is not your only option, and if you’re choosing it simply because it’s the only idea you’ve got, keep exploring.
Freelance writing is difficult to earn well at if you can never leave the house or take a phone call. Yes, you can build some business online, but eventually, good clients want to take meetings or hop on Zoom. This may not be compatible with your situation.
3. You don’t like writing. “Writing isn’t something I’m that enthusiastic about, but I’ve researched the options and this seems like the only thing with the flexibility I need.”
You may laugh, but you’d be surprised how many people seem to choose freelance writing by throwing a dart at a board. It’s not a passion, they haven’t been writing compulsively all their lives. But they have weighed the freelance options and selected writing from a list of possibilities.
Unfortunately, we’ve never met a thriving freelance writer who dislikes writing. That’s because freelance writing isn’t like writing a novel or your journal. It involves working hard on writing craft, marketing, and pleasing clients.
If you don’t start with love of the core task you’ll be doing all day, you’re not going to stick with this. It’ll be agony.
4. You’re unrealistic. “I have five free hours a week and desperately need to quit my job, so I’m planning to quickly launch a freelance writing business in my free time.”
This is a fantasy. Launching a freelance writing business that will pay all your bills will take quite a while to ramp if you only have a few hours a week.
What will likely happen instead is you will hop on content mills and earn a few pennies, because you have no marketing time. You will be very overworked between your day job and this, but it will never add up to a situation where you’ll feel confident quitting your job.
5. You don’t understand the marketplace. “I’m hoping I can earn a living as a freelance writer by getting paid to write poetry/short stories/opinions/essays/book reviews.”
It’s sad to say, but there is little reliable, well-paid writing in these areas. The bulk of paid freelance writing work is nonfiction, reported articles for magazines, and writing for businesses.
If you could pay the mortgage with poems, you wouldn’t find poets serving as many publication editors to pay the bills. You’ll need to broaden your horizons and learn new writing forms if you want to make a steady living from writing.
6. You’re allergic to business. “I really hate everything to do with business, but I’m planning to suck it up and find some clients.”
OK, this one is a big, big problem. Business-haters need to understand that 1) you are going into business yourself here, so that makes you a self-hater and 2) businesses are a big source of great pay in freelance writing.
If you’re coming into it holding your nose, it’s doubtful you’re going to be able to do the marketing necessary or tolerate working for the clients who pay the big bucks.
7. You’re a full-time mom. “I want to be a freelance writer so that I can homeschool/unschool/stay home full time with my baby/preschooler(s).”
This one is the biggest myth in freelancing, that you will somehow magically find great clients and meet their deadlines while the howling baby who also kept you up all night sits on your hip. Or while you create from scratch and teach Liam with your custom-crafted, multi-sensory homeschool curriculum. Not. Going. To. Happen.
They say being a mom is a full-time job because…it’s a full-time job. And so is freelance writing.
Our Freelance Writers Den forums are full of posts from new moms who are having nervous breakdowns because they’re slowly going broke and can’t get any freelance traction and can’t figure out why. The answer is: You need childcare, hon.
Grandmas or babysitting swaps with other work-at-home moms can be a great solution for a while, but sooner or later, kids need to go to preschool or a nanny comes or there’s a child care center that becomes your friend. For at least a few reliable, half-day blocks of time.
Yes, you can write while they nap (for a couple years) and late at night/early in the morning (if you’re not too tired), and maybe cobble together a small income. But if you’re quitting your corporate job in hopes of replacing a $50,000 income with an occasional spot of writing work you dash off at naptime, that is a pipe dream.
Ready to Become a Freelance Writer?
Now that you know how to become a freelance writer, the only thing to do is get started! Start pitching prospective clients, applying to jobs on quality job boards, and doing everything else you can to get the ball rolling on your career.
Need more help along the way?
While you wait for the Freelance Writers Den to accept more members, we highly recommend checking out the Den 2X Income Accelerator now to get an affordable, self-study version of coach Carol Tice’s proven program for doubling your income (or more)! You’ll learn exactly how to take your career from zero to six figures with a proven blueprint.
TL;DR: Watch Gujarat Titans vs. Royal Challengers Bengaluru in the IPL for free on JioCinema. Access this free streaming platform from anywhere in the world with ExpressVPN.
The new season of the IPL is in full swing and is already displaying incredible talent and exciting competition. The latest game will see Gujarat Titans and Royal Challengers Bengaluru take to the pitch as some of the best cricket players in the world go head-to-head.
Want to catch the next fixture? You can watch Gujarat Titans vs. Royal Challengers Bengaluru for free from anywhere in the world, just keep reading to find out how.
When is Gujarat Titans vs. Royal Challengers Bengaluru?
Gujarat Titans vs. Royal Challengers Bengaluru starts at 11 a.m. BST on April 28. This game will be played at the Narendra Modi Stadium in Ahmedabad, India.
How to watch Gujarat Titans vs. Royal Challengers Bengalurufor free
Cricket fans can tune in to live streams of IPL cricket matches with the help of JioCinema. The streaming service is offering free live streams in 4K resolution on its app.
Mashable Top Stories
JioCinema is geo-restricted to India, but don’t worry, you can unblock this free streaming service with the help of a VPN. A VPN is a tool that can hide your real IP address (digital location) and connect you to a secure server in India, meaning you can access JioCinema from anywhere in the world.
Unblock JioCinema to stream the IPL 2024 by completing these easy steps:
Sign up for a streaming-friendly VPN (like ExpressVPN)
Download the app to your device of choice (the best VPNs have apps for Windows, Mac, iOS, Android, Linux, and more)
Open up the app and connect to a server in India
Visit JioCinema (you will need an Indian phone number to subscribe)
Watch Gujarat Titans vs. Royal Challengers Bengaluru for free from anywhere in the world
Most of the best VPNs for streaming are not free, but they do tend to offer free trials or money-back guarantees. By taking advantage of these offers, you can watch IPL live streams without committing with your cash. This is clearly not a long-term solution, but it does mean you can watch select IPL fixtures for free.
What is the best VPN for JioCinema?
ExpressVPN is the best service for unblocking JioCinema, for a number of reasons:
Servers in 105 countries including India
Easy-to-use app available on all major devices including iPhone, Android, Windows, Mac, and more
Strict no-logging policy so your data is secure
Fast connection speeds
Up to eight simultaneous connections
30-day money-back guarantee
A one-year subscription to ExpressVPN is on sale for £82.82 and includes an extra three months for free — 49% off for a limited time. This plan also includes a year of free unlimited cloud backup and a generous 30-day money-back guarantee.
You’re now just a quick click away from the answer to today’s Wordle. You’re only a short scroll away from a heap of helpful tips and a guided clue for the April 28 (1044) puzzle too. However you want to win, we’ve got something that’ll help.
My first line wasn’t unhelpful, but it did leave me feeling pretty stumped. That green letter, there? And what to do with that yellow? So I decided to go wild on my second attempt, trying to boldly eliminate as many alternatives as possible instead of picking around the letters I had got—and immediately found every other letter I was searching for. Incredible.
Wordle today: A hint
(Image credit: Josh Wardle)
Wordle today: A hint for Sunday, April 28
Today’s answer is the name of a dried plum with a distinctive wrinkly texture. This word can also mean to cut back or trim, especially in gardening.
Is there a double letter in Wordle today?
No, there is no double letter in today’s puzzle.
Wordle help: 3 tips for beating Wordle every day
Anyone can pick up and play Wordle, but if you want to do it well and make all of your guesses count, these quick tips will help get you started on your Wordle winning streak:
Choose an opener with a balanced mix of unique vowels and consonants.
The answer may contain the same letter, multiple times.
Try not to use guesses that contain letters you’ve already eliminated.
Thankfully, there’s no time limit beyond ensuring it’s done by midnight. So there’s no reason not to treat the game like a casual newspaper crossword and come back to it later if you’re coming up blank. Sometimes stepping away for a while means you can come back with a fresh perspective.
Wordle today: The answer
(Image credit: Future)
What is today’s Wordle answer?
Second win of the weekend. The answer to the April 28 (1044) Wordle is PRUNE.
Sign up to get the best content of the week, and great gaming deals, as picked by the editors.
Previous Wordle answers
The last 10 Wordle answers
Past Wordle answers can give you some excellent ideas for fun starting words that keep your daily puzzle-solving fresh. They are also a good way to eliminate guesses for today’s Wordle, as the answer is unlikely to be repeated.
Here are some recent Wordle solutions:
April 27: GLEAM
April 26: VAPID
April 25: INTRO
April 24: SWORE
April 23: ROVER
April 22: LASER
April 21: JOLLY
April 20: LUCID
April 19: RAISE
April 18: FACET
Learn more about Wordle
(Image credit: Nurphoto via Getty)
Wordle gives you six rows of five boxes each day, and you’ll need to work out which secret five-letter word is hiding inside them to keep up your winning streak.
You should start with a strong word like ARISE, or any other word that contains a good mix of common consonants and multiple vowels. You’ll also want to avoid starting words with repeating letters, as you’re wasting the chance to potentially eliminate or confirm an extra letter. Once you hit Enter, you’ll see which ones you’ve got right or wrong. If a box turns ⬛️, it means that letter isn’t in the secret word at all. 🟨 means the letter is in the word, but not in that position. 🟩 means you’ve got the right letter in the right spot.
You’ll want your next guess to compliment the first, using another “good” word to cover any common letters you might have missed last time while also trying to avoid any letter you now know for a fact isn’t present in today’s answer. After that, it’s simply a case of using what you’ve learned to narrow your guesses down to the correct word. You have six tries in total and can only use real words and don’t forget letters can repeat too (eg: BOOKS).
If you need any further advice feel free to check out our Wordle tips, and if you’d like to find out which words have already been used you can scroll to the relevant section above.
Originally, Wordle was dreamed up by software engineer Josh Wardle, as a surprise for his partner who loves word games. From there it spread to his family, and finally got released to the public. The word puzzle game has since inspired tons of games like Wordle, refocusing the daily gimmick around music or math or geography. It wasn’t long before Wordle became so popular it was sold to the New York Times for seven figures. Surely it’s only a matter of time before we all solely communicate in tricolor boxes.
March 14th, 2024: Two teenagers from Miami, Florida, aged 13 and 14, were arrested on December 22, 2023, for allegedly creating and sharing AI-generated nude images of their classmates without consent.
According to a police report cited by WIRED, the teenagers used an unnamed “AI app” to generate the explicit images of male and female classmates, ages 12 and 13.
The incident, which took place at Pinecrest Cove Academy in Miami, led to the suspension of the students on December 6th and was subsequently reported to the Miami-Dade Police Department.
The arrests and charges against the teenagers are believed to be the first of their kind in the United States related to the sharing of AI-generated nudes.
Under a 2022 Florida law that criminalizes the dissemination of deepfake sexually explicit images without the victim’s consent, the teenagers are facing third-degree felony charges, which are comparable to car theft or false imprisonment.
As of now, neither the parents of the accused boys nor the investigator and prosecutor in charge have commented on the case.
The issue of minors creating AI-generated nudes and explicit images of other children has become increasingly common in school districts across the country.
The impact of generative AI on matters of child sexual abuse material, nonconsensual deepfakes, and revenge porn has led to various states tackling the issue independently, as there is currently no federal law addressing nonconsensual deepfake nudes.
Although the naked bodies depicted in AI-generated fake images are not real, they can appear authentic, potentially leading to psychological distress and reputational damage for the victims.
The White House has called such incidents “alarming” and emphasized the need for new laws to address the problem.
The Internet Watch Foundation (IWF) has also reported that AI image generators are leading to an increase in child sexual abuse material (CSAM), complicating investigations and hindering the identification of victims.
People come to Roblox to imagine, create, and share experiences with each other in immersive, user-generated 3D worlds. As a global platform, we believe in building a safe, civil, and diverse community that inspires and fosters creativity and positive relationships around the world. Protecting the safety and privacy of children who come to Roblox to have fun and learn is our top priority. Because of this, we support legislation that we believe will help create a safer internet for children, including the recent California Senate Bill 933 (SB 933), which prohibits individuals from possessing and distributing explicit and/or abusive images of children that have been generated by artificial intelligence (AI).
As we’ve shared, we believe in the power of AI and generative AI as tools with the power to unlock creativity and productivity and to keep people safe. However, these powerful new technologies require great responsibility and care in how they are used as improper use can lead to harm. According to theStanford Internet Observatory’s 2023 report, there are thousands of explicit and abusive images of children hidden within popular AI image generators. These images make it easier to create explicit and abusive content. Such images are prohibited on our platform and we use an array of internal tools, as well as external tools like PhotoDNA to prevent that content from being uploaded to the platform or shared.
Such images should be prohibited more widely, which is why Roblox is pleased to stand alongside California law enforcement organizations and child safety advocates to support SB 933. We applaud Senator Aisha Wahab and the members of the Senate Public Safety Committee for their leadership on this legislation and the recognition that laws need to keep pace with the evolving technology landscape.
Since Roblox was founded almost two decades ago, we’ve been committed to putting the safety of young people first, while providing them with an enjoyable online experience. We find this type of content abhorrent, and are proud to collaborate with lawmakers to protect children both on and off of Roblox. SB 933 addresses the pressing issue by expressly prohibiting AI-generated explicit, abusive images of children, clarifying the law to provide more effective safeguards. The solutions set out in SB 933 are straightforward and impactful, and aim to set sensible guardrails for AI-generated images and create a more secure digital environment for children. We hope that others will join us in supporting this important, common-sense legislation.
Welcome to the January 2023 release of Visual Studio Code. There are many updates in this version that we hope you’ll like, some of the key highlights include:
Insiders: Want to try new features as soon as possible? You can download the nightly Insiders build and try the latest updates as soon as they are available.
Housekeeping
In previous release notes, the team reported on our housekeeping efforts and we wanted to do the same here.
As we had announced back in November 2022, we used December for housekeeping our GitHub issues and pull requests (see our issue cleanup guide). Across all of our repositories, we achieved a net reduction of 3637 open issues and pull requests. Unsurprisingly, the lion share of the reduction happened in our top 5 repositories: microsoft/vscode (2520), microsoft/vscode-jupyter (374), microsoft/vscode-remote-release (278), microsoft/vscode-python (220), and microsoft/vscode-pull-request-github (160).
Accessibility
Diff navigation improvements
Go to Next/Previous Change now has audio cues to indicate if a line was inserted, deleted, or modified. Additionally, the line of the change is selected so that it can read by a screen reader.
Terminal Accessibility Mode
The Terminal: Focus Accessible Buffer (⌥F2 (Windows Alt+F2, Linux Shift+Alt+F2)) command allows screen readers to navigate through the terminal buffer via keyboard.
Terminal accessibility help
Similar to the Show Accessibility Help command in the editor, the Terminal: Show Terminal Accessibility Help () command provides important information for screen reader users.
Workspace Trust editor shortcuts
To improve the keyboard accessibility of the Workspace Trust editor, which can be opened via Workspaces: Manage Workspace Trust, you can now toggle trust for the current workspace with the keyboard using Ctrl/Cmd+Enter or for the parent folder with Ctrl/Cmd+Shift+Enter.
Improved keyboard navigation on Settings editor indicators
For settings with multiple indicators, such as a “Modified Elsewhere” indicator and a “Default value changed” indicator, the left and right arrow keys are now used to navigate between the indicators. This change allows users to tab out of the indicators with a single press of the Tab key.
Profiles
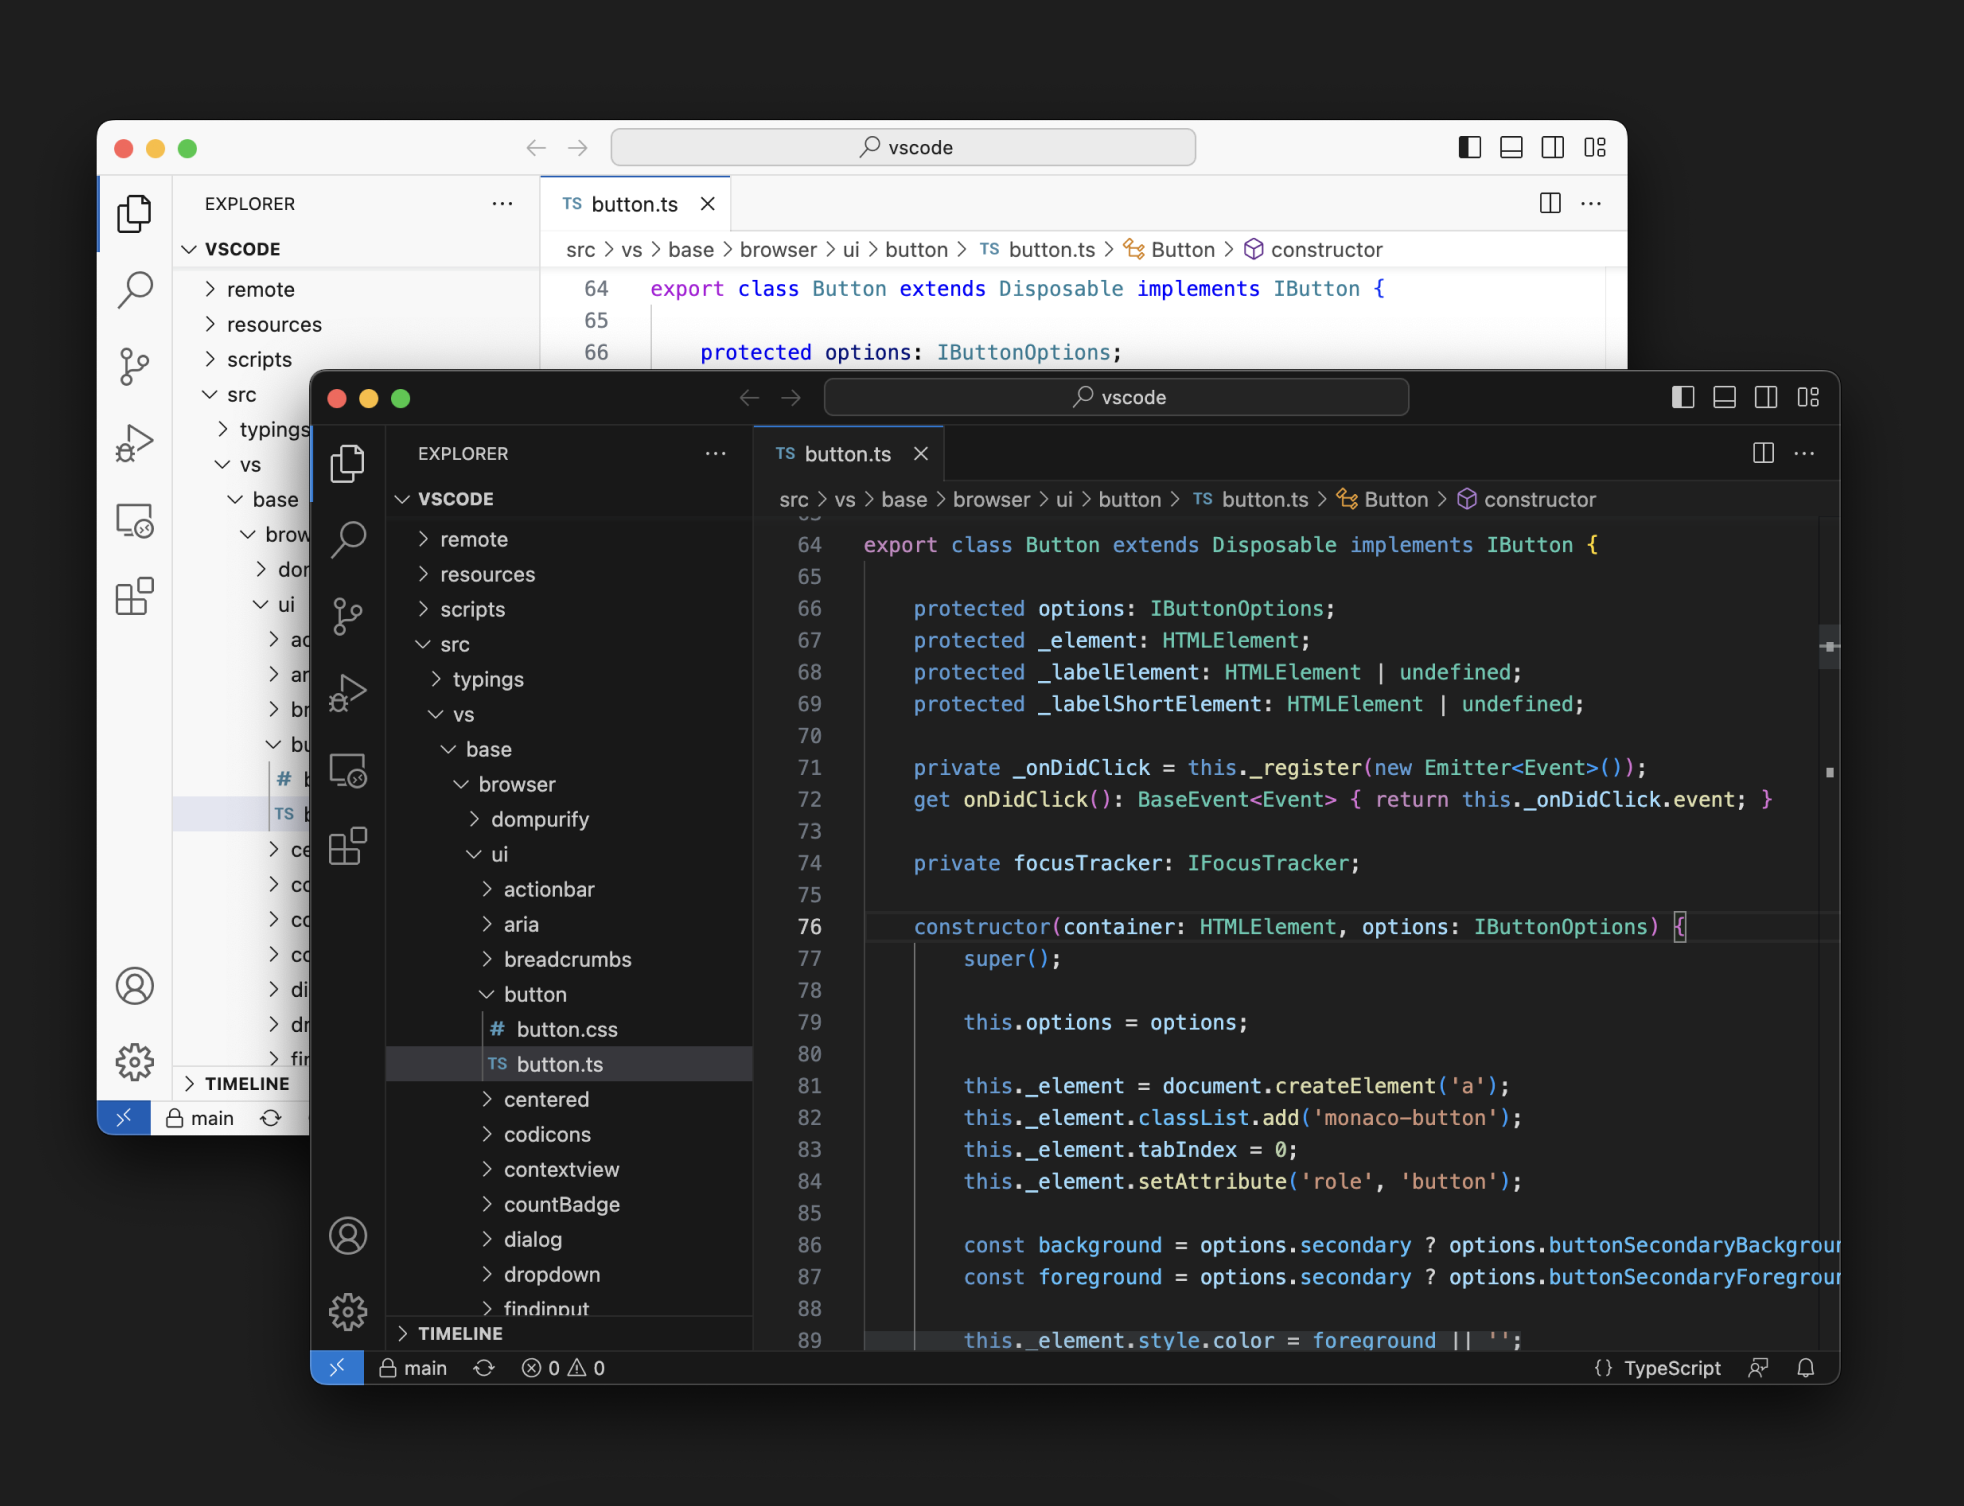
We are happy to announce that the Profiles feature is now generally available in VS Code. A Profile can include extensions, settings, keyboard shortcuts, UI state, tasks, and user snippets. You can customize VS Code for different development scenarios like data science, documentation writing, or for multiple programming languages like Python or Java. If you have different VS Code setups based on workflow such as “Work” or “Demo”, you can also save those as different profiles. You can open multiple workspaces (folders) with different profiles applied simultaneously.
The following image demonstrates a folder opened with a Work profile that is customized for a work setup.
You can also export and import profiles to share them with your colleagues, friends, or students to help them get started with VS Code.
The following video demonstrates how to export a profile using a GitHub gist in order to share it with someone. Users that receive the profile link can preview the shared profile in VS Code for the Web and import it to their local VS Code instance.
Note: Profiles currently do not work in remote scenarios like GitHub Codespaces, but we are working on enabling this. You can track progress in issue #165247.
Workbench
Improved multi-view resizing support
You can now resize multiple views at the same time by dragging the corners of the views.
Improved grid layout
If an editor is minimized, the grid will now preserve that state when resizing the entire workbench or sidebars. In the short video below, the width of the minimized editor on the right remains constant as the overall editor region is expanded.
Restore defaults from the Customize Layout command
When working the custom Customize Layout command either via triggering the command or using the layout controls in the custom title bar, you can Restore Defaults using the revert arrow button in the top right of the layout control.
Manage panel alignment from panel
You can now adjust panel alignment directly from the panel context menu just like panel position.
We have simplified the Preferences menu for your global settings and organized the options into a more logical order and grouping.
Tree Find history
The Find control inside tree views now supports history navigation. You can use the Up/Down arrow keys to navigate through the history of your previous searches.
Tree Find contiguous matching
The tree view Find control now supports contiguous matching along with the existing “fuzzy” matching. In the video below, initially searching for "src" has matches such as "resource". When “fuzzy” matching is disabled via the Fuzzy Match toggle button, only text with the contiguous text "src" is highlighted.
List scroll by page
A new setting, workbench.list.scrollByPage, lets you configure whether the list should scroll by page when clicking directly on the scroll bar.
List type navigation mode
The new workbench.list.typeNavigationMode setting allows you to configure the type navigation mode for lists. By default (setting value automatic), navigation occurs in list and trees as you type. If you prefer to only enable navigation at certain times, you can set typeNavigationMode to trigger and the list will only go into type navigation mode once the list.triggerTypeNavigation command is run.
The command list.triggerTypeNavigation does not have a keybinding by default but you can add your own. For example, if you’d like to enter type navigation mode after you press the / key, you can add a keybinding such as:
To prevent accidental opening of very large files, especially in remote environments where there might be an actual cost due to network transfer, a confirmation is shown before opening the file. The limit can be modified via the new workbench.editorLargeFileConfirmation setting and has different defaults based on opening local files versus remote files.
The files.watcherExclude setting supports glob patterns for powerful exclusion rules of the file watcher. However, glob patterns had not been supported natively by the library used for file watching. In this milestone, we contributed support for glob patterns for exclusions for more efficient resource usage, especially on Linux.
For Linux, refer to this FAQ entry for more information if you see file watching issues.
Keyboard Shortcuts editor improvements
Show extensions contributing keybindings
The Keyboard Shortcuts editor now shows the extension that contributes a keybinding in the Source column. You can select the extension name to open the extension’s details page.
You can also search for any keybindings contributed by an extension using the Extension Keyboard Shortcuts action available in the extension context menu.
Show context key suggestions for when clause property
The keyboard shortcuts editor now shows context key suggestions for the when property. You can use the Ctrl+Space shortcut to trigger suggestions.
Search for keybindings with chords
Keyboard shortcuts editor now supports searching for keybindings with chords. For example, "Ctrl+K" will also show all keybindings with Ctrl+K as the first chord.
Setting to configure shell environment resolution timeout
A new setting application.shellEnvironmentResolutionTimeout (macOS and Linux only) allows you to increase the timeout for resolving the shell environment when that is required. By default, VS Code will wait up to 10 seconds for the environment to resolve, but in certain cases with more complex shell setups that may not be enough time.
Refer to this FAQ entry for more information on how VS Code resolves shell environments.
New VSCODE_RESOLVING_ENVIRONMENT environment variable
When VS Code is resolving the user shell environment, it will now set a new environment variable VSCODE_RESOLVING_ENVIRONMENT to 1. This is useful for user scripts (for example, in .bashrc) that need to know whether they are being run in the context of resolving the shell environment.
Easier opt-out of release notes after update
You can now opt out of reading the release notes after every update, directly from the release notes editor. This will reflect and update the update.showReleaseNotes setting.
Editor
Suggest selection mode
There is a new setting (editor.suggest.selectionMode) that allows you to configure if suggestions are selected automatically as you type or via trigger characters.
The default is to always select the best suggestion so that hitting Enter or Tab inserts it. If you prefer to not have a suggestion selected, set the value to never, whenQuickSuggestion, or whenTriggerCharacter. When using those setting values, suggestions will still show but are not selected automatically and you can use the arrow keys to select one.
Note that this setting only applies to automatic suggestions, not to suggestions that are shown when you explicitly trigger them via Ctrl+Space.
Code Action list is now scrollable
Some extensions generate long lists of Code Actions. If there is not space to render all Code Actions, you can now scroll through the list:
Color decorators limit
The number of color decorators that are shown in the editor is limited to 500. This is to prevent performance issues when opening a file containing a large number of colors. This limit can now be configured via the editor.colorDecoratorsLimit setting.
Editor Find Go To Match
The new Go To Match… command allows you to jump to a specific match in a file based on the count when the Find control is open. This is useful when you have a large number of matches and want to jump to a specific one.
Redesigned inline suggestions toolbar
In this milestone, we redesigned the inline suggestions toolbar to make it more compact and easier to use. It features buttons to quickly cycle through alternative suggestions and to accept a suggestion fully or word by word.
In the video below, the user reviews both suggestions provided by GitHub Copilot, triggered on the comment prompt, and then incrementally accepts first console and the next word for console.log.
The setting "editor.inlineSuggest.showToolbar": "always" can be used to always show the toolbar when inline suggestions are available.
We also added default keybindings for accepting/undoing a suggestion word by word (Ctrl+Arrow Left/Arrow Right).
Terminal
New default keybindings
The following default keybindings have been added to improve discoverability of advanced terminal features:
Open Detected Link – Ctrl/Cmd+Shift+O
The Open Detected Link command (⇧⌘G (Windows, Linux Ctrl+Shift+G)) is the keyboard-accessible way of opening terminal links. The command opens a Quick Pick with all available links in the terminal’s viewport.
The ⇧⌘G (Windows, Linux Ctrl+Shift+G) keybinding was chosen as it’s a similar action to Go to Symbol in Editor but for the terminal.
Go to Recent Directory – Ctrl/Cmd+G
Go to Recent Directory (⌘G (Windows, Linux Ctrl+G)) opens a Quick Pick with recent directories, picked up by shell integration. It supports pinning and fuzzy matching.
This keybinding was chosen because Ctrl+G is a relatively low-usage shell keybinding.
Send Ctrl+G to the shell – Ctrl+Alt+G
Since Ctrl+G is now used to Go to Recent Directory, using Ctrl+Alt+G is the new way to send Ctrl+G directly to the shell.
Run Recent Command – Ctrl+Alt+R
Run Recent Command (⌃⌥R (Windows, Linux Ctrl+Alt+R)) opens a Quick Pick with recent commands that have been run, modeled after most shell’s reverse index search (Ctrl+R) but in a more accessible and more functional package. It supports pinning and fuzzy matching.
The keybinding ⌃⌥R (Windows, Linux Ctrl+Alt+R) was chosen because it’s an alternative behavior to Ctrl+R, but that keybinding is too important to overwrite its default behavior.
Accessibility mode overrides
Because reverse index search isn’t very accessible to screen readers, when accessibility mode is on Ctrl+R will trigger Run Recent Command and Ctrl+Alt+R will send Ctrl+R to the shell.
Link improvements
There have been many improvements to link detection in the terminal this release:
Links containing spaces are detected under certain circumstances:
When the entire line is a link.
Python-style stack trace links: File "<path>", line <line>
Some compiler errors: <path>(<line>,<col>) : ...
Independently styled sections of text are all detected independently, so if a path is underlined, it should be detected even if it has spaces.
Links containing [ and ] characters now work, they even support detection in difficult edge cases like this:
vscode:// protocol links are now detected.
/mnt/, \\wsl$\ and \\wsl.localhost\ links are now detected on Windows.
The terminal.integrated.enableFileLinks setting now features a "notRemote" option, allowing it to be conditionally disabled only on remotes where the file existence checks can cause performance problems.
Most link formats also consistently support the following line and column formats:
<file>:<line>
<file>:<line>:<column>
<file> <line>
<file> <line>:<column>
<file>(<line>)
<file>(<line>,<column>)
<file>(<line>, <column>)
<file> (<line>)
<file> (<line>,<column>)
<file> (<line>, <column>)
Single quotes or no quotes also work for these:
"<file>",<line>
"<file>",<line>:<column>
"<file>", line <line>
"<file>", line <line>, col <column>
"<file>", line <line>, column <column>
"<file>":line <line>
"<file>":line <line>, col <column>
"<file>":line <line>, column <column>
"<file>": line <line>
"<file>": line <line>, col <column>
"<file>": line <line>, column <column>
"<file>" on line <line>
"<file>" on line <line>, col <column>
"<file>" on line <line>, column <column>
Terminal editor file drag and drop support
Terminal editors now support drag and drop while holding Shift to write files to the terminal instead of opening an editor.
“Unsafe” profile detection
Detection of the Cygwin shell on Windows was recently removed due to a security vulnerability. This release we bring this back in a safer form and also detect more shell profiles, including Cygwin, Cmder and MSYS2. To mitigate the security problem, before one of these profiles is used, it must be configured via the Select Default Profile command:
When selected, a warning will appear before being added to your settings.json file and acting like a regular profile:
This warning can safely be ignored if the computer isn’t used by multiple users, for example in a corporate environment.
Toggle commands in the terminal view
A long-time request has been to add the Clear Terminal command to the terminal view actions but we have always been concerned about bloat in the UI. Thanks to a new internal feature, we have new hidden-by-default actions that appear in an overflow menu but can be toggled to show via right-click:
Ctrl+C drops selection on Windows
Windows shares Ctrl+C between copying a selection and sending SIGINT to the shell, depending on whether there is a selection. A common annoyance was that if you had accidentally made a selection, Ctrl+C may not send SIGINT. To help mitigate this, Ctrl+C to copy the selection will now also clear the selection, so pressing Ctrl+C twice will reliably send SIGINT either 1 or 2 times.
Add a terminal tab stop size setting
There is a new setting terminal.integrated.tabStopWidth that configures the tab stop width of the terminal. This is useful when programs output the \t character instead of configuring the tab size in their configuration.
Powerline triangle and diagonal line custom glyphs
GPU-accelerated terminals now get pixel-perfect custom glyphs for the triangle and diagonal line Powerline extra symbols glyphs (U+E0B8-U+E0BF). These characters are ambiguous as to whether they are single or double width characters and differ depending on the font used, so we chose to render them as single width.
Before:
After:
Bracketed paste mode used in “Run Selected Text In Active Terminal”
The Run Selected Text In Active Terminal command will now run the text using “bracketed paste mode” in supporting shells, so a multi-line selection will be treated as a single input, rather than multiple commands. This makes running actual scripts much more intuitive with fewer errors occurring.
The terminal now pulls Quick Fixes from the [General] and [cmd-not-found] feedback providers. The Quick Fix dialog can be opened by clicking on the light bulb or via Ctrl/Cmd+..
Source Control
New commands
Git 2.35 introduced a new --staged mode for the git stash command. This new mode allows you to easily stash only the changes that are staged. If you have a version of Git that supports this new mode, you can take advantage of it using the new Git: Stash Staged command.
VS Code already had support for deleting a local tag using the Git: Delete Tag command. This milestone we enabled the deletion of remote tags using the new Git: Delete Remote Tag command.
Git repositories in parent folders
VS Code uses git rev-parse --show-toplevel to determine the root of a Git repository. In most cases, the root of the Git repository is inside the workspace, but there are scenarios in which the root of the Git repository is in the parent folders of the workspace or the open file(s). While opening Git repositories in parent folders of workspaces or open files is a great feature for advanced users, it can be confusing for new users. We have seen cases in which this confusion resulted in discarding changes from these Git repositories causing data loss.
To avoid confusion, and to reduce the risk of data loss, starting this milestone, VS Code will display a notification and a new welcome view in the Source Control view, and will not automatically open Git repositories from the parent folders of workspaces and open files.
The Open Repository button will open a Quick Pick with a list of all Git repositories that were discovered in the parent folders of the workspace or the open file(s). The choice to open a Git repository from the parent folders is remembered.
Users can control how Git repositories from parent folders are being handled using the git.openRepositoryInParentFolders setting. Users who would like to restore the old behavior can set the git.openRepositoryInParentFolders setting to always.
Command disablement
Based on the size of a Git repository or the presence of various Git hooks, some Git operations can take a long time to complete. We have seen in the past that initiating commands while a previous command is still in progress can lead to unexpected results (for example, discarding changes on a file while the commit operation is in progress).
To prevent this, we are disabling most Git commands while the following operations are in progress: Checkout, Commit, Push, and Pull. This means that while these operations are running, most Git commands will not appear in the Command Palette, and will be disabled in the Source Control view and the Status bar.
User interface improvements
This milestone we have polished some of the Source Control user interface elements:
The tooltip of the Commit and Publish Branch action buttons in the Source Control view now includes the branch name.
The Checkout Status bar item now uses a different icon depending of the type of ref that is checked out (branch, tag, or commit).
The Checkout Status bar item now shows a spinning progress icon while the checkout operation is in progress.
Notebooks
Kernel picker improvements
We continued to improve the MRU (Most Recently Used) kernel picker. It can be enabled by setting notebook.kernelPicker.type to mru. Kernels that are not used are moved into a secondary picker Select Another Kernel…. This picker will group all kernels by their source (for example: Jupyter Kernel, Python Environment, etc.) when you have latest Jupyter and Python extensions installed.
Join Selected Cells
There is a new command Join Selected Cells (kb(notebook.cell.joinSelected)`) to merge multiple selected cells into one cell.
Fallback rendering of output to a supported mimetype
Rich outputs in Jupyter Notebooks such as IPyWidgets are visible only during the lifetime of the kernel. This means that when the notebook is closed and reopened again, the outputs are no longer visible. However, in a number of these cases, the output can be rendered using a fallback mechanism. For example, an IPyWidget can in some cases (depending on the widget used) be rendered as a static image or HTML content.
As a result, users opening existing notebooks with matplotlib widgets (or similar widgets) can now see the output without having to re-execute the code.
New documentation
There are two new topics to help you work with Jupyter Notebooks in VS Code.
Debugging
JavaScript debugging
Improved Node.js Startup Performance
The ‘breakpoint predictor’ used for Node.js debugging has been rewritten and improved to dramatically increase speed for large projects. For example, startup time overhead when debugging unit tests in the TypeScript repo was reduced by 62%, and the overhead to debug and start a build in the VS Code repo was reduced by 80%.
If you run into problems such as breakpoints not being hit, please file an issue. You can disable the new behavior by setting "enableTurboSourcemaps": false in your launch.json, however this option will eventually be removed as we gain confidence.
Languages
JavaScript React language label is now JavaScript JSX
The JavaScript React language mode has been renamed to JavaScript JSX to reflect that JSX syntax is used by more than just React. TypeScript React has also been renamed to TypeScript JSX.
Note that only the language names shown in the UI have been changed. The internal language IDs (javascriptreact and typescriptreact) remain unchanged for compatibility reasons.
New shellscript grammar
VS Code now uses a new grammar from better-shell-syntax for shellscript syntax highlighting.
Extensions
VS Marketplace extension signing
Every extension uploaded to the Visual Studio Marketplace starting from November 2022 is code signed by the VS Marketplace. When a user installs a signed extension through VS Code’s Extensions view, VS Code will verify the signature, and thus prove that the extension is indeed coming from the VS Marketplace and that the extension package has not been modified. If the signature verification fails, VS Code will not install the extension.
VS Marketplace is in the process of signing all existing extensions (including extensions that have not been updated since November). Once this process is done, in a couple of months, VS Code will require that all extensions coming from the VS Marketplace are signed by the VS Marketplace. This requirement will guarantee the integrity of every package coming from the VS Marketplace, thus improving the overall security of our extension ecosystem.
Note: Extension authors do not have to do anything to opt-in to Marketplace signing. In addition to Marketplace signing, we are currently working on publisher signing. More about publisher signing can be found in discussion #137.
Pin an extension version from CLI
When you install a specific version of an extension from the CLI (code --install-extension {publisher}.{name}@{version}), it will now be pinned to that version. This means that the extension will not be updated automatically when you have automatic updates enabled.
Sync pinned extension versions
Settings Sync will now sync pinned extension versions. This means that when you install a specific version of an extension on one machine, it will be pinned to that version on all other machines that you sync to.
Contributions to extensions
Python
Auto-select environment when VS Code is launched from an activated terminal
If a user launches VS Code via a terminal with a conda or virtual environment already activated, the Python extension now detects that and then either auto-selects the environment itself, or asks the user if they would like to make that environment their selected one; depending on the environment.
Select requirements files when creating environment
When creating a virtual environment using the Python: Create Environment command, the Python extension now finds requirement files in the workspace folder, and allows users to multi-select any number of requirements to install.
Select optional dependencies from pyproject.toml
The Python extension detects and loads the optional dependencies provided in the [project.optional-dependencies] part of the pyproject.toml file. We use the pip editable install command if we detect that the workspace contains a pyproject.toml along with any selected optional dependencies.
Auto indentation with Pylance
When the editor.formatOnType setting is enabled for Python files, Pylance will automatically indent the code as it’s typed in, allowing you to focus more on the logic of your code and less on formatting.
To try it out, enable formatOnType for Python files by adding the following to your user settings.json file:
"[python]": {"editor.formatOnType": true, },
Live Preview
Setting for external browser preview
The Live Preview extension now lets you open the external browser preview in browsers other than your default browser. Using the livePreview.customExternalBrowser setting, you can set the external preview to open in:
Microsoft Edge
Google Chrome
Mozilla Firefox
Your default browser
Setting for the server root
You can now set the server’s root path to a sub-folder in your workspace. For example, you can ask Live Preview to serve files from your src folder in your workspace by setting livePreview.serverRoot to "src".
ESLint
The ESLint extension has been updated to version 2.4.0. Major new features are:
Support for the new experimental flat config files. You need to enable the support separately in VS Code using the setting eslint.experimental.useFlatConfig. ESLint version 8.21 or greater is required.
The ESLint status indicator moved into VS Code’s Language status area. As a result, the setting eslint.alwaysShowStatus was removed. Use VS Code’s pin feature instead.
The language status item will now inform you of slow validation times and long ESLint runs when computing code fixes during save. The time budget available (in milliseconds) can be control via the two settings eslint.timeBudget.onValidation and eslint.timeBudget.onFixes.
Long problem squiggles can be shortened to a single line using the new settings eslint.problems.shortenToSingleLine.
GitHub Pull Requests and Issues
There has been more progress on the GitHub Pull Requests and Issues extension, which allows you to work on, create, and manage pull requests and issues. Highlights include:
Support for suggesting and accepting changes.
GitHub handles in comments are now linkified.
Labels can be added to PRs at creation time.
An experimental setting githubPullRequests.experimental.quickDiff will show a quick diff view in the editor gutter for changed lines in a checked out PR.
The GitHub Copilot extension is an AI-powered code completion tool that helps you write code faster and smarter. You can use the Copilot extension in VS Code to generate code, or to learn from the code it generates.
GitHub Copilot integrates into the VS Code editor through the inline suggestions UI, which lets you review various suggestions and easily accept all or part of the generated code.
GitHub Copilot is now generally available for businesses, with features like license management, organization-wide policy controls, and privacy protections. You can learn more in the GitHub Copilot for Business announcement.
Remote Tunnels can now prevent the computer from going to sleep on Windows, macOS, and systemd-based Linux systems. This is useful if you leave your desktop to work remotely and want to make sure the tunnel stays accessible. To use this feature:
When turning on Remote Tunnel Access from the VS Code UI, update the setting remote.tunnels.access.preventSleep to true.
When using code tunnel on the CLI, pass in a --no-sleep flag.
Reliability Improvements
Several connection-related issues in Remote Tunnels have been fixed, which should improve reliability.
Continue Working On
The Continue Working On feature supports starting in a Git repository in a local window and continuing in a remote window like a GitHub Codespace. If you are on a branch that has not yet been published to the remote, you will now automatically be prompted to publish your current branch when you choose to continue working in a different development environment, so that you can access your full branch context elsewhere.
Additionally, when you’re on a Git repository in a remote window, you can now continue working in a new local Git clone on VS Code Desktop using the Continue Working in New Local Clone command.
Finally, all options for continuing your work in a local, remote, or web window are now conveniently surfaced in the remote indicator. These options are also available in the Command Palette.
Preview features
Dark+ V2 and Light+ V2 experimental themes
Two new color themes, Dark+ V2 and Light+ V2, are now available for use. These themes are an evolution of the existing Dark+ and Light+ themes, and are designed to be more accessible and make VS Code look better than ever! These themes are still marked as experimental, and we are looking for early feedback.
You can find the new themes listed as Light+ V2 (Experimental) and Dark+ V2 (Experimental) in the Color Theme picker (Preferences: Color Theme⌘K ⌘T (Windows, Linux Ctrl+K Ctrl+T)).
TypeScript 5.0 support
This update includes support for the upcoming TypeScript 5.0 release. See the TypeScript 5.0 iteration plan for more details on what the TypeScript team is currently working on. Some editor tooling highlights:
New switch and case completions help you fill in both sections of switch statements more quickly.
To start using the TypeScript 5.0 nightly builds, install the TypeScript Nightly extension.
“commonly used” section in the Command Palette
This milestone, we have added a new “commonly used” section to the Command Palette. The goal of this section is help new users have a better understanding of what the Command Palette is for and what it can do.
This section will show up underneath the “recently used” section so to not break muscle memory and as you run more and more commands and get familiar with VS Code, either the section disappears (because the “commonly used” commands move up to “recently used”) or the section is below the fold and out of sight.
For now, we have put this new experience behind the setting workbench.commandPalette.experimental.suggestCommands but we plan to make this the default behavior in the near future. Let us know what you think!
Extension authoring
The CommentThreadstate API has been finalized. This API controls whether a comment renders as resolved or unresolved and can affect filtering in the Comments view. You can learn more about how to use the API in issue #127473.
Ignore a setting to sync
You can now hide a setting from Setting Sync by default using the ignoreSync property while registering a setting. This is useful for settings that are not meant to be synced across machines.
Telemetry
The new TelemetryLogger API has been finalized. This API aims to make using telemetry easier for extension authors and safer for the end user. The API enables things such as built-in secret cleaning, a telemetry output channel, error handlers, and automatic telemetry level management. This should result in a more cohesive telemetry experience that is guaranteed to follow our requirements.
Proposed APIs
Every milestone comes with new proposed APIs and extension authors can try them out. As always, we want your feedback. Here are the steps to try out a proposed API:
Use the latest vscode-dts and run vscode-dts dev. It will download the corresponding d.ts files into your workspace.
You can now program against the proposal.
You cannot publish an extension that uses a proposed API. There may be breaking changes in the next release and we never want to break existing extensions.
Let notebook renderer fallback to a different mimetype
Sometimes when rendering content, a notebook render may realize that it cannot render the item properly. For example, perhaps the renderer requires that the kernel be in a certain state.
Previously for cases like this, the renderer’s only option was to render an error message. We’ve added a new proposed API that lets a renderer throw a specially named error that causes VS Code to silently fallback to rendering the other data stored on the notebook output item. For example, an interactive chart renderer could throw this error to make VS Code fallback and render the image data also stored on the current output item.
To trigger this fallback, throw an error with the name vscode.fallbackToNextRenderer in renderOutputItem:
This special error is only meant for cases where rendering is expected to fail in certain situations. If your renderer runs into an unexpected error, it should continue to show an error message.
Quick diff
The quick diff, which is the gutter decoration that shows on added, changed, and deleted lines in the editor, is currently only usable by SCM providers. The proposed quick diff API allows the quick diff to be used outside of SCM providers. The following example is from the GitHub Pull Request extension, which uses the quick diff API to show a quick diff for lines changed in a PR:
Continuous test runs allow test extensions to indicate that they’re able to watch and rerun tests when changes happen. Supporting this API is a matter of indicating support on your test run profile…
The utility process usage for extension host that is required for process sandboxing is now enabled by default. There is still a setting (extensions.experimental.useUtilityProcess), which we will remove soon.
Performance testing via command line
We introduced the following node modules to run a set of performance tests from the command line.
vscode-bisect – This module helps us measure performance regressions quickly. Run npx vscode-bisect --help for how to operate this tool.
vscode-perf – This module helps us measure the performance of VS Code. npx vscode-perf --help describes how to operate this tool.
GB18030 Certification
VS Code is now GB18030-certified – this means that a certification board within the Chinese government has confirmed that VS Code can correctly represent the full range of Chinese characters. The testing covered all built-in usage scenarios. With VS Code certified, the core Visual Studio Family (including Visual Studio and Visual Studio for Mac) has been certified under GB18030.
Migrating to ESM
We have embarked on a journey to migrate our codebase to ESM. The VS Code project predates native modules (ESM) and we have been using the asynchronous module system (AMD) for the time being. AMD has served us well but it is time to move on. We have started to migrate our codebase to ESM, we are making good progress, and hope to finish this effort in the next months.
EOL warning for macOS 10.11 and 10.12
VS Code desktop will be updating to Electron 22 in the next couple of milestones. With the Electron 22 update, VS Code desktop will no longer run on OS X El Capitan and macOS Sierra. In this milestone, we have added deprecation notices for the users on these affected platforms to prepare them for migration. If you are a user of these aforementioned OS versions, please take a look at our FAQ for additional information.
Improved usage of system and application language variables
In a previous release, we started passing in the application language to Electron so that it can lay out some components such as the window controls overlay (WCO) correctly. Meanwhile, the language recommender relied on the system language, but app.getLocale() started fetching the application language instead of the system language, so we used a newer app.getPreferredSystemLanguages() Electron API to retrieve the system language to use for the language recommender. As a result, a regression occurred where extensions in the Extensions view could not render, because the new API returned some values that toLocaleString() could not parse.
The immediate solution, which we pushed for a recovery release, was to revert back to app.getLocale() and temporarily break language recommendation, but it turns out that many areas of the codebase should have been using the application language variable instead of the system language variable as well.
This release replaces many usages of the system language with the application language. In turn, dates should now be localized in a format more consistent to the application language rather than the system language.
Notable fixes
99878 Prepending PATH env var with environmentVariableCollection doesn’t work on macOS
153786 Have a command to open either side of a diff editor
165123 Allow to open a diff editor with two untitled sides
167004Output: Show Output Channels A command to show an output channel
167528 Log level of an extension output channel persists after reloading the window
Thank you
Last but certainly not least, a big Thank You to the contributors of VS Code.


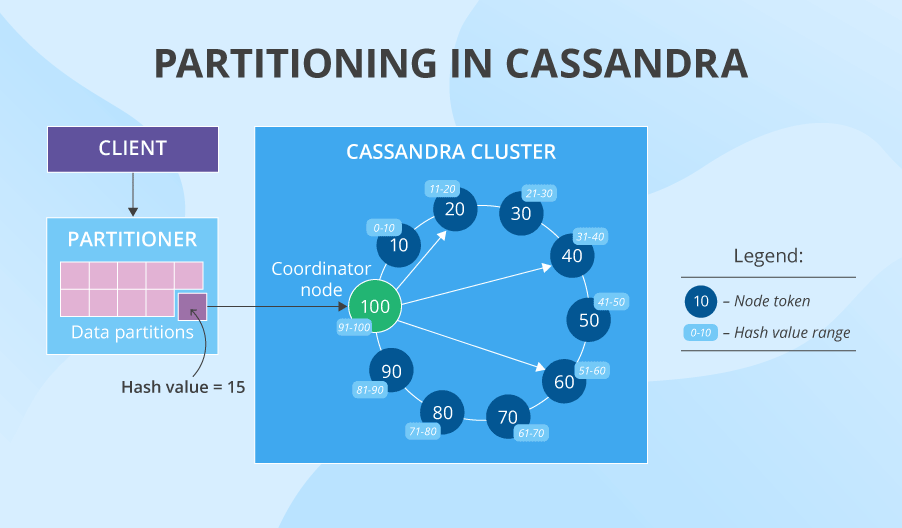
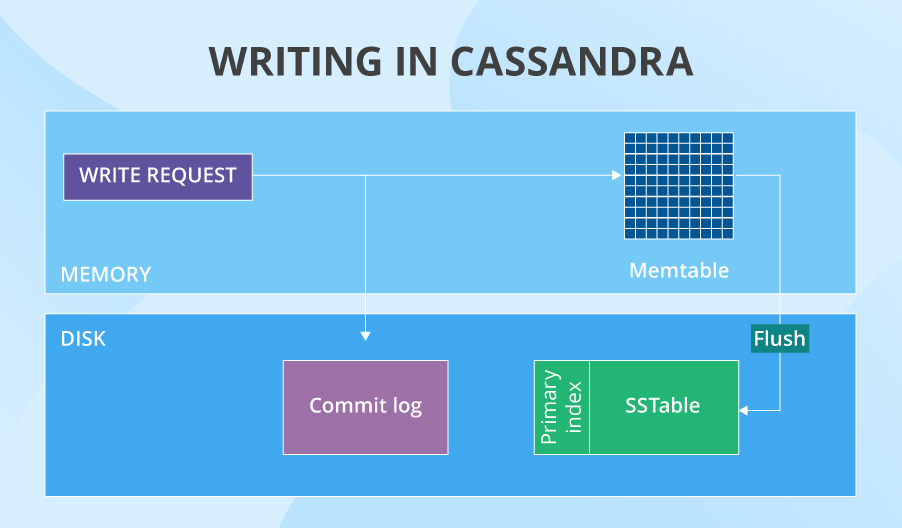
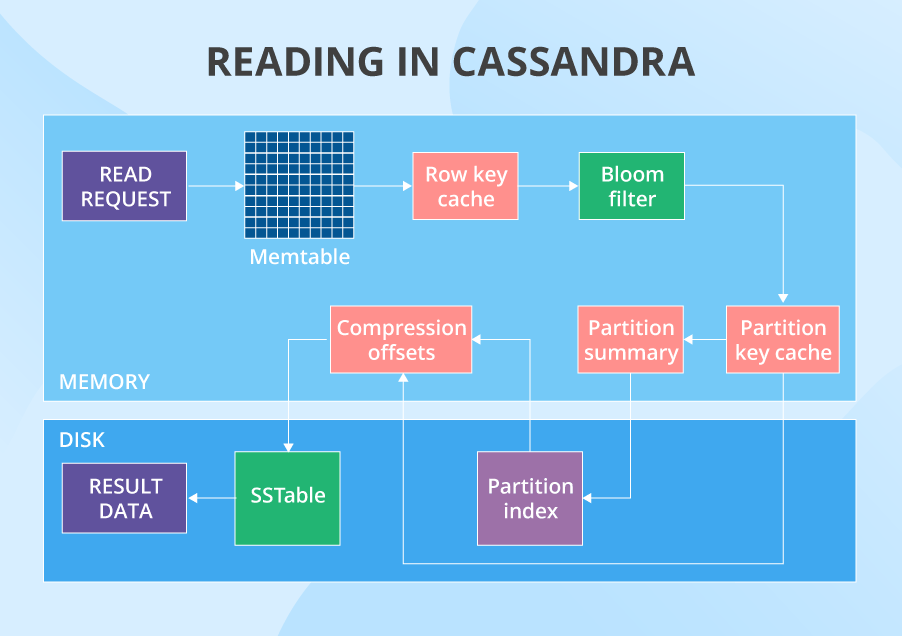


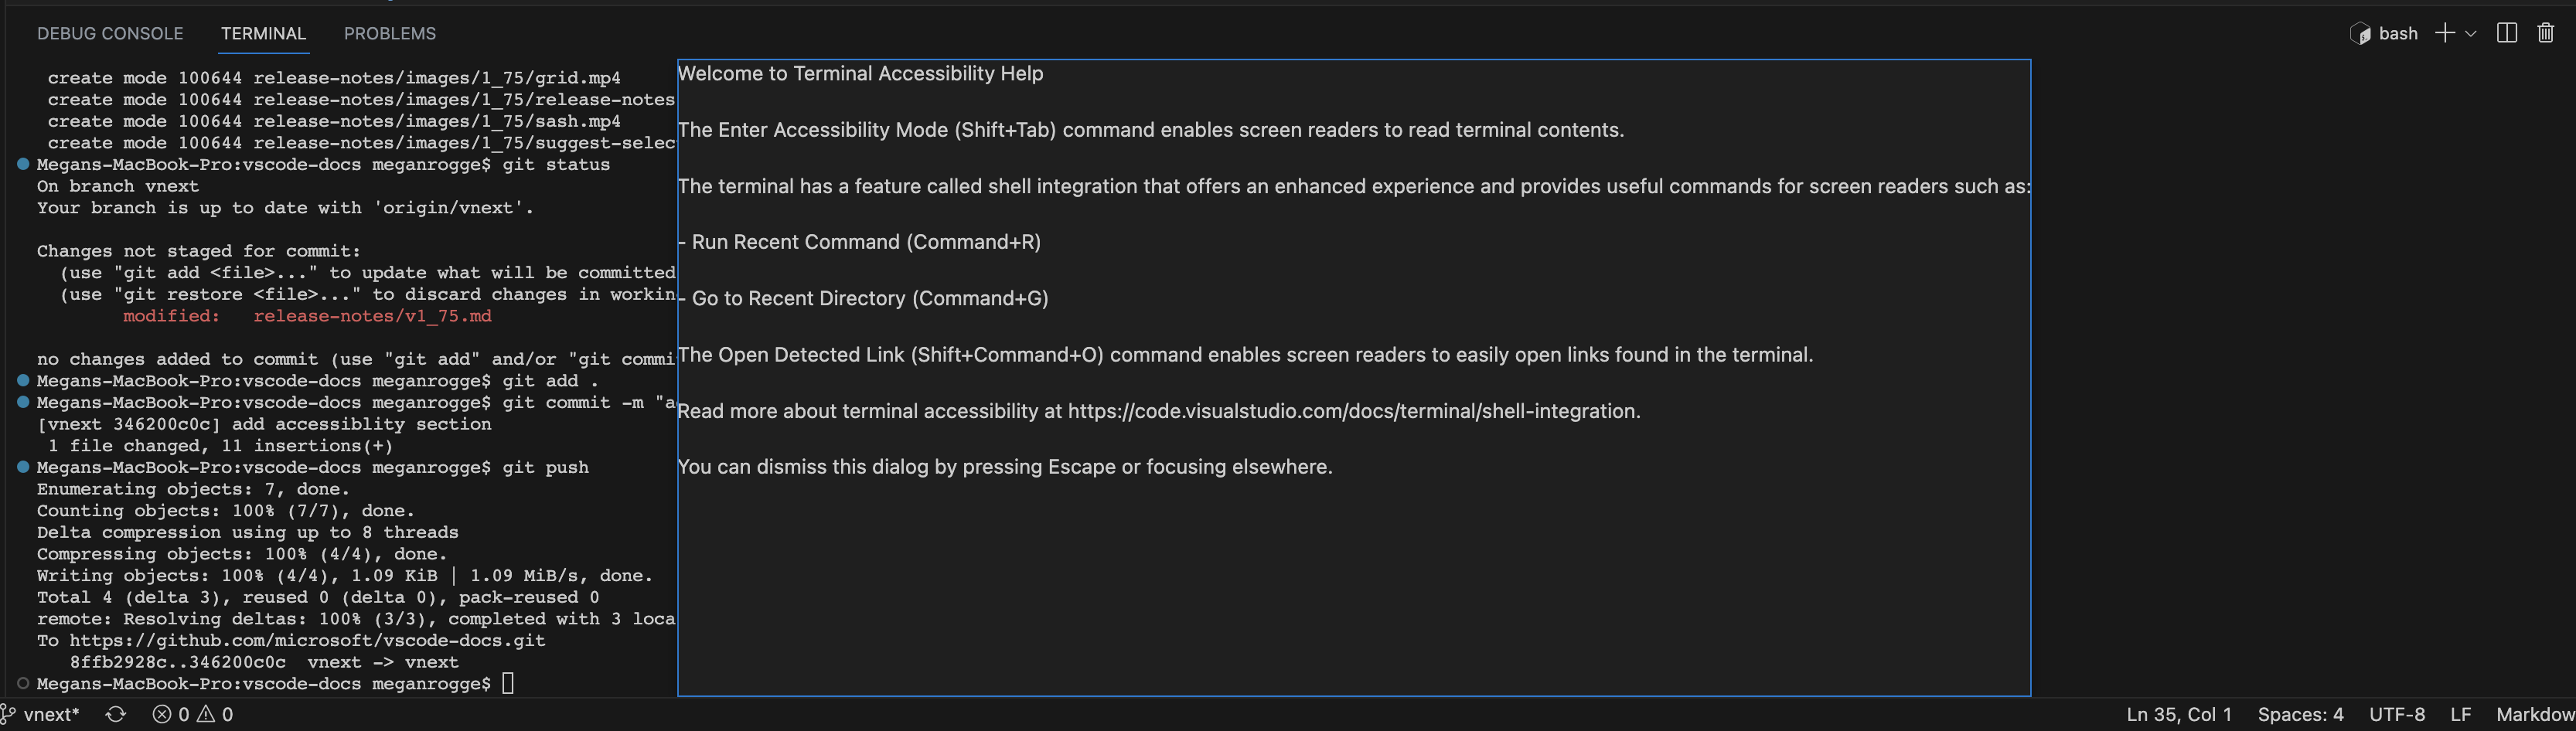
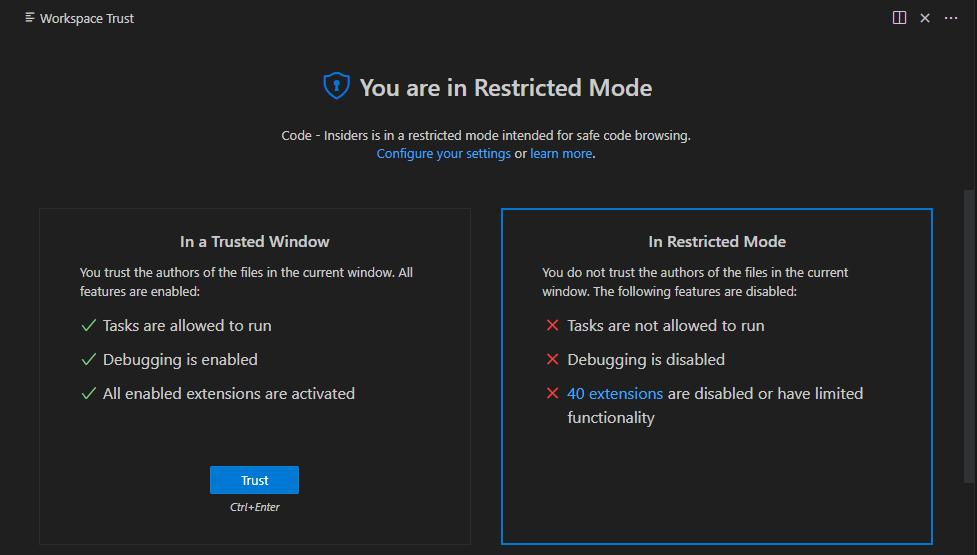

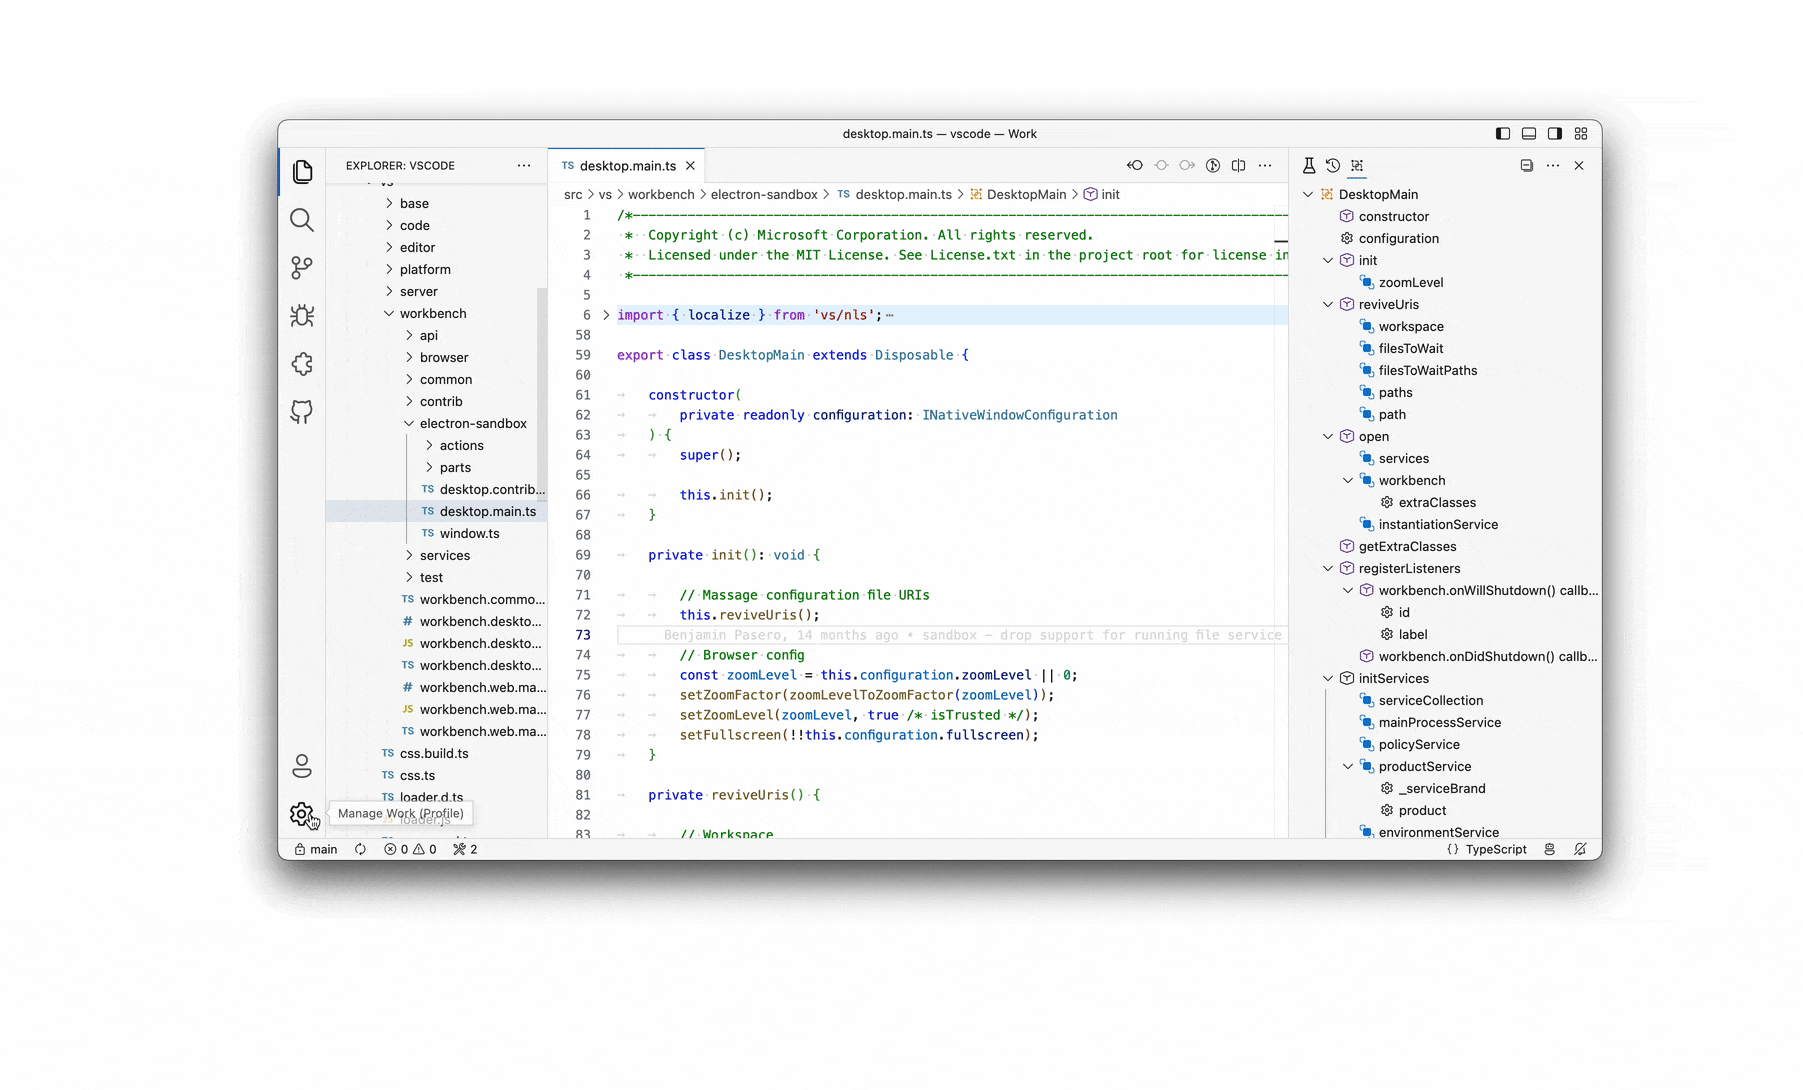
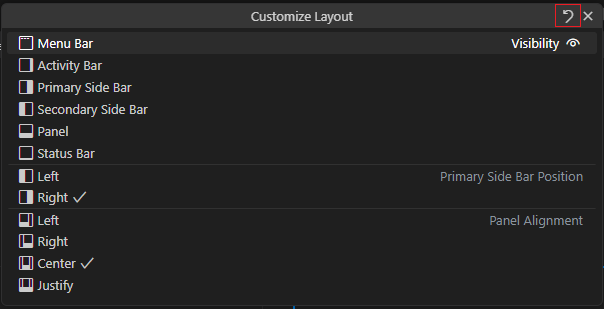
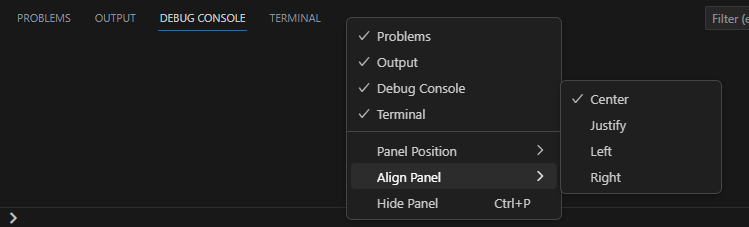
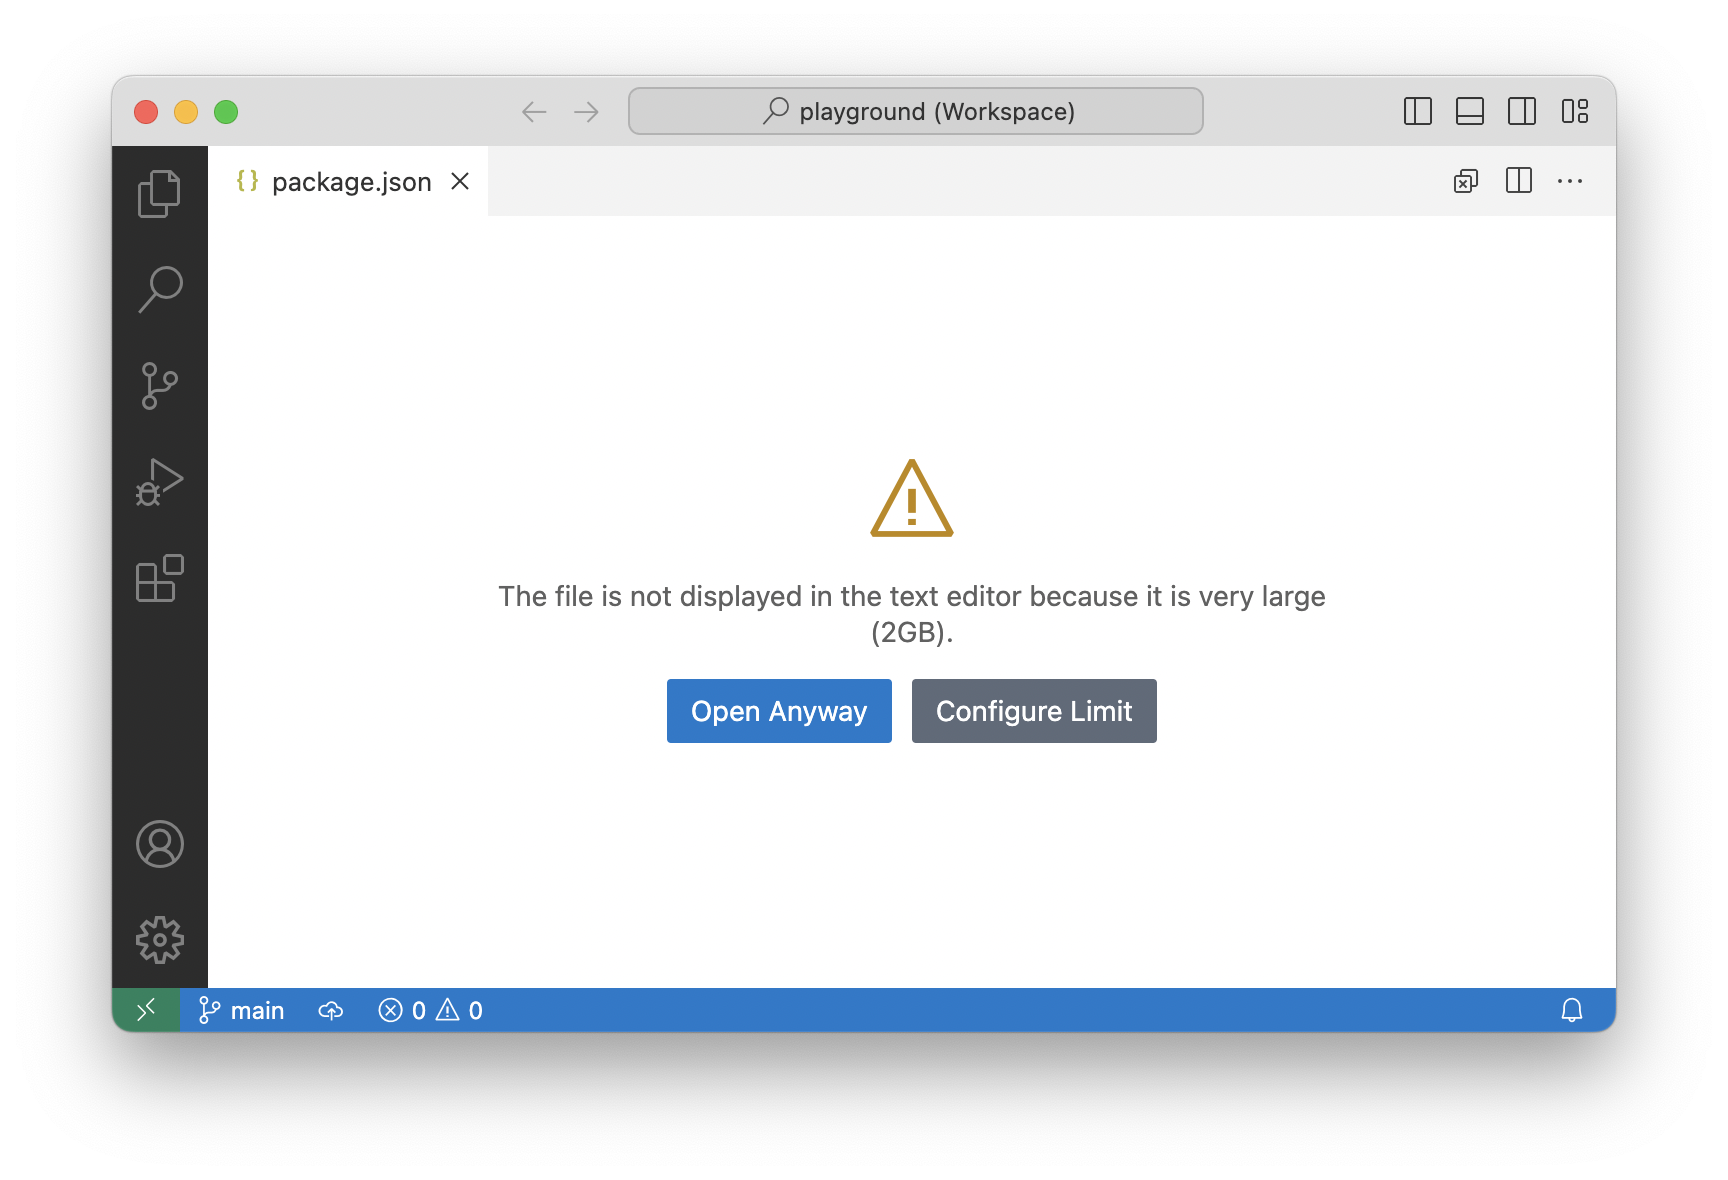

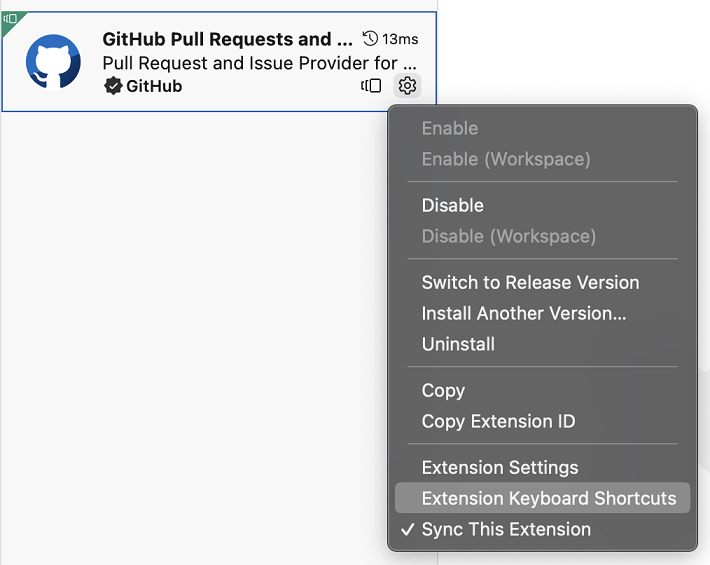
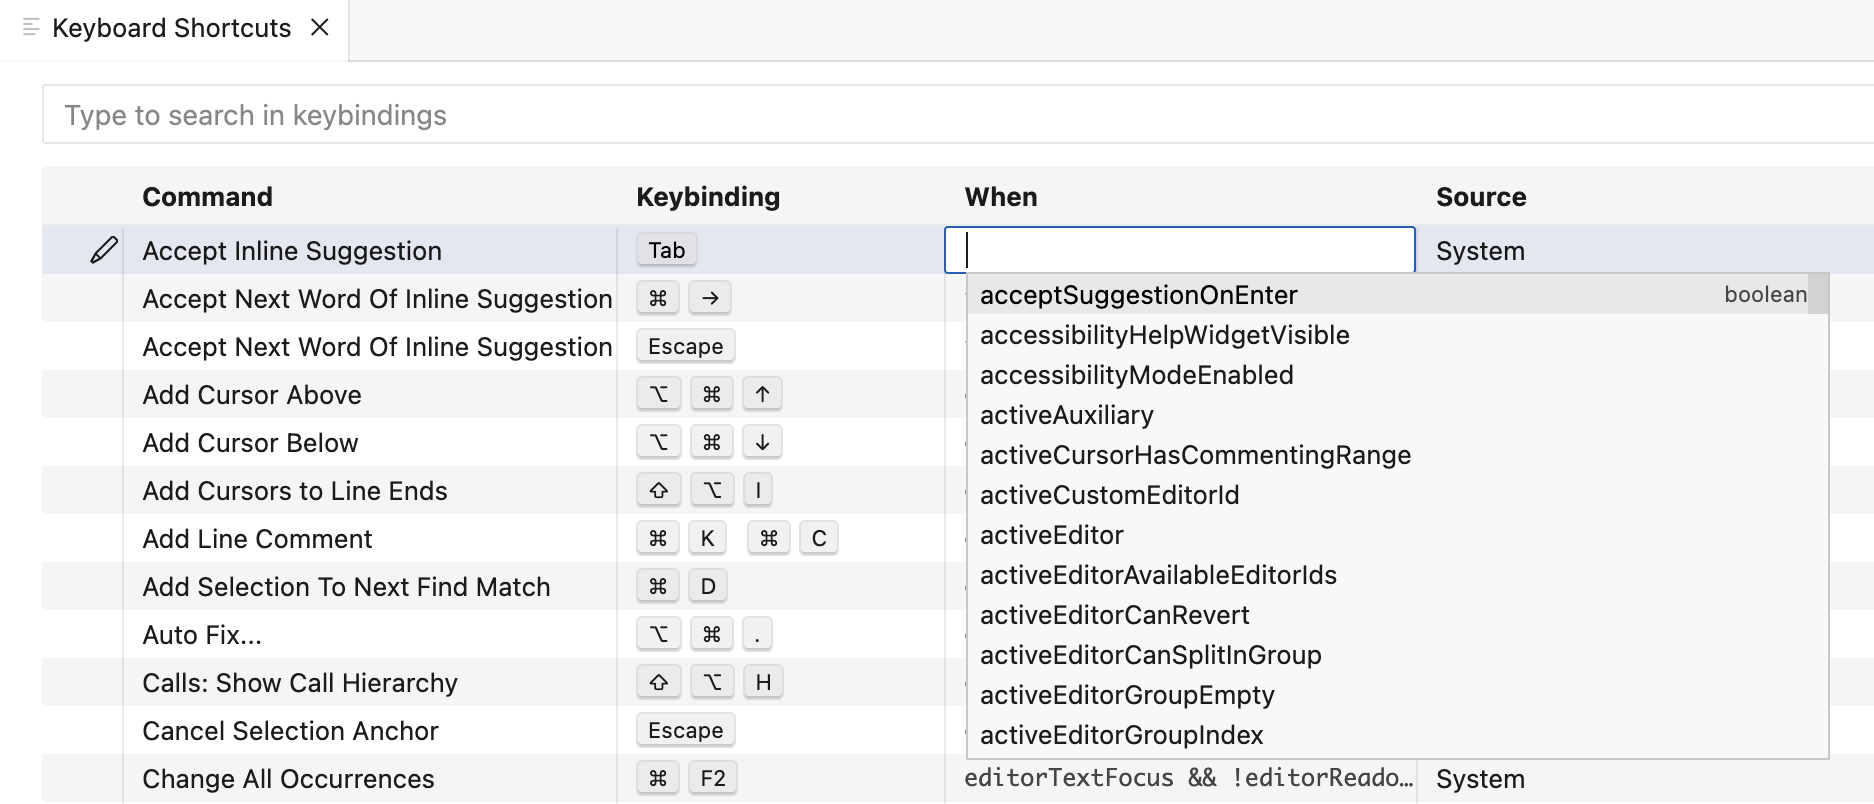
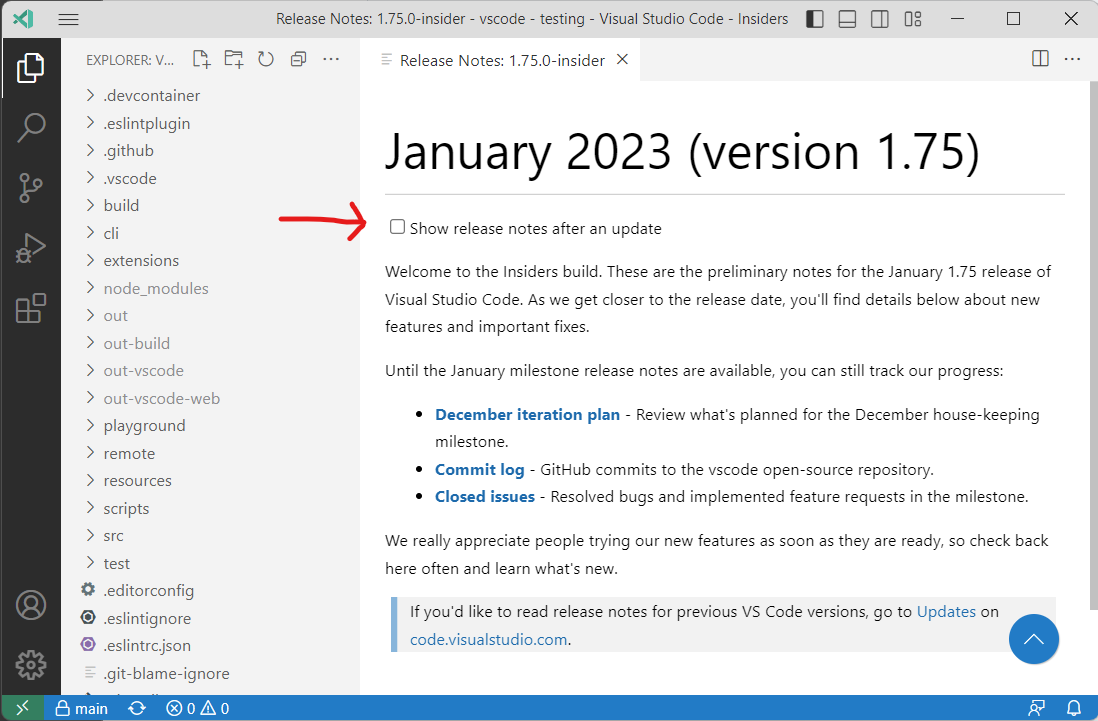
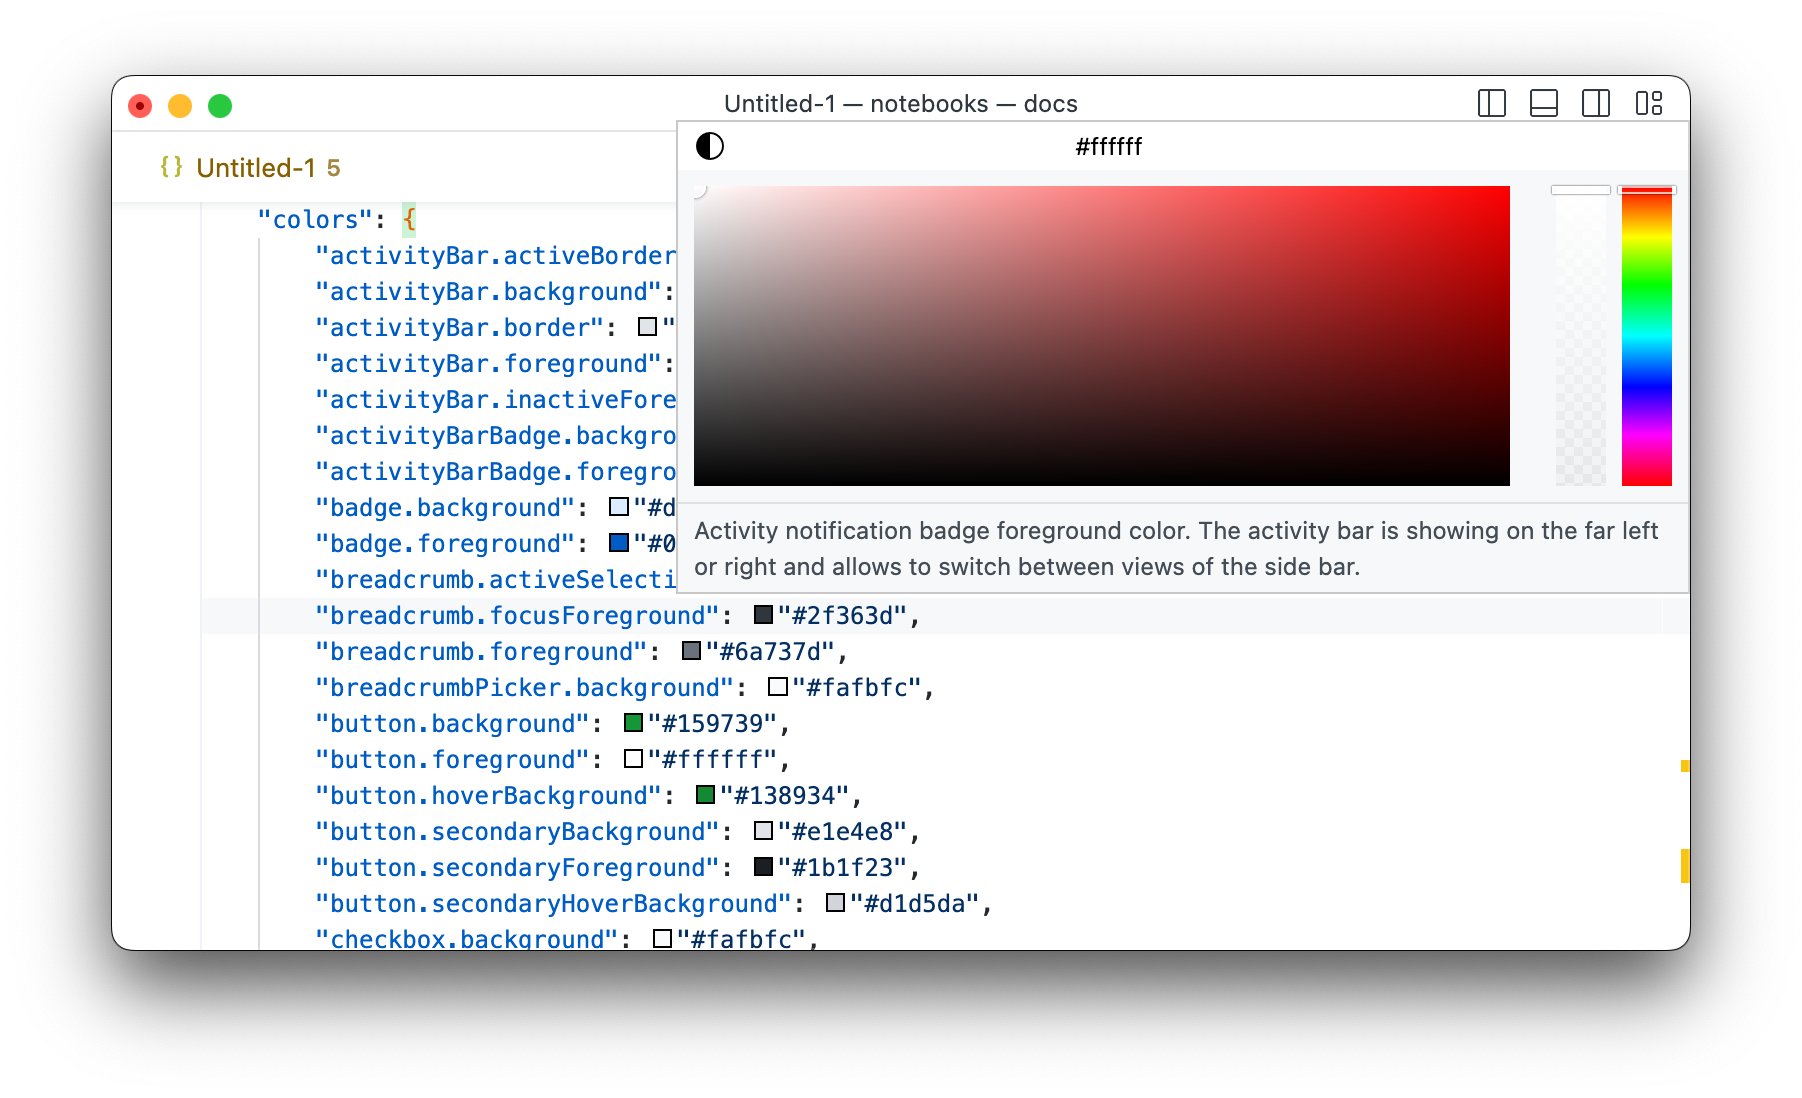
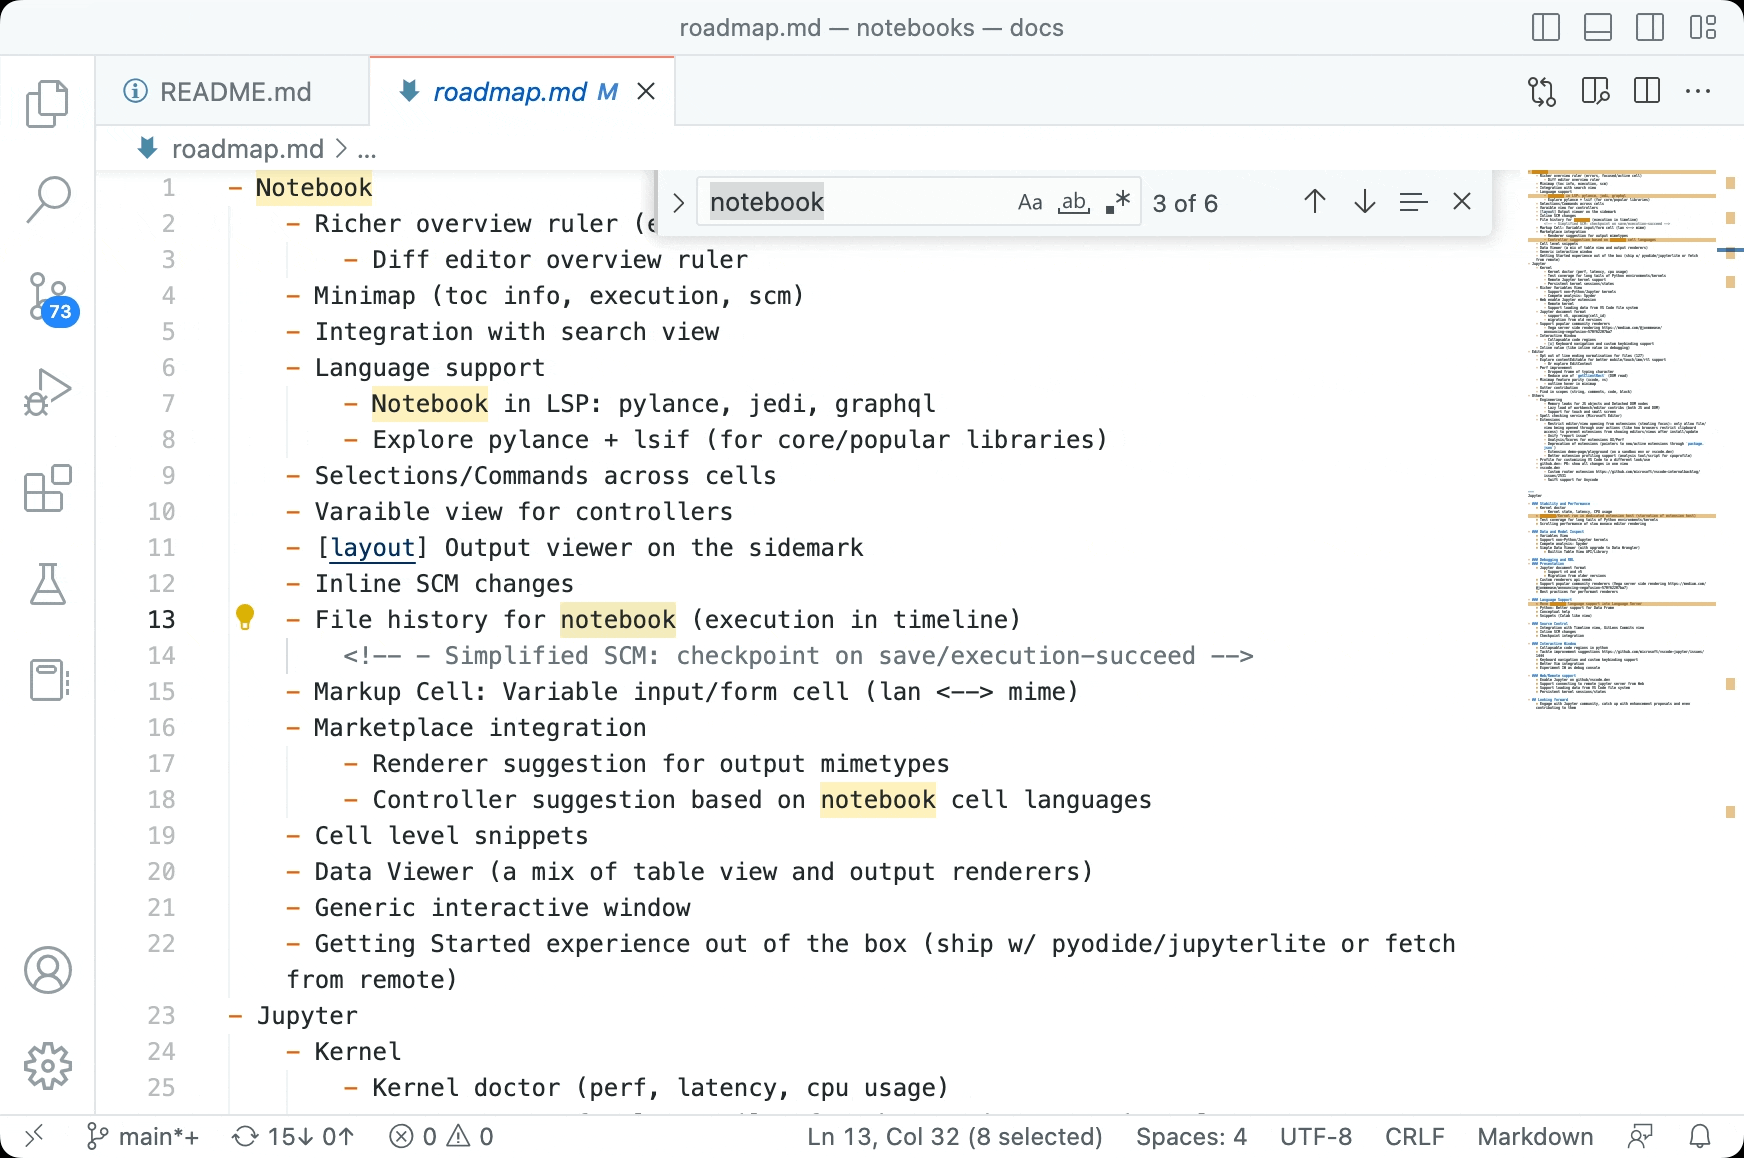
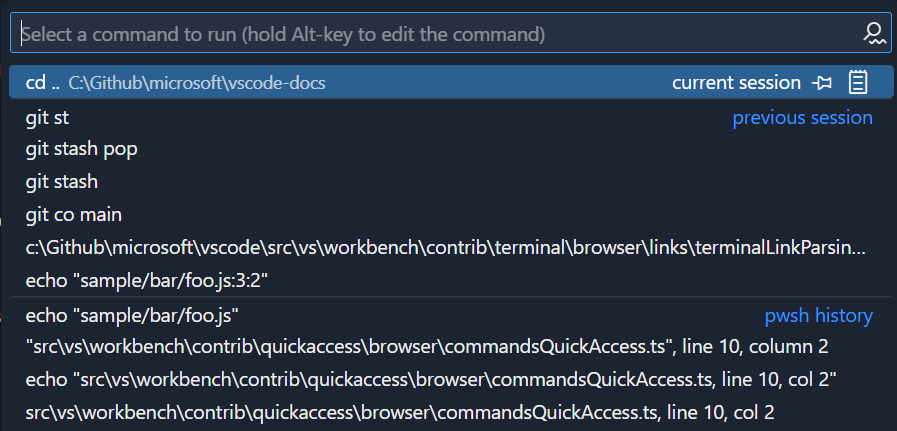
![Links that end in the ] character will be detected, even when the whole link is wrapped in [ and ]](https://code.visualstudio.com/assets/updates/1_75/terminal-square-bracket.png)