WhereHurt Free Download (v2024.07.04) – World Of PC Games


WhereHurt Free Download By WorldofpcgamesWhereHurt Free Download By Worldofpcgames

WhereHurt Direct Download:

Immerse yourself in the world of WhereHurt, a spine-chilling psycho-horror game that blurs the lines between reality and nightmare. Navigate through the distorted landscapes of your home, city, and workplace while racing against the merciless passage of time in an attempt to escape. If you run out of time, your inner demons will be unleashed and relentlessly pursue you. The city’s random, impenetrable walls symbolize the mental barriers created by societal norms. Will you be able to navigate the maze of your mind, or will the monsters within you prevail? Or do you want to wander here forever? The puzzle pieces will help you break free. Confront your fears in a game where every second and step matters. Exploration: Traverse through diverse environments such as your home, city, and workplace, each meticulously crafted to distort reality and intensify tension.

Time-Limited Challenges: Race against the clock to escape before your inner demons are unleashed. Puzzle Solving: Gather scattered puzzle pieces essential for completing the game. The game intentionally contains many repetitive parts that are boring for many people, thereby affecting the player and evoking certain feelings. Stealth Mechanics: Employ minimal stealth tactics to evade dangers. Minimal Sexual Content: Depicts a woman in revealing clothing. Intense Violence: Presents frequent, intense violence without highly detailed depictions. Sensitive Themes: Some story elements may disturb players depending on personal perspectives. For many puzzles the main challenge is to figure out what the goal of the puzzle IS, rather than managing to do it after you’ve figured out the goal.

Features and System Requirements:

  • Dynamic Environments: Experience that morph with the protagonist’s mental state, adding depth and unpredictability.
  • Atmosphere: Immerse yourself in chilling sound design and visual effects that maintain suspense throughout.
  • Psychological Horror: Engage with a narrative delving into deep psychological themes, challenging players to confront personal fears and anxieties.

1 :: Operating System :: Windows XP/7/8/8./10.
2 :: Processor: Intel Core i5-2500K or AMD FX-6300
3 :: Ram :: 8 GB RAM
4 :: DirectX: Version 11
5 :: Graphics:: NVIDIA GeForce GTX 760 or AMD Radeon R9 280
6 :: Space Storage:: 13 GB space

Turn Off Your Antivirus Before Installing Any Game

1 :: Download Game
2 :: Extract Game
3 :: Launch The Game
4 :: Have Fun 🙂

Notebooks, Visual Studio Code style


November 8, 2021 by Tanha Kabir, @_tanhakabir

Notebooks are documents that contain a mix of rich Markdown, executable code snippets, and accompanying rich output. These are all separated into distinct cells and can be interleaved in any order.

An example notebook showing code cells, Markdown, and a rich graph output

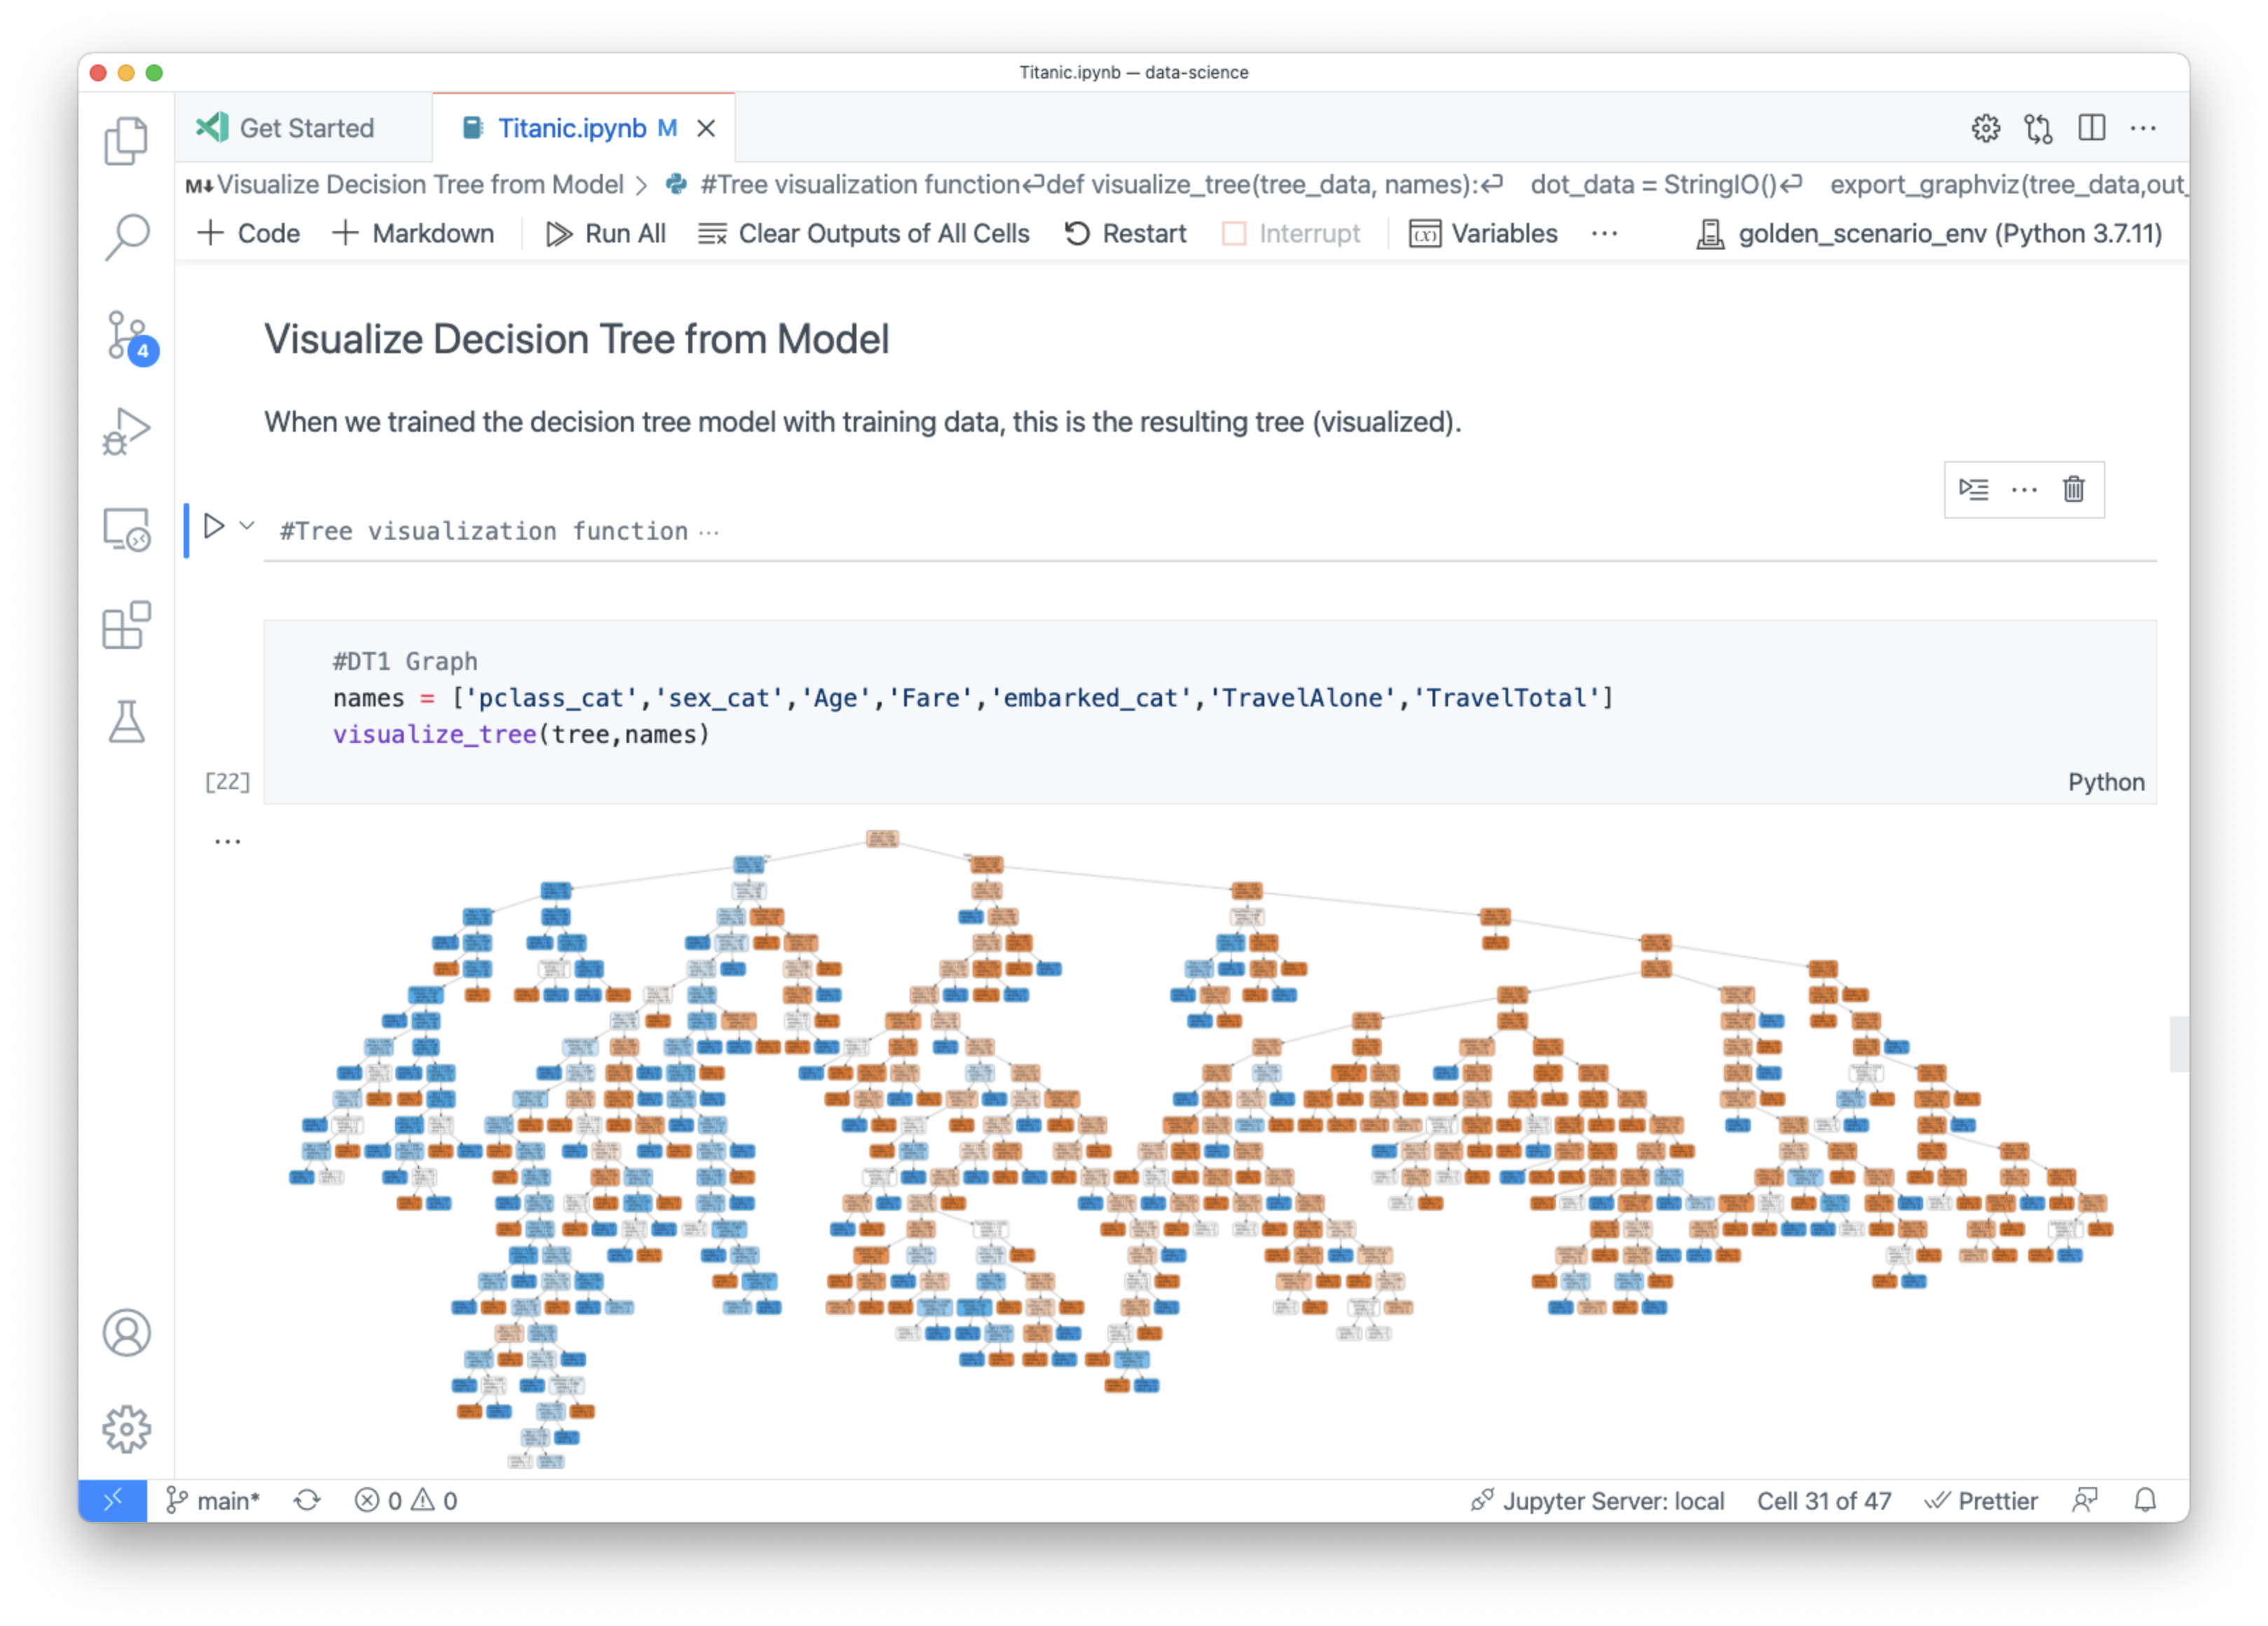
If you aren’t familiar with notebooks, you might be familiar with REPLs (read-eval-print loop)? A REPL is an interactive application where you can write a few lines of code and execute the code immediately and see the output. Notebooks are the epitome of a REPL and let you quickly create an environment where you can iterate and work on small chunks of code.

Notebooks are not only great REPLs, they are also great storytelling devices, allowing you to interleave Markdown elements like images, math equations, and explanatory text with your code. Notebooks can be a perfect way to share and explain your ideas with coworkers or the public community.

The most popular form of notebooks today is the Jupyter Notebook, used extensively in the data science community with rich Python support. Jupyter Notebooks also support other languages like Julia or R through Jupyter kernels, executables that follow a specific protocol to run code in your notebook. Visual Studio Code has supported Jupyter Notebooks for several years but recently added native notebook support into the VS Code core.

Notebook support in VS Code

That’s right, notebooks are now a part of the core functionality of VS Code! This means there are now Notebook APIs available in VS Code to let extension authors create their own notebook experiences. Anyone can make a VS Code notebook extension that supports custom languages and rich output and creating a notebook is no different than creating any other extension.

Prior to the Notebook APIs, Jupyter Notebook support in VS Code was contributed solely from the Jupyter extension. The extension created its notebook experience within an isolated webview, somewhat like an independent webpage within VS Code, that can’t talk with any of the other extensions you have installed.

However, now with the core Notebook APIs, the notebook support comes from VS Code and isn’t in an isolated webview. This means notebook extensions can interact with the rest of VS Code and other extensions. For example, editor extensions like Rainbow Indent will work in the code cells of your notebooks.

The Notebook APIs are not limited to Jupyter Notebooks, as we believe that there are many other domains that can benefit from having a tool to help you iterate and narrate your code. We made the new Notebook APIs public for any extension author to craft their own custom notebooks.

Beginnings of a notebook extension ecosystem

The next section describes two custom notebooks that we developed while vetting the Notebook API.

GitHub Issues Notebook

The first notebook experience the VS Code team created was the GitHub Issues Notebook. It is a notebook to help us triage and organize the thousands of issues we have in GitHub. With this notebook, we can examine multiple repos at once to find issues using queries such as “find all the issues labeled bug and assigned to me”. The VS Code team uses this notebook daily to process issues across the many repos the team works on.

A preview of the GitHub Issues Notebook we use on the team that's available in the vscode repo

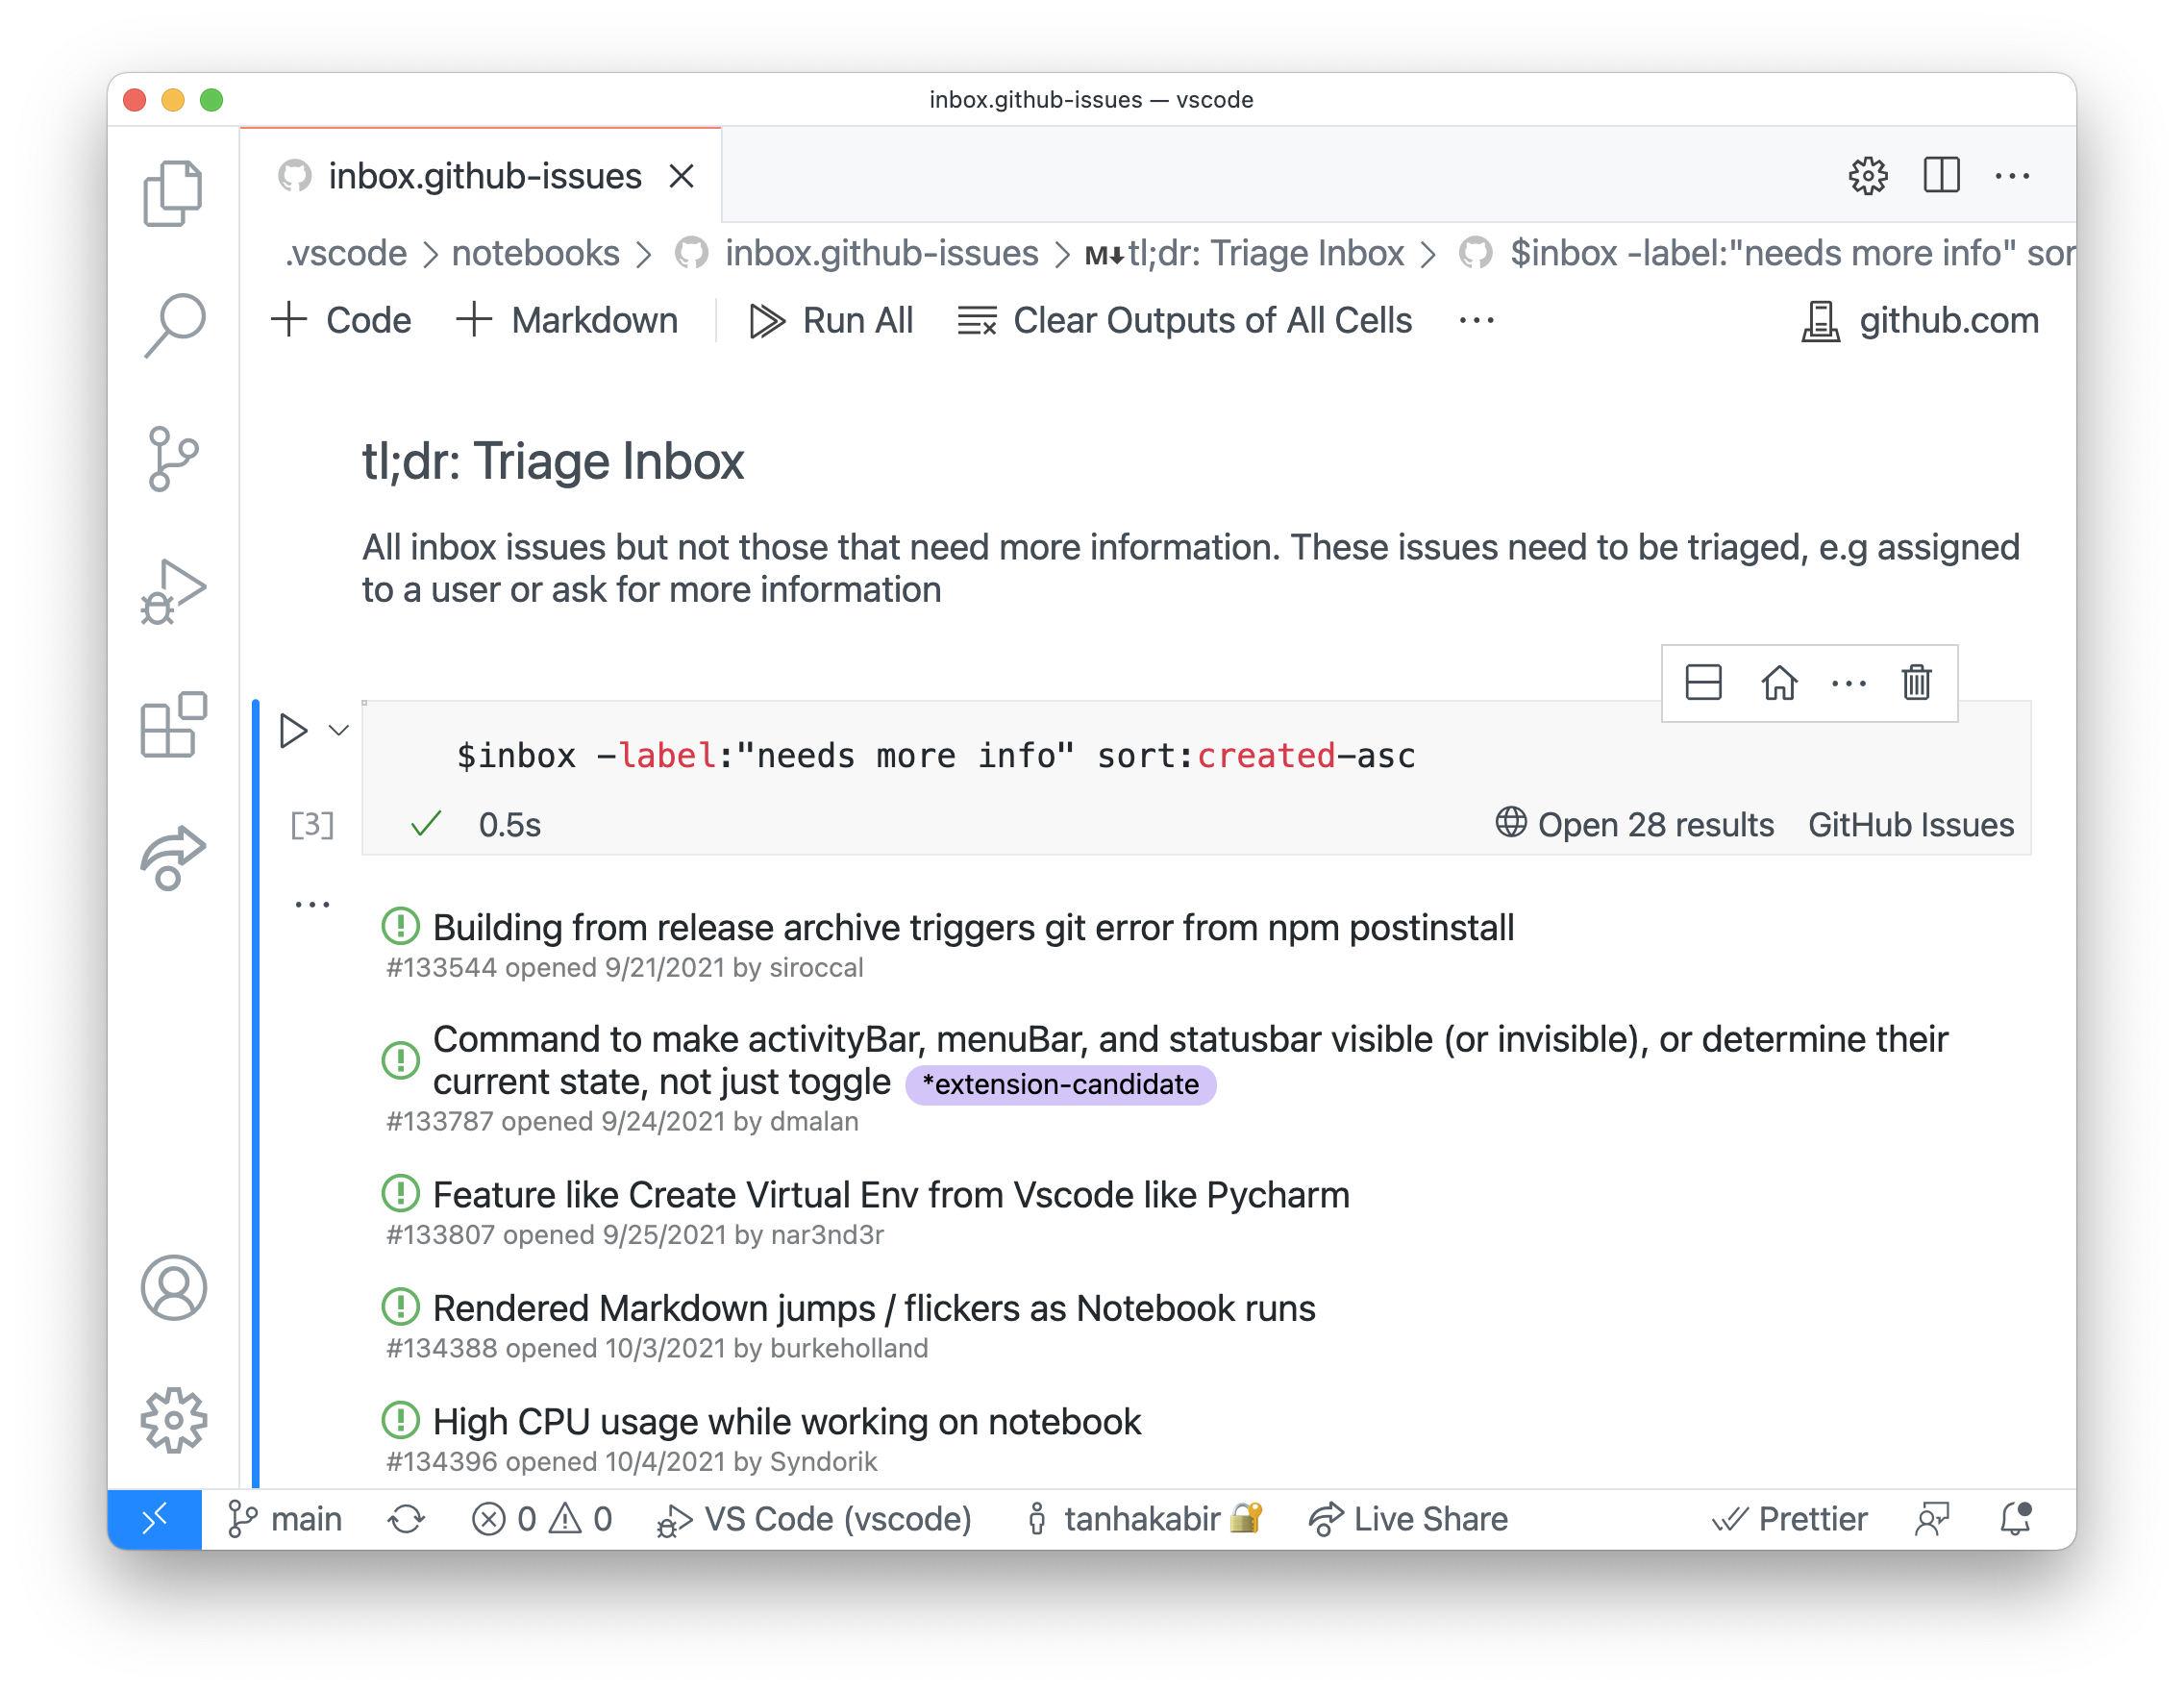
You can find the specific notebooks we use for triaging in the VS Code repo under .vscode/notebooks. There’s one called inbox.github-issues to triage new issues to their appropriate area and assignee.

GitHub Issues Notebook is available on the VS Code Marketplace for anyone to use. You can try it out by installing the extension, creating a file for your notebook with a .github-issues file extension such as my-notebook.github-issues, and then creating queries such as:

$repo=repo:microsoft/vscode-github-issue-notebooks
$repo is:open no:assignee

The notebook language, github-issues, used to create the queries is almost the same as the syntax used on GitHub.com. One addition in the GitHub Issues Notebook language is that it allows you to create variables and use them in any other cell.

You can view the source code for the GitHub Issues Notebook here on GitHub.com.

REST Book

Inspired by the querying experience in the GitHub Issues Notebook, I created REST Book as a learning exercise when I first joined the VS Code team. REST Book allows you to make HTTP calls in a notebook. I found REST Book useful to iterate on my projects with a server, by being able to make multiple calls over time and compare the results easily on one page. I also used REST Book notebooks to set up some manual testing of my project with documentation interleaved with the test cases.

A preview of the REST Book being used in a project with an Express App

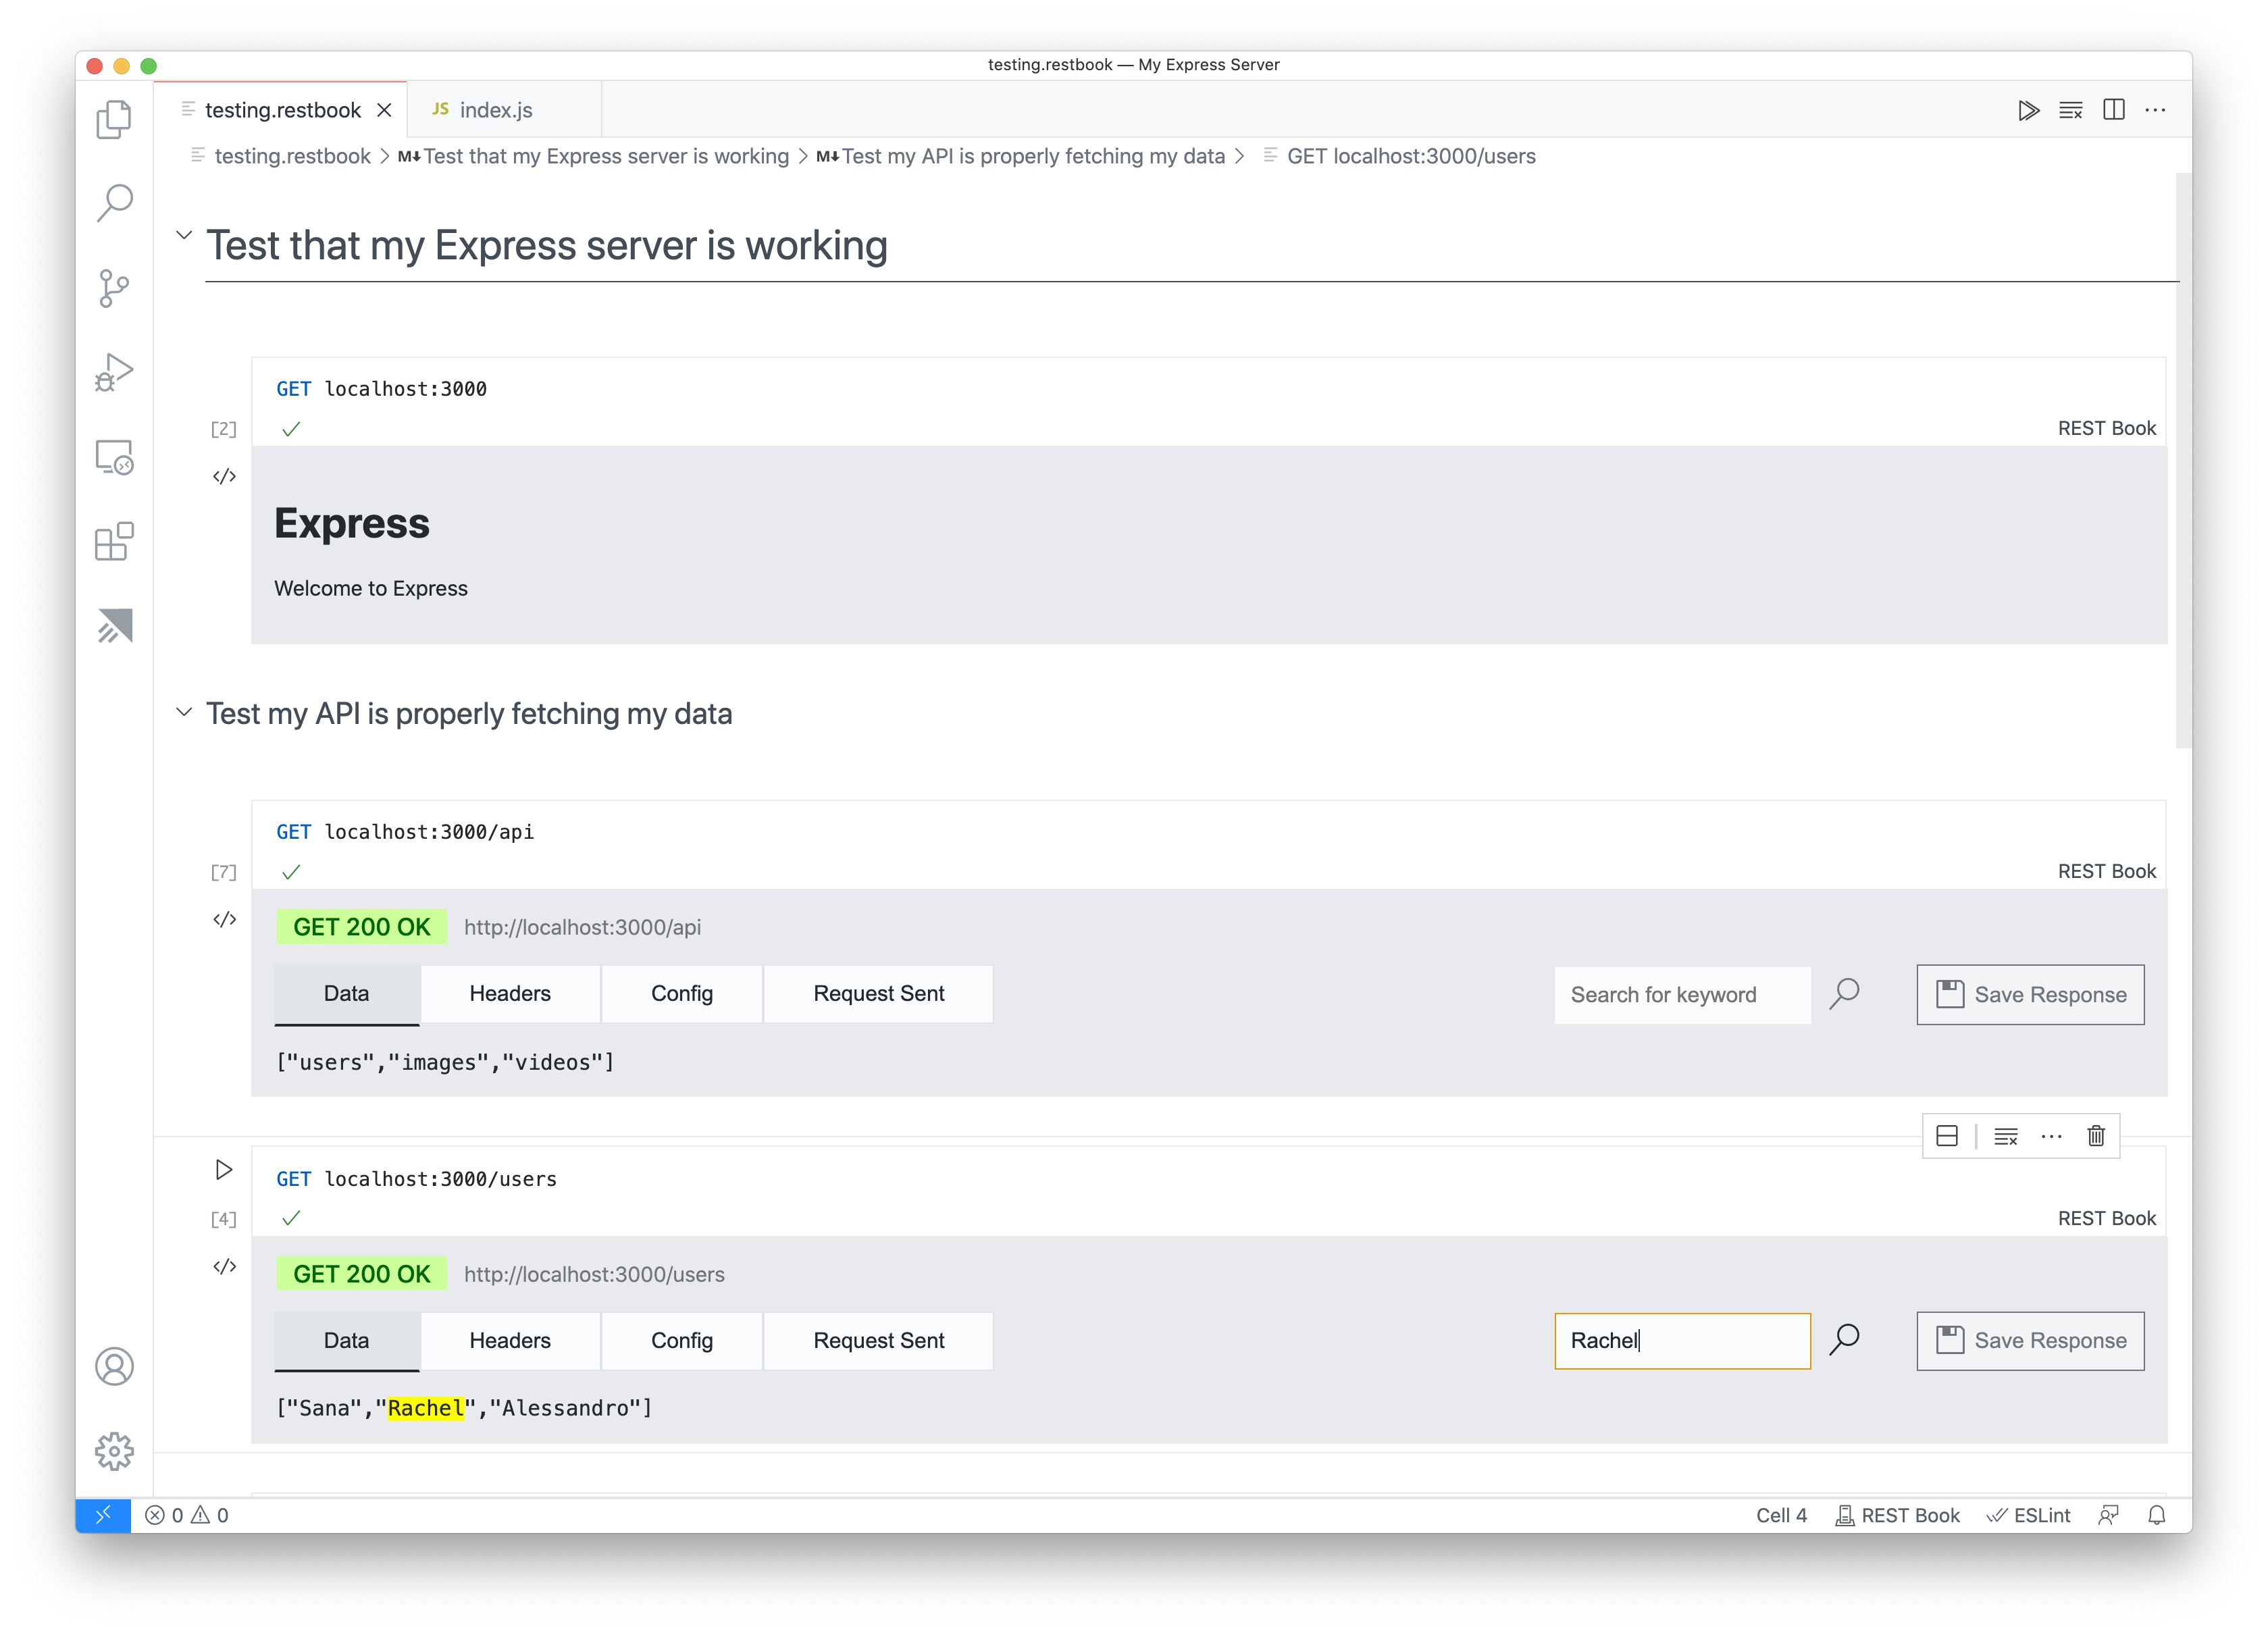
This REST Book extension is also available on the Marketplace today. You can install the REST Book extension, create a file with a .restbook ending, and then perform any HTTP query like GET github.com.

Developing REST Book seemed complicated to me at first, but with the large number of VS Code APIs available, programming and creating REST Book was much easier than I expected. Most notably, I used the language APIs heavily for syntax highlighting and auto-completions for my custom REST query language. Then with the Notebook APIs, I just needed to fill in what should be done when the user wants to run a query.

You can view the source code for the REST Book here.

For both of these notebooks, it was great to have the VS Code Notebook UI to create these REPL-like experiences. You don’t need to worry about creating and maintaining your own UI, you can just focus on the functionality.

Make your own custom notebook extension

Watch a coding tutorial

The VS Code team recorded a livestream several months ago about custom notebooks and in it, I showcased in a live coding demo of what it’s like to create a custom notebook extension. You can watch it on YouTube: VS Code Notebooks: A Deep Dive. Some of the Notebook APIs have changed since the video was published but the principles are still the same.

For the most up to date and detailed information when you’re ready to build your own notebook extension, you can reference the Notebook extension authors guide.

If you aren’t interested in creating your own notebook extension but have ideas for useful applications, we encourage you to tweet notebook ideas at the VS Code Twitter account, @code, or create issues in the VS Code GitHub repository. This will let the VS Code community read and discuss your notebook idea and hopefully inspire folks to make your notebook a reality!

The few custom notebooks we covered in this blog are just the beginning! We’re excited to see what custom notebook experiences you will inspire and create!

Happy Coding!

Tanha Kabir (@_tanhakabir) , and the VS Code Team (@code)


AMD Zen 5 Strix ‘Halo’ Chip to Require Desktop-Sized BGA Socket


It was almost a year ago when we first heard details about AMD’s plans for its top-dog mobile part for Zen 5, which goes by the name Strix Halo. For Zen 5 in laptops, AMD is developing two lines of chips: Strix Point for mainstream and Strix Halo to tower over the entire lineup by offering more of everything. Now it appears this chip will indeed be a big one, as newly unearthed details show it will use a BGA package that is 70% larger than the one required by existing Phoenix and Strix mobile CPUs.

Details about this upcoming Strix Halo chip have been collected from various sources, with more information found in shipping manifests aligning with online leaks, such as a schematic from the Chiphell forums, making them seem like they could be real. The most eye-opening number included in these leaks is that it will use a new BGA socket named FP11 with 2,077 pins. As HotHardware notes, its previous and current standard mobile chips have all used a socket named FP8, so this is a whole new ball of wax that is seemingly much larger. It’s even bigger than the FL1 socket AMD currently uses for its Dragon Range CPUs, which are desktop-class chips shoehorned into a BGA socket for desktop-replacement laptops.

AMD Strix Halo

This flagship mobile part will use two different TSMC 4nm nodes; N4X for the Zen 5 cores and N4P for the SoC, allegedly.
Credit: AMD

The overall size of this socket is being tipped as measuring 37.5mm by 45mm, which compares with FP8’s 25mm by 40mm. The larger socket could be necessitated by the rumored 256-bit memory bus on Strix Halo. It is also rumored to support up to 64GB of DDR5-8000 memory, putting it in the realm of desktop machines in memory bandwidth. This chip is rumored to offer a beefy RDNA 3+ GPU with 40 compute units, making it theoretically more potent than a Radeon RX 7600 desktop GPU. AMD wants to take on Apple’s M-series chips and Intel’s upcoming Battlemage GPUs.

Other desktop-class specs that would necessitate such a large socket include a dual-chiplet design that mirrors that of its flagship desktop CPUs. It’s rumored to offer two eight-core CCDs for a total of 16 cores and 32 threads. It will also feature a sizable SOC die with an XDNA 2 neural processing unit (NPU) capable of up to 45-50 TOPS, so it could be used on AI PCs. Its TDP is rumored to be around 120W, roughly double that of regular Strix CPUs, indicating it’s essentially a desktop chip in a mobile package.

Google Maps will show speedometer and speed limits on iPhone and CarPlay


Google Maps displays the speed limit on an iPhone

Screenshot by Lance Whitney/ZDNET

Android users have long been able to see the speedometer and speed limits when using their phones to navigate with Google Maps. That same capability is finally coming to Google Maps for the iPhone.

The speedometer and speed limit display is now rolling out to iPhone users around the world, Google told TechCrunch on Tuesday. TechCrunch said that it already saw the new feature pop up in Google Maps in India early last week.

Also: 12 iPhone apps that I can’t live without (and why you need them, too)

Once you start using the latest version of Google Maps for iOS to head to your destination, your car’s speed and the speed limit will appear in miles or kilometers depending on your current region. The speed limit indicator even changes colors to tell you whether or not you’re driving within the posted speed limit.

The new display is available with Google Maps for iOS version 6.123.0, according to 9to5Google, which jibes with the latest version on my iPhone. However, the server-side update for the feature has been rolling out to iOS users over the past few weeks.

The capability should serve as a useful indicator for any iPhone owner behind the wheel. Your eyes sometimes naturally check the iPhone or CarPlay screen for visual help as you drive. Seeing both your own speed and the speed limit on the screen can help you stay within the limit and avoid a hefty fine and ticket.

Still, a Google Maps support page cautions you that the speedometer shown in the app is for informational purposes only. Google advises drivers to check their car’s actual speedometer to confirm their driving speed.

Also: Worried about dementia? Here’s why I’m ditching GPS for a road atlas

The speedometer and speed limit display has been available in Google Maps for Android users for the past five years. iPhone owners who use CarPlay have also long be able to see the current speed and speed limit.

To turn on the speedometer and speed limits, according to TechCrunch, open Google Maps on your iPhone and tap your profile icon. Go to Settings, select Navigation, and then select Driving options. I didn’t see that setting on my iPhone; however, I did find another way to control the speedometer. Make sure you’re at the Navigation screen in Google Maps. Swipe down to the Map display section. The fourth option says “Show speedometer,” which you can turn on and off.

I tried out the new display on a drive, and both the speedometer and speed limit appeared on the iPhone and my CarPlay screen. Though I typically use Apple Maps when navigating, this may provide a bit more incentive to use Google Maps the next time I take my car for a ride.


The latest Windows update means Notepad might now be my favourite word processor


The latest round of Windows 11 updates has finally delivered Notepad in its finest form, as arguably now the best, most reliable offline word processor around.  It’s always been a handy li’l app, sitting in your Windows installation waiting patiently for that time when you might need to quickly edit a text or system file. But, as a straight word processor, it’s been a little lacking, with its younger sibling WordPad getting more tippytappy keyboard attention. 

But now WordPad has gone the way of Clippy, Notepad is the only game in town on a fresh Windows installation. And Microsoft has actually been making it better and better in recent years. The ability to tab, and for the app to essentially remember each of them from one boot to the next, has made it such a useful thing for me. The tabbed functionality arrived last year, and prior to that word wrapping and the improved find/replace dialog was introduced. And now we are finally getting a spell check, too.

Turning Ideas into Reality: A Guide to Bring Your Invention to Life with Design Firms


How do you turn your bright ideas into tangible reality?

Compared to what most people think, products are developed over time. Before something comes to fruition, it goes through a long and arduous process to ensure it serves its purpose, performs its function, and exudes excellent aesthetics. Great ideas can change an entire industry when given the chance. As an inventor, you must take reasonable action to bring your product to market. This article is a step-by-step guide to bringing your invention to life.

1. Prepare yourself and conceptualize the invention

The number one step in turning your invention into reality is to have a concept of your invention in mind. During the earliest phases of invention, the key is to have a clear concept and idea of your invention. Investors should know where they expect their idea to go. They also need to see it clearly for accessible communication.

If you’re lingering on an invention idea, you have to be prepared from the get-go. Here are some critical questions you need to ask yourself:

  • Does the market have other similar products that fulfill the needs of customers?
  • Have I conducted sufficient research on my target customers?
  • Do I have a good enough idea to have a spot in the crowded marketplace?
  • Do I have a clear enough product idea, or do I need help clarifying my vision?

If you’re still having trouble, you can also get new invention design services, wherein you consult with freelancers to help you with your project on a personalized level. If you have clear answers to all these questions, you can proceed to the second step in making your invention.

2. Document the idea

At this point, you already have a clear image of your concept and have finished your research. This in-depth research helped you clarify the idea further and hone in on target customers. You’ve proven that you have a sound idea and that there is a potential market for it.

The next move for you to take is to document the idea to finally turn your invention into reality. Below are several steps you have to take as you document your idea:

  • Get an inventor’s journal where you can write down your invention idea. This journal is a bound notebook whose pages are consecutively numbered and cannot be reinserted or removed.
  • Add details about your invention’s concept, design, and potential marketability in the inventor’s journal.
  • Time and date everything in the journal and look for a witness to sign it.
  • Take photos of the invention with a watermark of the date you captured it.

Taking the crucial steps to document your idea can serve as your protection in the long run if an inevitable contestant for an idea shows up.

RELATED: Elevating Your Company Using CAD Product Design Services During Product Development

3. Conduct market and product research

invention1

After documenting your idea and being ready to proceed, your next step is conducting market and product research. Most inventors don’t make money from their ideas since they don’t conduct research.

This product research helps you understand if the idea already exists. The following are the critical steps involved in product research:

  • Browse art databases to verify that your ideas and drawings don’t exist in art form yet.
  • Check with the National Patent Office to see if your renderings and ideas don’t exist.
  • Research the marketplace for similar items and confirm if the market still has gaps that need to be filled.

Market research can help you check if the market already has a product to answer customers’ pain points. Here are the steps to take during market research:

  • Come up with online surveys to help discover customers’ pain points.
  • Consider hosting casual focus groups with potential customers.
  • Gather all feedback and use this to identify if you have a sound invention idea.

4. Design the product

After performing market and product research, you can now design your product. Below are the fundamental principles that investors should use during product design.

How would you like to communicate your product idea visually? Consider how the idea will look on a tablet or paper. Brainstorming in design is about defining the problem and developing many ideas. It’s critical to have answers to solve as many issues as possible. Critical eyes don’t have a place at this point.

This is the stage where it’s vital to have a good sense of direction. This might involve having loosely outlined tasks you will complete in the next few weeks. It can also include listing industrial design firms you can contact when you need assistance during prototyping. No matter what it is, you can stay on track if you have expectations.

Sketching is an ideal way to hone in on your design vision for your idea. These sketches don’t need to be perfect; rough ones are even better if they show how you envision the product after completion.

RELATED: Prototyping for Product Development & Investor Presentations

5. Manufacture your prototype

invention2

While creating your intended product’s design was a significant step, a prototype is just as crucial. Accordingly, freelance prototype design services help bring your invention to life. There are three steps typically involved in prototype manufacturing. These include the following:

  • Prepare a concept sketch of the appearance and function of your prototype.
  • Turn your idea into a 3D digital model
  • Develop a physical model of the invention
  • Look for a manufacturer that can help in large-scale building and testing of your prototype

6. Prepare an application for a provisional patent

Congratulations! Your idea has the potential to become a tangible product! This is when you must ensure it will stay yours and yours alone. A provisional patent is incredibly beneficial for an inventor. Inventors can apply for a provisional patent without a disclosure agreement, oath, declaration, or official patent claim.

Applications for provisional patents have a waiting period of 12 months before the patent becomes legally binding. This period begins right on the day the patent is filed. Inventors must also file for non-provisional patent applications to take advantage of early filing. This process can take up much of your energy and attention; hence, you may opt to get patent services to assist you throughout the application process.

RELATED: How to Calculate a Product Development Cost Estimate for New Products

7. Look for a reliable manufacturer (Not mandatory for licensing)

Finding a potential product manufacturer is the next step in making your invention a reality. Before doing so, however, you need to iron out a few details.

  • Decide on the type of manufacturer you plan to work with. There are three main types of manufacturers. The first are manufacturers that produce products according to your product ideas. The second type involves suppliers, distributors, or wholesalers who purchase existing products and brands. The third type comprises dropshipping companies that can supply products and fulfill the orders of existing products and brands.
  • Determine if you would like to opt for an international or domestic manufacturer. International manufacturers are your best option if you focus more on long-term global reach. Meanwhile, domestic manufacturers are ideal for inventors who are conscious of the environment and wish to prioritize quality control.
  • Identify what you plan to offer as an inventor. Do you welcome the idea of custom orders? If so, the manufacturer should offer this. What is your preferred lead time or the time between the order placement and shipping? How much do you plan to spend on shipping costs? How much is your target cost per unit? Do the manufacturers you’re considering have a defect policy in place? What kind of factory conditions do they have? Are these ethical or sustainable?
  • Choose payment and quantities for your orders. What target number of product units do you plan to produce at first? Suppliers have a minimum commitment, so agreeing with the number is important. Other manufacturers also require upfront payment to start production. Consider your preference and budget, check for possible negotiation, and decide.
invention3

8. License or sell the product

Licensing or selling the product is the best option for small manufacturers or investors. With product licensing, inventors can sell product ideas to manufacturing companies. You then earn a profit in exchange for selling your concept to them through a percentage of every sale made.

The following are the main benefits of licensing or selling your product:

  • It opens doors for additional income opportunities.
  • Prevent risks and challenges associated with product development, like lack of money or experience to produce the items.

However, you also need to consider a few drawbacks, such as the following:

  • There is a slight chance for the inventor to gain wealth if they sell their idea to a big company. To be rich, consider other options.
  • The company that you sold your idea to will be its new owner. Once they develop a new, improved version of the invention, you may not receive any royalties from this.

RELATED: The Advantages of Product Licensing: How to Get Your Invention Made Without Starting a Business

How Cad Crowd can help

If you need help turning your invention into a reality, Cad Crowd can connect you with the right professionals who can transform your ideas into tangible products.

Las Vegas Sphere Delivers Dazzling Displays


Sphere, a new kind of entertainment medium in Las Vegas, is joining the ranks of legendary circular performance spaces such as the Roman Colosseum and Shakespeare’s Globe Theater — captivating audiences with eye-popping LED displays that cover nearly 750,000 square feet inside and outside the venue.

Behind the screens, around 150 NVIDIA RTX A6000 GPUs help power stunning visuals on floor-to-ceiling, 16x16K displays across the Sphere’s interior, as well as 1.2 million programmable LED pucks on the venue’s exterior — the Exosphere, which is the world’s largest LED screen.

Delivering robust network connectivity, NVIDIA BlueField DPUs and NVIDIA ConnectX-6 Dx NICs — along with the NVIDIA DOCA Firefly Service and NVIDIA Rivermax software for media streaming — ensure that all the display panels act as one synchronized canvas.

“Sphere is captivating audiences not only in Las Vegas, but also around the world on social media, with immersive LED content delivered at a scale and clarity that has never been done before,” said Alex Luthwaite, senior vice president of show systems technology at Sphere Entertainment. “This would not be possible without the expertise and innovation of companies such as NVIDIA that are critical to helping power our vision, working closely with our team to redefine what is possible with cutting-edge display technology.”

Named one of TIME’s Best Inventions of 2023, Sphere hosts original Sphere Experiences, concerts and residencies from the world’s biggest artists, and premier marquee and corporate events.

Rock band U2 opened Sphere with a 40-show run that concluded in March. Other shows include The Sphere Experience featuring Darren Aronofsky’s Postcard From Earth, a specially created multisensory cinematic experience that showcases all of the venue’s immersive technologies, including high-resolution visuals, advanced concert-grade sound, haptic seats and atmospheric effects such as wind and scents.

image of the Earth from space displayed in Sphere
“Postcard From Earth” is a multisensory immersive experience. Image courtesy of Sphere Entertainment.

Behind the Screens: Visual Technology Fueling the Sphere

Sphere Studios creates video content in its Burbank, Calif., facility, then transfers it digitally to Sphere in Las Vegas. The content is then streamed in real time to rack-mounted workstations equipped with NVIDIA RTX A6000 GPUs, achieving unprecedented performance capable of delivering three layers of 16K resolution at 60 frames per second.

The NVIDIA Rivermax software helps provide media streaming acceleration, enabling direct data transfers to and from the GPU. Combined, the software and hardware acceleration eliminates jitter and optimizes latency.

NVIDIA BlueField DPUs also facilitate precision timing through the DOCA Firefly Service, which is used to synchronize clocks in a network with sub-microsecond accuracy.

“The integration of NVIDIA RTX GPUs, BlueField DPUs and Rivermax software creates a powerful trifecta of advantages for modern accelerated computing, supporting the unique high-resolution video streams and strict timing requirements needed at Sphere and setting a new standard for media processing capabilities,” said Nir Nitzani, senior product director for networking software at NVIDIA. “This collaboration results in remarkable performance gains, culminating in the extraordinary experiences guests have at Sphere.” 

Well-Rounded: From Simulation to Sphere Stage

To create new immersive content exclusively for Sphere, Sphere Entertainment launched Sphere Studios, which is dedicated to developing the next generation of original immersive entertainment. The Burbank campus consists of numerous development facilities, including a quarter-sized version of Sphere screen in Las Vegas, dubbed Big Dome, which serves as a specialized screening, production facility and lab for content.

dome-shaped building flanked by palm trees
The Big Dome is 100 feet high and 28,000 square feet. Image courtesy of Sphere Entertainment.

Sphere Studios also developed the Big Sky camera system, which captures uncompressed, 18K images from a single camera, so that the studio can film content for Sphere without needing to stitch multiple camera feeds together. The studio’s custom image processing software runs on Lenovo servers powered by NVIDIA A40 GPUs.

The A40 GPUs also fuel creative work, including 3D video, virtualization and ray tracing. To develop visuals for different kinds of shows, the team works with apps including Unreal Engine, Unity, Touch Designer and Notch.

For more, explore upcoming sessions in NVIDIA’s room at SIGGRAPH and watch the panel discussion “Immersion in Sphere: Redefining Live Entertainment Experiences” on NVIDIA On-Demand.

All images courtesy of Sphere Entertainment.

Vizrt CaptureCast Saves the Day


The article titled “Class of 2024: University of Utah, SJ Quinney College of Law” by Macy O’Hearn for AVNetwork, discusses how the University of Utah’s SJ Quinney College of Law cost-effectively expanded the availability of their lecture capture (LC) service to more classroom locations. The college invested in an NDI-based LC solution from Vizrt called CaptureCast, which can consume the growing number of NDI-based sources added to the learning spaces using both software and hardware NDI solutions. The main challenge was gaining traction and support for the AVoIP (specifically NDI) solutions from the central campus resources, as the college needed resources not available on staff, with AV system coding support being the most critical need to enable coding the legacy matrix switch out of the equation and adding support for the NDI-based solutions into the existing touch panel UI.

What were the main goals of this project at the University of Utah’s SJ Quinney College of Law?
The main goals of the project at the University of Utah’s SJ Quinney College of Law were to cost-effectively continue to support established lecture capture processes and expand the availability of the lecture capture service to more classroom locations.

What was the main challenge the college faced in implementing the new lecture capture solution?
The main challenge the college faced in implementing the new lecture capture solution was gaining traction and support for AVoIP (specifically NDI) solutions from central campus resources. As a smaller department, the college needed resources not available on staff, with AV system coding support being the most critical need. This support would enable coding the legacy matrix switch out of the equation and adding support for the NDI-based solutions into the existing touch panel UI.

What equipment was used in the new lecture capture solution?
The equipment used in the new lecture capture solution at the University of Utah’s SJ Quinney College of Law included Magewell Pro Convert HDMI Plus, NewTek NDI Tools screen capture and webcam tools, and the NewTek CaptureCast Server.

Read the full article by by Macy O’Hearn for AVNetwork HERE


Learn more about Vizrt below:

Migration not adding, Screen hangs after “Build succeeded” message in Visual Studio


I’m encountering an issue in Visual Studio where, after a successful build, the screen hangs and I’m unable to add migrations. The specific steps I’m taking are as follows:

  1. I initiate a build process for my project.
  2. The build completes successfully, and I see the “Build succeeded” message.
  3. Immediately after, when I attempt to add a migration, Visual Studio hangs and becomes unresponsive.

I’ve tried the following troubleshooting steps, but the problem persists:

  • Restarting Visual Studio and my computer.
  • Clearing the NuGet cache and restoring packages.
  • Ensuring all project dependencies and packages are up-to-date.
  • Running Visual Studio as an administrator.
  • Checking for any background processes or tasks that might be interfering.
  • Reviewing the Output and Error List windows for any hidden issues or warnings.

Has anyone else encountered this issue or have any suggestions on how to resolve it? Any help would be greatly appreciated.

Maintaining Your Practice Autonomy


Maintaining Your Practice Autonomy:

5 Ways to Increase Profitability and Reduce Your Administrative Burden 

Maintaining Your Practice Autonomy

Independent physician practices face a growing risk due to heavy administrative burdens, declining revenue, and increased expenses. This white paper reveals five strategies to combat revenue loss and simplify administrative duties to secure your practice autonomy. 

In this whitepaper you will learn how to:

  • Automate processes, reduce denials, and accelerate reimbursements.
  • Eliminate data silos and streamline workflows for maximum efficiency.
  • Identify root causes, improve accuracy, and recover lost revenue.
  • Use data analytics to optimize billing and identify areas for improvement.
  • Find a trusted expert to support your practice’s financial health.

Download the whitepaper

Download the whitepaper

Error: Contact form not found.

About Inovalon

Inovalon is a leading provider of cloud-based SaaS solutions empowering data-driven healthcare. The Inovalon ONE® Platform brings together national-scale connectivity, real-time primary source data access, and advanced analytics to enable improved clinical outcomes and economics across the healthcare ecosystem. The company’s analytics and capabilities are used by nearly 20,000 customers. 

The post Maintaining Your Practice Autonomy appeared first on Tech Research Online.