Real Estate Marketing: How 3D Aerial Rendering Services Utilize Drone Photography


Drone photography is undoubtedly the newest and hottest game-changer in real estate marketing, offering an exceptional one-of-a-kind view and approach that remains unbeatable by traditional photography.

It offers an innovative and groundbreaking means of showcasing properties, providing a more detailed understanding of a property’s features, size, and location, as well as its surrounding and nearby environment. This helps boost customer engagement and ultimately pushes the decision matter towards closing a sale and taking your marketing efforts to the next level.

But the thing is, your skills would not improve by just pressing buttons on a remote control. Having the cool, up-to-date, and latest equipment and camera tools does not suffice to make up for the actual skills needed to pull off what is needed to satisfy your clients. Drone photography calls for meticulous planning and careful consideration of various factors so that you can capture enticing images that can pique your client’s interest and encourage enticing engagements.

This short guide talks about how 3D aerial rendering services utilize drone photography for real estate marketing purposes:

Limitations and challenges of traditional photography for real estate

For the longest time, real estate professionals have been using traditional photography to achieve various purposes, such as the following:

  • Capture before and after photos to document real estate construction sites.
  • Create marketing materials such as business cards, site signage, flyers, and brochures
  • Identify leaks, cracks, and other possible problems for maintenance and inspection purposes
  • Provide references of both the site and its nearby surroundings for renovation projects

While there is no doubt that traditional photography has always been a big help, it continues to have several notable limitations, such as:

Accessibility concerns

Physical obstacles might hamper traditional photography, as they can prevent or even make it impossible for the photographer to get near the subject. For example, it can be tricky to capture photos of exterior walls and other inaccessible landscapes for crack or leak inspections.

Issues with automation

Traditional photography requires a high level of skill to make manual adjustments like ISO, speed, shutter, and aperture. It also means the photographer must capture and process numerous images to reach the desired result.

Inability to capture bigger structures

It’s challenging to capture bigger structures like bridges and skyscrapers in just one frame using conventional photography.

Low light limitations

Low-light situations might pose another difficulty in traditional photography. They can make it hard to capture well-lit and clear images. The images might also lack detail in spots of high contrast, like shadows or bright skies.

Resolution problems

The resolution of traditional photography might be more limited than newer technologies, resulting in lower-quality images once enlarged or printed. It can also make it hard to produce large-scale prints or capture finer details in more complex scenes for architectural design firms.

Restricted perspectives

Traditional photography is also usually limited to perspectives on the ground level, making it hard to capture images of structures or buildings from the preferred angle.

RELATED: Cost breakdown for 3D rendering services: Pricing & rate highlights for 3D design services in 2025 & 2026

example of aerial rendering of a garden home and condominium by Cad Crowd experts

Drone photography and its role in the real estate industry

Now more than ever, drone photography is extensively used in the real estate industry for an extensive variety of purposes that remain unparalleled by traditional photography. Some good examples include:

  • Visualization and marketing: Drone photography offers a dynamic and unique perspective for more 3D options.
  • Progress follow-up: Use drone photography to document the entire project and have an immersive communication with stakeholders.
  • Safety: Cut down risks of injuries without needing personal access to dangerous areas.
  • Site inspections: Pinpoint cracks, leaks, and other potential problems in hard-to-reach spots.
  • Surveying: Capture more topographical data and develop 3D terrain models for bigger land areas.

All in all, drone photography offers a long list of benefits, such as improved accuracy, efficiency, and safety, which can then help improve project management, communication, and visualization.

The plight of drone photography

Context transforms artistic renders into photorealistic visuals that accurately portray buildings and structures. What seems to be trivial details, like the warmth of interior lights in nighttime renders, can significantly impact how a potential investor or client perceives an image.

In line with this and in the never-ending attempt to enhance the accuracy of 3D renders while boosting the value they offer, more and more 3D aerial rendering services are now harnessing the power of readily available UAV or Unmanned Aerial Vehicle platforms, more popularly called drones, to gain a more distinct vantage point of spans of land intended to be developed soon.

Back in the day, capturing aerial images of a place was only possible from helicopters or planes, both of which are associated with hefty rental price tags. Drones fitted with similar capabilities are now available for a cheaper cost, making aerial photography an easier and more affordable option.

In addition to capturing standard images or videos, drones also give 3D aerial rendering services access to software that lets them create accurate topographical maps of areas that will be developed soon, to add a whole new level of accuracy and context to the rendering.

Photogrammetry, or the science of using photographs to make measurements, is not a novel technique. The truth is that it has already been adapted for different applications, such as aerial photogrammetry by architectural design and rafting services.

With this particular application, the camera is mounted below a drone, helicopter, or plane and pointed at the ground. During numerous passes, several images of the area are taken, and these are processed using aerial photogrammetry software to determine the area’s topography. This data will be output in various formats according to the user’s specific needs.

There are numerous benefits associated with aerial photogrammetry, regardless of the applications.

For starters, drone photogrammetry can capture data in unsafe or difficult places for surveyors to reach, such as places with harsh weather conditions and difficult-to-navigate terrain. It helps reduce the risk of injuries.

Drones equipped with high-res cameras can also capture detailed and sharp photos. Enabling higher-end features also allows the equipment to provide extremely precise survey results.

aerial rendering of a garden fountain and sculpture and suburban housing zone by Cad Crowd design experts

RELATED: How to determine the quality of architectural 3D renderings with design services companies firms

How to use drone images to create 3D models

The best 3D aerial rendering services are experts in using drone images to create 3D models by 3D modeling experts. These professionals follow several steps to convert drone images into 3D maps or models.

These steps may include, but are not limited to the following:

  • Choose a drone with a high-quality camera: The accuracy and clarity of 3D models and maps will greatly depend on the quality of the images that the drone has captured during its flight.
  • Set up GCPs: GCPs, or Ground Control Points, are black-and-white points placed on the ground surrounding the survey site to function as reference points for the drone pilot. The pilot will easily identify the area that will be captured in the field according to the GCPs shown during the drone’s operation, which helps significantly reduce the risk of errors during the survey.
  • Get the camera and drone ready: Before the device takes off, it’s important to conduct a complete check and inspect everything again. The drone must have enough juice in its battery and sufficient storage space in the memory card. The camera aperture, shutter speed, and angle should also be set properly.
  • Stay updated with the weather report: Jeopardizing the equipment is the last thing you’d want to happen, so see to it that you will conduct the drone photography session during a sunny day. Avoid cloudy and rainy days. It’s also highly recommended and important to pick a time of day when there is good light, often around noontime.
  • Process the data with an appropriate 3D drone modeling software: 3D aerial rendering services use photogrammetry software to process the captured drone photos into 3D models. If they are not very skilled at processing the drone data themselves, they also sometimes outsource this stage of the process to a freelancer. Professional freelancers are more than capable of handling drone data and guaranteeing that the results will meet the project’s requirements and needs.

3D rendering services often perform several things to improve the accuracy of 3D models developed using drone images.

For one, they ensure that the aerial images will have an overlap of 60% to 70%, which here includes both the frontal overlap and lateral overlap. The recommended overlap for drone 3D mapping is to ensure that the triangulation process is more accurate by tracking similar points between the images.

Another thing they do is to ensure that the drone captures more details of the landscapes at various altitudes and angles so that there are more available data points. They also try to have the drone fly at much lower altitudes to capture clearer images.

RELATED: 12 important hiring tips for 3D rendering freelancers & 3D modeling service companies

How Cad Crowd can help

Search for trustworthy 3D aerial rendering services that know how to harness the potential of drone photography here at Cad Crowd. Contact us today, and let us make your work simpler!

author avatar

MacKenzie Brown is the founder and CEO of Cad Crowd. With over 18 years of experience in launching and scaling platforms specializing in CAD services, product design, manufacturing, hardware, and software development, MacKenzie is a recognized authority in the engineering industry. Under his leadership, Cad Crowd serves esteemed clients like NASA, JPL, the U.S. Navy, and Fortune 500 companies, empowering innovators with access to high-quality design and engineering talent.

Connect with me: LinkedInXCad Crowd

Eight Tips for Causing Maximum Chaos in Friends vs Friends From Day One


Summary

  • Friends vs Friends launches on Xbox Series X/S September 1.
  • Battle your friends and enemies in chaotic online multiplayer that combines shooting with deckbuilding.
  • Learn about the basics and the best cards and characters for beginners.

Hey fellow Xbox enjoyers! Today we announced that our chaotic online PVP shooter Friends vs Friends will be coming to Xbox Series X & S next week on the 1st September!

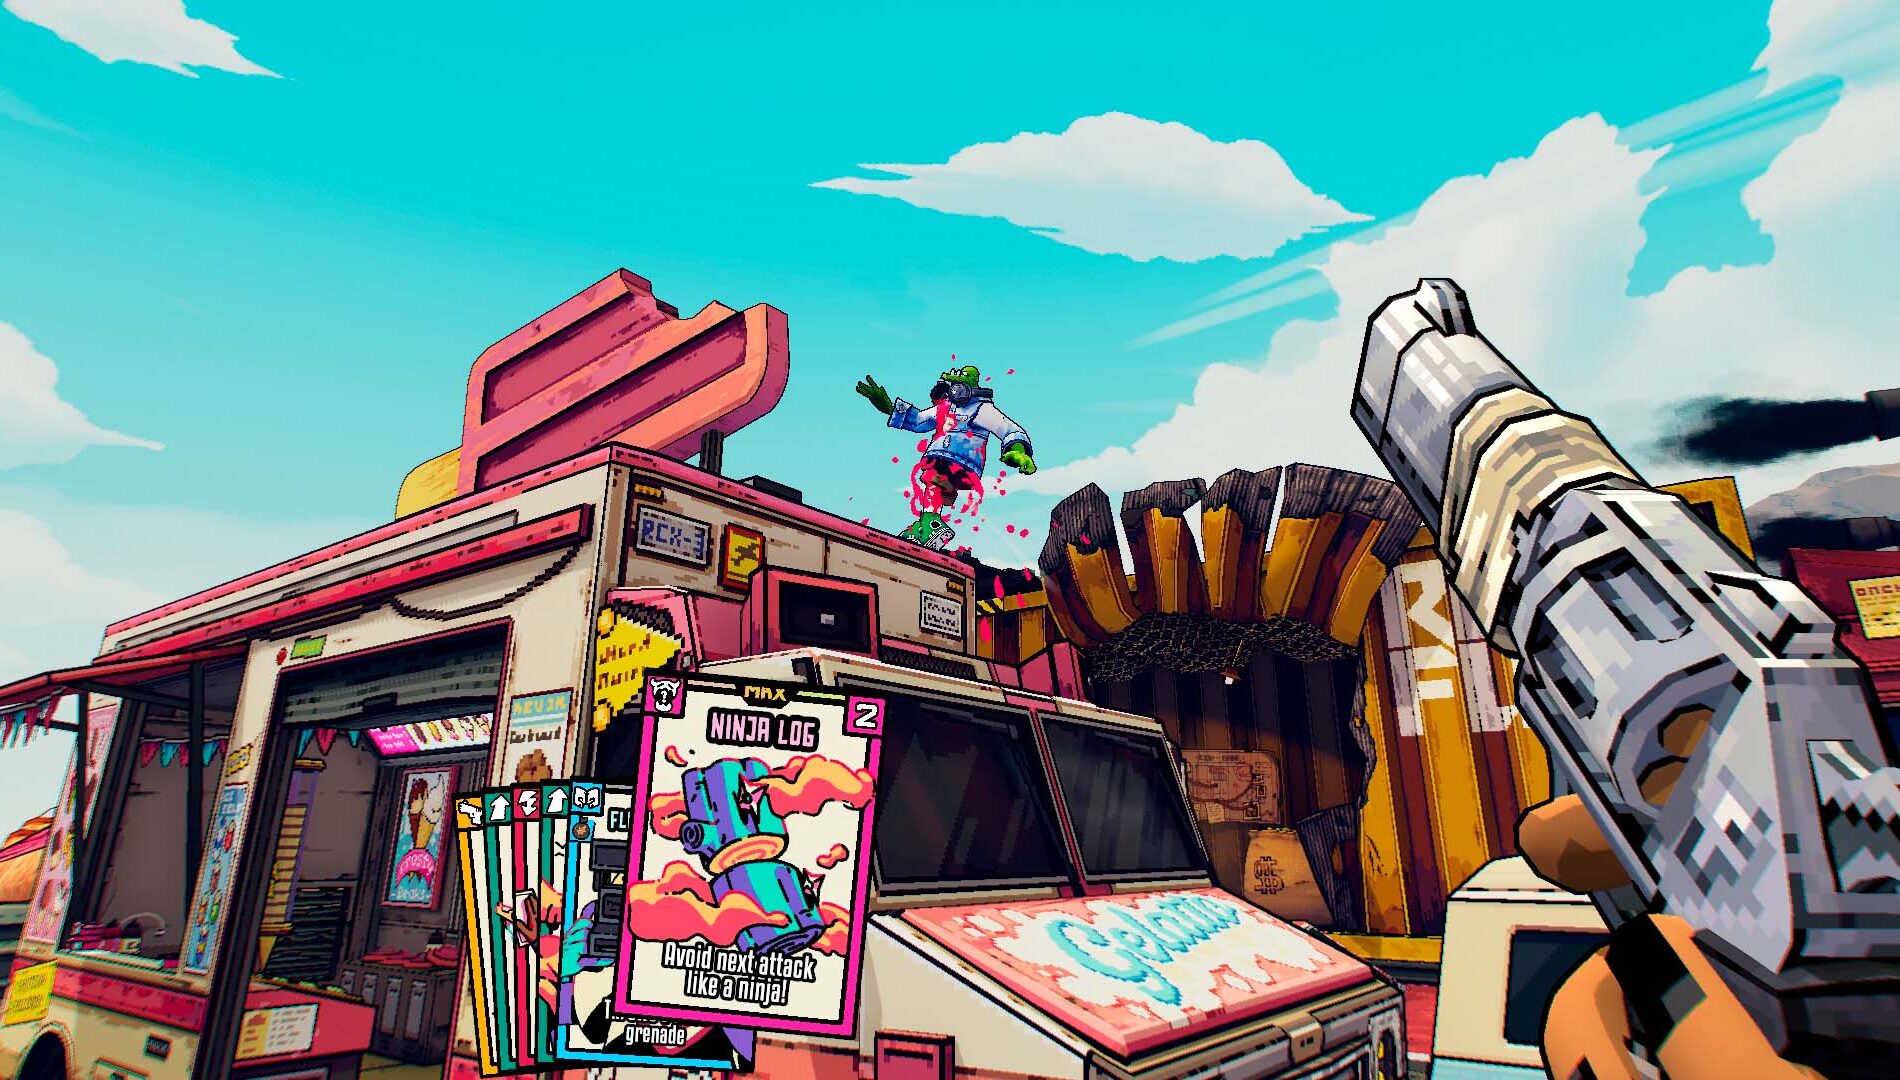
Friends vs Friends is a game that blends deck-building with first-person shooting. All at once. That can be exciting (or a bit overwhelming) at first, but if you keep reading, you might just get an edge over your friends!

How to Play

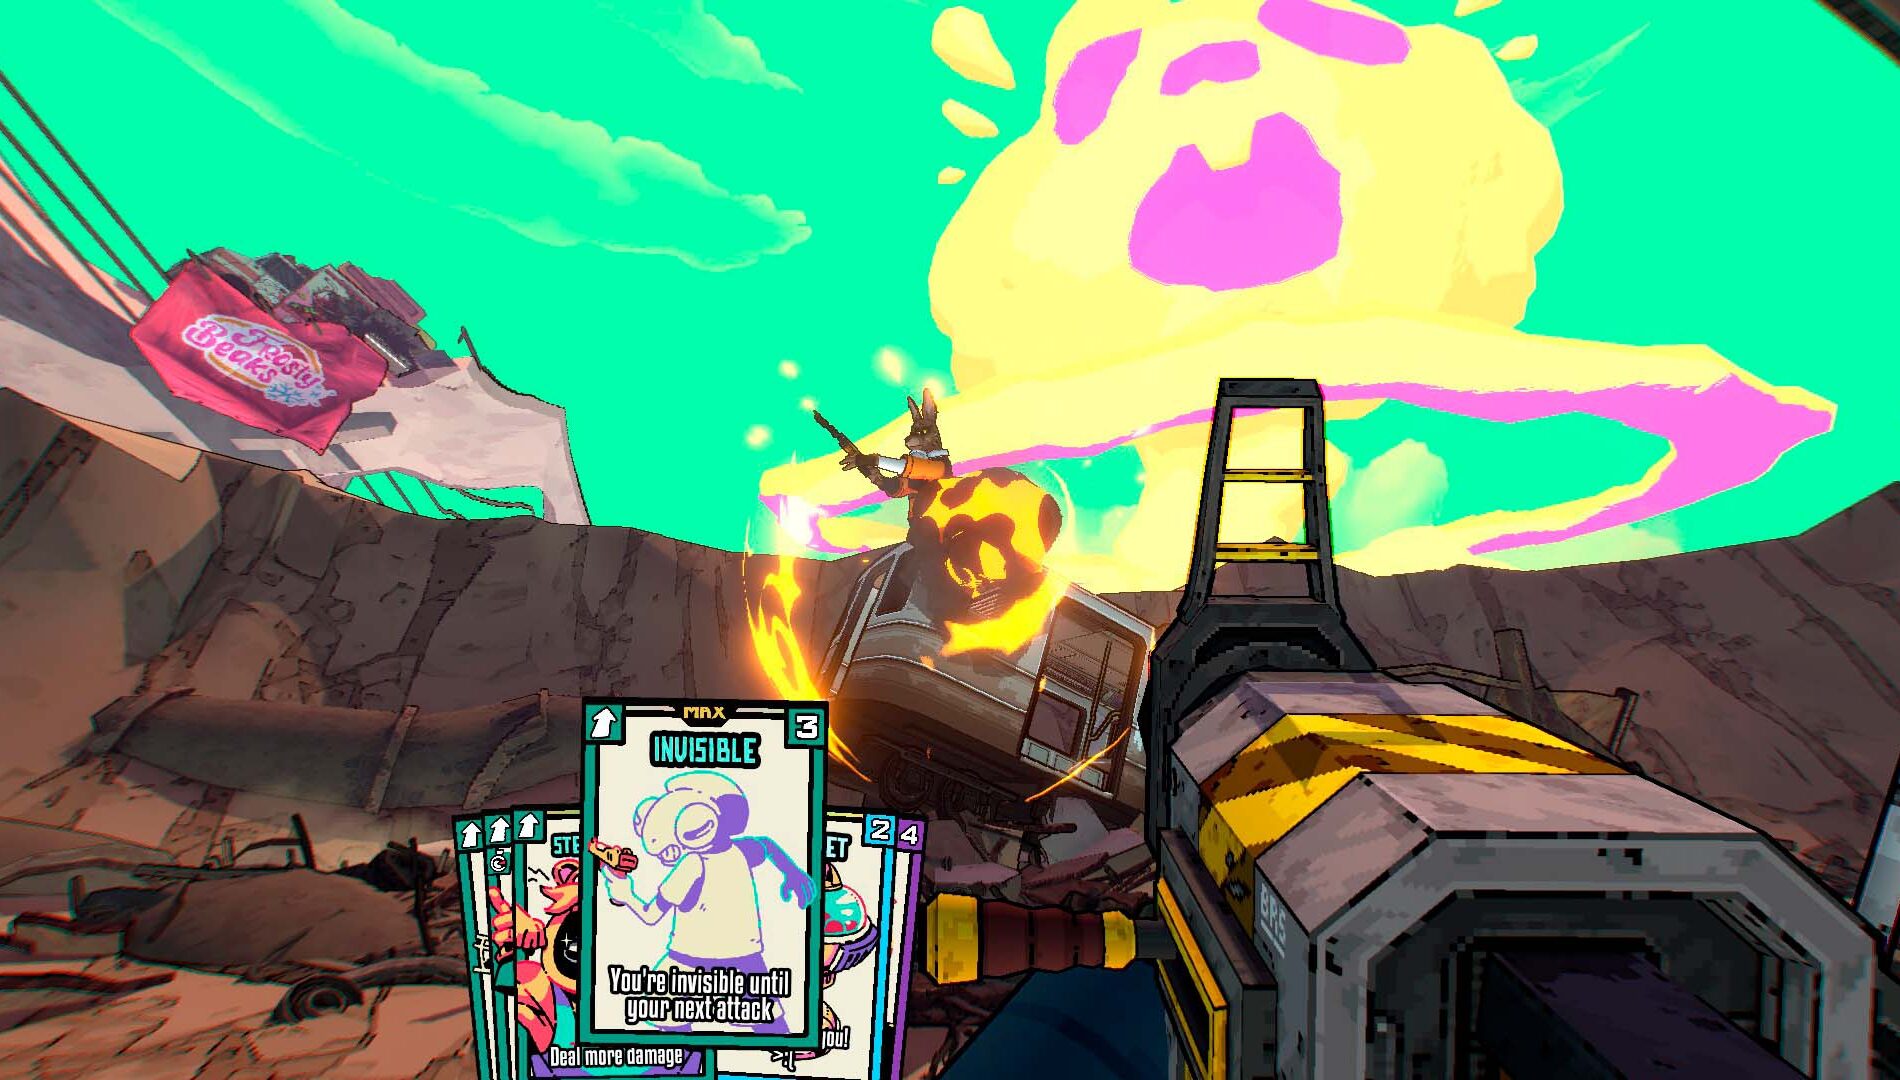
Each game of Friends vs Friends is played in rounds. At the start of each round, you’re dealt cards that can modify your abilities or sabotage your opponent’s. Once the round begins, you can use these cards without any restrictions until one player is defeated: either through card effects or with good old-fashioned guns (it’s still a first-person shooter, after all).

When a round ends, new cards are dealt and added to any unused ones you still have. Rounds continue until one player wins three times.

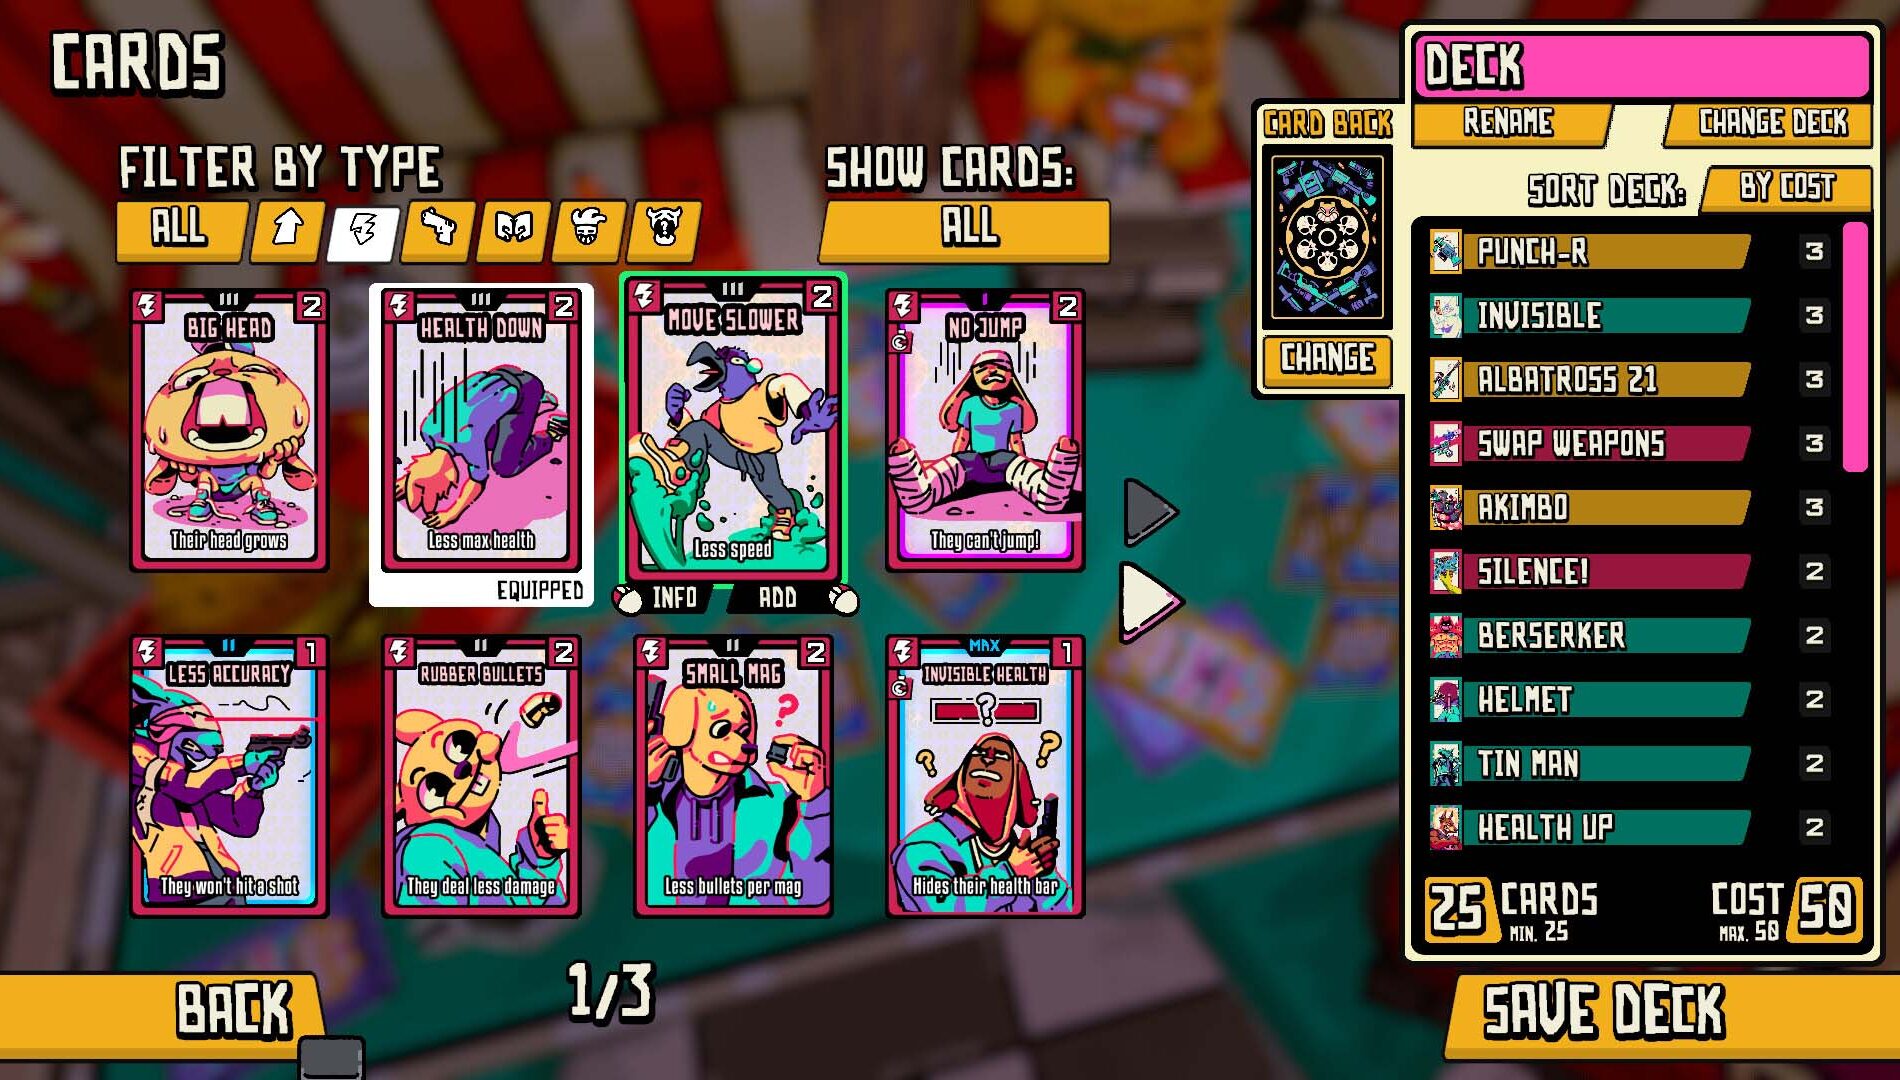
The cards you draw depend on your personal deck, which you can edit in the in-game menu located in Buddy’s Boulevard. All cards are accessible without spending real money – in fact, you can’t spend money on gameplay-related content at all. We’ve done this to keep the game as fair as possible.

Friends v friends screenshot

Best Cards for Beginners

The starter deck is as balanced as we could make it and gives you a good taste of the variety of strategies the game offers. Once you start earning booster packs with new cards, just experiment! Think about how two cards could work together, look for counters to cards you often face, and most importantly have fun. Don’t stress too much about “optimal” play.

However, the “Big Head” card in particular is a great choice for beginners. Use this one and you’ll be firing off some headshots straight from the get-go!

Best Characters for Beginners

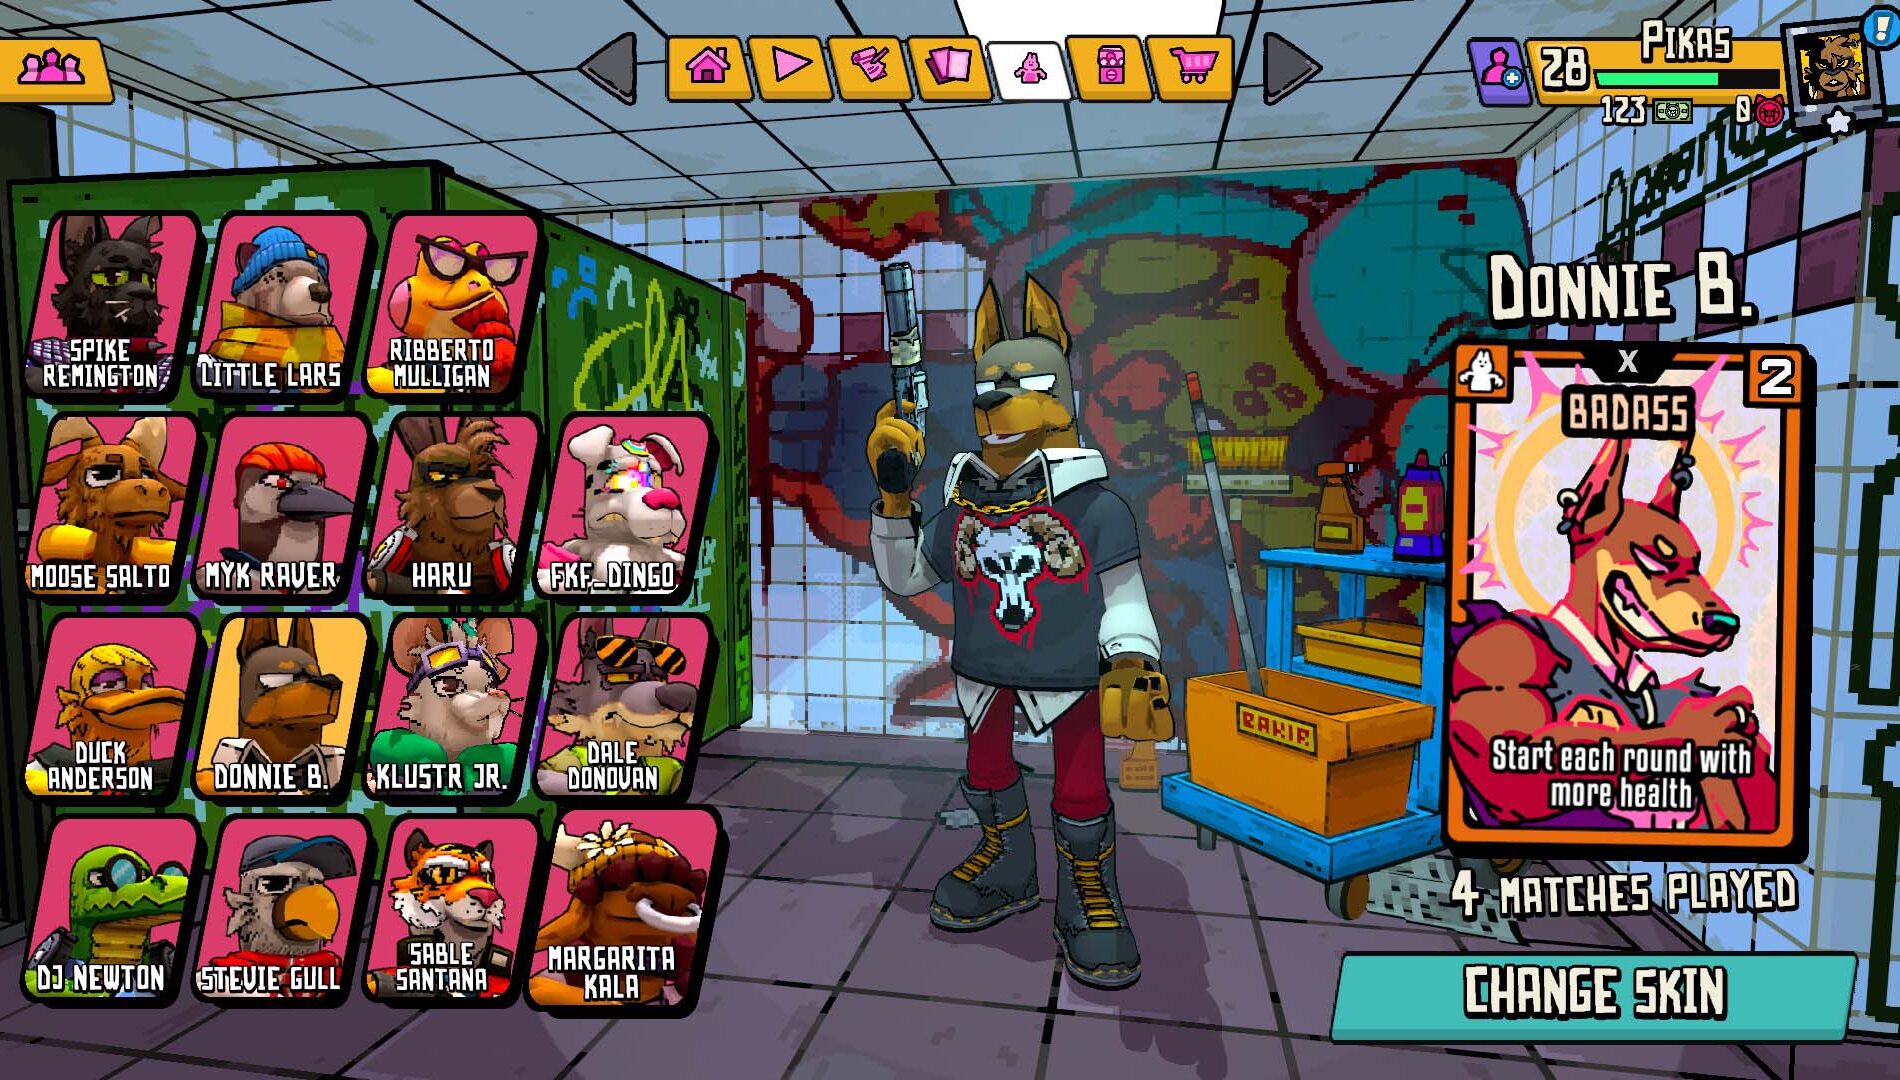
Most of the starting characters are distinct enough to feel unique. The rest unlock naturally as you play (again, there’s no payment system for this, every character is available to everyone, simply by playing).

That said, Spike Remington hits the hardest (literally Spike deals more damage than the others.)

Friends v friends screenshot

Best Cards for Seasoned Players

As mentioned earlier, there are no truly overpowered cards, but certain synergies can put even the most experienced player on the ropes. We’re not going to list those combos here—that’s part of the fun to discover – but here’s our main tip: think of your deck as a whole rather than just a collection of individual, unrelated cards.

Cards also improve when you get duplicates of the same one. The more you play, the better their stats become. This progression is subtle and absolutely not game-breaking, we’re talking about percentage boosts only noticeable to very experienced players.

Map-Specific Tips

Maps in Friends vs Friends cover a range of styles, both visually and in terms of layout. Some are more open, others are tighter, but all are relatively small and quick to traverse. As with any shooter, mastering the maps is part of improving your game.

While they aren’t overly complex, there are certain tendencies like the importance of holding high ground. Still, you can adapt to the map dynamically thanks to your cards. For example, playing a wall-generating card in a hallway can effectively block an access point.

Friends v friends screenshot

How to Level Up Quickly

Play. Have fun. And if you lose, hit “rematch” and learn from opponents who seem more skilled. The penalties for losing are very low in this game, so it’s always worth observing when and how experienced players use their cards.

As developers, we’ve learned a lot just from watching people play our game.

(This advice might actually help you level up your IQ as much as your profile level.)

How to Upgrade Cards

Just open card packs (never by paying real money) and hope for the best. There’s also a machine in the basement of the HUB designed to help complete your collection in the late game—so it’s not all RNG.

Friends v friends screenshot

How to Get the Best Cosmetics

Complete missions—and yes, buying DLC helps too. We have several paid add-on packs that purely add cosmetic items, including new weapon skins and some awesome character outfits. So please, Buy Buy Buy… just kidding.

How to End this Post

If you’ve made it this far, thank you for taking the time to learn about our game. Friends vs Friends is a bit unusual in many ways, and we hope you enjoy it as much as we struggled to develop it.

We’ve mentioned several times that there’s no way to access playable content through real-world transactions because, for us, this was a core design principle. It might sound like a small thing, but it’s important to us.

Thanks again for reading. Have a great day!! <3

Friends vs Friends

Raw Fury


Play 1v1 or 2v2 in online, fast-paced, chaotic combat! Gain player levels, get new cards, improve the ones you already have, and get to know an array of eclectic characters with their own unique passive skills. The best part? At this price, you can invite all of your friends to get wrecked, guilt-free!

●Friends vs Friends: Matchmake with players worldwide in 1v1 or 2v2 combat, or host private matches with your friends. Need Support? Invite your friends to spectate!
●A Game with Character: Choose from a stylish cast of characters, each with their own abilities that improve the synergies of your deck.
●Low Price + High Quality = How?!: In order to keep the crew together, we made sure to level the playing field on cost so jumping in is a big-brain move.
●Progress to Impress: Level up and get new cards through matched bouts and timed challenges.
●Stack Your Deck: Collect weapon, trap, and curse cards, then level them up to increase their power.
●Updates and Seasonal Content: Expect post-launch content including new unique characters, cards, maps, and upgrades to your home base.
●Play Dress-up: Unlock cool cosmetics like skins and card design variants for bragging rights!
●Practice, Practice, Practice: Go up against bots to try out new card combos and improve your skills for when it counts.

I installed Google Journal on my Samsung, and you should too


google journal on samsung phone 1

Andy Walker / Android Authority

Google rolled out many new software features and apps with the Pixel 10, including a new diary app called Journal. While it’s believed to be exclusive to the new phone line, that’s not entirely true. I downloaded the APK and installed it on my Samsung Galaxy phone without much trouble. If you’re looking for a simple, immediate journal app, I suggest you try it on your phone too.

Do you plan on using Pixel Journal?

1046 votes

How to install Google Journal on a non-Pixel phone

google journal apkmirror 1

Andy Walker / Android Authority

For many, Google Journal isn’t visible on the Play Store, but it comes preinstalled on Pixel 10 devices. However, it’s not locked to Google devices even if it uses on-device Gemini Nano to unleash its full potential. It can therefore run on phones from other manufacturers. To install it, follow these steps:

  1. Before you can install Google Journal, you’ll need a split APK installer. Since we’re grabbing the APK file from APK Mirror, you may as well use APKMirror Installer. Download it from the Play Store at the link.
  2. Next, open your web browser. Visit the Google Journal listing on APK Mirror and hit the orange Download APK bundle icon.
  3. Now, open APKMirror Installer > Browse files, go to your Download folder, and you’ll find the Journal installation file with a green APKM logo beneath it. Select it, then tap Install package.
  4. APKMirror Installer does have ads, unfortunately. So you can either subscribe to remove the ads or Watch ad and install app. I recommend the latter.
  5. After the ad completes, a pop-up will appear asking if you want to install Journal. Choose Install.
  6. Once the app is installed, tap Open app to get journaling.

Don’t want to miss the best from Android Authority?

Without the AI, Google Journal nails the basics

google journal on samsung phone 2

Andy Walker / Android Authority

If there’s one thing Google Journal does well, it’s the basics. That might not sound positive, but let me explain. Google emphasizes the app’s AI features, but many are limited to the Pixel 10. On other phones, the absence of these features is actually beneficial.

My colleague Joe mentioned in a recent opinion that this AI feature, which creates writing prompts based on past entries, activity data, and photos, is why he won’t use the app. This feature uses Gemini Nano on-device and currently only works on the Pixel 10. You don’t have this AI issue on non-Pixel devices.

Using Google Journal on a Samsung phone is an AI-free experience.

Sure, Google Journal is as simple as a pigeon nest, but I see this as a positive. While more powerful diary apps have habit-tracking, multi-journals, and universal availability, these features can be overwhelming. Even Notion and Obsidian can feel excessive when I want to jot down a few thoughts. Journal’s simplicity allows me to clear my head and just write.

google journal on samsung phone memories goals 1

Andy Walker / Android Authority

Of course, you can use Journal as a journal, but it has other potential uses. It could be a useful travel log, allowing you to include multiple photos and maps in an entry quickly. It could also work as a brain dump tool, a food log, or a more focused project record tool.

Overall, I think Google did a good job with Journal. It’s a fledgling app, but it looks great in its Material 3 Expressive design and offers pretty much everything I could want in a quick-fire journal app.

There are still better options for journaling on Android

Notion templates

Dhruv Bhutani / Android Authority

I might like Journal’s simplicity, but you might not. There are more established journaling options on Android if you need more features. For instance, Journal doesn’t have a voice note feature, which seems strange. It also lacks habit tracking, a feature many bullet journal enthusiasts consider essential.

Here are a few Google Journal alternatives (or useful partners) you might want to check out:

  • Habitica: Gamifying chores and tasks, Habitica encourages users to perform tasks and develop habits. It’s not strictly a journaling app, but complements an app like Journal really well.
  • Daylio: With a colorful interface and a focus on moods, Daylio helps connect daily activities with mental health. Like Journal, you can upload photos, select a mood, and write a brief entry.
  • Journey: Journey is like Journal all grown up, with more organizational features like tagging, a built-in mood tracker, and platform availability beyond Pixel devices.
  • Day One: If you need a collaborative journal shared with family or friends, Day One is a great option. It includes custom writing templates and a clean interface.
  • Notion: Not strictly a journaling app, Notion is highly adaptable and customizable. It offers dedicated journal templates with habit tracking options, or you can build your own.

If you don’t own a Pixel 10 phone, I suggest installing Journal. The app works well without its built-in AI features and gets to the core of journaling. This might be my way back into journaling, and I’m excited to see how Google develops and hopefully broadens the app’s availability in the coming years.

Thank you for being part of our community. Read our Comment Policy before posting.

Price, Specs, Benchmarks & Decision Guide


Summary: The NVIDIA H100 Tensor Core GPU is the workhorse powering today’s generative‑AI boom. Built on th¯e Hopper architecture, it packs unprecedented compute density, bandwidth, and memory to train large language models (LLMs) and power real‑time inference. In this guide, we’ll break down the H100’s specifications, pricing, and performance; compare it to alternatives like the A100, H200, and AMD’s MI300; and show how Clarifai’s Compute Orchestration platform makes it easy to deploy production‑grade AI on H100 clusters with 99.99% uptime.

Introduction—Why the NVIDIA H100 Matters in AI Infrastructure

The meteoric rise of generative AI and large language models (LLMs) has made GPUs the hottest commodity in tech. Training and deploying models like GPT‑4 or Llama 2 requires hardware that can process trillions of parameters in parallel. NVIDIA’s Hopper architecture—named after computing pioneer Grace Hopper—was designed to meet that demand. Launched in late 2022, the H100 sits between the older Ampere‑based A100 and the upcoming H200/B200. Hopper introduces a Transformer Engine with fourth‑generation Tensor Cores, support for FP8 precision and Multi‑Instance GPU (MIG) slicing, enabling multiple AI workloads to run concurrently on a single GPU.

Despite its premium price tag, the H100 has quickly become the de facto choice for training state‑of‑the‑art foundation models and running high‑throughput inference services. Companies from startups to hyperscalers have scrambled to secure supply, creating shortages and pushing resale prices north of six figures. Understanding the H100’s capabilities and trade‑offs is essential for AI/ML engineers, DevOps leads, and infrastructure teams planning their next‑generation AI stack.

What you’ll learn

  • A detailed look at the H100’s compute throughput, memory bandwidth, NVLink connectivity, and power envelope.
  • Real‑world pricing for buying or renting an H100, plus hidden infrastructure costs.
  • Benchmarks and use cases showing where the H100 shines and where it may be overkill.
  • Comparisons with the A100, H200, and alternative GPUs like the AMD MI300.
  • Guidance on total cost of ownership (TCO), supply trends, and how to choose the right GPU.
  • How Clarifai’s Compute Orchestration unlocks 99.99 % uptime and cost efficiency across any GPU environment.
GPU H100 Compute Orchestration

NVIDIA H100 Specifications – Compute, Memory, Bandwidth and Power

Before comparing the H100 to alternatives, let’s dive into its core specifications. The H100 is available in two form factors: SXM modules designed for servers using NVLink, and PCIe boards that plug into standard PCIe slots.

Compute performance

At the heart of the H100 are 16,896 CUDA cores and a Transformer Engine that accelerates deep‑learning workloads. Each H100 delivers:

  • 34 TFLOPS of FP64 compute and 67 TFLOPS of FP64 Tensor Core performance—critical for HPC workloads requiring double precision.
  • 67 TFLOPS of FP32 and 989 TFLOPS of TF32 Tensor Core performance.
  • 1,979 TFLOPS of FP16/BFloat16 Tensor Core performance and 3,958 TFLOPS of FP8 Tensor Core performance, enabled by Hopper’s Transformer Engine. FP8 allows models to run faster with smaller memory footprints while maintaining accuracy.
  • 3,958 TOPS of INT8 performance for lower‑precision inference.

Compared to the Ampere‑based A100, which peaks at 312 TFLOPS (TF32) and lacks FP8 support, the H100 delivers 2–3× higher throughput in most training and inference tasks. NVIDIA’s own benchmarks show the H100 performs 3×–4× faster than the A100 on large transformer modelst.

Memory and bandwidth

Memory bandwidth is often the bottleneck for training large models. The H100 uses 80 GB of HBM3 memory delivering up to 3.35–3.9 TB/s of bandwidtht. It supports seven MIG instances, allowing the GPU to be partitioned into smaller, isolated segments for multi‑tenant workloads—ideal for inference services or experimentation.

Connectivity is handled via NVLink. The SXM variant offers 600 GB/s to 900 GB/s NVLink bandwidth depending on modet. NVLink allows multiple H100s to share data rapidly, enabling model parallelism without saturating PCIe. The PCIe version, however, relies on PCIe Gen5, offering up to 128 GB/s bidirectional bandwidth.

Power consumption and thermal design

The H100’s performance comes at a cost: the SXM version has a configurable TDP up to 700 W, while the PCIe version is limited to 350 W. Effective cooling—often water‑cooling or immersion—is necessary to sustain full power. These power demands drive up facility costs, which we discuss later.

SXM vs PCIe – Which to choose?

  • SXM: More bandwidth with NVLink, a full 700 W power budget, and it works best with NVLink-enabled servers like the DGX H100. Great for training with a lot of GPUs and a lot of data.
  • PCIe: easier to use in conventional servers, costs less and uses less power, but has less bandwidth. Good for workloads with only one GPU or inference when NVLink isn’t needed.

Hopper innovations

Hopper introduces several features beyond raw specs:

  • Transformer Engine: Dynamically switches between FP8 and FP16 precision, delivering higher throughput and lower memory usage while maintaining model accuracy.
  • Second‑generation MIG: Allows up to seven isolated GPU partitions; each partition has dedicated compute, memory and cache, enabling secure multi‑tenant workloads.
  • NVLink Switch System: Enables eight GPUs in a node to share memory space, simplifying model parallelism across multiple GPUs.
  • Secure GPU architecture: Our innovative GPU architecture brings a new level of security, ensuring that your intellectual property and data remain safe and sound.

The H100 brings a new level of speed and versatility, making it ideal for secure AI deployments across multiple users.

Price Breakdown – Purchasing vs. Renting the H100

The H100’s cutting‑edge hardware comes with a significant cost. Deciding whether to buy or rent depends on your budget, utilization and scaling needs.

Buying an H100

According to industry pricing guides and reseller listings:

  • H100 80 GB PCIe cards cost $25,000–$30,000 each.
  • H100 80 GB SXM modules are priced around $35,000–$40,000.
  • A fully configured server with eight H100 GPUs—such as the NVIDIA DGX H100—can exceed $300k, and some resellers list individual H100 boards for up to $120k during shortagest.
  • Jarvislabs notes that building multi‑GPU clusters requires high‑speed InfiniBand networking ($2k–$5k per node) and specialized power/cooling, adding to the total cost.

GPU H100 Cost Orchestration

Renting in the cloud

Cloud providers offer H100 instances on a pay‑as‑you‑go basis. Hourly rates vary widely:

Provider

Hourly Rate*

Northflank

$2.74/hr

Cudo Compute

$3.49/hr or $2,549/month

Modal

$3.95/hr

RunPod

$4.18/hr

Fireworks AI

$5.80/hr

Baseten

$6.50/hr

AWS (p5.48xlarge)

$7.57/hr for eight H100s

Azure

$6.98/hr

Google Cloud (A3)

$11.06/hr

Oracle Cloud

$10/hr

Lambda Labs

$3.29/hr

*Rates as of mid‑2025; actual costs vary by region and include variable CPU, RAM and storage allocations. Some providers bundle CPU/RAM into the GPU price; others charge separately.

Renting eliminates upfront hardware costs and provides elasticity, but long‑term heavy usage can surpass purchase costs. For example, renting an AWS p5.48xlarge (with eight H100s) at $39.33/hour amounts to $344,530/yeart. Buying a similar DGX H100 can pay for itself in about a year, assuming near‑continuous utilizationt.

Hidden costs and TCO

Beyond GPU prices, factor in:

  • Power and cooling: When you have a 700 W GPU multiplied across a cluster, it can really stretch the power budgets of the facility. The annual cost for cooling infrastructure in data centers can range from $1,000 to $2,000 per kilowatt.
  • Networking: Connecting multiple GPUs for training involves using InfiniBand or NVLink networks, which can be quite an investment, often running into thousands of dollars for each node.
  • Software and maintenance: When it comes to software and maintenance, MLOps platforms, observability, security, and continuous integration pipelines can lead to additional licensing expenses.
  • Downtime: When hardware fails or supply issues arise, projects can come to a halt, leading to costs that far exceed just the price of the hardware itself. Maintaining 99.99% uptime is essential for safeguarding your investments.

Grasping these costs allows for a clearer picture of the actual total cost of ownership and aids in making an informed choice between buying or renting H100 hardware.

Performance in the Real World – Benchmarks and Use Cases

How does the H100 translate specs into real‑world performance? Let’s explore benchmarks and typical workloads.

Training and inference benchmarks

Large Language Models (LLMs): NVIDIA’s benchmarks show the H100 delivers 3×–4× faster training and inference compared with the A100 on transformer‑based modelst. OpenMetal’s testing shows H100 can generate 250–300 tokens per second on 13 B to 70 B parameter models, while A100 outputs ~130 tokens/s.

HPC workloads: In non‑transformer tasks like Fast Fourier Transforms (FFT) and lattice quantum chromodynamics (MILC), the H100 yields 6×–7× the performance of Ampere GPUst. These gains make the H100 attractive for physics simulations, fluid dynamics and genomics.

Real‑time applications: Thanks to FP8 and Transformer Engine support, the H100 excels in interactive AI—chatbots, code assistants and game engines—where latency matters. The ability to partition the GPU into MIG instances allows concurrent inference services with isolation, maximizing utilization.

Typical use cases

  • Training foundation models: Multi‑GPU H100 clusters train LLMs like GPT‑3, Llama 2 and custom generative models faster, enabling new research and products.
  • Inference at scale: Deploying chatbots, summarization tools or recommendation engines requires high throughput and low latency; the H100’s FP8 precision and MIG support make it ideal.
  • High‑performance computing: Scientific simulations, drug discovery, weather prediction and finance benefit from the H100’s double‑precision capabilities and high bandwidth.
  • Edge AI & robotics: While power‑hungry, smaller MIG slices allow H100s to support multiple simultaneous inference workloads at the edge.

These capabilities explain why the H100 is in such high demand across industries.

H100 vs. A100 vs. H200 vs. Alternatives

Choosing the right GPU involves comparing the H100 to its siblings and competitors.

  • Memory: A100 offers 40 GB or 80 GB HBM2e; H100 uses 80 GB HBM3 with 50 % higher bandwidth.
  • Performance: H100’s Transformer Engine and FP8 precision deliver 2.4× training throughput and 1.5–2× inference performance over A100.
  • Token throughput: H100 processes 250–300 tokens/s vs A100’s ~130 tokens/s.
  • Price: A100 boards cost ~$15k–$20k; H100 boards start at $25k–$30k.

H100 vs H200

  • Memory capacity: H200 is the first NVIDIA GPU with 141 GB HBM3e and 4.8 TB/s bandwidth—1.4× more memory and ~45 % more tokens per second than H100t.
  • Power and efficiency: H200’s power envelope remains 700 W but features improved cores that cut operational power costs by 50 %t.
  • Pricing: H200 starts around $31k, only 10–15 % higher than H100, but may reach $175k in high‑end serverst. Supply is limited until shipments ramp up in 2024.

H100 vs L40S

  • Architecture: L40S uses Ada Lovelace architecture and targets inference and rendering. It offers 48 GB of GDDR6 memory with 864 GB/s bandwidth—lower than H100.
  • Ray‑tracing: L40S features ray‑tracing RT cores, making it ideal for graphics workloads, but it lacks the high HBM3 bandwidth for large model training.
  • Inference performance: The L40S claims 5× higher inference performance than A100, but without the memory capacity and MIG partitioning of H100.

AMD MI300 and other alternatives

AMD’s MI300A/MI300X combine CPU and GPU in a single package, offering an impressive 128 GB of HBM3 memory. They offer a commitment to high bandwidth and energy efficiency. However, they depend on the ROCm software stack, which currently has less maturity and ecosystem support compared to NVIDIA CUDA. For certain tasks, MI300 might provide a more favorable price-performance ratio, though adapting models could present some difficulties. There are also alternatives like Intel Gaudi 3 and unique accelerators such as Cerebras Wafer‑Scale Engine or Groq LPU, though these are designed for specific applications.

Emerging Blackwell (B200)

NVIDIA’s Blackwell architecture (B100/B200) is said to potentially offer double the memory and bandwidth compared to the H200, with anticipated release dates set for 2025. We may experience some initial limitations in supply. For now, the H100 continues to be the go-to option for cutting-edge AI tasks.

Factors to consider in decision-making

  •  Workload size: For models with around 20 billion parameters or less, or if your throughput requirements aren’t too high, the A100 or L40S could be a good fit. For larger models or high throughput workloads, the H100 or H200 is the way to go.
  • Budget:When considering your options, the A100 stands out as the more budget-friendly choice, while the H100 delivers superior performance for each watt used. On the other hand, the H200 offers a level of future-proofing, though it comes at a slightly higher price point.
  • Software ecosystem: CUDA remains the dominant platform; AMD’s ROCm has improved but lacks the maturity of CUDA; consider vendor lock‑in.
  • Supply: A100s are readily available; H100s are still scarce; H200s may be backordered; plan procurement accordingly.

Total Cost of Ownership – Beyond the GPU Price

Buying or renting GPUs is only one line item in an AI budget. Understanding TCO helps avoid sticker shock later.

Power and cooling

Running eight H100s at 700 W each consumes more than 5.6 kW. Data centers charge for power consumption and cooling; cooling alone can add $1,000–$2,000 per kW per year. Advanced cooling solutions (liquid, immersion) raise capital costs but reduce operating costs by improving efficiency.

Networking and infrastructure

Efficient training at scale relies on InfiniBand networks that offer minimal latency. Every node might require an InfiniBand card and switch port, costing between $2k and $5k. NVLink connections between nodes can achieve speeds of up to 900 GB/s, yet they still depend on dependable network backbones.

Elements like rack space, uninterruptible power supplies, and facility redundancy play a significant role in total cost of ownership. Think about the choice between colocation and constructing your own data center. While colocation providers often offer essential features like cooling and redundancy, they do come with monthly fees.

Software and integration

Although CUDA is available at no cost, creating a comprehensive MLOps stack involves various components such as dataset storage, distributed training frameworks like PyTorch DDP and DeepSpeed, experiment tracking, model registry, as well as inference orchestration and monitoring. Licensing commercial MLOps platforms and investing in support contributes to the overall cost of ownership. Teams should also consider allocating resources for DevOps and SRE professionals to effectively oversee their infrastructure.

Downtime and reliability

A single server crash or a network misconfiguration can bring model training to a standstill.. For customer‑facing inference endpoints, even minutes of downtime can mean lost revenue and reputational damage. Achieving 99.99 % uptime means planning for redundancy, failover and monitoring.

That’s where platforms like Clarifai’s Compute Orchestration help—by handling scheduling, scaling and failover across multiple GPUs and environments. Clarifai’s platform uses model packing, GPU fractioning and autoscaling to reduce idle compute by up to 3.7× and maintains 99.999 % reliability. This means fewer idle GPUs and less risk of downtime.

Real‑World Supply, Availability and Future Trends

Market dynamics

Since mid‑2023, the AI industry has been gripped by a GPU shortage. Startups, cloud providers and social media giants are ordering tens of thousands of H100s; reports suggest Elon Musk’s xAI ordered 100,000 H200 GPUst. Export controls have restricted shipments to certain regions, prompting stockpiling and grey markets. As a result, H100s have sold for up to $120k each and lead times can extend months.

H200 and beyond

NVIDIA began shipping H200 GPUs in 2024, featuring 141 GB HBM3e memory and 4.8 TB/s bandwidth. Although just 10–15% more expensive than H100, H200’s improved energy efficiency and throughput make it attractive. However, supply will remain limited in the near term. Blackwell (B200) GPUs, expected in 2025, promise even larger memory capacities and more advanced architectures.

Alternative accelerators

AMD’s MI300 series and Intel’s Gaudi 3 provide competition, as do specialized chips like Google TPUs and Cerebras Wafer‑Scale Engine. Cloud‑native GPU providers like CoreWeave, RunPod and Cudo Compute offer flexible access to these accelerators without long‑term commitments.

Future‑proofing your purchase

Given supply constraints and rapid innovations, many organizations adopt a hybrid strategy: rent H100s initially to prototype models, then transition to owned hardware once models are validated and budgets are secured. Leveraging an orchestration platform that spans cloud and on‑premises hardware ensures portability and prevents vendor lock‑in.

How to Choose the Right GPU for Your AI/ML Workload

Selecting a GPU involves more than reading spec sheets. Here’s a step‑by‑step process:

  1. Define your workload: Determine whether you need high‑throughput training, low‑latency inference or HPC. Estimate model parameters, dataset size and target tokens per second.
  2. Estimate memory requirements: LLMs with 10 B–30 B parameters typically fit on a single H100; larger models require multiple GPUs or model parallelism. For inference, MIG slices may suffice.
  3. Set budget and utilization targets: If your GPUs will be underutilized, renting might make sense. For round‑the‑clock use, purchase and amortize costs over time. Use TCO calculations to compare.
  4. Evaluate software stack: Ensure your frameworks (e.g., PyTorch, TensorFlow) support the target GPU. If considering AMD MI300, plan for ROCm compatibility.
  5. Consider supply and delivery: Assess lead times and plan procurement early. Factor in datacenter availability and power capacity.
  6. Plan for scalability and portability: Avoid vendor lock‑in by using an orchestration platform that supports multiple hardware vendors and clouds. Clarifai’s compute platform lets you move workloads between public clouds, private clusters and edge devices without rewriting code.

By following these steps and modeling scenarios, teams can choose the GPU that offers the best value and performance for their application.


Clarifai’s Compute Orchestration—Maximizing ROI with AI‑Native Infrastructure

Clarifai isn’t just a model provider—it’s an AI infrastructure platform that orchestrates compute for model training, inference and data pipelines. Here’s how it helps you get more out of H100 and other GPUs.

Unified control across any environment

Clarifai’s Compute Orchestration offers a single control plane to deploy models on any compute environment—shared SaaS, dedicated SaaS, self‑managed VPC, on‑premise or air‑gapped environments. You can run H100s in your own data center, burst to public cloud or tap into Clarifai’s managed clusters without vendor lock‑in.

AI‑native scheduling and autoscaling

The platform includes advanced scheduling algorithms like GPU fractioning, continuous batching and scale‑to‑zero. These techniques pack multiple models onto one GPU, reduce cold‑start latency and cut idle compute. In benchmarks, model packing reduced compute usage by 3.7× and supported 1.6 M inputs per second while achieving 99.999 % reliability. You can customize autoscaling policies to maintain a minimum number of nodes or scale down to zero during off‑peak hours.

Cost transparency and control

Clarifai’s Control Center offers a comprehensive view of how compute resources are being used and the associated costs. It monitors GPU expenses across various cloud platforms and on-premises clusters, assisting teams in making the most of their budgets. Take control of your spending by setting budgets, getting alerts, and fine-tuning policies to reduce waste.

Enterprise‑grade security

Clarifai ensures that your data is secure and compliant with features like private VPC deployment, isolated compute planes, detailed access controls, and encryption. Air-gapped setups allow sensitive industries to operate models securely, keeping them disconnected from the internet.

Developer‑friendly tools

Clarifai provides a web UI, CLI, SDKs and containerization to streamline model deployment. The platform integrates with popular frameworks and supports local runners for offline testing. It also offers streaming APIs and gRPC endpoints for low‑latency inference.

By combining H100 hardware with Clarifai’s orchestration, organizations can achieve 99.99 % uptime at a fraction of the cost of building and managing their own infrastructure. Whether you’re training a new LLM or scaling inference services, Clarifai ensures your models never sleep—and neither should your GPUs.

Conclusion & FAQs – Putting It All Together

The NVIDIA H100 delivers a remarkable leap in AI compute power, with 34 TFLOPS FP64, 3.35–3.9 TB/s memory bandwidth, FP8 precision and MIG support. It outperforms the A100 by 2–4× and enables training and inference workloads previously reserved for supercomputers. However, the H100 is expensive—$25k–$40k per card—and demands careful planning for power, cooling and networking. Renting via cloud providers offers flexibility but may cost more over time.

Alternatives like H200, L40S and AMD MI300 introduce more memory or specialized capabilities but come with their own trade‑offs. The H100 remains the mainstream choice for production AI in 2025 and will coexist with the H200 for years. To maximize return on investment, teams should evaluate total cost of ownership, plan for supply constraints and leverage orchestration platforms like Clarifai Compute to maintain 99.99 % uptime and cost efficiency.

Frequently Asked Questions

Is the H100 still worth buying in 2025?
Yes. Even with H200 and Blackwell on the horizon, H100s offer substantial performance and are readily integrated into existing CUDA workflows. Supply is improving, and prices are stabilizing. H100s remain the backbone of many hyperscalers and will be supported for years.

Should I rent or buy H100 GPUs?
If you need elasticity or short‑term experimentation, renting makes sense. For production workloads running 24/7, purchasing or colocating H100s often pays off within a yeart. Use TCO calculations to decide.

How many H100s do I need for my model?
It depends on model size and throughput. A single H100 can handle models up to ~20 B parameters. Larger models require model parallelism across multiple GPUs. For inference, MIG instances allow multiple smaller models to share one H100.

What about H200 or Blackwell?
H200 offers 1.4× the memory and bandwidth of H100t and can reduce power bills by up to 50 %t. However, supply is limited until 2024–2025, and costs remain high. Blackwell (B200) will push boundaries further but is likely to be scarce and expensive initially.

How does Clarifai help?
Clarifai’s Compute Orchestration abstracts away GPU provisioning, providing serverless autoscaling, cost monitoring and 99.99 % uptime across any cloud or on‑prem environment. This frees your team to focus on model development rather than infrastructure.

Where can I learn more?
Explore the NVIDIA H100 product page for detailed specs. Check out Clarifai’s Compute Orchestration to see how it can transform your AI infrastructure.


c# – Visual Studio silently reverts mstest package versions


With

Microsoft Visual Studio Community 2022, Version 17.14.12
VisualStudio.17.Release/17.14.12+36408.4
Microsoft .NET Framework
Version 4.8.09032

and this simple mstest project content:

<Project Sdk="MSTest.Sdk/3.6.4">
  <PropertyGroup>
    <TestingPlatformShowTestsFailure>true</TestingPlatformShowTestsFailure>
    <TestingExtensionsProfile>AllMicrosoft</TestingExtensionsProfile>
  </PropertyGroup>

  <ItemGroup>
    <PackageReference Update="MSTest.Analyzers" Version="3.10.3">
      <PrivateAssets>all</PrivateAssets>
      <IncludeAssets>runtime; build; native; contentfiles; analyzers; buildtransitive</IncludeAssets>
    </PackageReference>
  </ItemGroup>

  <ItemGroup>
    <PackageReference Update="MSTest.TestAdapter" Version="3.10.3" />
  </ItemGroup>

  <ItemGroup>
    <PackageReference Update="MSTest.TestFramework" Version="3.10.3" />
  </ItemGroup>
</Project>

I have a dual environmental/build problem. It looks like NuGet package manager has successfully upgraded my references to MSTest to 3.10.3 as above as well as the following output:

Successfully uninstalled 'Microsoft.ApplicationInsights 2.22.0' from Tests
Successfully uninstalled 'Microsoft.Testing.Extensions.Telemetry 1.4.3' from Tests
Successfully uninstalled 'Microsoft.Testing.Extensions.TrxReport.Abstractions 1.4.3' from Tests
Successfully uninstalled 'Microsoft.Testing.Extensions.VSTestBridge 1.4.3' from Tests
Successfully uninstalled 'Microsoft.Testing.Platform 1.4.3' from Tests
Successfully uninstalled 'Microsoft.Testing.Platform.MSBuild 1.4.3' from Tests
Successfully uninstalled 'Microsoft.TestPlatform.ObjectModel 17.11.1' from Tests
Successfully uninstalled 'MSTest.Analyzers 3.6.4' from Tests
Successfully uninstalled 'MSTest.TestAdapter 3.6.4' from Tests
Successfully uninstalled 'MSTest.TestFramework 3.6.4' from Tests
Successfully installed 'Microsoft.ApplicationInsights 2.23.0' to Tests
Successfully installed 'Microsoft.Testing.Extensions.Telemetry 1.8.3' to Tests
Successfully installed 'Microsoft.Testing.Extensions.TrxReport.Abstractions 1.8.3' to Tests
Successfully installed 'Microsoft.Testing.Extensions.VSTestBridge 1.8.3' to Tests
Successfully installed 'Microsoft.Testing.Platform 1.8.3' to Tests
Successfully installed 'Microsoft.Testing.Platform.MSBuild 1.8.3' to Tests
Successfully installed 'Microsoft.TestPlatform.AdapterUtilities 17.13.0' to Tests
Successfully installed 'Microsoft.TestPlatform.ObjectModel 17.13.0' to Tests
Successfully installed 'MSTest.Analyzers 3.10.3' to Tests
Successfully installed 'MSTest.TestAdapter 3.10.3' to Tests
Successfully installed 'MSTest.TestFramework 3.10.3' to Tests

…but in the dependencies / packages UI, it only temporarily shows that and then reverts to the following once I run the tests:

Packages

I need to solve that problem because it’s my best guess as to the cause of the following behaviour. In test classes, this:

using Microsoft.VisualStudio.TestTools.UnitTesting;
using System;
using System.Collections.Generic;

// ...
Assert.IsLessThan(upperBound: 1e-2, value: error);

fails with

Error CS0117: ‘Assert’ does not contain a definition for ‘IsLessThan’

despite the fact that (1) Visual Studio temporarily was able to find that method via IntelliSense, and (2) that method is clearly documented here:

Assert.IsLessThan(T, T, String) Method

I have no idea what’s going on. As a wild guess informed by MSTest refuses to run 64-bit? , I’ve tried switching from x64 to Any CPU but the behaviour has not changed.

DJI-Owned Hasselblad Releases First Mirrorless Camera with LiDAR Autofocus


The new Hasselblad X2DII may be expensive, but it brings a number of technological innovations.

Credit: Hasselblad

LiDAR autofocus for consumer cameras has been around for a few years, but until now, DJI‘s only involvement with the technology has been the awkward, expensive, and only somewhat useful accessory called the Focus Pro. This week, Hasselblad, a high-end camera manufacturer owned by DJI, unveiled a world-first mirrorless camera with integrated LiDAR autofocus.

Let’s talk about exactly why that’s different, and what it means for camera tech in the future.

Fast and accurate camera autofocus is a harder problem than most people realize. After all, for a camera’s sensor to “see” a scene and adjust the focus accordingly, light has to have already entered the camera from that scene. (How do you stay ahead of motion if that motion has to have already happened?) Even worse, just seeing that an image is out of focus is only part of the job; if you know you’re 6 inches off of focus, how do you know whether you need to focus 6 inches closer to the lens, or 6 inches further away?

Modern mirrorless cameras have on-sensor technologies like “phase detection” to answer this question, but the results have taken years of development and still provide only partial solutions.

Below, you can see a user setting up an earlier version of DJI’s LiDAR autofocus system.

But what if the camera didn’t have to infer distance from the minute details of the image, and could instead interrogate the world directly, building a physical map of the space in front of it? That’s what LiDAR autofocus promises.

Put simply, the technology shoots low-powered, invisible laser light at the scene and performs time-of-flight calculations on any light that bounces back. It has a maximum range of a couple of dozen feet, but the camera also sports a regular autofocus system that can assist or take over when LiDAR isn’t usable.

There are a number of big advantages to this approach, especially for video.

One is that the LiDAR system’s refresh rate can be hundreds of hertz, which unlocks quick, responsive analysis of the scene that is totally independent of the sensor’s filming framerate; traditional video autofocus systems have suffered from worse performance at lower framerates due to the slower updates those frames provide.

Another advantage of LiDAR is the increased physical resolution, as the system can build a remarkably detailed 3D map of the objects in front of the lens. Not only does this increase the focusing system’s accuracy and decisiveness, but it also unlocks a remarkable new view-assist tool for manual focus work that provides a depth map showing the real, physical distances to objects in the scene.

Because LiDAR doesn’t collect passive light but rather light it produces itself, the system is also impervious to concerns about exposure; LiDAR autofocus can operate in pitch darkness or in badly overexposed outdoor scenarios.

We’ll have to wait a little longer for more in-depth reviews of the camera to arrive, with weeks or months spent with the new autofocus system. Though DJI has been working on this technology for years, this is the brand’s first time trying to work it right into a piece of consumer technology.

If the reception is good, the tech could be integrated into a wide variety of cameras relatively soon. DJI is in a business alliance with camera maker Panasonic, making it possible that future LUMIX cameras could integrate LiDAR autofocus as well.

Nvidia says two mystery customers accounted for 39% of Q2 revenue


Nearly 40% of Nvidia’s second quarter revenue came from just two customers, according to a filing with the Securities and Exchange Commission.

On Wednesday, the chipmaker reported record revenue of $46.7 billion during the quarter that ended on July 27 — a 56% year-over-year increase largely driven by the AI data center boom. However, subsequent reporting highlighted how much of that growth seems to be coming from just a handful of customers.

Specifically, Nvidia said that a single customer represented 23% of total Q2 revenue, while sales to another customer represented 16% of Q2 revenue. The filing does not identify either of these customers, only referring to them as “Customer A” and “Customer B.”

During the first half of the fiscal year, Nvidia says Customer A and Customer B accounted for 20% and 15% of total revenue, respectively. Four other customers accounted for 14%, 11%, another 11%, and 10% of Q2 revenue, the company says.

In its filing, the company says these are all “direct” customers — such as original equipment manufacturers (OEMs), system integrators, or distributors — who purchase their chips directly from Nvidia. Indirect customers, such as cloud service providers and consumer internet companies, purchase Nvidia chips from these direct customers.

In other words, it sounds unlikely that a big cloud provider like Microsoft, Oracle, Amazon, or Google might secretly be Customer A or Customer B — though those companies may be indirectly responsible for that massive spending.

In fact, Nvidia’s Chief Financial Officer Nicole Kress said that “large cloud service providers” accounted for 50% of Nvidia’s data center revenue, which in turn represented 88% of the company’s total revenue, according to CNBC.

Techcrunch event

San Francisco
|
October 27-29, 2025

What does this mean for Nvidia’s future prospects? Gimme Credit analyst Dave Novosel told Fortune that while “concentration of revenue among such a small group of customers does present a significant risk,” the good news is that “these customers have bountiful cash on hand, generate massive amounts of free cash flow, and are expected to spend lavishly on data centers over the next couple of years.”

Slay or Fall Free Download


Slay or Fall Pre-Installed Worldofpcgames

Slay or Fall Direct Download:

Slay or Fall is a text-based roguelike with management elements, in which you must overcome an impending foe within a set number of events. Playing as the Dark Lord, you are set to take control of an enormous Dungeon while brave heroes are coming to take your life! Use magic, scheme, and issue orders to your subordinates — just make sure to defeat the heroes before the final clash! The multifaceted text events contain numerous branches, with every choice you make having consequences that affect both the heroes and the player! Between events, you’ll need to engage in combat skirmishes and tackle political issues, where the player’s decisions also carry weight! DAVY x JONES

Under your dominion reside four factions: Goblins, Cultists, Lizards, and Ratfolks. Not all of them are pleased with your rule… Goblins – greedy and dishonorable creatures. Their sheer numbers and insatiable lust for profit fill your treasury with jingling coins. Cultists – your endlessly loyal subjects. Dark mages willing to stake their lives for your victory! As a result, they are few in number… Lizards – warriors of honor and brute force. They hold little affection for magic, dedicating themselves to logistics within the Dungeon.

Features and System Requirements:

  • Craft different strategies—corrupt, sabotage, fight directly, or manipulate minds—to stymie your adversaries.
  • With varied hero presets, randomized events, and divergent narrative branches, each run promises a unique experience.
  • Built with Godot Engine, the game employs moody pixel visuals that accentuate its dark fantasy vibe—drawing players deeper into its dungeon-lord role.

Screenshots

System Requirements

Recommended
Requires a 64-bit processor and operating system
OS: Windows 10/Windows 11
Processor: Intel Core i5 or AMD equivalent or above
Memory: 4 GB RAM
DirectX: Version 11
Storage: 10 GB available space
Support the game developers by purchasing the game on Steam

Installation Guide

Turn Off Your Antivirus Before Installing Any Game

1 :: Download Game
2 :: Extract Game
3 :: Launch The Game
4 :: Have Fun 🙂

Why a CEO Fired 80% of His Staff (and Would Do It Again)


Most business leaders talk about AI adoption in optimistic, measured tones. They speak of “augmentation, not automation” and “upskilling the workforce.” But Eric Vaughan, the CEO of enterprise-software company IgniteTech, took a far more radical approach. Continue reading “Why a CEO Fired 80% of His Staff (and Would Do It Again)”

Modders Reimagine Games With RTX Remix and GenAI


Last week at Gamescom, NVIDIA announced the winners of the NVIDIA and ModDB RTX Remix Mod Contest, a $50,000 competition celebrating community-made projects that reimagine classic games with modern fidelity.

The entries showed how far video game modding has come, with individual modders and small teams pulling off overhauls of similar quality to those created by entire studios.

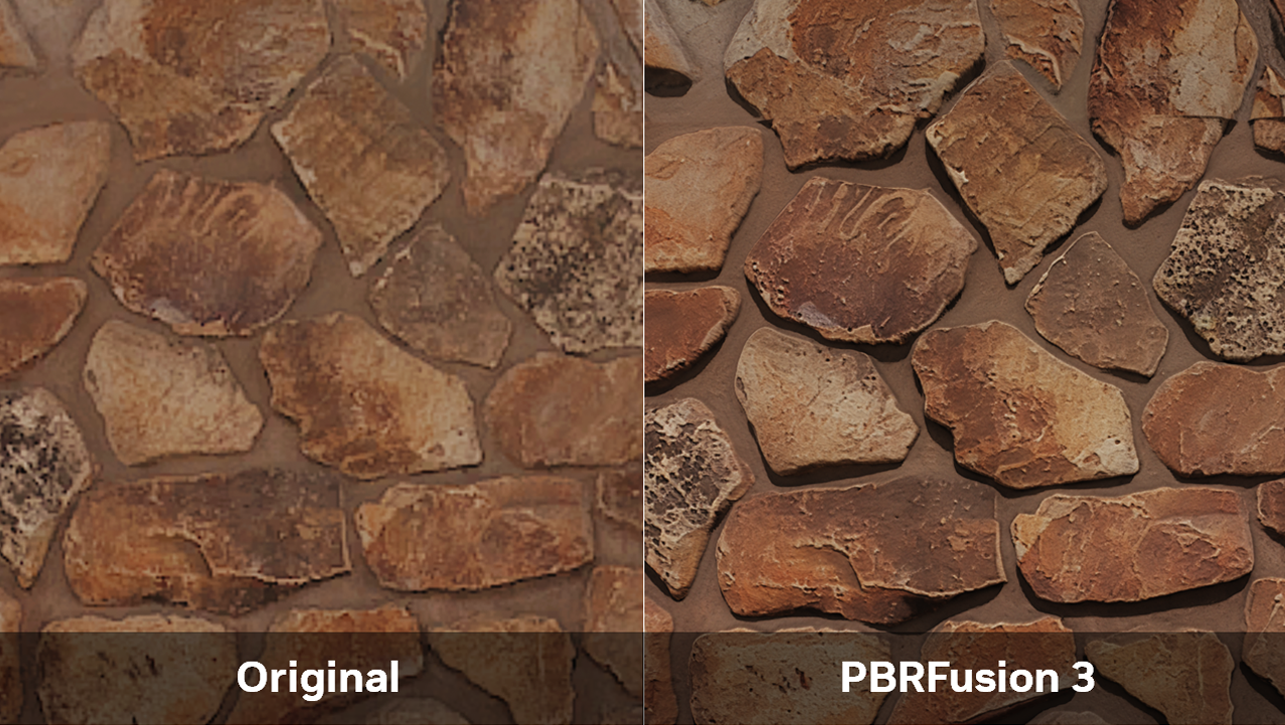
At the heart of these projects was NVIDIA RTX Remix, a platform that lets creators capture assets from classic titles and rebuild them with modern lighting, geometry and materials. Paired with generative AI tools like PBRFusion and ComfyUI, modders can now upscale or generate thousands of textures and automate repetitive tasks so they can focus on their artistry.

Plus, with NVIDIA RTX GPUs accelerating these AI-driven workflows, ambitious remasters that once took years can now come together in months.

There are currently 237 RTX Remix projects in development, building on over 100 finished mods and 2 million downloads across fan favorites like Half-Life 2, Need for Speed: Underground, Portal and Deus Ex.

Transforming Classics With Generative AI

The RTX Remix Mod Contest crowned Merry Pencil Studios’ Painkiller RTX Remix with several awards, but it wasn’t the only mod worth celebrating.

Here’s a closer look at the winning submission, along with other standout projects that showcase how RTX Remix and AI-powered tools are redefining what’s possible with modding on PCs.

‘Painkiller’ RTX Remix: Winner in Best Overall, Best Use of RTX and Most Complete Categories

The mod team Merry Pencil Studios rebuilt more than 35 levels of the gothic shooter Painkiller using AI-assisted workflows and handcrafted artistry. The team batch-processed thousands of low-resolution textures and generated high-resolution physically based rendering (PBR) materials that automatically got imported into RTX Remix.

The team’s AI model of choice was PBRFusion, a model trained by the RTX Remix community that can upscale textures by 4x and generate high-quality normal, roughness and height maps.

This workflow provided a consistent foundation for the game’s complex environments, freeing up time for creative polish. From there, the team used tools like Blender and InstaMAT to craft assets like lanterns and other gothic details that define the game’s atmosphere.

“Generative AI has completely expanded what feels possible in modding. Beyond texture upscaling, we’re now seeing it generate 3D models, refine complex multi-material surfaces and assist with coding tasks like building workflow tools, writing documentation and catching errors.” — Merry Pencil Studios 

RTX Remix transforms the gothic cathedral in “Painkiller”: RTX OFF (left) shows the original look, while RTX ON (right) fills the hall with stained glass reflections, volumetric beams and realistic shadows.

“PBRFusion and other AI tools made it possible for a small team to convert an entire game into PBR. It set the baseline look, while we focused our manual efforts on the assets players notice most.” — Merry Pencil Studios 

With RTX Remix, gothic churches now glow with volumetric light pouring through stained glass, marble statues scatter colored light and combat scenes erupt with particle effects that cast realistic shadows. NVIDIA GeForce RTX GPUs powered the workflow from start to finish, with real-time path tracing and NVIDIA DLSS technology ensuring smooth iteration while editing even on massive scenes.

“The NVIDIA GeForce RTX 5090 GPU was a dream for our workflow: speed, fluidity, everything felt seamless. DLSS Frame Generation doubled or even tripled frame rates, making the game look incredible on high-refresh displays.” — Merry Pencil Studios 

What makes the Painkiller RTX Remix notable is its scope, featuring over 35 remastered levels. This amount of work couldn’t have been completed in such a short time without RTX Remix and the generative AI tools the team used.

By combining generative AI automation with careful craftsmanship, Merry Pencil Studios delivered a project that feels both ambitious and polished.

‘Unreal’ RTX Remix: An Ambitious AI Texture Rebuild

“I wouldn’t have been able to create PBR textures without AI. I could have maybe created emissive maps and height maps, but I wouldn’t have been able to do the roughness or normal maps myself.” — mstewart401

UnrealRTX demonstrates the scale of generative AI’s impact in modding. Modder mstewart401 set out to remaster the entire 1998 classic, with 14 levels completed by the contest deadline and more in progress.

With RTX Remix’s built-in AI texture tools, plus experimental methods like generating animations from AI video tools and hand-editing light maps, whole environments were reimagined with new detail and atmosphere.

The results are striking: glowing crystals pulse with emissive light, alien landscapes shimmer with modern materials and the game’s otherworldly maps feel richer and more alive. By leaning on AI for the bulk of the texture work, mstewart401 could focus on creative polishing — delivering an overhaul that feels ambitious even by professional standards.

RTX Remix transforms the alien environments in “Unreal”: RTX OFF (left) shows the original flat look, while RTX ON (right) adds detailed PBR materials, emissive lighting and realistic reflections.

“If someone like me can make a mod like this, anyone can. I only get an hour here and an hour there, but with generative AI and RTX, I’ve been able to push ‘Unreal’ further than I ever thought possible.” — mstewart401

‘Need for Speed: Underground’ RTX Remix: Blending AI and 3D Artistry

In the Need for Speed: Underground RTX Remix, modder Alessandro893 used AI and 3D artistry to remaster every race course in the game with new textures, materials and lighting.

“In racing games, generative AI opens up new possibilities for creating realistic and immersive environments. In a racing game like ‘Need for Speed: Underground,’ the visual environment is crucial for player immersion, but it also needs to feel responsive and varied.” — Alessandro893

Using ComfyUI, Alessandro893 generated more than 500 new textures, then refined them in Adobe Photoshop for consistency and realism. In addition, the modder built over 30 new high-poly car and environment models in Blender, upgrading older assets with smoother, more lifelike detail.

“Generative AI was mainly used for texture generation. The original look was preserved by using the original textures as input for AI. It’s impossible to create such a large number of textures in such a short period of time alone without AI.” — Alessandro893

With RTX GPUs driving AI texture conversion, path-traced reflections and DLSS acceleration, the team could reimagine racing environments with faster iteration and higher fidelity than ever. But as the modder emphasized, AI didn’t replace artistry. It created room for it.

RTX Remix reimagines “Need for Speed: Underground’s” Chinatown: RTX OFF (left) shows low-resolution textures and flat lighting, while RTX ON (right) adds neon reflections, detailed materials and fully path-traced streets.

The overhaul is most striking on the Chinatown track, which was rebuilt with new buildings, vegetation and fully path-traced lighting that makes neon reflections pop against wet pavement.

By leaning on AI to handle the repetitive work of texture generation, the modder could focus on creative refinements — giving Olympic City a modern, cinematic twist while preserving its nostalgic feel.

‘Portal 2’ RTX Remix: An Innovative AI-Powered Workflow

“AI opened up new opportunities and drastically accelerated my workflow, allowing me to focus on more ambitious creative tasks.”  — Skurtyyskirts

Skurtyyskirts, the modder behind Portal 2 RTX Remix, used a unique workflow — tapping a large language model to build a custom plug-in called Substance2Remix, bridging Adobe Substance Painter directly to RTX Remix.

This flow allowed the modder to pull in an asset, apply AI-assisted materials, hand-paint details and push it straight back into the game, all in one rapid loop. What would normally take days of exporting and importing was done in minutes.

“Once I saw the potential of Remix’s REST application programming interface, I realized I could create a more integrated workflow between tools like Substance Painter and RTX Remix. I didn’t want to deal with a manual, tedious export-import process for my handmade textures, so I developed a simple plug-and-play plug-in. This completely shifted the role of AI from a simple upscaling tool to a core component of my creative pipeline, enabling me to focus on creating detailed, high-quality textures by hand.” — Skurtyyskirts

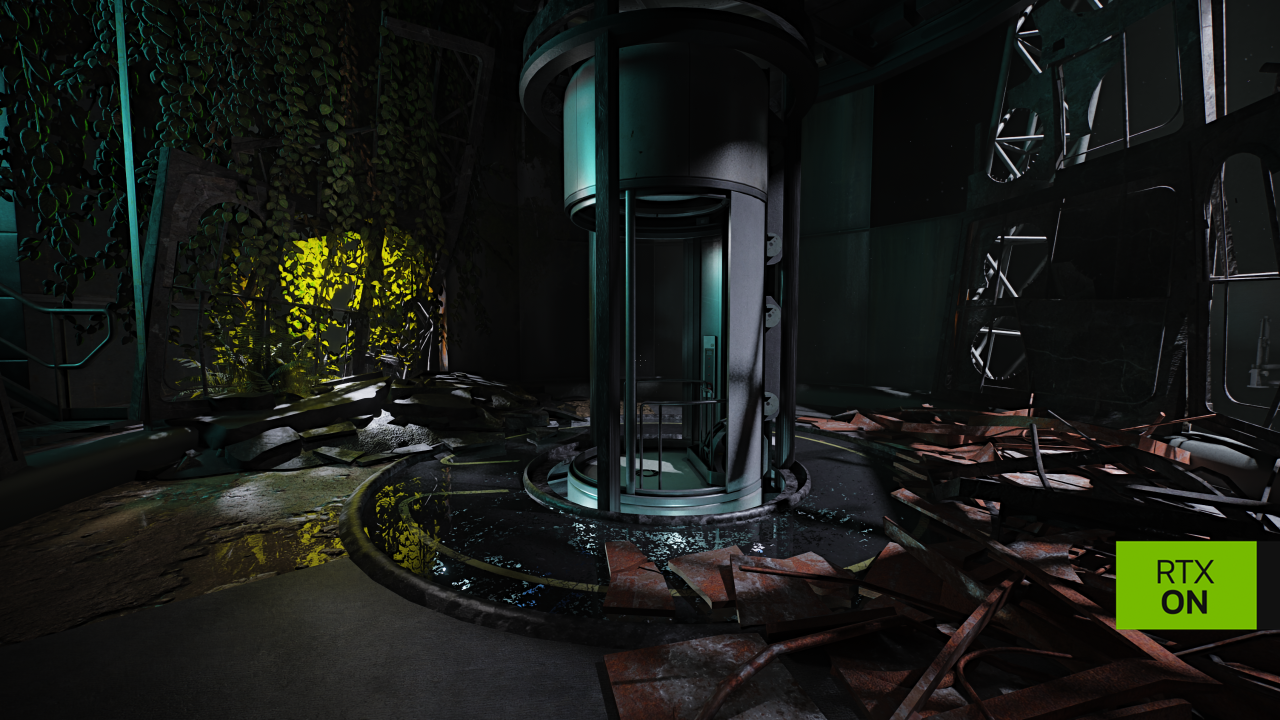
RTX Remix modernizes “Portal 2’s” test chambers: RTX ON highlights realistic reflections, detailed materials, and atmospheric lighting that transform Aperture Science into a more immersive environment.

Early on, the project leaned on AI upscalers like PBRFusion, but over time the workflow evolved into a mix of AI and manual artistry. The result is a sharper, more atmospheric game environment — enhanced further by RTX Remix’s volumetrics and fog systems, which make the decaying test chambers feel more alive.

RTX Remix modernizes “Portal 2’s” test chambers: RTX ON highlights realistic reflections, detailed materials, and atmospheric lighting that transform Aperture Science into a more immersive environment.

By creating a new pipeline, the project opens the door for other modders to experiment with faster, AI-powered workflows of their own.

Press Start: Remaster With RTX Remix

To get started creating RTX Remix mods, download NVIDIA RTX Remix from the home screen of the NVIDIA App and check out our tutorials and documentation. PBRFusion on Hugging Face also offers a plug-and-play setup with ComfyUI, letting modders batch-process textures into high-quality, PBR maps in just a few clicks.

PBRFusion is a generative AI tool built by modder NightRaven109 (and shared on Hugging Face) that helps convert old, low-res game textures into full PBR (Physically Based Rendering) materials.

Check out all of the mods submitted to the RTX Remix Modding Contest, as well as 100 more Remix mods, available to download from ModDB. Read the RTX Remix article to learn more about the contest and winners. For a sneak peek at RTX Remix projects under active development, join the community over at the RTX Remix Showcase Discord server — it’s a great place to get a helping hand.

Each week, the RTX AI Garage blog series features community-driven AI innovations and content for those looking to learn more about NVIDIA NIM microservices and AI Blueprints, as well as building AI agents, creative workflows, productivity apps and more on AI PCs and workstations. 

Plug in to NVIDIA AI PC on Facebook, Instagram, TikTok and X — and stay informed by subscribing to the RTX AI PC newsletter. Join NVIDIA’s Discord server to connect with community developers and AI enthusiasts for discussions on what’s possible with RTX AI.

Follow NVIDIA Workstation on LinkedIn and X

See notice regarding software product information.