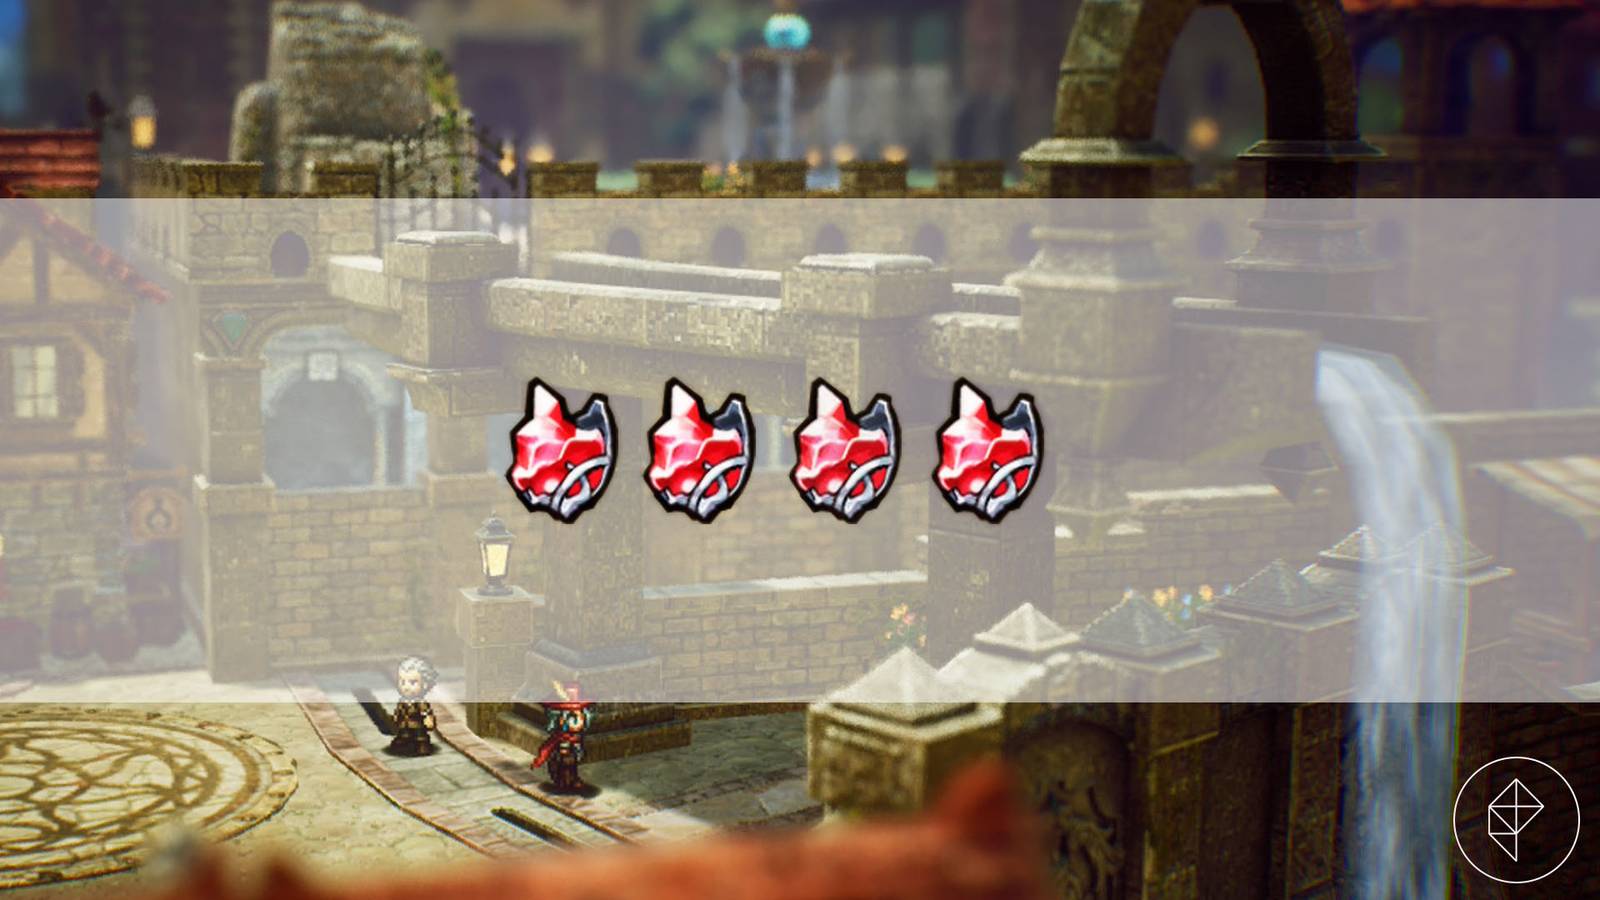
Forza’s Horizon Festival Is Hell On Earth


When a game world doesn’t make sense, you could simply dismiss it as being “just a game.” Or, through the power of imagination, you could attempt to truly visualize it and then discuss at length how absolutely absurd it truly is. With that in mind, it’s time I say it: Forza Horizon 6 and the previous entries in the series do not make sense, and the longer we think about it, the weirder it gets.

If you’re unfamiliar, each game in the Forza Horizon series is set at the Horizon Festival, a car show-meets-music-festival that spans a large portion of the country the festival is set in. There are racing events, all manner of records to break, and you’re encouraged to explore every road on the map to find things like abandoned cars and collectibles, which you collect by driving through them.

In many ways, it’s kind of like the Olympics: Each festival is set in a different region, such as Australia, the United Kingdom, Mexico, or, most recently, Japan. Space is dedicated to these races; markers are put down, new dirt roads are made, and semi-permanent structures are erected to house the thousands of incoming cars. But while countries fight for the privilege of hosting the Olympics, who would ask to host the Horizon Festival? 

When the Horizon Festival descends on a region, countless drivers appear and begin to wreak havoc on the city and countryside. These drivers are destroying forests, private property, and municipal infrastructure; they slam into civilian cars at hundreds of miles per hour. They take “abandoned” cars out of old barns. Maybe someone left that car there for a reason? Surely, there should be some consequences, right? But you won’t find anything resembling law enforcement appearing, no matter what you do. That sounds impossible. 

There’s only one answer that makes this all make sense: billionaires.

Oh yeah, it’s all coming together. The Horizon Festival is orchestrated by billionaires for their own entertainment. They pick a peaceful-seeming place–the locations chosen for the festival are all premium vacation spots–they’ve decided they want to see destroyed. The region is blanketed in the emissions of some of the least fuel-efficient vehicles on the planet, and people are afraid to leave their houses.

The best way to celebrate Japan’s beauty? Tearing up its countryside with fuel-guzzling vehicles, apparently.

As you explore the region, you can win points doing just about anything. You’re encouraged not to just win races, but also to actively engage in destruction and dangerous activities. It calls to mind the government-sponsored Transcontinental Road Race in the film Death Race 2000, in which participating drivers are encouraged to win by any means necessary and to hit pedestrians for bonus points. In that film, the government covers up activity by a resistance group because the race is so popular with the general population, making sure everything is treated as fun and exciting for the viewership. The police in the region have been paid off, too, which is why they aren’t showing up to crashes or putting up roadblocks to catch drivers. Sure, you can’t hit civilians at the Forza Horizon Festival, but that doesn’t stop you from causing plenty of destruction.

As you race around the festival region, radio DJs report on your actions, telling everyone how great it is that you just set a new speed record on a public road, or won a race through the middle of a populated city. You might think it’s simply a game acknowledging your accomplishments, but it’s actually propaganda to make you sound like a hero not just to viewers and listeners, but to yourself. If you started to worry about the consequences of your actions, you wouldn’t want to participate in this grisly affair.

Billionaire sponsorship explains another aspect, too. Even if you end up somewhere like Southern Europe, the setting for Forza Horizon 2, there’s no way to explain the sudden preponderance of expensive cars. You don’t see the thousands of shipping containers full of hypercars and rally cars being shipped in, alongside the monopoly the event puts on all new and used cars in the region, but they’re there, out of view. 

These billionaires reward the dangerous actions drivers take with “credits” instead of any kind of real currency, and these credits are also assigned to the prices of the cars themselves. The billionaires sponsoring this have already purchased all of these cars, so you can’t buy them with real money. You have to engage in the events the festival sponsors want you to to advance, and it’s almost inevitable that even the cleanest driver will create some damage.

A race car tears past a vacated residential area. Its citizens are clearly to scared to leave their homes.

As you race, though, you’ll see people cheering you on and cars on the roads.The standard, inexpensive cars on the road are civilians just trying to live their lives while the “drivers” zoom around them. They stay inside when they can, but the festival goes on for months, and people have to go out for food and to go to work. The people you see cheering you on, though–these are people who attend for fun and clout. Rich people, influencers, and people like that.

There are other ways we could explore this. For example, maybe it’s a Westworld situation for people who really like cars, and that’s why all the DJs talk directly to you and why you have two cool friends who you know nothing about.

The longer I think about what’s happening in Forza Horizon, the darker it gets. Yeah, I know: It’s just a game and I’m way overthinking it. Framing this bright, happy game full of pop music, flashy events, and bright colors as a dark manifestation of class oppression is hilarious.
Use your own language model key in VS Code


June 18, 2026 by Kayla Cinnamon

At Microsoft Build this year, I had the opportunity to present in the opening keynote. One thing I showed was using local models inside VS Code on the new Surface RTX Spark Dev Box. My model was periodically analyzing my log files and giving me summaries, so I could easily diagnose issues without having to look through the logs myself. Check out the recording at 12:18.

Using local models gives you even greater flexibility when working with agents. Sometimes you want the built-in models available through GitHub Copilot. Sometimes you want to try a new model from a provider your team already uses. Sometimes you want to experiment locally. VS Code allows you to do all of these workflows with bring your own language model key (BYOK) and bring your own local model.

With BYOK in VS Code, you can add models from providers like Azure, Anthropic, Huggingface, Gemini, OpenAI, OpenRouter, or you can run a model locally with Ollama, Foundry Local, and more, then use them directly from the Chat model picker.

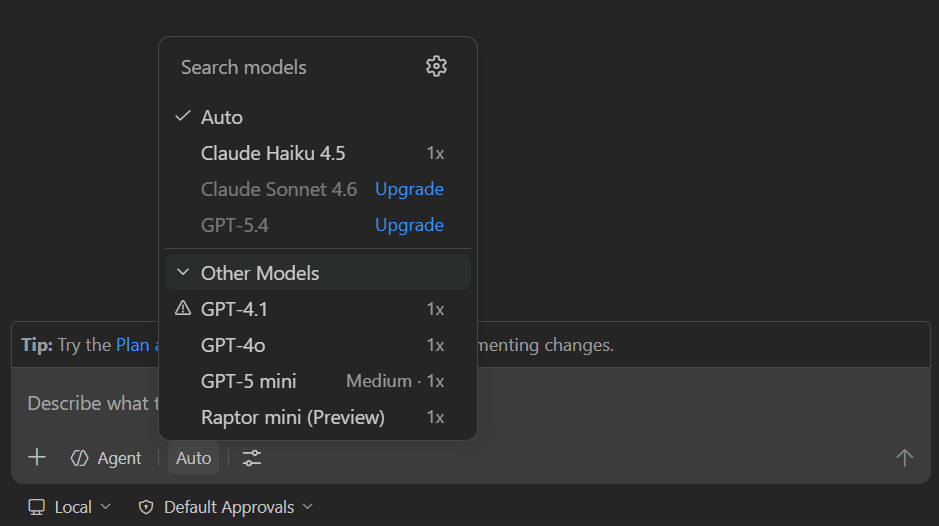
Screenshot of the VS Code Chat model picker showing available language models.

What is BYOK?

BYOK lets you use a language model from a supported provider by adding your own API key or endpoint configuration in VS Code. Once configured, those models appear in the same Chat model picker you already use for Copilot. Support is built in for several providers and VS Code is extensible, so any model provider can enable support through an extension.

This gives you more choice for chat and agent workflows. For example, you can:

  • Try models that are not built into VS Code.
  • Use a provider your organization already has billing or governance set up for.
  • Connect to local models through providers such as Ollama or Foundry Local.
  • Pick different models for different tasks, such as quick Q&A, planning, or multi-step agent work.

The goal is to allow you to choose the right model and keep working.

What BYOK works with

BYOK models are available for VS Code chat experiences, including agent workflows when the selected model supports the required capabilities.

There are a few important details to keep in mind:

  • BYOK models work without signing into a GitHub account and without a Copilot plan. You can add and use models entirely with your own API keys, including fully offline scenarios with local models.
  • BYOK applies to chat and utility tasks, not standard code completions.
  • Some AI features, such as semantic search, inline suggestions, and features that rely on embeddings, still require a GitHub account or Copilot support.
  • Usage for provider-backed BYOK models is billed directly by that provider and does not count against GitHub Copilot request quotas.
  • For Copilot Business and Enterprise, organization administrators can control BYOK availability through Copilot policy settings.

In other words, BYOK expands model choice in VS Code Chat, but it does not replace every Copilot-powered feature in the editor.

Getting started with BYOK

The easiest way to get started is through the Language Models editor.

You can open it from the Chat model picker by selecting the Manage Language Models gear icon, or you can run Chat: Manage Language Models from the Command Palette.

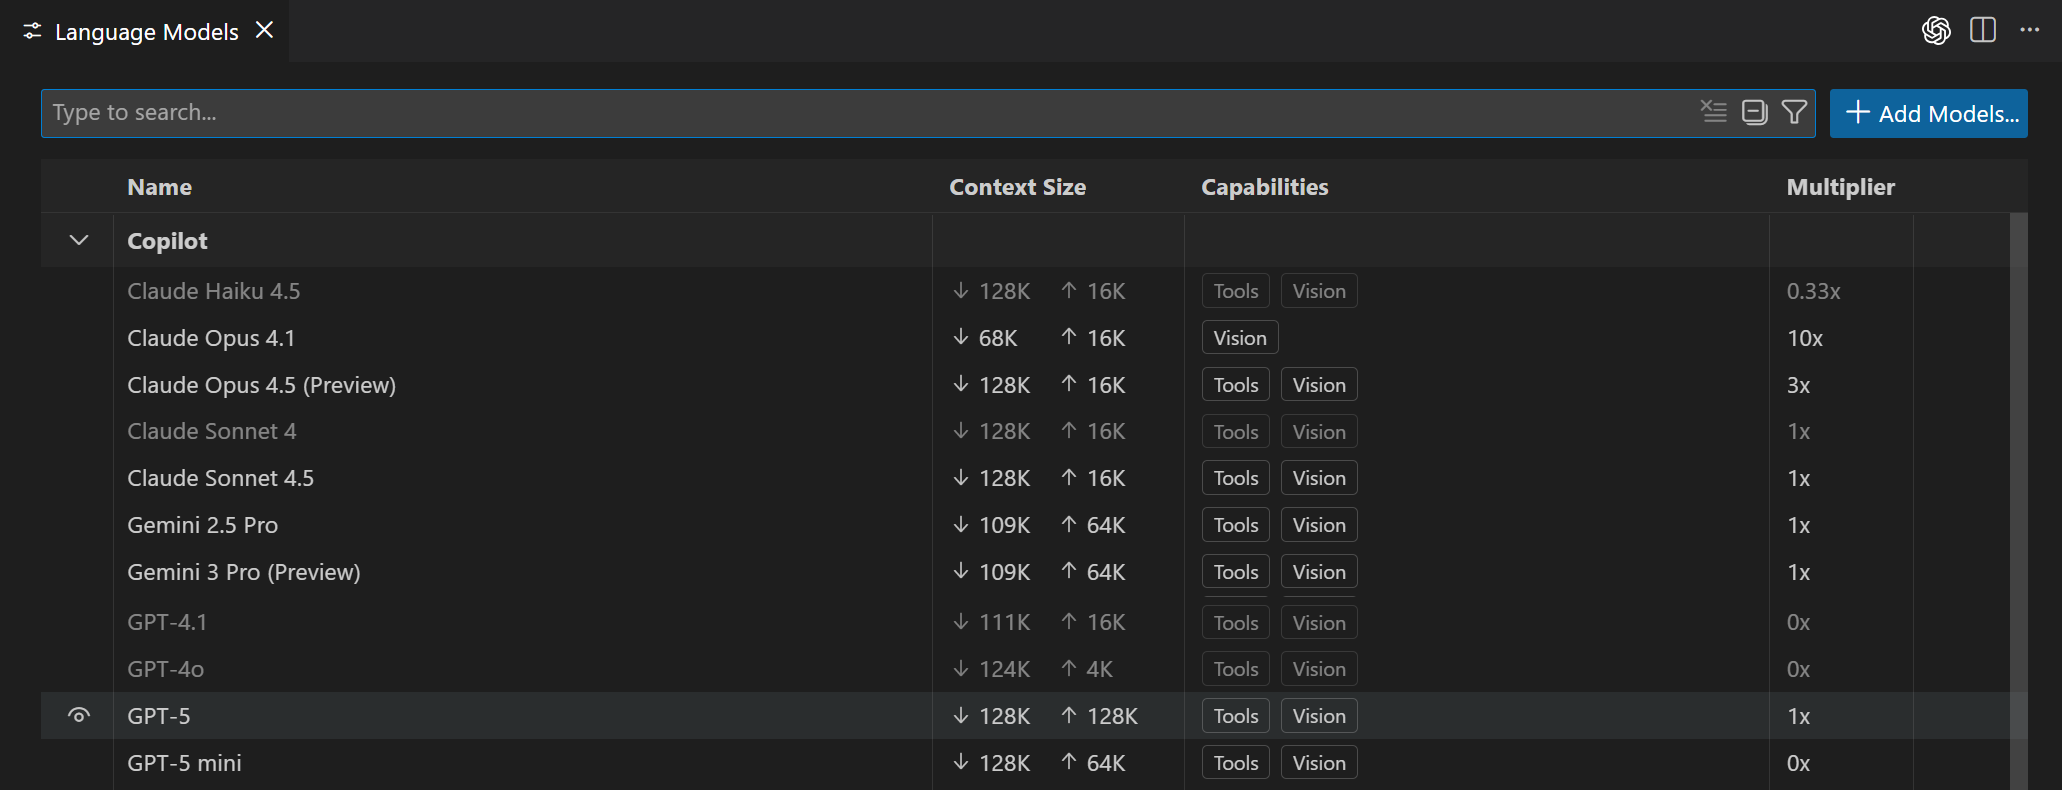
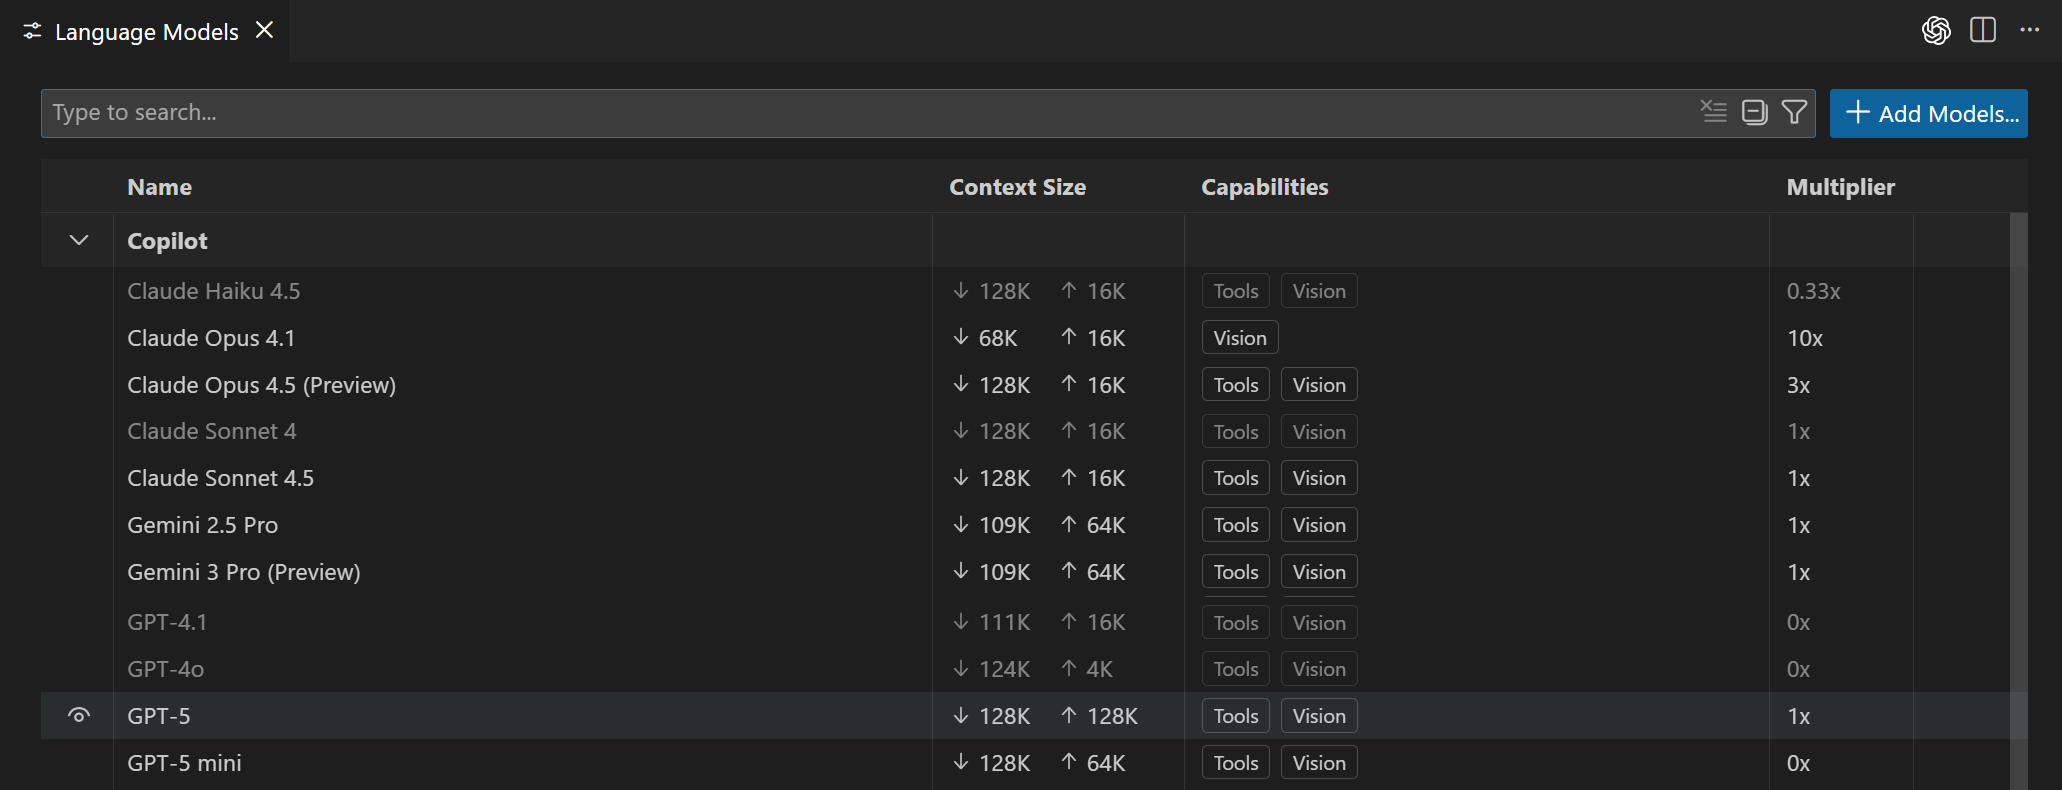
Screenshot of the Language Models editor in VS Code.

The Language Models editor shows the models available to you, grouped by provider. It also shows useful details like model capabilities, context size, billing information, and whether a model is visible in the picker.

This is also where you can keep the model picker focused. If you are testing several providers, you can hide models you do not use often and keep your day-to-day models easy to find.

Adding models from a built-in provider

If the provider you want is built into VS Code, setup is a few clicks.

  1. Open Chat: Manage Language Models.
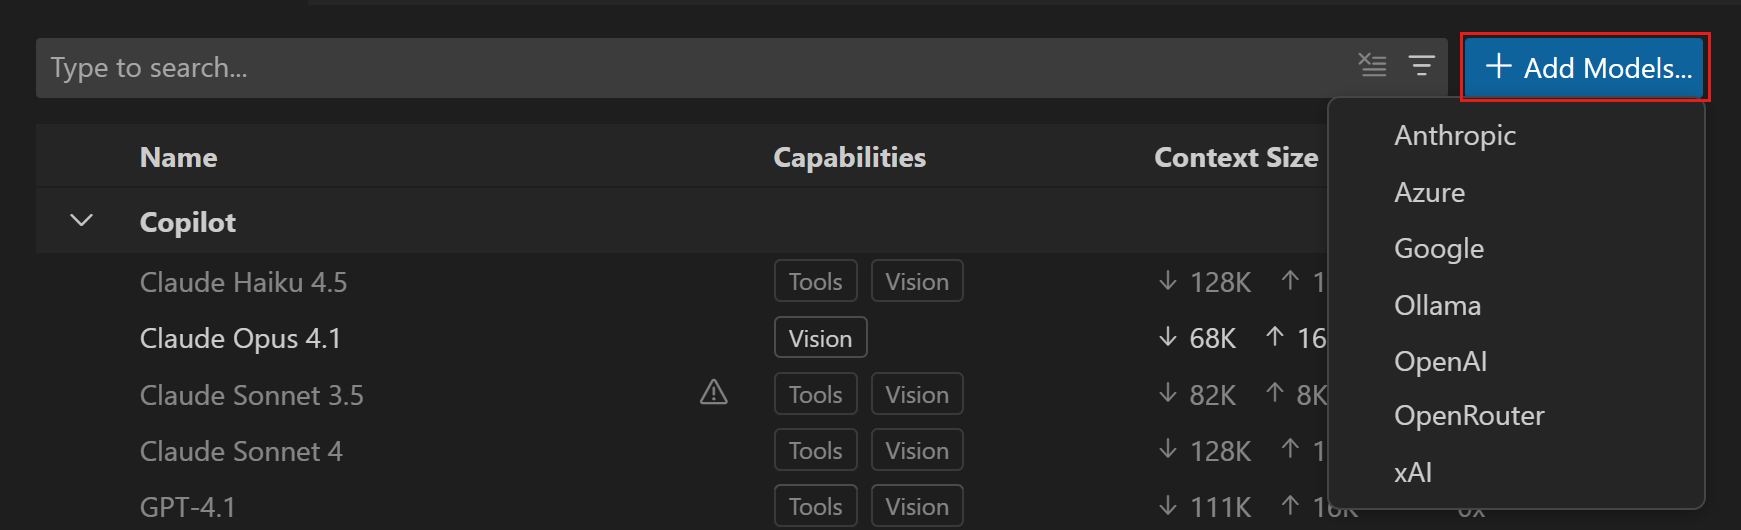
  2. Select Add Models.
  3. Choose a provider.
  4. Enter a group name for the models. This is the label shown in the model picker and Language Models editor.
  5. Enter the provider details, such as an API key, endpoint, deployment name, or other required configuration.
  6. Select the model from the Chat model picker.

Screenshot of the model provider picker in VS Code.

Depending on the provider, VS Code might open a chatLanguageModels.json file so you can finish configuring model details.

For example, a Mistral configuration specifies the endpoint URL, API type, and model capabilities:

[
  {
    "name": "Mistral",
    "vendor": "customendpoint",
    "apiKey": "<your-mistral-api-key>",
    "apiType": "chat-completions",
    "models": [
      {
        "id": "mistral-medium-latest",
        "name": "mistral medium",
        "url": "https://api.mistral.ai/v1/chat/completions",
        "toolCalling": true,
        "vision": true,
        "maxInputTokens": 256000,
        "maxOutputTokens": 16000
      }
    ]
  }
]

The exact fields depend on the provider and model. The important part is that after the provider is configured, the model becomes available from the same picker you use for the rest of Chat. For more information, check out the Language Model docs.

Adding models from extensions

VS Code also supports language model provider extensions. These extensions can contribute models directly into the Language Models editor and Chat model picker.

To find provider extensions:

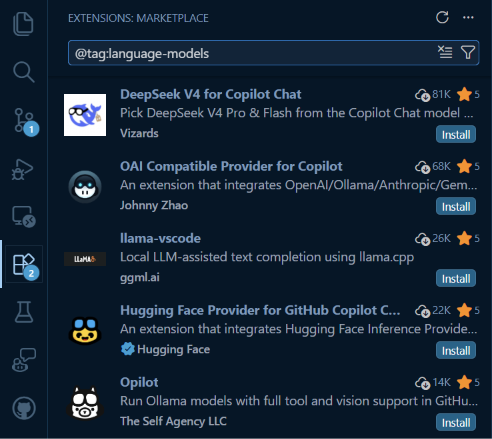
  1. Open the Extensions view.
  2. Search for @tag:language-models.
  3. Install the provider extension you want to use.
  4. Follow the extension’s setup instructions.
  5. Select the model from the Chat model picker.

Screenshot of the Extensions view listing extensions that provide language models.

This extensibility is a big part of the BYOK story. Instead of every provider needing to be hard-coded into VS Code, extensions can bring new model providers into the editor as the ecosystem evolves.

Leveraging utility models

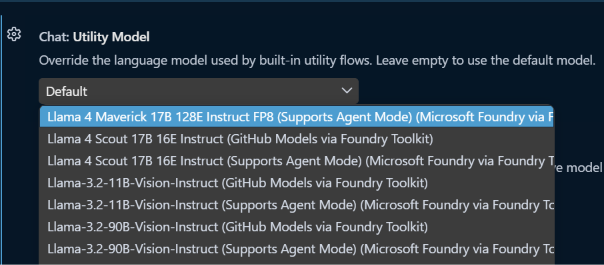
VS Code also uses lightweight models in the background for small tasks like generating chat titles, commit messages, and rename suggestions. These default to built-in Copilot models and most users won’t need to touch them. But if you’re using BYOK without signing into a GitHub account, those defaults aren’t available. VS Code will show a notification in the Chat view prompting you to configure them. Set


chat.utilityModel

and


chat.utilitySmallModel

to one of your BYOK models to keep those features working. A fast, inexpensive model works well here.

Screenshot of the setting for configuring the Chat Utility Model.

Choosing the right model

One of the best parts of BYOK is that you do not have to use one model for everything.

For everyday work, you might choose:

  • A fast model for quick questions, summaries, and small edits.
  • A reasoning model for planning, debugging, or complex refactors.
  • A local model when you want to experiment offline.
  • A provider-specific model when your team already has workflows around that provider.

Simply choose which model you want to use in the model picker below the Chat box.

Screenshot of the VS Code Chat model picker showing available language models.

Try it out

BYOK gives you more flexibility in VS Code without adding more tools to your workflow. You can keep using the built-in Copilot models, add models from providers you already use, experiment with local models, and choose the right model for each task from one place.

To learn more, check out the VS Code docs on AI language models, the VS Code blog post on Expanding Model Choice in VS Code with Bring Your Own Key, and the GitHub changelog entry for BYOK availability in VS Code.

We also have a video for how to Bring Your Own AI… No Sign-In Required!.

We are continuing to improve model choice in VS Code, and your feedback helps shape what comes next. Try BYOK with your workflow and let us know what you think in the VS Code repository.

Happy coding! 💙

Can You Get Banned for Valorant Boosting? Risks Explained


Illustration of Valorant rank boosting versus account bans, showing rank progression on one side and a suspended gaming account warning on the other.

If you’re searching can you get banned for valorant boost, you’re really asking two things: how Riot treats boosting in practice, and what usually gets accounts flagged.


In plain language, Valorant elo boost refers to a scenario where a high-ranking player facilitates you to rank up faster than you would if you were to do that solo, either by playing alongside you or using your account. For instance, when talking about Valorant boosting from Eloboss, it refers to the situation where a Radiant-ranked boosters assists in your ranking process through duo queue, training, and account share boosting, among other things.


The purpose of this guide is to remain neutral and factual by highlighting aspects such as considerations prior to ordering, detection, consequences, and minimizing risks.

Things to Consider Before Ordering a Boost


Start by deciding which method you’re actually comfortable with, because the risk profile changes a lot depending on how the boost is delivered.


Account-share (sometimes called piloted boosting) means someone else logs into your Riot account and plays ranked for you. It’s usually the most convenient, but it also creates the cleanest “paper trail” in account security terms: new device, new IP patterns, and activity that doesn’t match your normal routine.


Duo queue boosting (also called self-play carry) means you stay on your own account and queue with a higher-skill player on their account. You keep control of your login, which removes a major security variable.


“Duo queue boosting remains popular because players can participate in every match while working toward their rank goal,” says Eloboss, a Valorant boosting and coaching service.


Before paying for anything, it helps to pressure-test the provider like you would any online service that touches your account or money:


  • What is the process exactly, duo queue, coaching or account-share?
  • In which regions and on which servers is the account supported?
  • How does the support work if you feel something wrong during the order?
  • What is the refund policy, and in particular what about unfinished orders?
  • Does the provider make absolute guarantees, such as zero risk? (Absolute guarantees are usually a good indicator that the page is selling, not informing you).


Common features that players often look for include progress tracking, privacy options, region support, account-protection measures, and multiple service formats such as duo queue, coaching, or account-share boosting.

Standard Techniques of Boosting Detection

Although Riot has not provided an official list of criteria for “boosting detection,” there are some standard techniques used in most competitive video games.

Login and location inconsistencies

A sudden shift in where the account is accessed from can stand out, especially if it looks like a rapid jump between regions or repeated logins from known VPN endpoints.


Even if you travel, most people don’t teleport across continents in the span of a few hours, then immediately start grinding ranked with a very different performance profile.

Artificially high performance peaks

Sudden jumps may catch the eye, for example:


  • Win streaks way beyond what you have shown before historically
  • An abrupt rise in KDA ratio, headshot percentage, or impact metrics over multiple games
  • A fast climb in ranks within a short span


While none of them is by themselves conclusive evidence of boosting, they are all factors in building a case.

Discrepancies between behavior and play style

Users exhibit certain behaviors through accounts – their preferred agents, buy styles, speed, and timing of decision making. If these features suddenly undergo an overnight change, it would appear that someone else was using the account.


Practical example: After spending months controlling maps using keyboard, you realize that your account fights in duels aggressively and gets into the map in seconds.

Reports, chat, and avoidable receipts

Allegations made by players do not point at any guilt, yet their aggregation brings up concerns. In addition, even the chats might be proven useful for providing evidence if players talk freely about paid boosting and use of their accounts.


If keeping things discreet is important to you, keep everything you say in chat such that you wouldn’t mind it being screen-captured and sent around.

Potential Penalties for Boosting Violations


However, punishments differ depending on what Riot considers to be the case and what they can prove. Consider this to be more like a spectrum of possibilities.


Some of the most frequent punishments people discuss include:


  • Temporarily suspending an account
  • Limiting access to ranked matches/queues for that period
  • Extending suspensions due to account sharing issues
  • Permanent bans in extreme cases where the violations involve another infraction (such as cheating on the shared account)


There’s one fact most tutorials forget to mention: If the account you’ve boosted isn’t being permanently banned, the disruption of having your account suspended for a week at a crucial time during the season, being ineligible for ranked play, or having a locked account might be a worse “price” than getting the boost.

How Riot Handles Boosting and Account Sharing

According to Riot Games’ general policies, boosting and the sharing of accounts in their competition titles is prohibited. However, as far as how this policy is enforced, it is a combination of both automatic triggers and manual reviews.


It’s also worth separating two ideas that often get mixed together:


  • Account security: whether someone else accessing your account looks like unauthorized access
  • Competitive enforcement: whether the ranked results look like manipulation of matchmaking integrity


Duo queue boosting tends to avoid the first category because you aren’t handing over credentials. Account-share boosting tends to collide with it by default, even if the booster uses precautions.


Based on internal order patterns from Eloboss, placement matches and rank progression services tend to be the most requested options, especially at the start of a new ranked season.

Risk-Reduction Tips for Valorant Boost Users


None of this removes the risk, but here are the measures that help reduce exposure the most.

Choose approaches that allow you to play from your own account

If your goal is to minimize account-security risk, duo queue or coaching is the cleaner route because your login stays with you.


Coaching is also the most “future-proof” option in the sense that your improvement carries over after the sessions, and there’s no second player touching your account.

Keep your account activity consistent

Accounts that appear “normal” receive less scrutiny than those that make drastic changes overnight. If you want to avoid being too suspicious:


  • Avoid cramming an enormous change in ranking in a very small period of time
  • Maintain your agent pool relatively similarly to how you typically play
  • Avoid dramatic changes in your schedule such as only playing during the day to only ranked games at night

Be careful with offline status tools and third-party apps

Some mention being “offline”. If the technique involves other software that may be employed, think carefully before proceeding. In the case where the purpose is privacy, introducing other software opens up another layer of vulnerability.

Reduce social friction and report incentives

Most “detection” occurs from the intuition of the players who sense something wrong and report it. You can minimize the chance of triggering this chain reaction by maintaining a calm demeanor and keeping your communication quiet.


Another issue when there’s someone playing using your account is making sure they don’t even chat. Not because chatting is necessarily bad, but because it leaves behind a paper trail.

Secure your account like it matters

This isn’t about Riot; this is about you not losing your account.


  • Always use a strong password that isn’t easy to guess.
  • Use two-factor authentication if possible for both your email and Riot accounts.
  • When sharing your account with others, immediately change your passwords after.

Conclusion

Of course, there is the possibility of getting banned due to valorant boost since this kind of behavior might go against the regulations of the company, but the actual possibility depends a lot on the specific technique used. For instance, account-share boosting is likely to give off more security warnings than duo queuing and coaching.


When it comes to using any kind of boost-related assistance, think of it as a compromise decision where you have to choose one of two things wisely.


iPhone Ultra leak reveals Apple’s Samsung-inspired foldable design


iPhone Ultra in two colors

TL;DR

  • Apple’s rumored iPhone Ultra could debut in September with a wider foldable design that aims to feel like an iPhone when closed and an iPad when opened.
  • The foldable is tipped to feature a nearly crease-free display, an advanced hinge, and a 4.5mm unfolded profile — just 0.3mm thicker than Samsung’s Galaxy Z Fold 7.
  • With a rumored price above $2,000, the iPhone Ultra would enter a foldable market already dominated by Samsung’s Galaxy Z Fold 7 and upcoming Fold 8 series.

Fresh off WWDC 2026 and Apple’s cozy relationship with Gemini-powered Siri features, the rumor mill has already moved on to Apple’s next big swing: its first foldable iPhone. According to a new video and renders shared by Jon Prosser, the so-called iPhone Ultra could finally make its debut alongside the iPhone 18 Pro lineup this September.

If the renders are anywhere close to reality, Apple doesn’t appear interested in copying the narrow foldables of the past. Instead, the iPhone Ultra is said to embrace a much wider design philosophy. The idea is that when folded shut, it should feel like a regular iPhone in your pocket. Open it up, and it transforms into something much closer to a compact iPad.

iPhone Ultra when unfolded

The design philosophy also feels strikingly familiar. After years of criticism over the narrow cover screens on earlier Fold models, Samsung finally embraced a wider, more phone-like display with the Galaxy Z Fold 7. That change made the Fold feel much more like a regular smartphone when closed. Based on these latest renders, Apple appears to be borrowing that exact roadmap.

Prosser also claims Apple is preparing a remarkably thin foldable with a nearly invisible crease and a hinge mechanism reportedly imbued with Apple’s trademark obsession with over-engineering. Whether that translates into a meaningful real-world advantage remains to be seen, but Apple has rarely entered a new hardware category without first addressing the industry’s most obvious complaints.

The rumored dimensions are particularly ambitious. When unfolded, the iPhone Ultra could reportedly measure just 4.5mm thick, making it thinner than even Apple’s ultra-slim iPhone Air. That’s undeniably impressive, though it would still be around 0.3mm thicker than Samsung’s Galaxy Z Fold 7, which currently sits at an astonishing 4.2mm when unfolded. Even so, for Apple’s first foldable attempt, matching Samsung this closely on thickness would be a notable achievement.

iPhone Ultra camera island

Of course, that kind of engineering won’t come cheap. Early whispers point to a price tag north of $2,000, putting it firmly in luxury-device territory. Then again, premium pricing has never stopped Apple fans before.

What’s particularly interesting is the timing; Samsung isn’t standing still. By the time Apple enters the foldable race, Samsung will have the Galaxy Z Fold 7 firmly established and will launch the next chapter with the Galaxy Z Fold 8 and the rumored Fold 8 Wide. If those devices continue Samsung’s push toward wider displays and thinner bodies, Apple won’t be entering an empty field — it’ll be stepping into a category that’s already rapidly maturing.

For years, foldables have largely been Samsung’s playground. The iPhone Ultra could change that overnight. Whether Apple ends up leading the category or simply joining it fashionably late is the question we’ll be asking for the rest of 2026.

Thank you for being part of our community. Read our Comment Policy before posting.

This Is What B2B Marketers Need to Know About the Future of Work


The 2026 State of AI for Business Report surveyed more than 2,100 professionals, 84% of whom work at B2B organizations and about a third of whom are marketers. This makes this one of the most relevant datasets for B2B professionals trying to understand where AI is taking their profession.
Continue reading “This Is What B2B Marketers Need to Know About the Future of Work”

All shard of life locations in The Adventures of Elliot


Collecting Shards of Life in The Adventures of Elliot: The Millennium Tales is as important as saving the world. These small red gem pieces can make you stronger, but only if you find enough of them.

Every time you collect four shards, they combine into one tear, which represents Elliot’s health — similar to Link’s hearts in Zelda games. The tear cap is 20, and obtaining all of them requires collecting 60 shards of life.

If you’re ready to explore every corner of this game looking for shards, then we can help you. Below, you find all shard of life locations in The Adventures of Elliot, split by ages.

[Ed. note: If you’re viewing this guide on a mobile device, you may need to swipe left and right to see the full tables listed below.]


All Age of Safekeeping Shard of Life locations in The Adventures of Elliot

There are 16 Shards of Life in the Age of Safekeeping, but obtaining some of them becomes easier after you have progressed in the campaign and unlocked more skills.

Map

Location

Description

A montage of two The Adventures of Elliot screenshots showing the location of a shard of life in the Age of Safekeeping

Eastern Fields of Flon

On the southwestern side of the Eastern Fields of Flon, you will find the Shrine of Life 1.

A montage of two The Adventures of Elliot screenshots showing the location of a shard of life in the Age of Safekeeping

Western Fields of Flon

Follow the path to the southwest through the remains of an old house, then follow the upper path that passes in front of a locked door until you find a blue chest behind a tree. Open it to obtain a shard of life.

A montage of two The Adventures of Elliot screenshots showing the location of a shard of life in the Age of Safekeeping

Eddartrayl

Use the Southern Caves — Desert Exit and head west to enter a small area with a guidepost and a chest to the northern side. Open it to find the shard.

A montage of two The Adventures of Elliot screenshots showing the location of a shard of life in the Age of Safekeeping

Mist Ruins – Neverwither

You find the chest containing this shard of life in a room on the eastern side of sublevel two.

A montage of two The Adventures of Elliot screenshots showing the location of a shard of life in the Age of Safekeeping

Western Fields of Flon

You must go through the Secret Shortcut 1 to reach the chest containing this shard. To unlock its entrance, located southwest of the chest, you must have unlocked the bombs in the Age of Reconstruction.

A montage of two The Adventures of Elliot screenshots showing the location of a shard of life in the Age of Safekeeping

Forest Ruins – Neverwither

The Forest Ruins are located on the western side of Neverwither. After entering the place, go to the second level. Use the moving platforms to cross to the south side and jump on the plant trampolines to reach the upper floor where there’s a blue chest.

A montage of two The Adventures of Elliot screenshots showing the location of a shard of life in the Age of Safekeeping

Westerea

You find the Shrine of Life 9 southwest of the Rainbow Lotus dungeon.

A montage of two The Adventures of Elliot screenshots showing the location of a shard of life in the Age of Safekeeping (editado)segunda-feira, 15 de junho de 2026 18:09 :heart: Clique para reagir :upside_down: Clique para reagir :smiling_face_with_tear: Clique para reagir Adicionar reação Editar Encaminhar Mais

Westerea

Head north of the Rainbow Lotus dungeon using the ladder on the west side, and enter Monster Trail 3. Next, use Secret Shortcut 6 to reach the blue chest.

A montage of two The Adventures of Elliot screenshots showing the location of a shard of life in the Age of Safekeeping

Westerea

To reach the Shrine of Life 10, you must use Monster Trail 2. Its entrance is hidden among poisonous vegetation northeast of the Raindow Lotus dungeon.

A montage of two images from the Adventure of Elliot showing the location of a shard of life

Geared Ruins

Reach the second level then head to the east side. Jump over the gears that form a bridge to reach the chest.

A montage of two The Adventures of Elliot screenshots showing the location of a shard of life in the Age of Safekeeping

Garretbelt

Go to the northern part of Garretbelt and reach the Mount Phoenix – Approach guidepost. From there, head south and drop off the edge to reach the Shrine of Life 18.

A montage of two The Adventures of Elliot screenshots showing the location of a shard of life in the Age of Safekeeping

Westerea

Go east of the Northern Westera guidepost to find the chest with this shard.

A montage of two The Adventures of Elliot screenshots showing the location of a shard of life in the Age of Safekeeping

Whiterea

Use Secret Shortcut 3 in Whiterea to reach the area, near the river, where you can find this shard.

A montage of two The Adventures of Elliot screenshots showing the location of a shard of life in the Age of Safekeeping

Whiterea

You find the Shrine of Life 5 north of Whiterea, and you must use Secret Shortcut 3 to reach the place.

A montage of two The Adventures of Elliot screenshots showing the location of a shard of life in the Age of Safekeeping

Neverwither

The Shrine of Life 16 is located in the southeastern part of Neverwither.

A montage of two The Adventures of Elliot screenshots showing the location of a shard of life in the Age of Safekeeping

Westerea

This shard is located in the Falls Caves, south of the Northern Tower. Use the Northern Westerea guidepost, head to the river on the left side and swim your way north to find the caves.

Table images: Graphic: Paulo Kawanishi/Polygon | Source images: Square Enix and Claytechworks/Square Enix via Polygon


All Age of Reconstruction Shard of Life locations in The Adventures of Elliot

You can find 18 Shards of Life in the Age of Reconstruction. While most of them you can obtain without too much trouble, you will need to learn the dive ability to collect a few shards.

Map

Location

Description

A montage of two The Adventures of Elliot screenshots showing the location of a shard of life in the Age of Reconstruction

Neverwither

To reach the Shrine of Life 3, you must use Secret Shortcut 2 southeast of Neverwither. You must have unlocked the bomb to open the entrance.

A montage of two The Adventures of Elliot screenshots showing the location of a shard of life in the Age of Reconstruction

Neverwither

Go west of the Littlehope Village – Northern Entrance guidepost to find some boulders blocking a ladder. Use a bomb to destroy them and get to the chest.

A montage of two The Adventures of Elliot screenshots showing the location of a shard of life in the Age of Reconstruction

Whiterea

You must use Secret Shortcut 3’s northwest entrance to make your way to where the Shrine of Life 4 is located.

A montage of two The Adventures of Elliot screenshots showing the location of a shard of life in the Age of Reconstruction

Whiterea

This chest is located inside the Northern Caverns and you find its entrance on the northwestern side of Whiterea. Inside, on the east side of the cave, there’s a blue chest. To reach it, use the spear to break the vases and jump to where it’s located.

A montage of two The Adventures of Elliot screenshots showing the location of a shard of life in the Age of Reconstruction

North of Western Fields of Flon

You will find this chest on a small island north of the Western Fields of Flon.

A montage of two The Adventures of Elliot screenshots showing the location of a shard of life in the Age of Reconstruction

Western Fields of Flon

The Shrine of Life 2 is located north of the Western Fields of Flon.

 A montage of two The Adventures of Elliot screenshots showing the location of a shard of life in the Age of Reconstruction

Northern Tower – Westerea

East of the sublevel one, enter a room with two pillars. Align them to bridge your way to the platform with a blue chest that contains the shard.

A montage of two The Adventures of Elliot screenshots showing the location of a shard of life in the Age of Reconstruction

Westerea

Find this chest to the right of the Southern Westerea guidepost.

A montage of two The Adventures of Elliot screenshots showing the location of a shard of life in the Age of Reconstruction

Eddartrayl

From the Geared Ruins, head southwest and follow the path that takes you upwards to find this chest.

A montage of two The Adventures of Elliot screenshots showing the location of a shard of life in the Age of Reconstruction

Eddartrayl

The Shrine of Life 8 is located northwest of Eddartrayl, but to reach it you must use a bomb to open the entrance to Secret Shortcut 4 on the southwestern side of Eddartrayl.

A montage of two The Adventures of Elliot screenshots showing the location of a shard of life in the Age of Reconstruction

Southern Caves (Desert exit) – Eddartrayl

You pass through the Southern Caves during the campaign to reach the Shrine of Mystic – Ignite. The chest is behind a path, and you must have unlocked the hammer to open the way for the platforms that take you to the chest containing this shard.

A montage of two The Adventures of Elliot screenshots showing the location of a shard of life in the Age of Reconstruction

Neverwither

This Shard of Life is inside a chest on the southeast side of Neverwither. Go south from the guidepost outside the Eastern Cave, take the route to the east and swim to the other side of the small lake to find it.

A montage of two The Adventures of Elliot screenshots showing the location of a shard of life in the Age of Reconstruction

Grandtree – Neverwither

The chest containing is located on the northern side of the first level in the Grandtree. To reach the place, you must drop from the southwest area on the second level.

A montage of two The Adventures of Elliot screenshots showing the location of a shard of life in the Age of Reconstruction

Doorway Ruins – Neverwither

On the west side of sublevel two, there’s a room with two moveable mirrors and on the south side of it, you will find the chest on a platform.

A montage of two The Adventures of Elliot screenshots showing the location of a shard of life in the Age of Reconstruction

Garretbelt

Shrine of Life 7 is located on the western side of Garretbelt. You can reach the area by using the Western Caves.

A montage of two The Adventures of Elliot screenshots showing the location of a shard of life in the Age of Reconstruction

Westerea

Southwest of the Water Ruins, there are two elevated platforms. You can access the one on the left using a ladder, then jump on the one to the east to find a blue chest containing the shard. You can only access this area after having unlocked the ability to dive.

A montage of two The Adventures of Elliot screenshots showing the location of a shard of life in the Age of Reconstruction

Water Ruins surroundings

Shrine of Life 6 is located to the right of the Water Ruins.

  A montage of two The Adventures of Elliot screenshots showing the location of a shard of life in the Age of Reconstruction

Dragonpillar – Whiterea

Use the stairs to reach sublevel three. As soon as you’re on the level, you will see the chest containing this shard.

Table images: Graphic: Paulo Kawanishi/Polygon | Source images: Square Enix and Claytechworks/Square Enix via Polygon


All Age of Magic Shard of Life locations in The Adventures of Elliot

Among the 13 Shards of Life in the Age of Magic, you will only need to have unlocked specific abilities to collect a couple of them.

Map

Location

Description

A montage of two The Adventures of Elliot screenshots showing the location of a shard of life in the Age of Magic

Eastern Fields of Flon

On the northeastern side of the Eastern Fields of Flon, to the right of the Secret Shortcut 1 entrance.

A montage of two The Adventures of Elliot screenshots showing the location of a shard of life in the Age of Magic

Eastern Fields of Flon

The Shrine of Life 11 is located on the north side of the Eastern Fields of Flon.

A montage of two The Adventures of Elliot screenshots showing the location of a shard of life in the Age of Magic

Eddartrayl

You find the Shrine of Life 13 on the southeastern side of Eddartrayl.

A montage of two The Adventures of Elliot screenshots showing the location of a shard of life in the Age of Magic

Westerea

Head northeast of the Rainbow Lotus dungeon to find the Shrine of Life 12.

A montage of two The Adventures of Elliot screenshots showing the location of a shard of life in the Age of Magic

Garretbelt

This chest is north of Garretbelt. You must go through Monster Trail 5 to reach the place after having obtained the key to the Western Caves.

A montage of two The Adventures of Elliot screenshots showing the location of a shard of life in the Age of Magic

Garretbelt

The Shrine of Life 17 is on the southern side of Garretbelt, near the Doorway Ruins.

A montage of two The Adventures of Elliot screenshots showing the location of a shard of life in the Age of Magic

Fire Ruins – Garretbelt

You find this chest inside the Fire Ruins, on the northwest side of the first level, coming from the sublevel one.

A montage of two The Adventures of Elliot screenshots showing the location of a shard of life in the Age of Magic

Eddartrayl

To reach the Shrine of Life 14, use Secret Shortcut 3 to reach the upper part of the snowfield in Whiterea, where you will find a chest containing this shard.

A montage of two The Adventures of Elliot screenshots showing the location of a shard of life in the Age of Magic

Whiterea

Use Secret Shortcut 3 to reach the upper part of the snowfield in Whiterea, where you will find a chest containing this shard.

A montage of two The Adventures of Elliot screenshots showing the location of a shard of life in the Age of Magic

Ice Ruins – Whiterea

After unlocking Faie’s Vacuum spell, go to the west wing of the Ice Ruins. Use her ability to open the door and head northeast to find this chest.

A montage of two The Adventures of Elliot screenshots showing the location of a shard of life in the Age of Magic

Whiterea

The Shrine of Life 15 is located on the west shore of Whiterea.

To access this shrine, you must unlock the dive ability and enter Monster Trail 4 east of the Ice Ruins in Whiterea. From there, the only exit available will take you to the shrine.

A montage of two The Adventures of Elliot screenshots showing the location of a shard of life in the Age of Magic

Water Ruins – North of Western Fields of Flon

Use the stairs to reach sublevel two, then activate the orbs on the east side to raise the water level. Swim to the south side of the map then head right to find the chest.

A montage of two The Adventures of Elliot screenshots showing the location of a shard of life in the Age of Magic

Rainbow Lotus – Westerea

The chest is on the first level, but you must go to the sublevel one to find the stairs that will lead up to the area from where you can reach the chest.

Table images: Graphic: Paulo Kawanishi/Polygon | Source images: Square Enix and Claytechworks/Square Enix via Polygon


All Age of Budding Shard of Life locations in The Adventures of Elliot

By the time you reach the Age of Budding, you might have already unlocked most abilities and spells you will need to collect all 13 Shards of Life in this age.

Map

Location

Description

A montage of two The Adventures of Elliot screenshots showing the location of a shard of life in the Age of Budding

North of Western Fields of Flon

Head to the north Western Fields of Flon and use a bomb to break the wall and enter the lake. Swim to the west and dive to reach the beach that gives you access to the ladder to climb the small island.

A montage of two The Adventures of Elliot screenshots showing the location of a shard of life in the Age of Budding

Western Fields of Flon

The Shrine of Life 19 is located on the northern side of the Western Fields of Flon, but you must go around it to reach the ladder that gives you access to the shrine.

A montage of two The Adventures of Elliot screenshots showing the location of a shard of life in the Age of Budding

Desert Caves – Eddartrayl

Reach sublevel two by dropping off the hole in the first level, then taking the stairs to the northwest side of sublevel one. Then, open the chest to get this shard.

A montage of two The Adventures of Elliot screenshots showing the location of a shard of life in the Age of Budding

Eddartrayl

Shrine of Life 20 is on the southwest side of Eddartrayl. Take the Southern Caves – Desert Exit and head southwest to reach the area where the shrine is located.

A montage of two The Adventures of Elliot screenshots showing the location of a shard of life in the Age of Budding

Western Fields of Flon

Enter the Southern Caves – Desert Exit on the southwest side of Eddartrayl and head north to reach the area where you will find the chest containing this shard.

A montage of two The Adventures of Elliot screenshots showing the location of a shard of life in the Age of Budding

Neverwither

The Shrine of Life 23 is near the Grandtree in Neverwither. The only path to its location is along Monster Trail 6. The trail’s entrance is on the river located southeast of the shrine.

A montage of two The Adventures of Elliot screenshots showing the location of a shard of life in the Age of Budding

Dragonpillar – Whiterea

Head to sublevel three and, on the west side, use the Warp magic to reach the chest.

A montage of two The Adventures of Elliot screenshots showing the location of a shard of life in the Age of Budding

Whiterea

This shard of life is located on the northwest side of Whiterea, near the Northern Whiterea guidepost.

A montage of two The Adventures of Elliot screenshots showing the location of a shard of life in the Age of Budding

Mount Phoenix – Garretbelt

On the first level, on the west side of the map, you can open this chest after having raised the bridge by lighting a pillar near the area.

A montage of two The Adventures of Elliot screenshots showing the location of a shard of life in the Age of Budding

Garretbelt

You find the Shrine of Life 24 on the northern side of Garretbelt. Go through the monster trail 5 to reach the place.

A montage of two The Adventures of Elliot screenshots showing the location of a shard of life in the Age of Budding

Westerea

Shrine of Life 22 is located northwest of Westerea. To reach the location, you must use Monster Trail 3.

A montage of two The Adventures of Elliot screenshots showing the location of a shard of life in the Age of Budding

Water Ruins surroundings

This chest is located on the largest island southeast of the Water Ruins. You can reach it by heading to the northern side of the Western Fields of Flon.

A montage of two The Adventures of Elliot screenshots showing the location of a shard of life in the Age of Budding

Garretbelt

Use the Secret Shortcut 7 passage, southwest of Mount Phoenix to reach this chest.

Table images: Graphic: Paulo Kawanishi/Polygon | Source images: Square Enix and Claytechworks/Square Enix via Polygon

Google’s extensive June security update fixes tons of lingering Pixel problems


What you need to know

  • Google detailed its June security patch for Pixel phones shortly after Android 17 and its Pixel Drop went live.
  • The company is still focused on fixing lingering display problems, as well as battery charging issues that weren’t quite solved in May.
  • Android 17 brings a few new features for Pixels, but it also bolsters security and threat detection.

Google’s busy week continues as a new security patch is rolling out for its Pixels, carrying a series of fixes for the latest software.

Android 17 launched this week, and Pixels are receiving a June Drop loaded with features. Now, a June security patch has been detailed with a substantial number of fixes for Pixel phones. The update is rolling out for Pixel 6 and newer devices, marked as vCP2A.260605.012 for global units. Google’s extensive patch notes clue us into several “Display & Graphics” issue fixes that have plagued Pixel phones for the past few months.

How to turn off AI in your Google Docs


It happened to me: I opened a Google Doc to write an article, and I was immediately confronted with a text box inviting me to “write with Gemini.” I looked for some button to swipe away the garish AI display, but I could not find it. It made me mad.

Now, instead of writing the article I’m supposed to be working on, I am writing about how to get the AI pop-ups off of your Google Docs screen, since it took me some time to figure out. You’re welcome.

What is this monstrosity? Why won’t it just go away?Image Credits:Screenshot from Google Docs

The first fix is pretty straightforward:

  • Click “Gemini” on the top menu bar above your document.
  • On the drop-down menu, select “bottom bar preferences.”
  • You can choose to turn off that bottom bar, which will get rid of that AI box at the bottom of your screen.
Image Credits:Screenshot from Google Docs

Full disclosure: I was so enraged when I set out to find “bottom bar preferences” that I initially missed it entirely. Instead, I clicked “Ask something else” and asked Gemini to help me remove itself from my life. AI may not be human, but Gemini seemed to have some sort of survival instinct, because it told me to click the “X” icon. That does not remove Gemini. It simply closed the conversation, the one in which I was asking it how to turn itself off. Suspicious!

Image Credits:Screenshot from Google Docs

Other aggrieved Google Docs users have reported features that I have yet to encounter, like a “help me write” feature that hovers over your cursor while you work. This seems like something that would upset me, so it’s probably worth nipping that in the bud before it’s too late. Benjamin Franklin once said, “An ounce of prevention is worth a pound of cure.” (He was talking about fire safety. I am talking about product design.)

Instead of turning off each individual AI feature like a game of whac-o-mole, we can disable “smart features” across our Google workspace via Gmail.

  • First, navigate to your Gmail inbox.
  • From there, find the gear icon for Settings and click it.
  • Then, at the top of the menu, click “See all settings.” (But while you’re here, you should pick out a fun theme for your inbox. Would a little bit of whimsy kill you?)
  • After clicking “See all settings,” scroll about half way down the page to find “Google Workspace smart features,” then click “Manage Workspace smart feature settings.”
Image Credits:Screenshot from Gmail
  • Here, you’re presented with two options: one that lets you toggle off smart features in Google Workspace (like those annoying Gemini pop-ups in Google Docs), and one that applies to other smart features (which I personally find less annoying). I only toggled off the first option, but if for some reason you hate when Gmail automatically makes calendar events for your flights, this is where you can fix that.

You should now be safe from annoying Gemini pop-ups that disrupt your writing process in Google Docs. You can rest easy.

When you purchase through links in our articles, we may earn a small commission. This doesn’t affect our editorial independence.

City Car Driving 2.0 Free Download (Build 23761771)


City Car Driving 2.0 PC Game


Download File


City Car Driving 2.0 Direct Download

Choose your car – explore an entire region where every sign, traffic light, and road marking follows real traffic laws. Become the ultimate driver in the city. Goofy Gorillas

Become more confident on realistic roads: every traffic light, sign, and road marking is placed strictly according to traffic regulations, creating a believable environment for learning and honing your skills.

Progress from novice to professional: from your first city turn to off-road driving — your actions impact the gameplay and carry realistic consequences.

Prepare for the unexpected: unpredictable pedestrian behavior, dangerous lane changes, sudden hazards, and other dangers can occur at any moment – learn to make quick, correct decisions.

Challenge yourself in various weather conditions: from morning fog to nighttime storms — the dynamic weather system will push your limits and create unique scenarios for every drive.

AI vehicles obey traffic laws: strictly following regulations, traffic yields to pedestrians at crosswalks, respects speed limits, reacts to changing road conditions, and interacts with other vehicles.

Every vehicle has unique behavior: each car in traffic acts differently, imitating various driving styles — from cautious beginners to aggressive drivers who stop at nothing.

Traffic can make its own decisions: it can make mistakes, break rules, and handle situations on the fly — creating not only the atmosphere of a real road environment, but also unique gameplay!

Screenshots

System Requirements

Minimum
Requires a 64-bit processor and operating system
OS: Windows 10 / 11 (64 bit)
Processor: Intel Core i5 – 8400 2,8 GHz / AMD Ryzen 5 2600 3,4 GHz
Memory: 8 GB RAM
Graphics: nVidia GeForce GTX1660 6 GB VRAM / AMD RX 5700 8 GB VRAM
DirectX: Version 12
Storage: 15 GB available space
Sound Card: Any sound card compatible with DirectX
Support the game developers by purchasing the game on Steam

Installation Guide

Turn Off Your Antivirus Before Installing Any Game

1 :: Download Game
2 :: Extract Game
3 :: Launch The Game
4 :: Have Fun 🙂


Download File

Fired Rockstar developers can bring blacklisting claims against the GTA 6 developer, UK tribunal rules as final trial looms


An employment tribunal in the UK has ruled against striking blacklisting claims levied against Rockstar Games by staff the GTA 6 studio abruptly fired last year from ongoing legal proceedings between the two sides. The staff were let go in autumn last year, with Rockstar subsequently claiming that they were fired due to the leaking of “confidential information” via a public forum. The IWGB Game Workers Union, representing the ousted workers, have accused Rockstar of union busting over the firings.

Continue reading “Fired Rockstar developers can bring blacklisting claims against the GTA 6 developer, UK tribunal rules as final trial looms”