ARES Commander 2024: Explore the Exciting New Features for More Efficient CAD Design


Discover the efficiency-boosting capabilities of ARES Commander 2024, the latest version of the renowned CAD software. From customizable tool palettes to the cloud-based Trinity Block Library, powerful BIM-to-CAD automation, and more, ARES Commander 2024 offers new features and enhancements that will revolutionize your design process. Read on to learn about four of these standout features that will help you to take control of your CAD environment and streamline your workflows.

ARES Commander 2024, the latest version of the renowned CAD software, brings a host of exciting new features to enhance your design experience. In this blog post, we will dive into four standout features that will revolutionize the way you work: customizable tool palettes, the Trinity Block Library, the Flatten and Flatshot commands, and expanded BIM-to-CAD capabilities. We will explore how these features e

mpower you to take control of your CAD environment and streamline your workflows. And you can try all the new features of ARES Commander 2024 for yourself by downloading a free 30-day trial today!

With tool palettes in ARES Commander 2024, CAD users can conveniently store and organize their frequently used tools and data in one place, which is accessible across different drawing files and application sessions.

These tool palettes, designed with familiar properties like docking and auto-hide, offer a user-friendly experience. The software provides a preconfigured example palette, which can be customized or replaced with a palette created from scratch.

In addition to creating tool palettes for their own use, users can share them with other ARES Commander or AutoCAD users in the same *.xtp file format. This enables faster and more consistent tool reuse throughout departments or companies, as tool palettes created in AutoCAD can also be used in ARES Commander, and vice versa. Learn more about tool palettes in this video.


Flatten and Flatshot Simplify 3D-to-2D Conversion


The new FLATTEN command allows users to effortlessly convert 3D entities into 2D projections. This function not only simplifies the process of transforming complex designs into a more manageable format, but it also proves invaluable in rectifying elevation issues that may have been overlooked.

Additionally, the MAKEFLATSNAPSHOT command (alias FLATSHOT) in ARES Commander has been improved, offering users greater control over their designs. Notably, users can now customize the color and line style of foreground lines, resulting in clearer, more visually appealing representations. The updated command also enables users to modify the color and line style of hidden lines, ensuring accurate representation of concealed elements. The “Show tangent edges” option further enhances the flat representation, providing a comprehensive view of the design and ensuring no intricate details are missed. Learn more about Flatten and Flatshot in these videos.


Cloud-Based Trinity Block Library Fosters Collaboration

The Trinity Block Library is a cloud-based solution that simplifies block management in ARES Commander, ARES Kudo, and ARES Touch. With this integrated feature, users can effortlessly access and synchronize block libraries across multiple devices, ensuring consistency and accuracy in their drawings. The cloud storage enables instant updates to the library, making blocks available to all users as soon as they’re added or modified. 

This powerful tool also facilitates collaboration within organizations, allowing for easy sharing and customization of blocks to improve drawing uniformity. The Trinity Block Library is a game-changer for CAD users and CAD managers, simplifying block management and ensuring consistency across different environments and devices. Learn more about the Trinity Block Library in this video.

Expanded BIM-to-CAD Features Offer More Automation

ARES Commander’s BIM-centric features aim to address the broken workflow between CAD and BIM software. ARES Commander empowers CAD users to create smart DWG drawings from BIM models, leveraging the intelligence embedded in BIM objects. The associative connection between the original BIM project and the DWG files allows for effortless updates, so the drawings stay up to date, reflecting any changes made to the BIM project. ARES Commander also automates various routine tasks, such as adding callouts, generating aligned dimensions, creating annotations, and applying styles to BIM entities, streamlining the production of BIM drawings and reducing manual effort. 

ARES Commander 2024 introduces a new feature that automates the generation of these smart drawings, providing users with a customizable script to produce a set of enriched DWG drawings from imported BIM projects. Learn more about ARES Commander’s BIM features.

Try the New Features in ARES Commander 2024

As the examples above demonstrate, ARES Commander 2024 offers a range of exciting new features that will reshape your design experience, saving you time and effort. From customizable tool palettes and 3D-to-2D conversion with the Flatten and Flatshot commands, to the Trinity Block Library for enhanced block management and powerful BIM-centric capabilities, ARES Commander empowers CAD users to take control of their CAD environment and streamline their workflows. To learn more about these features and how they can transform your design process, visit the New Features of ARES Commander 2024 section of our website or visit Graebert’s Youtube channel.

And you can try all the new features of ARES Commander CAD software today!

Helldivers 2 devs confirm that, no, trimming ‘excess leg space in the cockpit’ doesn’t mean the nice Eagle-1 lady is hacking off her legs for liberty


Helldivers 2 players are normal about the Eagle-1 pilot—otherwise known as that charmingly-voiced lady who helps you dispense liberty from the cockpit of her fighter jet with lines such as “Administering Freedom!”, “Democracy’s on its way!” and “Got ’em!”

Eagle-1’s cheery disposition, confident attitude, and distant nature has quickly elevated her to “best girl” status in record time—and, to be fair, while I’m not exactly going goggle-eyed over certain fanart of her like some, I can appreciate that she’s a comforting presence on the battlefield. When your diver(s) are screaming Sweet Liberty and getting wrung through the meat grinder, Eagle-1’s moxie is more than welcome. 

SAVE US EAGLE 1! from r/Helldivers


Visual Studio Code and GitHub Copilot AI


March 30, 2023 by Chris Dias, @chrisdias

AI did not write this blog post, but it will make your development experiences incredible.

Note: If you like to learn about the latest GitHub Copilot experience in Visual Studio Code, go to the GitHub Copilot in VS Code topic, where you’ll find details on the Copilot editor integration and Copilot Chat features such as inline Chat, the dedicated Chat view, and Quick Chat.

There is a lot of buzz, excitement, and some concerns around Artificial Intelligence today. Advancements are happening almost daily, it’s hard to keep up. But once you give it a try, you quickly realize what more than a million Copilot users see daily, that this technology does not disappoint, especially with Large Language Models (LLMs) like OpenAI’s GPT-3.5/4.

In this post, we want to give a little background on AI in VS Code, show you some exciting new experiences powered by GitHub Copilot, and give a peek into where and how we see things going forward.

GitHub Copilot “V1”

Microsoft’s Developer AI Service is GitHub Copilot, and if you have not seen GitHub’s vision for the entire development lifecycle, check out this great blog post.

It’s been more than a year since the Copilot extension first launched. Oege De Moor and his team at GitHub collaborated with OpenAI to bring the first at scale example of using LLMs for development, specifically OpenAI’s codex model.

Editor with Copilot generated ghost (faded) text suggestions

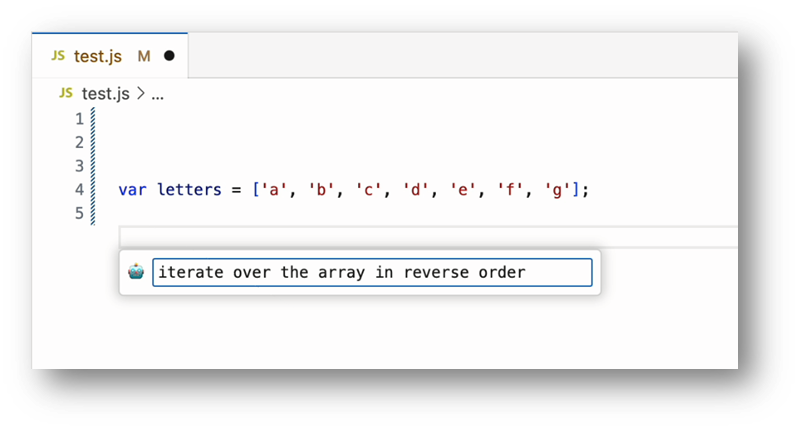
Copilot offers real-time hints for the code you are writing by providing suggestions as “ghost text” based on the context of the surrounding code. If you write your intentions as comments or use descriptive function names, Copilot can use these hints to automatically generate code, word by word, line by line, or even block by block.

This is a surprisingly effective experience, often the ghost text just works, and you quickly end up writing code in a smooth “Tab-Tab-Tab” development flow.

It turns out, this was just the beginning.

In-Editor Chat

We knew it was just a matter of time before AI permeated the development process. We had been working with the GitHub Next team on Copilot and the Copilot Labs extension, but the release of ChatGPT in November 2022 significantly accelerated the timetable.

The VS Code team had an internal hackathon to explore how to integrate AI into VS Code more deeply and came up with many cool ideas such as improved renaming and refactorings, code transformations based on examples, and ways to create file glob patterns or regex expressions using natural language.

As interesting as these ideas were, we kept circling around the Chat experience. We had a healthy dose of skepticism. Did we really need yet another Chat experience in our lives? VS Code is an editor, our job is to get you into the “zone” and help you stay there by removing distractions while you crank out the next unicorn.

One exploration we did find interesting, involved building Chat directly into the editor. Here’s the very first prototype:

Prototype of a chat input in the editor

As we iterated on the design, we realized this user model has advantages. It’s easily invoked from the keyboard, you stay in your code, and the output is code (and only code).

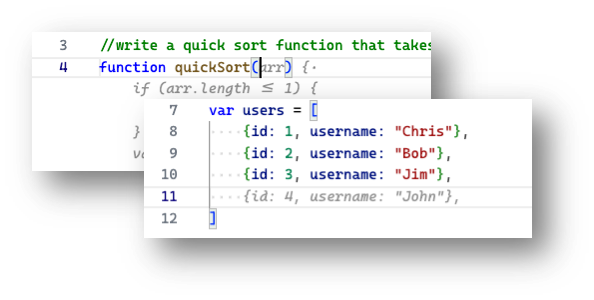
In the example below, we first selected the users array and then pressed Cmd+I on macOS (or Ctrl+I on Windows/Linux) to bring up the Chat input. We then asked Copilot to split the username field into both firstName and lastName, and last we clicked on Inline Diff to see the changes Copilot made.

Inline change with preview of update

No need to express your intentions to Copilot using a comment or an overly descriptive function name, just press Cmd+I and describe what you want to do. Stay in the zone while the Copilot does the work.

Embracing the Chat view

As the excitement around ChatGPT grew, so did the number of internal and external extensions with custom Chat views. We worried that these would not scale, it’s hard to support the basics like key bindings and themes in a web view, and for those using the Monaco editor for code blocks, it is very hard to scale to hundreds of instances, not to mention there is no extension support in those editor instances. As a result, we partnered closely with the GitHub Copilot team to build a Chat view into the core of VS Code.

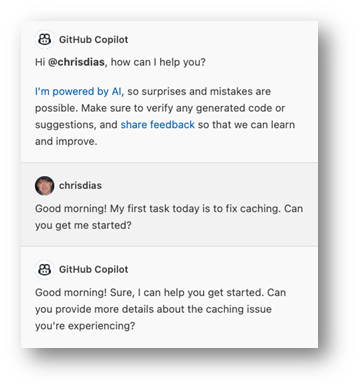
Over time and despite our initial hesitation, the full Chat view experience started to win us over. I mean, who doesn’t want to start off their day with a greeting like this?

A GitHub Copilot conversation within an extension's chat view

We started to realize more and more benefits of a Chat view.

The most obvious value of an integrated experience over a browser-based chat is that we can provide context to the model, helping to ground the conversation and provide better answers. For example, you can’t easily ask the browser-based ChatGPT to optimize code that spans multiple files. VS Code already knows a lot about the workspace as this is how you can do refactorings across files, Find All References, Go to Definition, and more. Key information can be responsibly embedded in the prompt so that the model can give more relevant answers, ultimately letting you ask Copilot to optimize or refactor code that has dependencies across multiple files.

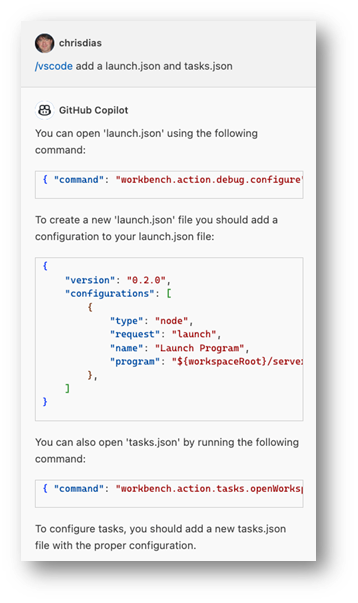
Answers to many programming questions often include multiple steps. Think about how many blog posts walk you through a process – a Chat view is well suited for this type of interaction. A great example is debugging. If we’re being honest (and we are), it isn’t easy to configure launch.json and tasks.json for debugging. Instead of us writing more documentation or adding dialogs and wizardry to the editor, it turns out you can simply ask “/vscode add a launch.json and a tasks.json” which then provides instructions on how to create the files, content to add, and so on, until you are hitting breakpoints and inspecting variables like a boss.

A GitHub Copilot chat asking how to add debugging support

But perhaps the most important reason for integrating chat is because having a two-way conversation helps you decide what is right and what is wrong. Large language models are not perfect, and they don’t “think”. They simply figure out the next best word to respond with (granted, they are pretty good at this).

As the Pilot, you are always in charge, and you decide which of Copilot’s suggestions to take and what code to bring into your workspace. The ability to ask clarifying questions or provide additional specifics helps you make those key decisions.

Getting the most out of Copilot

Naming is hard (we should know, our product is called “Code”). However, “GitHub Copilot”, is a great name. Rather than “pair programmer” or “auto pilot” or simply “chat”, “Copilot” conveys multiple important concepts in a single word.

So, if you think of yourself as the Pilot of VS Code and GitHub Copilot as…well…the Copilot, you start to get a sense of how to think about the service and ways to interact with it to get the most from your seatmate.

  • We can’t repeat this enough: As the Pilot, you are in charge. You decide which suggestions to take and what code is integrated into your workspace.
  • Copilot’s primary job is to assist you, taking care of mundane or repetitive tasks. Let it write test cases, craft sample data, or scaffold out code based on existing patterns.
  • Copilot can do more with more context. We’re all accustomed to quick keyword-based web searches, but the more details you provide, the better results you will get. For example, instead of “Node Express TypeScript”, ask Copilot to “scaffold out a Node.js website using the Express.js framework using TypeScript” and then iterate!
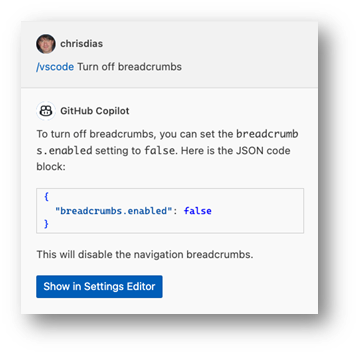
  • You can scope interactions to specific topics by pressing / in the Chat input field. For example, to learn how to turn on or off breadcrumbs in the editor, type in /vscode Turn off breadcrumbs.

Asking Copilot how to turn off VS Code breadcrumbs in the editor

  • You can also use topics as shortcuts. Instead of typing “explain this code” in the inline chat, simply type “/” + Tab (a shortcut to /explain) and hit Enter. The Chat view will open with an explanation of the selected code.
  • Know that Copilot isn’t perfect and will give wrong answers. Ask clarifying questions to help decide which are right, which are wrong, and use the Up/Down vote buttons to help us improve the experience.
  • Last and almost as important as the first tip, always greet your Copilot with a friendly “Hello” or “Good Morning”, it will put both of you in a better mood.

Getting started today

To see Copilot in action and get more tips on how to get the most out of Copilot, check out this awesome introductory video or dive into the full VS Code Copilot Series on Youtube.

The inline completions experience discussed above is available today. If you don’t have Copilot through your organization, you can sign up here and start a free trial. From there:

  • Open VS Code (even better, use Insiders).
  • Open the Extensions view (⇧⌘X (Windows, Linux Ctrl+Shift+X)), search for GitHub Copilot and install the extension.
  • When prompted, authenticate with your GitHub ID.
  • Open a code file and let the magic happen!

To access the chat experiences (in-editor, Chat view, Quick Chat), you’ll need to install the GitHub Copilot Chat extension:

  • Open the Extensions view (⇧⌘X (Windows, Linux Ctrl+Shift+X)), search for the GitHub Copilot Chat extension.
  • When prompted, authenticate with your GitHub ID.
  • To open the in-editor Chat, optionally select a block of code and press ⌘I (Windows, Linux Ctrl+I). Ask Copilot to write a Quick Sort function.
  • A “Chat” icon will appear in the Activity Bar, click on it to open the Chat view. Go ahead, ask Copilot to “write a program to calculate the airspeed velocity of an unladen swallow”.
  • To try out Quick Chat, you can run Chat: Open Quick Chat or use the ⇧⌘I (Windows Ctrl+Shift+I, Linux Ctrl+Shift+Alt+I) keyboard shortcut.

You can learn more about the GitHub Copilot and Copilot Chat extensions in the GitHub Copilot in VS Code topic.

Responsible AI

Monumental advancements in technology like this really are few and far between. We too believe AI is the next big shift that will transform how we think about, build, and use developer tools. It will ultimately enhance every aspect of the development process in ways we can only dream about today. We don’t claim to be the first to say this, but soon we will all wonder how we ever built, debugged, deployed, and maintained applications and systems without AI powered tools.

AI is not perfect (neither are we!) and it will improve over time. Microsoft and GitHub Copilot follow Responsible AI principles and employ controls to ensure that your experience with the service is appropriate, pleasant, and useful. We understand there is hesitation and concern surrounding the rapid expansion of AI’s capabilities, and fully respect those who don’t want or can’t use Copilot.

Connecting the dots

The combination of a Chat assistant, in-editor Chat, and inline completions let you leverage the power of Copilot no matter what coding “zone” you are in. Just getting started or have questions? Use the Chat view. Furiously writing code and want to do some refactoring, updating, or scaffolding? Smash Ctrl+I and ask Copilot to do it for you. Working your way through a problem step by step? Use inline completions to Tab-Tab-Tab your way to success.

Integrating Chat into VS Code, powered by GitHub Copilot, is just one step on a journey. We will continue to explore additional “inner loop” scenarios such as using natural language to describe search patterns or code generation, automatic generation of commit messages and pull request descriptions, smarter code renaming, refactoring, transformations, and more.

Follow along on GitHub, Twitter, and YouTube. Let us know what you think and what ideas you have for AI in VS Code.

Thanks,

Chris and the VS Code team

Happy Smart Coding!


Qualcomm Accused of Faking Benchmarks for Its Snapdragon X Elite and Plus SoCs


Qualcomm has been generating a lot of hype for its upcoming Snapdragon X Elite and Plus CPUs for Windows. As the first competitive Arm-based processors for Windows, the chip giant’s forthcoming CPUs promise to deliver the same power and efficiency that Apple has become famous for with its M-series SoCs to Windows users. However, according to a muckraking analyst, Qualcomm is not honest with its performance numbers, a claim that Qualcomm now says is false.

The site Semiaccurate published the bombshell piece about Qualcomm’s Snapdragon SoCs yesterday, igniting a firestorm of controversy and speculation throughout the tech world. The heart of the controversy is performance claims made by Qualcomm for its X Elite and X Plus SoCs, the latter of which was announced yesterday. Both SoCs are claimed to offer far superior performance to every other mobile CPU, and the benchmarks provided to the media so far have mostly backed up these claims. It’s also allowed media to run benchmarks, but only pre-selected tests, in a controlled environment, on its own machines.

Snapdragon X Plus

Adding to the mystery is Qualcomm has published specs and performance numbers without much clarity about how it was arriving at some of these numbers.
Credit: Qualcomm

However, Semiaccurate says these benchmark numbers are cooked and that none of Qualcomm’s OEM partners have been able to replicate them on their systems. The site says its sources for this claim are two “Tier 1” OEMs (Dell, HP, Lenovo) and “other sources.” The site said that when OEMs got their own samples to test, their performance was about 50% lower than the numbers in Qualcomm’s technical documentation. Qualcomm blamed the discrepancy on inferior cooling and benchmarks not native to Arm. However, after time passed, more OEMs with considerable engineering talent reported findings similar to Semiaccurate’s findings, leading the site to conclude something was rotten in Denmark.

Qualcomm has denied the claims in a statement to Tom’s Hardware. “We stand behind our performance claims and are excited for consumers to get their hands on Snapdragon X Elite and X Plus devices soon,” said a spokesperson for Qualcomm. This boilerplate statement doesn’t address any of the underlying claims by Semiaccurate, but we suppose it’ll all come out in the wash eventually. Microsoft is expected to reveal the first Snapdragon X Elite/Plus hardware at its Build conference next month, hopefully allowing the press to test it on its own so we can get to the bottom of this situation.

Best Summer Jobs for College Students To Make Money Online


There are numerous ways to make money during the summer as a college student. You can work from home and make money on your schedule with these online summer jobs.There are numerous ways to make money during the summer as a college student. You can work from home and make money on your schedule with these online summer jobs. Working while in school is an excellent way to take care of some college expenses. 

Most college students find it challenging to get a job that pays during summer break. The focus of this post is to teach you how to make money online as a student. 

There are so many companies who hire work from home college students, and you can join the train today. Making money from home as a college student is very easy. However, you must be determined, focused, and must possess a skill that people need. 

Also, you will need a personal computer, a fast internet connection, and a dedicated workspace. 

Want To Start Your Own Money-Making Blog?

My FREE 3 part-video series will show you why blogging is one of the best ways to make money online today. Watch now!

There are numerous ways to make money during the summer as a college student. Some of them are:

Online Surveys

Online Survey is a great way to make money as a college student. You will be required to voice your opinion on products and services that interest you. This information is then used to improve the quality of the product or service offered. The pay is not much at first. It is a great way to start your online money making a journey, though.  Companies like SwagbucksOpinion Outposts, and others here offer paid survey jobs online.

Social Media Manager

As a Millennial, this should be one job that excites you. Working as a Social Media is not only fun; it puts money in your pocket. Your job as a Social Media Manager is to serve as the company’s online public relations officer. You will be required to interact with the customers regularly. The pay of a Social media manager varies with each company. However, the minimum you can earn per hour of work is $15. You can check out a list of companies that hire Social Media Managers:

Also check out 6 Real Online Jobs To Make Extra Money from Home

Online Tutor

If you have knowledge on some courses, you can make money with that knowledge. In addition to earning money, you will also enhance your knowledge of that particular subject. You can offer peer tutoring classes to other college students. You can also choose to consult on other non-academic areas like Music, Fashion, and arts. As a Tutor, you can earn between $20 and $200 per hour of work. You can check a list of companies that hire Work from Home Tutors.

Data Entry

Data Entry is one of the most common work at home jobs for college students. This job requires little or no skill to fulfil. The pay is in the range of $5-$20 per job done. 

Before you apply for work as a Data Entry agent, make sure the company is genuine. Companies that hire work from home Data Entry Agents are

See this list of data entry work from home jobs.

Freelance Writer

Freelance Writing is one of the best online job that pays. Webmasters are on the lookout for writers to produce contents for their website. You can choose to write for blogs or even a website about life in college. Some companies pay up to $50 for every article. 

Example of companies that hire Freelance writers are:

Before you apply to work for any company, research the company well. Online Jobs will not make you a millionaire overnight. If the pay sounds too good to be true, then it is best if you avoid it.

How to change your IP address, why you’d want to – and when you shouldn’t


Cat5 ethernet cable

Jack Wallen/ZDNET

Security and privacy have been hot topics for a long time (and that’s not going to change any time soon). One means of achieving privacy on the internet is to either change or obfuscate your IP address, so evildoers and/or third parties aren’t able to track you or keep a history of your browsing traffic.

Also: This Linksys Wi-Fi 7 mesh router makes reliable wireless throughout your home so very easy

Changing your IP address might sound like a task that requires a computer science degree — but it’s not. It’s easier than you think. I want to show you how you can accomplish this without a struggle.

Before we get started, some explanation is in order

Different IP addresses

One of the first things to understand is the difference between an internal and external IP address. On your home network, you have one external IP address (which is assigned to the modem/router your service provider gave you). This IP address is what you see if you open a browser and go to What Is My IP Address

This address is the one seen by the outside world — and it’s one you cannot change permanently. However, you can make it appear to be different from what it is. Why would you want to do that? Changing the IP address as seen by the outside world makes it harder for others to track you, especially if you change it randomly. Perhaps you need to transmit sensitive data and you want the IP address to appear as though it’s in a different location  — even a different country.

On the other hand, you have several internal IP addresses — the addresses assigned by your router \to the various devices on your network (desktops, laptops, phones, tablets, TVs, etc.). You can change those addresses manually. If you have the skill (and the ability to access your router’s configuration window), you can even change the IP address scheme from something like 192.168.1.0 to 10.0.1.0. 

Also: This is the fastest and most expensive Wi-Fi router I’ve ever tested

Changing your internal IP address isn’t nearly as important as how your device is seen by the outside world via your external IP address. Why would you want to change an internal IP address? In a word, convenience. Here’s a personal example: I have a Samba share on my network and I want to ensure that this machine has an IP address that I can easily remember and an address that won’t ever change.  

A caution is in order: It’s not always a good idea to change these internal IP addresses. There’s a little thing called an IP address conflict, which happens when more than one device on a network has the same address. When this happens, a device might have difficulty accessing the internet or it could cause slowdowns on your network.

Your internal IP addresses are assigned by your router. Unless you configure your router manually to only assign from a specific pool of addresses (say 192.168.1.1-192.168.1.50) and then only configure manual addresses from 192.168.1.51 and up, you might run into IP address conflicts. To that end, it’s best to only change internal IP addresses if you know what you’re doing. 

Also: What is 5G home internet? Here’s what to know before you sign up

So, read on!

Changing your internal IP address manually

Here are the steps for different operating systems.

How you do this will depend on your desktop environment, so I’ll walk you through how it’s done on the GNOME desktop environment (which will be similar to other desktops) :

  1. Open the Settings app.
  2. Locate Network.
  3. Click the gear icon associated with either Wired or Wireless.
  4. Select the IPv4 tab.
  5. Click Manual.
  6. Fill out the necessary information (Address, Netmask, Gateway, DNS) and click Apply.

  1. Open System Settings.
  2. Go to Wi-Fi (if connected wirelessly).
  3. Locate your current wireless connection and click Details.
  4. Click TCP/IP.
  5. Select Manually from the Configure IPv4 drop-down.
  6. Fill out the necessary information (Address, Netmask, Gateway, DNS) and click Apply.
  7. Click OK.

    1. Open Settings.
    2. Go to Network & Internet.
    3. Select your connection type (Ethernet or Wi-Fi).
    4. Click Manage and then click Edit.
    5. Select Manual under Edit Network IP.
    6. Fill out the necessary information (Address, Netmask, Gateway, DNS) and click Apply.
    7. Click Save.

    1. Open Settings.
    2. Tap Network & Internet.
    3. Tap the gear icon associated with the wireless network you’re using.
    4. Tap the pencil icon in the upper right corner.
    5. Tap Advanced options.
    6. Select Static from the IP Settings drop-down.
    7. Fill out the necessary information (Address, Netmask, Gateway, DNS) and click Apply.
    8. Click Save.

    1. Open Settings.
    2. Select Wi-Fi
    3. Tap the icon to the right of the wireless network you’re using.
    4. Select Manual from the Configure IP drop-down.
    5. Fill out the necessary information (Address, Netmask, Gateway, DNS) and click Apply.
    6. Click Save

    Remember, changing your internal IP address does nothing to your external address.

    Changing your external IP address

    As I mentioned, you won’t be doing this manually or permanently. What you can do, however, is use a service to masquerade your true external IP address as something else. For this, you can obfuscate your external IP address in three different ways.

    1. VPN

    Most modern VPN services not only mask your external IP address but also encrypt your traffic. This is probably the easiest method to hide your external IP address. You’ll find VPN services for every platform you use (Linux, MacOS, Windows, Android, and iOS). Popular VPNs include NordVPN, ExpressVPN, Surfshark VPN, Private Internet Access, and Proton VPN. You can read more about how these services rate (and what features they offer) here. Most VPNs do have an associated cost.

    Also: The best VPN services: Expert tested

    2. Tor Browser

    If you don’t want to have to either pay for a VPN or go through the process of installing and configuring such a service, you could always use Tor Browser. Tor Browser does everything a VPN does, only with more layers of security. The only caveat to using Tor Browser is that it only works for your web browser traffic, which means it won’t obfuscate your external IP address for other network-based services.

    Also: How to use Tor browser (and why you should)

    3. Proxy Server

    This is the most complicated process because it requires installing and configuring the service, which is often more challenging than using either a VPN or Tor Browser. On top of that, if you opt for a Proxy Server, you also have to configure any machine on your network to connect through the proxy server. I wouldn’t recommend going this route as the complications it adds can be quite frustrating. 

    And there you have it: The various ways you can change your internal and external IP address. Do keep in mind that when changing your internal IP address you want to make sure you’re not changing it to one that is already in use (otherwise, you’ll wind up with IP Address conflict errors). As for your external address, your best bet is to go with either a VPN or Tor Browser to obfuscate your external address, which not only prevents third parties from locating (and even tracking) you but also encrypts your network traffic.


    Best Gaming PC under $400 in 2024


    What you get for $400

    For $400, you have to curb your expectations of what you want this PC to do. For gaming, you can expect around 30FPS in 1080p and 60 in 720p, which is perfect for e-sports titles, but not so much the AAA story-driven games. There have been a lot of compromises made when trying to confine to this tight budget, one of the most notable forfeitures is the dedicated GPU. With that being said, we do have a very efficient CPU to do all of the heavy lifting, the Ryzen 5 5600G is one of the best value gaming APUs on the market and is perfect for our purposes. We have paired the Ryzen 5600G with ultra-fast DDR4 3200MHz memory, as the 5000 series Ryzen core communication speed is directly tied to RAM speed, giving the Ryzen 5 a fighting chance.

    Performance

    This $400 gaming PC build is expected to hit the 30 – 60 FPS mark in 1080P, and 60FPS and over in the lower 720P resolution. This isn’t ideal for those resource-heavy AAA titles, but it’ll do just fine for those E-sports players who need every drop of FPS possible. To be frank, you’d get much better performance out of our $500 PC build if you just saved up the extra $100.

    $400 PC vs Console

    In reality, there’s no way that this $400 PC can compete with the likes of a PS5 or an Xbox Series X in gaming workloads. Consoles are incredibly optimized and the games that are made for them are tailor-made to the hardware that these consoles carry, and we can’t compete with that level of optimization. However, with our $400 build, you can use it as, well, a PC. Surf the web, create a website, develop a game, do some software development, all things you can’t do (or would be a pain to do) on a games console.

    If you want a very capable home server or media PC, then this $400 PC build would be a great consideration against a console. you can still do some light gaming until you save up enough money to pick up a 6600 XT for example, and then you’re off to the races. But if we’re talking of exclusively gaming, there is much more value to be found in a console.

    Can you overclock on a $400 budget?

    The short answer is yes, you’re probably overclocking right now and you don’t even know it. Do you know how you have to enable XMP or DOCP to make the most out of your memory? That’s overclocking. If you’re thinking about pushing the 5600G beyond its limits, then we would suggest overclocking the GPU component rather than the CPU component. Doing both will produce too much heat, and give you diminishing returns. Remember, you have to increase your cooling capacity if you want to overclock your CPU, which will cost extra for a better cooler.

    Should you buy second hand?

    Buying second-hand can be a great way to save money if you’re looking to make your budget go as far as possible. There are only a couple of things we recommend you stay away from when selecting second-hand parts, these are HDDs and Power supplies. There’s still a lot you can save when opting for second-hand components on a $400 budget. Ryzen 7 5700X CPUs go for around $130 right now, along with RTX 1650s that go for around $100. Even if you built the PC now, and used second-hand parts to upgrade the system later down the line, you’d still be saving money.

    Build a gaming PC by price

    Check out some of our price-focused custom PC build guides below.

    Other Related Custom PC Guides:

    Related Prebuilt Gaming PC Guides

    Check out some of our related guides below.


    Generative AI Landscape In The Mobile App Development Industry


    Generative AI Landscape in the Mobile App Development Industry

    The emergence of Generative Artificial Intelligence (Gen AI) and its intersection with mobile app development has led to remarkable advancements in creativity, personalization, and user engagement. Generative AI models, leveraging machine learning, deep learning, and artificial neural networks, can generate unique content, videos, audio, and images based on user prompts.

    In this article, we would like to walk you through how Generative AI is evolving in the mobile app development industry, highlighting its applications, challenges, and future of Gen AI in Android and iOS development.

    What is Generative AI?

    Generative AI refers to a class of algorithms capable of generating new data based on the user prompts and patterns learned. This revolutionizing AI technology can learn from a dataset of input, process structured and unstructured data, and generate accurate data and insights. Generative AI models, such as Generative Adversarial Networks (GANs), Variational Autoencoders (VAEs), and Transformer models, have demonstrated remarkable capabilities in generating realistic images, text, and even entire video scripts.

    Significant Use Cases of Generative AI in Mobile App Development

    Generative AI holds immense promise for enhancing mobile app experiences across various domains. Our expert mobile app developers with best practices in software development have listed a few key applications of generative AI in mobile app development.

    • Generative AI for Content Generation

    Generative AI can be used to automatically generate text, images, and videos for social media, content marketing, and personalized recommendations. Integration of Generative AI into mobile apps helps to create engaging content and videos tailored to user preferences.

    • Gen AI Ideas for Intuitive App Design

    Generative AI enables the creation of unique designs and illustrations for Android, iPhone, and web apps. UI designers can generate custom logos, graphics, and visual elements using generative AI algorithms. Hence, Gen AI in mobile application development empowers designers to create intuitive UI designs.

    • Gen AI for Generating Realistic Effects

    The trend for AI-generated images is all everywhere. Generative AI applications and solutions allow mobile application developers to integrate photo editing capabilities in mobile apps. This integration helps users apply creative filters, remove imperfections, and generate realistic effects with minimal effort, enhancing photo quality and visibility.

    • Collaborative and Interactive Virtual Assistants

    AI Chatbots or virtual assistants are the best innovations that are assisting industries to serve their client base in an optimized and the best way. Generative AI empowers conversational chatbots in mobile apps to better interpret user prompts and generate responses, enabling personalized experiences. Hence, Gen AI-powered Chatbots can engage users in human-like conversations, answer queries, provide recommendations, and perform tasks, enhancing customer support and user engagement.

    • Gen AI in Gaming app Development

    Generative AI is revolutionizing mobile gaming experiences by enabling procedurally generated content, dynamic storytelling, and interactive gaming sessions. Game app developers can use generative algorithms to create virtual environments, characters, and narratives that evolve and adapt based on player actions and preferences.

    • Behavior Analysis and Personalization

    Generative AI integration in mobile apps helps organizations analyze user behavior, preferences, and historical data to generate insights. These insights will help companies to deliver personalized recommendations, product suggestions, and customized content in mobile apps. By understanding user preferences, mobile apps can deliver tailored experiences that resonate with individual users.


    Key Challenges Involved in Generative AI Implementation

    Despite its potential, generative AI in mobile app development poses several challenges, including:

    • Data Privacy and Security

    Generative AI applications or solutions trained on user data might pose a few concerns about privacy and security. Mobile app developers must implement robust data protection measures and ensure compliance with privacy regulations to safeguard user information and prevent misuse of generative models. USM Business System has expert AI app developers who have best practices in developing AI and Gen AI-powered apps that ensure high data security and privacy.

    Generative AI algorithms may involuntarily continue biases and stereotypes present in the training data. Mobile app developers should evaluate and mitigate potential biases in generative models to ensure fairness, diversity, and inclusivity in the generated content and recommendations.

    • User Experience and Adoption

    Introducing generative AI features in mobile apps requires careful consideration of user experience and adoption. Developers should design intuitive interfaces, provide clear explanations of generative features, and solicit user feedback to ensure acceptance and usability among diverse user groups.


    The future of generative AI in mobile app development

    The future of generative AI in mobile app development is promising, with ongoing advancements in GPT models, algorithms, tools, and applications.

    Developments are continuously improving generative AI algorithms to generate more realistic, diverse, and high-quality content such as text, images, audio, and video. The Gen AI is further optimized using self-supervised learning, reinforcement learning, and meta-learning to enhance its capabilities.

    Further, with the rise of edge computing and on-device AI, mobile devices are becoming increasingly capable of running sophisticated generative models locally, without relying on cloud infrastructure. Mobile apps may leverage on-device inference to deliver real-time generative experiences while preserving user privacy and reducing delay.

    Generative AI will also continue to find applications in domain-specific tasks such as design, interior decoration, music composition, and virtual reality content creation. Mobile apps tailored to specific industries and niches will leverage generative models to automate creative workflows, inspire innovation, and enhance productivity.

    Moreover, as Gen AI becomes more integrated into creative workflows, the focus will shift towards enabling seamless collaboration between humans and AI. Future mobile apps will empower users to co-create, customize, and refine generative content, blurring the lines between human creativity and artificial intelligence.


    Wrapping Up!

    The use cases of Gen AI in mobile app development are incredible. Every application of Gen AI in mobile application development contributes to improving ROI. As we discussed in this article, while the benefits of generative AI for mobile app development are huge, there are a few challenges. But USM will help you overcome implementation challenges and optimize operational efficiencies. By harnessing the power of generative models, our mobile app developers can create innovative experiences that delight users, inspire creativity, and drive business growth in the digital age.


    AutoCAD SHEET SETS Explained! The Best Tool to Save You TIME Instantly


    Hi All,

    Happy Thursday!

    I hope you’re having a great week so far and enjoying some warm weather and time outside this spring.

    I’m excited to share this week’s video and if you haven’t checked out last week’s video yet you can watch it here (Get Started with SOLIDWORKS Online). I’ve also got some new 3d modeling/design tutorial videos coming where we will walk through the process of designing something for the real world!

    Jumping into this week’s video, we are getting into how sheet sets work in AutoCAD.

    I’ve long talked about how Sheet Sets are one of the most underused yet highly helpful tools in AutoCAD. I think the steep learning curve and general confusion about how Sheet Sets work have unfortunately kept many users from using them, but this is a huge hindrance to productivity, especially on large projects!

    In the video, I wanted to explain and simplify sheet sets as much as possible, things like what is a sheet set, how to set up a sheet set, tips, tricks, and useful automation when using sheet sets, and more!

    Watch this week’s video now: AutoCAD SHEET SETS Explained! The Best Tool to Save You TIME Instantly

    That’s all for today, I hope you enjoyed this week’s email and I would love to hear what you think, do you use Sheet Sets regularity? If not, Why?
     
    Be sure to let me know by hitting reply or on twitter @cadintentions

    As always, thank you so much for reading and watching, I am super excited for the rest of the year, growing the content, tutorials, and blog with you all. 

    Cheers and happy Drafting!

    PS. If you liked today’s video or any of my videos/tutorials and you want to learn over 15 years of AutoCAD Tips & Tricks in a hurry, you can use this link to get my AutoCAD Fundamentals Course and join 100’s of fellow drafters/designers and get started right now!

    The following two tabs change content below.

    The following two tabs change content below.

    Brandon is a Civil Designer, Aspiring Blogger/Creator, Husband, Father to two Amazing Kids and Tech Aficionado from a small town in Canada. He has been obsessed with design and technology since he can remember and working as a Civil Designer for nearly as long. Brandon’s blog and Youtube channel, CADIntentions.com has been his outlet and excuse for keeping up with new tech and trends in the CAD design world for the last 10 years growing to more than 60,000 subscribers and over 15,000,000 views, while also being the source of many great friendships and unique opportunities.

    If you would like to Sponsor CAD Intentions or Work together in some way, Please visit my About Page and send me an email: http://cadintentions.com/about-me/


    Which big data framework to choose


    With multiple big data frameworks available on the market, choosing the right one is a challenge. A classic approach of comparing the pros and cons of each platform is unlikely to help, as businesses should consider each framework from the perspective of their particular needs. Facing multiple Hadoop MapReduce vs. Apache Spark requests, our big data consulting practitioners compare two leading frameworks to answer a burning question: which option to choose – Hadoop MapReduce or Spark. 

    Spark vs. Hadoop MapReduce: Which big data framework to choose

    A quick glance at the market situation

    Both Hadoop and Spark are open source projects by Apache Software Foundation and both are the flagship products in big data analytics. Hadoop has been leading the big data market for more than 5 years. According to our recent market research, Hadoop’s installed base amounts to 50,000+ customers, while Spark boasts 10,000+ installations only. However, Spark’s popularity skyrocketed in 2013 to overcome Hadoop in only a year. A new installation growth rate (2016/2017) shows that the trend is still ongoing. Spark is outperforming Hadoop with 47% vs. 14% correspondingly.

    To make the comparison fair, we will contrast Spark with Hadoop MapReduce, as both are responsible for data processing.

    The key difference between Hadoop MapReduce and Spark

    In fact, the key difference between Hadoop MapReduce and Spark lies in the approach to processing: Spark can do it in-memory, while Hadoop MapReduce has to read from and write to a disk. As a result, the speed of processing differs significantly – Spark may be up to 100 times faster. However, the volume of data processed also differs: Hadoop MapReduce is able to work with far larger data sets than Spark.

    Now, let’s take a closer look at the tasks each framework is good for.

    Tasks Hadoop MapReduce is good for:

    • Linear processing of huge data sets. Hadoop MapReduce allows parallel processing of huge amounts of data. It breaks a large chunk into smaller ones to be processed separately on different data nodes and automatically gathers the results across the multiple nodes to return a single result. In case the resulting dataset is larger than available RAM, Hadoop MapReduce may outperform Spark.
    • Economical solution, if no immediate results are expected. Our Hadoop team considers MapReduce a good solution if the speed of processing is not critical. For instance, if data processing can be done during night hours, it makes sense to consider using Hadoop MapReduce.


    Tasks Spark is good for:

    • Fast data processing. In-memory processing makes Spark faster than Hadoop MapReduce – up to 100 times for data in RAM and up to 10 times for data in storage.
    • Iterative processing. If the task is to process data again and again – Spark defeats Hadoop MapReduce. Spark’s Resilient Distributed Datasets (RDDs) enable multiple map operations in memory, while Hadoop MapReduce has to write interim results to a disk.
    • Near real-time processingIf a business needs immediate insights, then they should opt for Spark and its in-memory processing.
    • Graph processing. Spark’s computational model is good for iterative computations that are typical in graph processing. And Apache Spark has GraphX – an API for graph computation.
    • Machine learning. Spark has MLlib – a built-in machine learning library, while Hadoop needs a third-party to provide it. MLlib has out-of-the-box algorithms that also run in memory. But if required, our Spark specialists will tune and adjust them to tailor to your needs.
    • Joining datasets. Due to its speed, Spark can create all combinations faster, though Hadoop may be better if joining of very large data sets that requires a lot of shuffling and sorting is needed.


    Interested how Spark is used in practice? Check how we implemented a big data solution for IoT pet trackers.

    View the project

    Examples of practical applications

    We analyzed several examples of practical applications and made a conclusion that Spark is likely to outperform MapReduce in all applications below, thanks to fast or even near real-time processing. Let’s look at the examples.

    • Customer segmentation. Analyzing customer behavior and identifying segments of customers that demonstrate similar behavior patterns will help businesses to understand customer preferences and create a unique customer experience.
    • Risk management. Forecasting different possible scenarios can help managers to make right decisions by choosing non-risky options.
    • Real-time fraud detection. After the system is trained on historical data with the help of machine-learning algorithms, it can use these findings to identify or predict an anomaly in real time that may signal of a possible fraud.
    • Industrial big data analysis. It’s also about detecting and predicting anomalies, but in this case, these anomalies are related to machinery breakdowns. A properly configured system collects the data from sensors to detect pre-failure conditions.

    Which framework to choose?

    It’s your particular business needs that should determine the choice of a framework. Linear processing of huge datasets is the advantage of Hadoop MapReduce, while Spark delivers fast performance, iterative processing, real-time analytics, graph processing, machine learning and more. In many cases Spark may outperform Hadoop MapReduce. The great news is the Spark is fully compatible with the Hadoop eco-system and works smoothly with Hadoop Distributed File System, Apache Hive, etc.


    Need professional advice on big data and dedicated technologies? Get it from ScienceSoft, big data expertise since 2013.