Editor’s note: This post is part of the AI Decoded series, which demystifies AI by making the technology more accessible, and showcases new hardware, software, tools and accelerations for RTX PC and workstation users.
Video is everywhere — nearly 80% of internet bandwidth today is used to stream video from content providers and social networks. While screens have become bigger and support higher resolutions, nearly all video is only 1080p quality or lower.
Upscalers can help sharpen streamed video and, powered by AI on the NVIDIA RTX platform, significantly enhance image quality and detail.
What Is an Upscaler?
The larger file size of videos makes it harder to compress and transmit compared to images or text. Platforms like Netflix, Vimeo and YouTube work around this limitation by encoding video — the process of compressing the raw source of a video into a smaller container format.
The encoder first analyzes the video to decide what information it can remove to make it fit a target resolution and frame rate. If the target bitrate is insufficient, the video quality decreases, resulting in a loss of detail and sharpness and the presence of encoding artifacts. The smaller the file, the easier it is to share on the internet — but the worse it looks.
Typically, software on the viewer’s device will upscale the video file to fit the display’s native resolution. However, these upscalers are fairly simplistic, merely multiplying pixels to meet the desired resolution. They can help sharpen the outlines of objects and scenes, but the final video typically carries encoding artifacts and sometimes looks over-sharpened and unnatural.
AI Know a Better Way
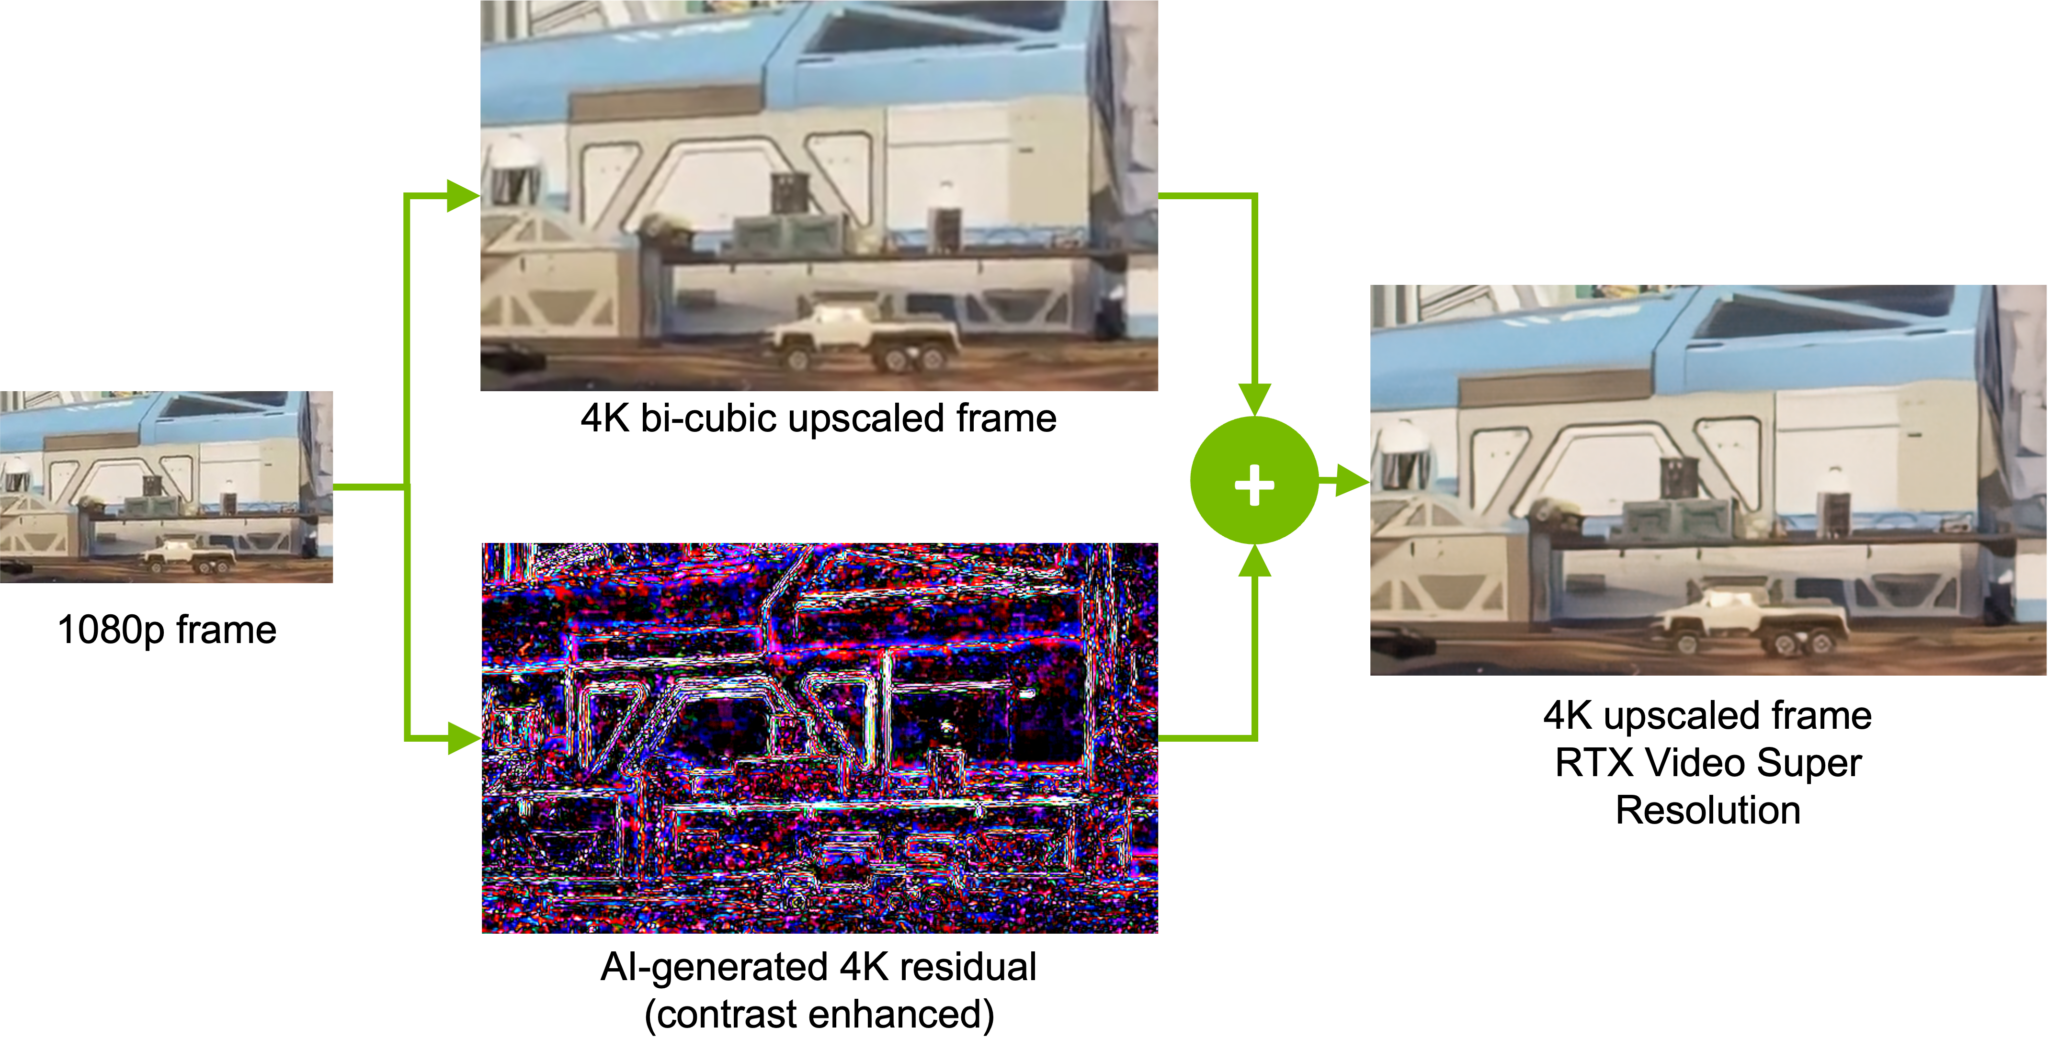
The NVIDIA RTX platform uses AI to easily de-artifact and upscale videos.
Easily de-artifact and upscale videos with RTX.
The process of AI upscaling involves analyzing images and motion vectors to generate new details not present in the original video. Instead of merely multiplying pixels, it recognizes the patterns of the image and enhances them to provide greater detail and video quality.
Images must be first de-artifacted before any processing begins. Artifacts — or unwanted distortions and anomalies that appear in video and image files — occur due to overcompression or data loss during transmission and storage.
NVIDIA AI networks can de-artifact images, helping remove blocky areas sometimes seen in streamed video. Without this first step, AI upscalers might end up enhancing the artifacted image itself instead of the desired content.
Super-Sized Video
Just like putting on a pair of prescription glasses can instantly snap the world into focus, RTX Video Super Resolution, one of NVIDIA’s latest innovations in AI-enhanced video technology, gives users a clearer picture into the world of streamed video.
Click the image to see the differences between bicubic upscaling (left) and RTX Video Super Resolution (right).
Available on GeForce RTX 40 and 30 Series GPUs and RTX professional GPUs, it uses AI running on dedicated Tensor Cores to remove block compression artifacts and upscale lower-resolution content up to 4K, matching the user’s native display resolution.
RTX Video Super Resolution can be used to enhance all video watched on browsers. By combining de-artifacting with AI upscaling techniques, it can make even low-bitrate Twitch streams look stunningly clear. RTX Video Super Resolution is also supported in popular video apps like VLC so users can apply the same upscaling process to their offline videos.
Creators can soon use RTX Video Super Resolution in editing apps like Black Magic’s Davinci Resolve, making it easier than ever to upscale lower-quality video files to 4K resolution, as well as convert standard-dynamic range source files into high-dynamic range (HDR).
Say Hi to High-Dynamic Range
RTX Video now also supports AI HDR. HDR video supports a wider range of colors, lending greater detail especially to the darker and lighter areas of images. The problem is that there isn’t that much HDR content online yet.
Enter RTX Video HDR — by simply turning on the feature, the AI network will turn any standard or low-dynamic-range content into HDR, performing the correct tone mapping so the image still looks natural and retains its original colors.
AI Across the Board
RTX Video is just the latest implementation of AI upscaling powered by NVIDIA RTX.
Members of the GeForce NOW cloud streaming service can play their favorite PC games on nearly any device. GeForce RTX servers located all over the world first render the game video content, encode it and then stream it to the player’s local device — just like streaming video from other content providers.
Members on older NVIDIA GPU-powered devices can still use AI-enhanced upscaling to improve gameplay quality. This means they can enjoy the best of both worlds — gameplay rendered on servers powered by RTX 4080-class GPUs in the cloud and AI-enhanced streaming quality. Get more information on enabling AI-enhanced upscaling on GeForce NOW.
The NVIDIA SHIELD TV takes this one step further, processing AI neural networks directly on its NVIDIA Tegra system-on-a-chip to upscale 1080p-quality or lower content from nearly any streaming platform to a display’s native resolution. That means users can improve the video quality of content streamed from Netflix, Prime Video, Max, Disney+ and more at the push of a remote button.
SHIELD TV is currently available for up to $30 off in North America and £30 or 35€ off in Europe as part of Amazon’s Prime Day event running July 16-17. For Prime members in Europe, eligible SHIELD TV purchases also include one month of the GeForce NOW Ultimate membership for free, enabling GeForce RTX 4080-class PC gameplay streamed directly to the living room.
AI has enabled unprecedented improvements in video quality, helping set a new standard in streaming experiences.
Generative AI is transforming gaming, videoconferencing and interactive experiences of all kinds. Make sense of what’s new and what’s next by subscribing to the AI Decoded newsletter.
On this episode of Videoguys Live, James goes over some frequently asked questions by our viewers and gives you his advice and best tech tips for your live production! Topics for this week include, which NETGEAR Pro AV Switch is right for you, options for wireless production, and what you should consider when building a new production studio.
Watch the full video below:
What NETGEAR Switch is Right For Me?
Engineered for AV over IP
Netgear is committed to ProAV
Easy to Configure (GUI)
Presets for NDI HX & NDI 5
Recommended by all of our partners: PTZOptics, Vizrt, Birddog etc
Terms to Know
PoE (Power over Ethernet)
PoE – 15.4 Watts
PoE+ – 30 Watts
PoE++ – 60-100 Watts depending on version
TPD (Total Power Delivery)
The maximum amount of power a switch can deliver
A PoE+ switch with 60 watts TPD can only power 2 PoE+ cameras, no matter how many ports it has
SFP (Small Form-Factor Pluggable Transceiver)
Commonly used for optical network connection, but can be copper
Allows for port flexibility
SFP – operates @ 1Gbps
SFP+ – operates @ 10Gbps
NETGEAR M4250 Series Network Switches built for NDI
8x1G PoE+
TPD 110W
1x1G
1xSFP
8x1G PoE+
TPD 220W
2xSFP+
What Options Are There For Productions Using NDI Over Wi-Fi?
Kiloview Wireless NDI Encoders with Enhanced Wi-Fi
1080p60 HDMI Wireless NDI|HX Encoder
1080p60 3G-SDI Wireless NDI|HX Encoder
Atomos Connect
Atomos Connect shares your creative vision with your team worldwide and upgrades your Ninja’s I/O with 12G-SDI to HDMI cross-conversion, Wi-Fi 6 (6E for Ninja Ultra) and 1GbE Ethernet, wireless NDI networking and timecode synchronization.
Atomos Connect includes a 12G SDI interface for a wide range of professional SDI-equipped cameras, adding to the already huge range of HDMI-supported by the Ninja and Ninja Ultra. The SDI input can also cross convert a signal to the HDMI output, for additional workflow options.
Atomos Connect is compatible with…
JVC Pro GY-HC500SPCU 4K Connected Camcorder with Sports Overlays with NDI|HX
10-bit ProRes 422/422HQ/422LT at 4K resolution and 50/60p frame rates
recording to M.2 SSD**
4K UHD 30p/25p/24p 4:2:2 10-bit / 4:2:0 8-bit (150Mbps) and various HD recording to SDHC/SDXC card*
HDR recording, HLG or J-Log1 (10-bit)
1-inch (effective) CMOS sensor with high picture quality
BirdDog X1 and X1 Ultra PTZ Cameras
X1 Features:
1080/60p
20X Zoom
Tally Light
AI Auto Focus tracking
HDMI/USB/IP
NDI HX3
WiFi Connection
E-ink Label
Integrated NDI HX decoder
X1 Ultra Features:
4K/30p
12X Zoom
Tally Light
AI Auto Focus tracking
HDMI/USB/IP
NDI HX3
WiFi Connection
E-ink Label
Integrated NDI HX decoder
Things We Learned While Redesigning Our Studio
Typically, We talk about Lighting and Video gear. Let’s talk about Floors and Walls today!
My goal is to create an editor that mirrors the functionality of the standard Visual Studio text editor, including Syntax error underlining, Syntax highlighting, and Contencutal right-click options (e.g. “Go to Definition”) While I can successfully load file content into the editor, none of these standard features are present. I suspect this might be related to the ContentType of the ITextBuffer, but I am unsure of the precise role it plays in enabling these features. Currently, my implementation is hardcoded to work exclusively with C# content and files. In another project (not related to this one), I implemented some standard features by associating the editor with .cs file extensions, but this is not a viable solution for my current project. I cannot use this association because it would interfere with the normal IDE experience, preventing me from editing or interacting with .cs files as usual. I am looking for a solution or understanding of this issue, or how I can get lower level information of what is going on under the hood when I set a Content Type. I have also included a screenshot of what the result looks like on my end:
You can see where I try to inspect the tags on the buffer in the commented out code where I use the ITextBuffer. There might be a bug but I am probably just using this wrong or there are no tags being applied to the buffer. Additionally, I have used IVsTextBuffer with IVsTextView, where I set the language service using SetLanguageServiceID(Guid) on the IVsTextBuffer. While I am able to load the content, I still encounter the same problem: file content is loaded without any features. For setting the language service, I passed in the GUID of the C# language service, which I found in examples: 694DD9B6-B865-4C5B-AD85-86356E9C88DC.
What I did to set up the project:
Create new project in VS2022, select C# VSIX project type, add a Tool Window to the project, press f5 which will load the experimental instance, tool window should be available in experimental instance under View->Other Windows
MyAnnotateV2Package.cs:
using Microsoft.VisualStudio.Editor;
using Microsoft.VisualStudio.Shell;
using System;
using System.Runtime.InteropServices;
using System.Threading;
using Task = System.Threading.Tasks.Task;

namespace MyAnnotateV2
{
    [PackageRegistration(UseManagedResourcesOnly = true, AllowsBackgroundLoading = true)]
    [Guid(MyAnnotateV2Package.PackageGuidString)]
    [ProvideMenuResource("Menus.ctmenu", 1)]
    [ProvideToolWindow(typeof(ToolWindow1))]
    public sealed class MyAnnotateV2Package : AsyncPackage
    {
        public const string PackageGuidString = "f56b58be-0719-4e37-8147-b824c8566701";

        #region Package Members

        protected override async Task InitializeAsync(CancellationToken cancellationToken, IProgress<ServiceProgressData> progress)
        {
            await this.JoinableTaskFactory.SwitchToMainThreadAsync(cancellationToken);
            await ToolWindow1Command.InitializeAsync(this);
        }

        #endregion
    }
}
ToolWindow1.cs:
using Microsoft.VisualStudio.Shell;
using System;
using System.Runtime.InteropServices;

namespace MyAnnotateV2
{
    [Guid("d13s0712-4527-4b27-8920-6b38dc41a26e")]
    public class ToolWindow1 : ToolWindowPane
    {
        public ToolWindow1() : base(null)
        {
            this.Caption = "ToolWindow1";

            // Pass the service provider to the control
            this.Content = new ToolWindow1Control(false);
        }
    }
}
ToolWindow1Command.cs:
using Microsoft.VisualStudio.Shell;
using Microsoft.VisualStudio.Shell.Interop;
using System;
using System.ComponentModel.Design;
using System.Globalization;
using System.Threading;
using System.Threading.Tasks;
using Task = System.Threading.Tasks.Task;

namespace MyAnnotateV2
{

    internal sealed class ToolWindow1Command
    {

        public const int CommandId = 0x0100;


        public static readonly Guid CommandSet = new Guid("10e1cf87-4456-493c-8cf6-92d8bceb4d21");

        private readonly AsyncPackage package;
        private ToolWindow1Command(AsyncPackage package, OleMenuCommandService commandService)
        {
            this.package = package ?? throw new ArgumentNullException(nameof(package));
            commandService = commandService ?? throw new ArgumentNullException(nameof(commandService));

            var menuCommandID = new CommandID(CommandSet, CommandId);
            var menuItem = new MenuCommand(this.Execute, menuCommandID);
            commandService.AddCommand(menuItem);
        }


        public static ToolWindow1Command Instance
        {
            get;
            private set;
        }

        private Microsoft.VisualStudio.Shell.IAsyncServiceProvider ServiceProvider
        {
            get
            {
                return this.package;
            }
        }

        public static async Task InitializeAsync(AsyncPackage package)
        {
            await ThreadHelper.JoinableTaskFactory.SwitchToMainThreadAsync(package.DisposalToken);

            OleMenuCommandService commandService = await package.GetServiceAsync(typeof(IMenuCommandService)) as OleMenuCommandService;
            Instance = new ToolWindow1Command(package, commandService);
        }

        private void Execute(object sender, EventArgs e)
        {
            ThreadHelper.ThrowIfNotOnUIThread();

            ToolWindowPane window = this.package.FindToolWindow(typeof(ToolWindow1), 0, true);
            if ((null == window) || (null == window.Frame))
            {
                throw new NotSupportedException("Cannot create tool window");
            }

            IVsWindowFrame windowFrame = (IVsWindowFrame)window.Frame;
            Microsoft.VisualStudio.ErrorHandler.ThrowOnFailure(windowFrame.Show());
        }
    }
}
using System;
using System.Collections;
using System.Diagnostics.CodeAnalysis;
using System.IO;
using System.IO.Packaging;
using System.Windows;
using System.Windows.Controls;
using EnvDTE;
using Microsoft.VisualStudio.ComponentModelHost;
using Microsoft.VisualStudio.Editor;
using Microsoft.VisualStudio.Shell;
using Microsoft.VisualStudio.Shell.Interop;
using Microsoft.VisualStudio.Text;
using Microsoft.VisualStudio.Text.Classification;
using Microsoft.VisualStudio.Text.Editor;
using Microsoft.VisualStudio.Text.Tagging;
using Microsoft.VisualStudio.TextManager.Interop;
using Microsoft.VisualStudio.Utilities;
using System.ComponentModel.Composition;
using System.Diagnostics;
using Microsoft.VisualStudio.Language.CodeLens.Remoting;

namespace MyAnnotateV2
{
    using IOleServiceProvider = Microsoft.VisualStudio.OLE.Interop.IServiceProvider;
    public partial class ToolWindow1Control : UserControl
    {
        private readonly object _provider;
        public ToolWindow1Control(bool comBased)
        {
            _provider = Microsoft.VisualStudio.Shell.Package.GetGlobalService(typeof(IOleServiceProvider));
            this.InitializeComponent();

            InitializeEditor("C:Your\\Local\\Path\\To\\Program.cs");
        }

        [SuppressMessage("Microsoft.Globalization", "CA1300:SpecifyMessageBoxOptions", Justification = "Sample code")]
        [SuppressMessage("StyleCop.CSharp.NamingRules", "SA1300:ElementMustBeginWithUpperCaseLetter", Justification = "Default event handler naming pattern")]
        private void button1_Click(object sender, RoutedEventArgs e)
        {
            MessageBox.Show(
                string.Format(System.Globalization.CultureInfo.CurrentUICulture, "Invoked '{0}'", this.ToString()),
                "ToolWindow1!!!!");
        }

        // factory for creating methods: https://learn.microsoft.com/en-us/dotnet/api/microsoft.visualstudio.text.editor.itexteditorfactoryservice?view=visualstudiosdk-2022
        //[Import] IBufferTagAggregatorFactoryService tagFactory = null;
        //[Import] IClassificationTypeRegistryService ClassificationRegistry = null;
        //[Import] ITextBufferFactoryService textBufferFactory = null;
        //[Import] ITextEditorFactoryService textEditorFactory = null;
        //[Import] IContentTypeRegistryService contentTypeRegistry = null;
        private void InitializeEditor(string filePath)
        {
            var componentModel = (IComponentModel)Microsoft.VisualStudio.Shell.Package.GetGlobalService(typeof(SComponentModel));
            var editorAdapterFactory = componentModel.GetService<IVsEditorAdaptersFactoryService>();
            var textBufferFactory = componentModel.GetService<ITextBufferFactoryService>();
            var textEditorFactory = componentModel.GetService<ITextEditorFactoryService>();
            var contentTypeRegistry = componentModel.GetService<IContentTypeRegistryService>();
            var tagFactory = componentModel.GetService<IBufferTagAggregatorFactoryService>();
            var viewTagFactory = componentModel.GetService<IViewTagAggregatorFactoryService>();
            var fileExtensionRegistryFactory = componentModel.GetService<IFileExtensionRegistryService>();
            var classifier = componentModel.GetService<IClassifierAggregatorService>();

            var contentT = fileExtensionRegistryFactory.GetContentTypeForExtension(".cs");

            //var oleServiceProvider = Microsoft.VisualStudio.Shell.Package.GetGlobalService(typeof(SVsServiceProvider)) as Microsoft.VisualStudio.OLE.Interop.IServiceProvider;

            // Create the text buffer and initialize it with content from the file
            // https://learn.microsoft.com/en-us/dotnet/api/microsoft.visualstudio.text.itextbufferfactoryservice?view=visualstudiosdk-2022
            string fileContent = File.ReadAllText(filePath);
            IContentType contentType = contentTypeRegistry.GetContentType("CSharp");

            ITextBuffer textBuffer = textBufferFactory.CreateTextBuffer(fileContent, contentType);

            IWpfTextView textView = textEditorFactory.CreateTextView(textBuffer);

            setAllTextViewOptions(textView);

            IWpfTextViewHost textViewHost = textEditorFactory.CreateTextViewHost(textView, false);

            var textViewElement = textViewHost.HostControl;
            textViewElement.HorizontalAlignment = HorizontalAlignment.Stretch;
            textViewElement.VerticalAlignment = VerticalAlignment.Stretch;

            // My attempt at getting tags from text buffer
            //ITagAggregator<IClassificationTag> tagAggregator = viewTagFactory.CreateTagAggregator<IClassificationTag>(textView);
            //ITextSnapshot currSnapshot = textView.TextSnapshot;
            //SnapshotSpan fullTextSnapshotSpan = new SnapshotSpan(currSnapshot, 0, 330); // Length of snapshot is 340
            //Span fullSpan = fullTextSnapshotSpan.Span;
            //IEnumerable enumerableTags = tagAggregator.GetTags(fullTextSnapshotSpan);
            //IEnumerator enumeratedTags = enumerableTags.GetEnumerator();
            //var nextOperationResult = enumeratedTags.MoveNext();
            //var currElement = enumeratedTags.Current;

            // Add the HostControl of the text view host to the RightPanel
            RightPanel.Children.Add(textViewHost.HostControl);
        }
private void setAllTextViewOptions(ITextView textView)
{
    textView.Options.SetOptionValue(DefaultTextViewHostOptions.VerticalScrollBarName, true);
    textView.Options.SetOptionValue(DefaultTextViewHostOptions.HorizontalScrollBarName, true);
    textView.Options.SetOptionValue(DefaultTextViewHostOptions.GlyphMarginName, true);
    textView.Options.SetOptionValue(DefaultTextViewHostOptions.SuggestionMarginName, true);
    textView.Options.SetOptionValue(DefaultTextViewHostOptions.SelectionMarginName, true);
    textView.Options.SetOptionValue(DefaultTextViewHostOptions.LineNumberMarginName, true);
    textView.Options.SetOptionValue(DefaultTextViewHostOptions.ChangeTrackingName, true);
    textView.Options.SetOptionValue(DefaultTextViewHostOptions.OutliningMarginName, true);
    textView.Options.SetOptionValue(DefaultTextViewHostOptions.ZoomControlName, true);
    textView.Options.SetOptionValue(DefaultTextViewHostOptions.IsInContrastModeName, false); // Set true if needed
    textView.Options.SetOptionValue(DefaultTextViewHostOptions.IsInHighContrastThemeName, false); // Set true if needed
    textView.Options.SetOptionValue(DefaultTextViewHostOptions.ShowScrollBarAnnotationsOptionName, true);
    textView.Options.SetOptionValue(DefaultTextViewHostOptions.ShowEnhancedScrollBarOptionName, true);
    textView.Options.SetOptionValue(DefaultTextViewHostOptions.ShowChangeTrackingMarginOptionName, true);
    textView.Options.SetOptionValue(DefaultTextViewHostOptions.ChangeTrackingMarginWidthOptionName, 5.0); // Adjust width as needed
    textView.Options.SetOptionValue(DefaultTextViewHostOptions.ShowPreviewOptionName, true);
    textView.Options.SetOptionValue(DefaultTextViewHostOptions.PreviewSizeOptionName, 5); // Adjust preview size as needed
    textView.Options.SetOptionValue(DefaultTextViewHostOptions.ShowCaretPositionOptionName, true);
    textView.Options.SetOptionValue(DefaultTextViewHostOptions.SourceImageMarginEnabledOptionName, true);
    textView.Options.SetOptionValue(DefaultTextViewHostOptions.SourceImageMarginWidthOptionName, 20.0); // Adjust width as needed
    textView.Options.SetOptionValue(DefaultTextViewHostOptions.ShowMarksOptionName, true);
    textView.Options.SetOptionValue(DefaultTextViewHostOptions.ShowErrorsOptionName, true);
    textView.Options.SetOptionValue(DefaultTextViewHostOptions.MarkMarginWidthOptionName, 5.0); // Adjust width as needed
    textView.Options.SetOptionValue(DefaultTextViewHostOptions.ErrorMarginWidthOptionName, 5.0); // Adjust width as needed
    textView.Options.SetOptionValue(DefaultTextViewHostOptions.EnableFileHealthIndicatorOptionName, true);
    textView.Options.SetOptionValue(DefaultTextViewHostOptions.RowColMarginOptionName, true);
    textView.Options.SetOptionValue(DefaultTextViewHostOptions.SelectionStateMarginOptionName, true);
    textView.Options.SetOptionValue(DefaultTextViewHostOptions.InsertModeMarginOptionName, true);
    textView.Options.SetOptionValue(DefaultTextViewHostOptions.IndentationCharacterMarginOptionName, true);
    textView.Options.SetOptionValue(DefaultTextViewHostOptions.UpdateIndentationCharacterOnEditOptionName, true);
    textView.Options.SetOptionValue(DefaultTextViewHostOptions.LineEndingMarginOptionName, true);
    textView.Options.SetOptionValue(DefaultTextViewHostOptions.EditingStateMarginOptionName, true);
}
Program.cs:
using System;
using System.Collections.Generic;
using System.Linq;
using System.Text;
using System.Threading.Tasks;

namespace TestSVN
{
    class Program
    {
        static void Main(string[] args)
        {
            // hello world
            // error below is intentional to test buffer functionality
            int hello
        }
    }
}
Amazon Prime Day is coming to an end, but we have one more deal to highlight this savings holiday. Gamers who have been looking for a good gaming headset have probably looked at Logitech options. One of our favorites is the Logitech G PRO X 2 headset, and you can get it for just $180.49 right now. That’s a 28% discount on the full $249 price point!
You can take your pick between the Black and White color variants, but only the Black iteration will cost $180.49. While still discounted, the White model is a bit more expensive at $190. Also, keep in mind these are Prime Day deals, which means only Amazon Prime subscribers can access this offer. You might want to sign up if you’re going to take advantage of all these hot Prime Day deals, though. Even if it is for just a month. Also, keep in mind new members get a free 30-day trial, so you might not have to pay anything!
The newest iteration of the G Pro headset line merges the benefits of its wireless and wired predece
The newest iteration of the G Pro headset line merges the benefits of its wireless and wired predecessors. The Logitech G PRO X 2 LIGHTSPEED features graphene headphone drivers, and a boatload of connection options.
Our sister site, Sound Guys, put this headset through its rigorous tests and still gave the Logitech G Pro X 2 a great review. This is a high-end headset through and through, and our co-workers had very little to complain about. The main issue was the price, but a 28% discount really makes this a much more enticing gaming headset.
These are very comfortable, for starters, which is important to gamers. You want to make sure you can wear these for long gaming sessions, and we had no issues wearing the headset all day. Both audio and microphone quality are really good compared to most other headphones.
It’s also packed with connectivity options, touting a 3.5mm headset jack, as well as both Bluetooth and 2.4GHz dongle support, making it easy to connect to nearly any device or console. And if you want good battery life, it will be hard to beat this one. Sound Guys‘ standardized battery tests showed the Logitech G PRO X 2 headset can last over 88 hours!
Today is Prime Day’s last day, so these deals will be gone in a few hours. Act quickly if you want to be the proud owner of one of our favorite gaming headsets.
Amazon’s Fallout series was a big hit, and it turns out the critics like it too. The show has been nominated for 16 Emmy awards, including a couple big ones: Outstanding Drama Series and Outstanding Lead Actor in a Drama Series for Walton Goggins.
Most of the categories Fallout is nominated in are for awards that are generally handed out off-camera—things like “Outstanding Period or Fantasy/Sci-Fi Makeup (Non-Prostethic),” or “Outstanding Sound Mixing For A Comedy Or Drama Series (One Hour),” the sorts of categories most of us likely haven’t even heard of. But it’s also up for awards in special visual effects, stunt performance, and writing for a drama series, which are nothing to sneeze at.
The highlight has to be the Outstanding Drama Series nom, which is great but, alas, not one I think it’s likely to win. The competition is stiff, including Shogun—”a programme about a man who’s so bad at boats he crashes into Japan” in the words of our own Joshua Wolens, which, okay, fair enough, although I don’t think that really captures the essence of the thing—as well as 3 Body Problem, Mr. and Mrs. Smith, Slow Horses, The Crown, The Gilded Age, and The Morning Show. I won’t pretend to have watched any of them, but the general consensus seems to be that Shogun is the one to beat, and it’s not going to be beat.
Goggins faces a similarly rough ride in the lead actor category. Other nominees include Idris Elba for Hijack, Donald Glover for Mr. and Mrs. Smith, Gary Oldman for Slow Horses, Hiroyuki Sanada for Shogun, and Dominic West for The Crown. Again, haven’t watched, don’t know, but it’s a hell of a sexy lineup.
(Image credit: Television Academy Emmy Awards)
There seems to be a bit of confusion about the number of categories in which Fallout is nominated: Amazon claimed 17, but the Emmy website says 16.
(Image credit: Amazon (Twitter))
Regardless of the number, Bethesda is just happy to be here: The studio said on Twitter that it was “humbled and thankful to have our show be recognized.”
(Image credit: Bethesda Game Studios (Twitter))
As someone who’s been around long enough to remember when Uwe Boll beat up Lowtax for lipping off about his movies too much, it’s a little hard to believe I’m saying this but Fallout’s impressive Emmy performance isn’t unprecedented for a videogame adaptation.
Keep up to date with the most important stories and the best deals, as picked by the PC Gamer team.
Arcane, the animated series based on League of Legends, became the first show based on a game to win an Emmy Award in 2022, while The Last of Us won a whopping eight Emmys in 2023. Even if Fallout misses out in the highlight categories, with 16 nominations to its name, I think there’s a good chance it can keep the run going in 2024.
September 29, 2021 by Henning Dieterichs, @hediet_dev
When dealing with deeply nested brackets in Visual Studio Code, it can be hard to figure out which brackets match and which do not.
To make this easier, in 2016, a user named CoenraadS developed the awesome Bracket Pair Colorizer extension to colorize matching brackets and published it to the VS Code Marketplace. This extension became very popular and now is one of the 10 most downloaded extensions on the Marketplace, with over 6 million installs.
To address performance and accuracy problems, in 2018, CoenraadS followed up with Bracket Pair Colorizer 2, which now also has over 3 millions of installs.
The Bracket Pair Colorizer extension is a good example of the power of VS Code’s extensibility and makes heavy use of the Decoration API to colorize brackets.
We are pleased to see that the VS Code Marketplace offers many more such community-provided extensions, all of which help identify matching bracket pairs in very creative ways, including: Rainbow Brackets, Subtle Match Brackets, Bracket Highlighter, Blockman, and Bracket Lens.
This variety of extensions shows that there is a real desire by VS Code users to get better support for brackets.
The performance problem
Unfortunately, the non-incremental nature of the Decoration API and missing access to VS Code’s token information causes the Bracket Pair Colorizer extension to be slow on large files: when inserting a single bracket at the beginning of the checker.ts file of the TypeScript project, which has more than 42k lines of code, it takes about 10 seconds until the colors of all bracket pairs update.
During these 10 seconds of processing, the extension host process burns at 100% CPU and all features that are powered by extensions, such as auto-completion or diagnostics, stop functioning. Luckily, VS Code’s architecture
ensures that the UI remains responsive and documents can still be saved to disk.
CoenraadS was aware of this performance issue and spent a great amount of effort on increasing speed and accuracy in version 2 of the extension, by reusing the token and bracket parsing engine from VS Code. However, VS Code’s API and extension architecture was not designed to allow for high performance bracket pair colorization when hundreds of thousands of bracket pairs are involved. Thus, even in Bracket Pair Colorizer 2, it takes some time until the colors reflect the new nesting levels after inserting { at the beginning of the file:
While we would have loved to just improve the performance of the extension (which certainly would have required introducing more advanced APIs, optimized for high-performance scenarios), the asynchronous communication between the renderer and the extension-host severely limits how fast bracket pair colorization can be when implemented as an extension. This limit cannot be overcome.
In particular, bracket pair colors should not be requested asynchronously as soon as they appear in the viewport, as this would have caused visible flickering when scrolling through large files. A discussion of this can be found in issue #128465.
What we did
Instead, in the 1.60 update, we reimplemented the extension in the core of VS Code and brought this time down to less than a millisecond – in this particular example, that is more than 10,000 times faster.
The feature can be enabled by adding the setting "editor.bracketPairColorization.enabled": true.
Now, updates are no longer noticeable, even for files with hundreds of thousands of bracket pairs. Notice how the bracket-color in line 42,788 reflects the new nesting level immediately after typing { in line 2:
Once we decided we move it into core, we also took the opportunity to look into how to make it as fast as we can. Who wouldn’t love an algorithmic challenge?
Without being limited by public API design, we could use (2,3)-trees, recursion-free tree-traversal, bit-arithmetic, incremental parsing, and other techniques to reduce the extension’s worst-case update time-complexity (that is the time required to process user-input when a document already has been opened) from O(N+E) to O(log3N+E) with N being the document size and E the edit size, assuming the nesting level of bracket pairs is bounded by O(logN).
Additionally, by reusing the existing tokens from the renderer and its incremental token update mechanism, we gained another massive (but constant) speedup.
VS Code for the Web
Besides being more performant, the new implementation is also supported in VS Code for the Web, which you can see in action with vscode.dev and github.dev. Due to the way Bracket Pair Colorizer 2 reuses the VS Code token engine, it was not possible to migrate the extension to be what we call a web extension.
Not only does our new implementation work in VS Code for the Web, but also directly in the Monaco Editor!
The challenge of bracket pair colorization
Bracket pair colorization is all about quickly determining all brackets and their (absolute) nesting level in the viewport. The viewport can be described as a range in the document in terms of line and column numbers and is usually a tiny fraction of the entire document.
Unfortunately, the nesting level of a bracket depends on all characters preceding it: replacing any character with the opening bracket “{” usually increases the nesting level of all following brackets.
Thus, when initially colorizing brackets at the very end of a document, every single character of the entire document has to be processed.
The implementation in the bracket pair colorizer extension addresses this challenge by processing the entire document again whenever a single bracket is inserted or removed (which is very reasonable to do for small documents). The colors then have to be removed and reapplied using the VS Code Decoration API, which sends all color decorations to the renderer.
As demonstrated earlier, this is slow for large documents with hundreds of thousands of bracket pairs and thus equally many color decorations. Because extensions cannot update decorations incrementally and have to replace them all at once, the bracket pair colorizer extension cannot even do much better. Still, the renderer organizes all these decorations in a clever way (by using a so called interval tree), so rendering is always fast after (potentially hundreds of thousands of) decorations have been received.
Our goal is not having to reprocess the entire document on each key-stroke. Instead, the time required to process a single text edit should only grow (poly) logarithmically with the document length.
However, we still want to be able to query all brackets and their nesting level in the viewport in (poly) logarithmic time, as it would be the case when using VS Code’s decoration API (which uses the mentioned interval tree).
Algorithmic complexities
Feel free to skip the sections on algorithmic complexities.
In the following, N refers to the length of the document.
More formally, our goal is to have a time complexity of at most O(logkN+R) for querying all brackets in a given range of size R and a reasonable small k (we aim for k=2). Brackets are queried when rendering the viewport and thus querying them has to be really fast.
However, we allow an initialization time complexity of O(N) when a document is opened the first time (which is unavoidable, as all characters have to be processed when initially colorizing brackets) and an update time of O(logjN+E) when E many characters are modified or inserted, again for a reasonable small j (we aim for j=3). We also assume that the nesting level of a bracket pair is not too deep and at most O(logN) and that the number of closing brackets without an opening counterpart is negligible – documents violating these assumptions are atypical and the algorithm we are looking for does not need to be fast on them.
Language semantics make bracket pair colorization hard
What makes bracket pair colorization really difficult is the detection of actual brackets as defined by the document language. In particular, we don’t want to detect opening or closing brackets in comments or strings, as the following C example demonstrates:
{ /* } */char str[] ="}"; }
Only the third occurrence of “}” closes the bracket pair.
This gets even harder for languages where the token language is not regular, such as TypeScript with JSX:
Does the bracket at [1] match the bracket at [2] or at [3]? This depends on the length of the template literal expression, which only a tokenizer with unbounded state (which is a non-regular tokenizer) can determine correctly.
Tokens to the rescue
Luckily, syntax highlighting has to solve a similar problem: should the bracket at [2] in the previous code snippet be rendered as string or as plain text?
As it turns out, just ignoring brackets in comments and strings as identified by syntax highlighting works well enough for most bracket pairs. < … > is the only problematic pair we found so far, as these brackets are usually both used for comparisons and as pair for generic types, while having the same token type.
VS Code already has an efficient and synchronous mechanism to maintain token information used for syntax highlighting and we can reuse that to identify opening and closing brackets.
This is another challenge of the Bracket Pair Colorization extension that affects performance negatively: it does not have access to these tokens and has to recompute them on its own. We thought long about how we could efficiently and reliably expose token information to extensions, but came to the conclusion that we cannot do this without a lot of implementation details leaking into the extension API. Because the extension still has to send over a list of color decorations for each bracket in the document, such an API alone would not even solve the performance problem.
As a side note, when applying an edit at the beginning of a document that changes all following tokens (such as inserting /* for C-like languages), VS Code does not retokenize long documents all at once, but in chunks over time. This ensures that the UI does not freeze, even though tokenization happens synchronously in the renderer.
The basic algorithm
The core idea is to use a recursive descent parser to build an abstract syntax tree (AST) that describes the structure of all bracket pairs. When a bracket is found, check the token information and skip the bracket if it is in a comment or string. A tokenizer allows the parser to peek and read such bracket or text tokens.
The trick is now to only store the length of each node (and also to have text-nodes for everything that is not a bracket to cover the gaps), instead of storing absolute start/end positions. With only lengths available, a bracket node at a given position can still be located efficiently in the AST.
The following diagram shows an exemplary AST with length annotations:
Compare this with the classical AST representation using absolute start/end positions:
Both ASTs describe the same document, but when traversing the first AST, the absolute positions have to be computed on the fly (which is cheap to do), while they are already precomputed in the second one.
However, when inserting a single character into the first tree, only the lengths of the node itself and all its parent nodes must be updated – all other lengths stay the same.
When absolute positions are stored as in the second tree, the position of every node later in the document must be incremented.
Also, by not storing absolute offsets, leaf nodes having the same length can be shared to avoid allocations.
This is how the AST with length annotations could be defined in TypeScript:
typeLength= ...;typeAST=BracketAST|BracketPairAST|ListAST|TextAST;/** Describes a single bracket, such as `{`, `}` or `begin` */classBracketAST {constructor(publiclength:Length) {}}/** Describes a matching bracket pair and the node in between, e.g. `{...}` */classBracketPairAST {constructor(publicopeningBracket:BracketAST;publicchild:BracketPairAST|ListAST|TextAST;publicclosingBracket:BracketAST; ) {}length=openingBracket.length+child.length+closingBracket.length;}/** Describes a list of bracket pairs or text nodes, e.g. `()...()` */classListAST {constructor(publicitems:Array<BracketPairAST|TextAST> ) {}length=items.sum(item=>item.length);}/** Describes text that has no brackets in it. */classTextAST {constructor(publiclength:Length) {}}
Querying such an AST to list all brackets and their nesting level in the viewport is relatively simple: do a depth-first traversal, compute the absolute position of the current node on the fly (by adding the length of earlier nodes), and skip children of nodes that are entirely before or after the requested range.
This basic algorithm already works, but has some open questions:
How can we make sure that querying all brackets in a given range has the desired logarithmic performance?
When typing, how can we avoid constructing a new AST from scratch?
How can we handle token chunk updates? When opening a large document, tokens are not available initially, but come in chunk by chunk.
Ensuring that query-time is logarithmic
What ruins performance when querying brackets in a given range are really long lists: we cannot do a fast binary search on their children to skip all irrelevant non-intersecting nodes, as we need to sum each node’s length to compute the absolute position on the fly. In the worst-case, we need to iterate over all of them.
In the following example we have to look at 13 nodes (in blue) until we find the bracket at position 24:
While we could compute and cache length sums to enable binary search, this has the same problem as storing absolute positions: we would need to recompute all of them every time a single node grows or shrinks, which is costly for very long lists.
Instead, we allow lists to have other lists as children:
If we can ensure that each list only has a bounded number of children and resembles a balanced tree of logarithmic height, it turns out that this is sufficient to get the desired logarithmic performance for querying brackets.
Keeping list trees balanced
We use (2,3)-trees to enforce that these lists are balanced: every list must have at least 2 and at most 3 children, and all children of a list must have the same height in the balanced list tree. Note that a bracket pair is considered a leaf of height 0 in the balanced tree, but it might have children in the AST.
When constructing the AST from scratch during initialization, we first collect all children and then convert them to such a balanced tree. This can be done in linear time.
A possible (2,3)-tree of the example before could look like the following. Note that we now only need to look at 8 nodes (in blue) to find the bracket pair at position 24 and that there is some freedom whether a list has 2 or 3 children:
Worst-case complexity analysis
Feel free to skip the sections on algorithmic complexities.
For now, we assume that every list resembles a (2,3)-tree and thus has at most 3 children.
To maximize query-time, we have a look at a document that has O(logN) many nested bracket pairs:
No lists are involved yet, but we already need to traverse O(logN) many nodes to find the bracket pair at [1]. Luckily, documents that are nested even deeper are atypical, so we don’t consider them in our worst-case analysis.
Now, for the worst-case, we fill up the document until it has size N by inserting additional O(logNN) many bracket pairs into every nested bracket pair:
{}{}{}{}{}{}{}{}... O(N / log N) many
{
    {}{}{}{}{}{}{}{}... O(N / log N) many
    {
        ... O(log N) many nested bracket pairs
            {
                {}{}{}{}{}{}{}{}... O(N / log N) many
                {} [1]
            }
        ...
    }
}
Every list of brackets on the same nesting-level yields a tree of height O(loglogNN)=O(logN−loglogN)=O(logN).
Thus, to find the node at [1], we have to traverse O(logN) many balanced trees of height O(logN). Once we found the node and want to collect all brackets in a range of size R, we have to read at most O(R) more adjacent leaf nodes connected by at most O(log2N+R) internal nodes.
Thus, the worst-case time-complexity of querying brackets is O(log2N+R).
Also, this shows that the AST has a maximum height of O(log2N).
Incremental updates
The most interesting question of performant bracket pair colorization remains open: given the current (balanced) AST and a text edit that replaces a certain range, how do we efficiently update the tree to reflect the text edit?
The idea is to reuse the recursive descent parser used for initialization and add a caching strategy, so nodes that aren’t affected by the text edit can be reused and skipped.
When the recursive descent parser parses a list of bracket pairs at position p and the next edit is at position e, it first checks if the previous AST has a node with a length of at most e−p at the position where p used to be before the text change. If this is the case, this node does not need to be reparsed and the underlying tokenizer can just be advanced by the length of the node. After consuming the node, parsing continues. Note that this node can both be a single bracket pair or an entire list. Also, if there are multiple such reusable nodes, the longest one should be taken.
The following example shows which nodes can be reused (in green) when a single opening bracket is inserted (omitting individual bracket nodes):
After processing the text edit by reparsing the nodes that contain edits and reusing all unchanged nodes, the updated AST looks as follows. Note that all 11 reusable nodes can be reused by consuming the 3 nodes B, H and G and only 4 nodes had to be recreated (in orange):
As demonstrated by this example, balanced lists do not only make querying fast, but also help to reuse huge chunks of nodes at once.
Algorithmic complexity
Feel free to skip the sections on algorithmic complexities.
Let’s assume that the text edit replaces a range of size up to E with up to E many new characters. We also ignore the rare case of closing brackets that have no opening counterpart for now.
We only have to reparse nodes that intersect the edit range. Thus, at most O(log2N+E) many nodes need to be reparsed (with the same reasoning as for the time-complexity of querying brackets) – all other nodes can be reused.
Clearly, if a node does not intersect with the edit range, then neither does any of its children. Thus, we only need to consider reusing nodes that don’t intersect with the edit range, but whose parent nodes do (this will implicitly reuse all nodes where both the node and its parent do not intersect with the edit range). Also, such parent nodes cannot be fully covered by the edit range, otherwise all of their children will intersect the edit range. However, every level in the AST only has at most two nodes that partially intersect the edit range. Since an AST has at most O(log2N) many levels (limited by the height of the AST), and every node has at most 3 children, all reusable nodes can be covered by consuming at most O(2⋅3⋅log2N)=O(log2N) nodes.
Thus, to construct the updated tree, we need to reparse at most O(log2N+E) many nodes and can reuse O(log2N) many nodes.
This would also determine the time complexity of the update operation, but there is a caveat.
How do we rebalance the AST?
Unfortunately, the tree in the last example is not balanced anymore.
When combining a reused list node with a newly parsed node, we have to do some work to maintain the (2,3)-tree property. We know that both reused and newly parsed nodes are already (2,3)-trees, but they might have different heights – so we cannot just create parent nodes, since all children of a (2,3)-tree node have to have same height.
How can we efficiently concatenate all these nodes of mixed heights into a single (2,3)-tree?
This can easily be reduced to the problem of prepending or appending a smaller tree to a larger tree: if two trees have the same height, it is sufficient to create a list that contains both children. Otherwise, we insert the smaller tree of height h1 into the larger tree of height h2 and potentially break up nodes if they end up having more than 3 children (similar to how the insert operation of (2,3)-trees works).
Because this has runtime O(h2−h1), we take 3 adjacent nodes (a, b, and c) that we want to concatenate and concatenate either a and b or b and c first (potentially increasing the height of the tree), depending on which pair has the smaller height difference. This is repeated until all nodes are concatenated. As an additional optimization, we look for sequences of nodes that have the same height and create parent lists for them in linear time.
To balance the lists α and γ of the previous example, we perform the concat operation on their children (lists in red violate the (2,3)-tree property, nodes in orange have unexpected height and nodes in green are recreated while rebalancing):
Because list B has height 2 and bracket pair β height 0 in the unbalanced tree, we need to append β to B and are finished with list α. The remaining (2,3)-tree is B, thus it becomes the new root and replaces list α. Continuing with γ, its children δ and H have height 0, while G has height 1.
We first concat δ and H and create a new parent node Y of height 1 (because δ and H have the same height). Then we concat Y and G and create a new parent list X (for the same reason). X then becomes the new child of the parent bracket pair, replacing the unbalanced list γ.
In the example, the balancing operation effectively reduced the height of the top-most list from 3 to 2. However, the total height of the AST got increased from 4 to 5, which negatively impacts the worst-case query time. This is caused by the bracket pair β, which acts as leaf in the balanced list tree, but actually contains another list of height 2.
Considering the internal AST height of β when balancing the parent list could improve the worst-case, but would leave the theory of (2,3)-trees.
Algorithmic Complexity
Feel free to skip the sections on algorithmic complexities.
We have to concatenate at most O(log2N) many nodes with a maximum list-height of O(logN) (those we reused) and additional O(log2N+E) many nodes of list-height 0 (those we reparsed).
Because concatenating two nodes of different height has time-complexity O(logN) and all reparsed nodes in a list are adjacent and have list-height 0, the time-complexity of the entire update operation is at most O(log3N+E), given that finding a reusable node can be done fast enough.
How do we find reusable nodes efficiently?
We have two data structures for this task: the before edit position mapper and the node reader.
The position mapper maps a position in the new document (after applying the edit) to the old document (before applying the edit), if possible. It also tells us the length between the current position and the next edit (or 0, if we are in an edit). This is done in O(1).
When processing a text edit and parsing a node, this component gives us the position of a node that we can potentially reuse and the maximum length this node can have – clearly, the node we want to reuse must be shorter than the distance to the next edit.
The node reader can quickly find the longest node that satisfies a given predicate at a given position in an AST. To find a node we can reuse, we use the position mapper to look up its old position and its maximum allowed length and then use the node reader to find this node. If we found such a node, we know that it did not change and can reuse it and skip its length.
Because the node reader is queried with monotonously increasing positions, it does not have to start searching from scratch every time, but can do so from the end of the last reused node. Key to this is a recursion-free tree-traversal algorithm that can dive into nodes, but also skip them or go back to parent nodes. When a reusable node is found, traversal stops and continues with the next request to the node reader.
The complexity of querying the node reader a single time is up to O(log2N), but we are very sure the amortized complexity for all requests issued by a single update operation is also O(log2N). After all, the node reader is only queried for positions unaffected by the text edit and always takes the shortest path from the last reusable node to the next reusable node. Thus, we think the node reader is efficient enough to not impact the runtime complexity of the update algorithm.
Token updates
When inserting /* at the beginning of long C-style documents that don’t contain the text */, the entire document becomes a single comment and all tokens change.
Because tokens are computed synchronously in the renderer process, retokenization cannot happen at once without freezing the UI.
Instead, tokens are updated in batches over time, so that the JavaScript event loop is not blocked for too long. While this approach does not reduce the total blocking time, it improves the responsiveness of the UI during the update. The same mechanism is also used when initially tokenizing a document.
Fortunately, due to the incremental update mechanism of the bracket pair AST, we can immediately apply such a batched token update by treating the update as a single text edit that replaces the range that got retokenized with itself. Once all token updates came in, the bracket pair AST is guaranteed to be in the same state as if it had been created from scratch – even if the user edits the document while retokenization is in progress.
That way, not only tokenization is performant even if all tokens in the document change, but also bracket pair colorization.
However, when a document contains a lot of unbalanced brackets in comments, the color of brackets at the end of the document might flicker as the bracket pair parser learns that these brackets should be ignored.
To avoid flickering of bracket pair colors when opening a document and navigating to its end, we maintain two bracket pair ASTs until the initial tokenization process completes.
The first AST is built without token information and does not receive token updates. The second one initially is a clone of the first AST, but receives token updates and diverges more and more as tokenization progresses and token updates are applied. Initially, the first AST is used to query brackets, but the second one takes over once the document is fully tokenized.
Because deep cloning is almost as expensive as reparsing the document, we implemented copy-on-write, enabling cloning in O(1).
Encoding of lengths
The editor view describes the viewport with line and column numbers. Color-decorations are also expected to be expressed as line/column based ranges.
To avoid conversions between offset and line/column based positions (which can be done in O(logN)),
we use line/column based lengths for the AST too.
Note that this approach is significantly different from data structures that are directly indexed by lines (such as using a string array to describe the line contents of a document). In particular, this approach can do a single binary search across and within lines.
Adding two such lengths is easy, but requires a case distinction: while the line counts are added directly, the column count of the first length is only included if the second length spans zero lines.
Surprisingly, most of the code does not need to be aware of how lengths are represented. Only the position mapper got significantly more complex, since care had to be taken that a single line can contain multiple text edits.
As an implementation detail, we encode such lengths in a single number to reduce memory pressure. JavaScript supports integers up to 253−1, so we can use up to 26 bits each for the number of lines and columns. Unfortunately, v8 stores numbers larger than 231in the heap, so this encoding trick did not turn out as effective as we thought.
Further difficulties: Unclosed bracket pairs
So far, we assumed that all bracket pairs are balanced. However, we also want to support unclosed and unopened bracket pairs.
The beauty of a recursive descent parser is that we can use anchor sets to improve error recovery.
Consider the following example:
( [1]
} [2]
) [3]
Clearly } at [2] does not close any bracket pair and represents an unopened bracket. The brackets at [1] and [3] match nicely.
However, when inserting { at the beginning of the document, the situation changes:
{ [0]
( [1]
} [2]
) [3]
Now, [0] and [2] should be matched, while [1] is an unclosed bracket and [3] an unopened bracket.
In particular, [1] should be an unclosed bracket terminating before [2] in the following example:
{
    ( [1]
} [2]
{}
Otherwise, opening a parenthesis could change the nesting-level of unrelated following bracket pairs.
To support this kind of error recovery, anchor sets can be used to track the set of expected tokens the caller can continue with. At position [1] in the previous example, the anchor set would be {}}. Thus, when parsing the bracket pair at [1] finds the unexpected bracket } at [2], it does not consume it and returns an unclosed bracket pair.
In the first example, the anchor set at [2] is {)}, but the unexpected character is }. Because it is not part of the anchor set, it is reported as an unopened bracket.
This needs to be considered when reusing nodes: the pair ( } ) cannot be reused when prepending it with {. We use bit-sets to encode anchor sets and compute the set of containing unopened brackets for every node. If they intersect, we cannot reuse the node. Luckily, there are only a few bracket types, so this does not affect performance too much.
Going forward
Efficient bracket pair colorization was a fun challenge. With the new data structures, we can also solve other problems related to bracket pairs more efficiently, such as general bracket matching or showing colored line scopes.
Even though JavaScript might not be the best language to write high performance code, a lot of speed can be gained by reducing asymptotic algorithmic complexity, especially when dealing with large inputs.
Happy Coding!
Henning Dieterichs, VS Code Team member @hediet_dev
Zoom in to discover where your emails are being read.
A great new feature offering more insight into your subscribers is now available with every email send and monthly insight report:
Geographic data on engagement stats.
And not just the numbers, the team went a step further and added a mapping feature for visual representation.
A new way to look at the behaviors of your subscribers, the maps and corresponding data show where your audience is when they open or click your emails. Take a bird’s eye view by looking at countries, or zoom in to drill down for specific regions and/or cities.
Working with this information can offer ideas for location-specific content or, broadly thinking about time zones for different countries, what times of the day seem best to send your emails.
The geographic data and mapping feature is available for all email campaigns sent after October 1, 2020, and any Monthly Insights reports for October 2020 and afterwards. After tweaking this feature in the first few weeks, the development team is looking to how and where else to can expand its abilities to other areas of the app.
Interested in giving this and all of our great features a try? Learn more about our free trial and reach out to us on our Support Page to contact us via email, chat, or even over the phone. Live support is available Monday to Friday, 9 AM to 5 PM Eastern.
Microsoft announced on Wednesday that its AI-powered Designer app is officially coming out of preview and is now available to all users on iOS and Android. The Canva-like app lets people generate images and designs with text prompts to create things like stickers, greeting cards, invitations, collages and more.
Designer is now accessible in more than 80 languages on the web, available as a free mobile app, and as an app in Windows.
The app features “prompt templates” that are designed to help jumpstart the creative process. The templates include styles and descriptions that you can experiment with and customize, and you can share templates with others in order to build on each other’s ideas.
In addition to stickers, you can create emojis, clip art, wallpapers, monograms, avatars and more with text prompts.
You can also use Designer to edit and restyle images with AI. For instance, you can upload a selfie and then choose from a set of styles and write in any extra details you want to see to transform your photo.
Image Credits: Microsoft
Soon, Designer will include a “replace background” feature that will allow you to use text prompts to transform images.
With the launch of the standalone Designer app, Microsoft shared that it’s bringing the service to apps like Word and PowerPoint through Copilot. People who have a Copilot Pro subscription can create images and designs in their workflow. Soon, users will get the option to create a banner for their document in Word based on the content of their document.
As part of Wednesday’s announcement, Microsoft revealed that Microsoft Photos on Windows 11 is getting a deeper integration with Designer. Users can now use AI to edit photos without leaving the Photos app. You can now do things like erase objects, remove backgrounds and auto-crop images directly within the app.
Put your headphones on and get swept away with this colourful, idol, visual novel experience. Do you love boybands, JPop? Have you ever dreamed of being the driving force behind a successful idol group? Well now you can experience it in visual novel form! Step into the hardworking role of A&R (Artist & Repertoire) to the talented idol group, B-Project. Take 14 young members under your wing, each with different personalities and struggles. It’s your job to support them, help them grow, and allow them to flourish! Discover the beginnings of the different idol groups – Kitakore, MooNs, THRIVE and KiLLER KiNG. Learn about their trainee days and the struggles they faced on the path to success. Follow the story as they join together to become one group, B-Project, and stand on Japan’s brightest stage. Sparkling visual novel full of brightness and colour, B-PROJECT RYUSEI*FANTASIA is a visual novel which follows the lives and careers of the idol group “B-Project”.
Become an idol A&R: support these idols towards their dreams in the role of an A&R (Artist & Repertoire) where you are their representative and the expert in their artistic development 14 different idols to represent: each with different personalities, likes and dislikes, but all with the same dream, you must foster your individual relationships well Interactive mechanics: your phone is your gateway to nurturing your relationship with the idols, respond to messages and answer calls, don’t lose your chance! Voiced and animated: voiced by famous seiyuu, let the idols beautiful voices take you away and watch their lively animated reactions Endless magic: with 2 different possible endings, 14 characters epilogues to explore and many CGs to unlock, the replayability is high.
Features and System Requirements:
With 2 different possible endings, 14 characters epilogues to explore and many CGs to unlock, the replayability is high.
Each with different personalities, likes and dislikes, but all with the same dream, you must foster your individual relationships well.
Take 14 young members under your wing, each with different personalities and struggles.
1 :: Operating System :: Windows XP/7/8/8./10. 2 :: Processor: Core i5 of Skylake generation or better 3 :: Ram :: 4 GB RAM 4 :: DirectX: Version 9.0 5 :: Graphics:: Intel HD Graphics Series (It needs 1GB memory allocation) 6 :: Space Storage:: 6.38 GB space
Turn Off Your Antivirus Before Installing Any Game
1 :: Download Game 2 :: Extract Game 3 :: Launch The Game 4 :: Have Fun 🙂
3D architectural rendering has undoubtedly changed the game’s name despite all the tools available at the designers’ and architects’ disposal for doing their job. You can enhance your business’ profitability and performance by constantly presenting photorealistic 3D exterior and 3D interior space images to your clients. Whether you want to make the most out of your budget, improve communication, or attract new clients, 3D architectural rendering firms can boost your company in more ways than one. This piece discusses what 3D architectural rendering is all about and how companies can benefit from its use:
What is 3D architectural rendering?
3D architectural rendering involves designing three-dimensional images to explain or visualize proposed architectural designs and concepts. 3D architectural rendering uses 3D software to compute all inputs to produce photorealistic two-dimensional images. The 3D images can range from the most basic shapes to highly intricate 3D models.
The following are some of 3D architectural rendering’s most common types and applications:
Exterior 3D architectural renderings
The vantage points of 3D exterior rendering services are the outside perimeters of real estate properties. This type of rendering involves the creation of alluring three-dimensional imagery of exterior design for residential and commercial properties. These 3D architectural renderings are perfect for builders and architects who wish to sell and present their new ideas for construction projects to potential clients and investors. These 3D renderings can also be simple and plain 3D models, while some may include more realistic elements in their design, such as streets, fences, foliage, and even people.
3D architectural renderings
Interior 3D architectural renderings are 3D images that offer a realistic way to check the interior design and layout of a house or building. These renderings provide an exceptionally immersive experience that makes them handy tools at different stages, from pitching ideas to marketing real estate plans and properties.
With the help of 3D aerial rendering artists, companies can show the building or real estate structure from outside and above. 3D Aerial renderings generally include the nearby environment more, as this is used for visualizing how the structure and the surrounding buildings will blend. Aerial renderings also allow architects to decide on the features of the landscape and the suitable landscape orientation.
Virtual tours and virtual staging for architecture
3D architectural renderings are ideal for real estate agents and architects because they allow potential clients and investors to experience what it is like inside the property, even if they don’t visit it in person. Virtual tours and virtual staging for architecture professionals offer immersive experiences that allow clients to see and check the space and visualize the features, layout, and overall look and feel. 3D rendering in virtual tours eliminates the risk of making mistakes during construction, which may result in more effort, time, and money to fix.
How companies benefit from 3D architectural rendering
Here’s how companies can benefit from using 3D architectural rendering on their future projects:
1. Get an accurate building site layout
3D architectural renderings can show the site’s overall layout, complete with different elements for the landscape, such as trees and other structures that exist or may exist within the vicinity. Companies can also use these renders to map out electrical and natural gas lines, water and wastewater piping, gutters, and more. It provides plumbers, electricians, and other workers with the correct details to do their job. These 3D architectural renderings also include the final positioning of elements, such as playground equipment and garden furniture, that should be fixed to the ground.
2. Come up with realistic presentations
2D drawings and floor plan services, product descriptions, and catalogs are sometimes insufficient for client presentations and interoffice communication with designers and contractors. You must see what’s happening with a building to understand what clients want and how your team plans to achieve it. Realistic exterior and interior 3D architectural renderings provide the most precise presentation of colors, decorations, materials, and more. Renderings may include furniture and lighting fixtures for a more comprehensive design overview.
One of the most significant benefits of 3D architectural rendering is that it allows quick edits. You can speed up editing time compared to hand-generated drawings or physical photoshoots. 3D renderings are extra helpful for real estate staging. Realtors can ditch the physical shoot by editing the changes using the rendering software rather than returning to the property and redecorating its interior for another round of shoots. Architects, developers, and interior designers are other professionals who can take advantage of the quick editing process.
4. Encourages communication
All parties involved in a project can enjoy more accessible communication with the help of 3D architectural visualization companies. It saves architects more time because they no longer have to explain all of their designs’ technical aspects to project managers. For the most part, 3D renders are straightforward to understand. If the project needs any modification or change, 3D architectural renderers can update their renders and forward them to project developers or managers, no matter where they are. It ensures that all involved parties stay updated.
Different professionals need to work as a single team for the vision of an architectural company to come to life. Various team members may have other tasks delegated to them, but everything is still related, which means they need to work together to breathe life into the project. Also, sharing 3D renders over the cloud further ensures that all team members are on the same page during construction.
5. Options for customization
Every client is unique, so you can only create a single presentation and expect it to work for some clients. Even if the exteriors of the complex you’re designing are similar or the units in the building are all the same, there will always be specific preferences for lighting fixtures, paint colors, furniture upholstery, or rug fabrics. Most 3D rendering service providers can come up with any exterior you like while considering the people, roads, landscaping, fences, parking lots, and other similar objects. 3D architectural renderings allow you to quickly change and update any image and tailor it to the client’s desires.
With the explorable and fully detailed 3D architectural renderings, architects no longer have to leave things to the imagination. Investors and clients can get a comprehensive view of suggested designs to understand what the project will achieve and how the specifications and design are justified. Through this, companies can win the projects to which they submit their proposals. It also helps them improve collaboration and communication with clients. Project stakeholders can also get a more precise representation of what they will get before laying the first brick.
3D visualization services are also excellent tools for projects that need community approval to show the general public how the project can improve the functionality and beauty of the community. People will also clearly visualize how they might interact with the area in their everyday lives and realize the value of their taxpayer investment.
7. Pinpoint problems not visible in architectural drawings
3D architectural rendering programs use more advanced algorithms to produce more realistic architectural render effects. The intensity and angle of the sunlight can also be simulated correctly and automatically modified in response to the time of day, surrounding vegetation, and the addition of cloud cover. Interiors aptly reflect lighting conditions like in real life, letting architects improve their designs for exposure to daylight. They can also spot if there is extremely weak or strong lighting that can cause issues with the energy efficiency and comfort of the occupants.
Real-time renders produced by real-time ray tracing rendering experts, with their interactive quality, allow troubleshooting for other design aspects as well. Unlike standard drawings that might not indicate any problems, virtual walkthroughs might reveal that a layout may not work as well as expected or identify clashes that can cause severe disruption to the construction process.
3D architectural rendering software programs within a CAD or BIM program allow architects to render while designing. This is the quickest and most efficient means to create, generate, visualize, and iterate different types of renderings. These renders can also offer a fuller picture than traditional drawings, allowing architects to fast-track decision-making for the project along the way. Contractors and stakeholders can also find evaluating and identifying what to do easier because they no longer need to envision the result. This system can significantly enhance the overall efficiency of the project.
9. Reduce errors
3D architectural rendering allows more precision and accuracy during the designing and building phases. It doesn’t matter if it’s a residential or commercial space; displays that feature static floor pans, diagrams, and 2D blueprints can never guarantee 100% accuracy. But 3D rendering artists can mitigate all these problems thanks to perfectly reproducing everything from scale to measurements and angles in 3D images and videos.
Cad Crowd is a platform where companies can search for 3D architectural rendering professionals and experts who can help them bring projects to life. Contact us for a free quote today.


