The VS Code Server


July 7, 2022 by Brigit Murtaugh, @BrigitMurtaugh

A remote present and future

Note: We’ve released changes to how you can connect to the VS Code Server since this blog was published. Check out the December 2022 blog post for the latest guidance.

In 2019, we released the Remote Development extensions, which let you use VS Code locally to develop applications “remotely” on the Windows Subsystem for Linux (WSL), in Docker containers, and on remote physical or virtual machines you manage over SSH. In 2020, we took another step forward with remote development with GitHub Codespaces, which let you use VS Code locally or in a browser to develop applications on a remote virtual machine that is hosted and managed in the cloud for you.

We can do this because VS Code is, by design, a multi-process application. Conceptually, the front end (where you type your code) runs in one process and a backend service (which hosts extensions, the terminal, debugging, etc.) runs in a separate process.

Today we are releasing a private preview of the backend service that makes this all possible, the “VS Code Server,” along with a CLI that makes it easy to install, update, manage, and connect to the service. You can install the server wherever you like (a local development machine, a VM in the cloud, etc.) and access it securely through the browser using VS Code for the Web (also known as vscode.dev), without the hassle of setting up SSH or https (although you can do that if you want as well 😊).

Terminal starting the VS Code Server, and vscode.dev connected to it

Getting started

As the service that you use to securely connect to the VS Code Server is in private preview, you’ll need to request access through a signup form. You’ll receive an email, hopefully only within a few weeks, once you can start using the service.

At that point, here are step-by-step instructions to quickly get up and running:

  1. Install the VS Code Server on your remote machine (or wherever you want to develop against).

    Note: There are different install commands for different remote architectures, which you can review in the server documentation. This post will set up the VS Code Server in a Windows Subsystem for Linux (WSL) instance, which provides a true, isolated Linux environment on Windows and can serve as our “remote”, isolated machine.

    Run the following command in a WSL terminal:

    wget -O- https://aka.ms/install-vscode-server/setup.sh | sh
    
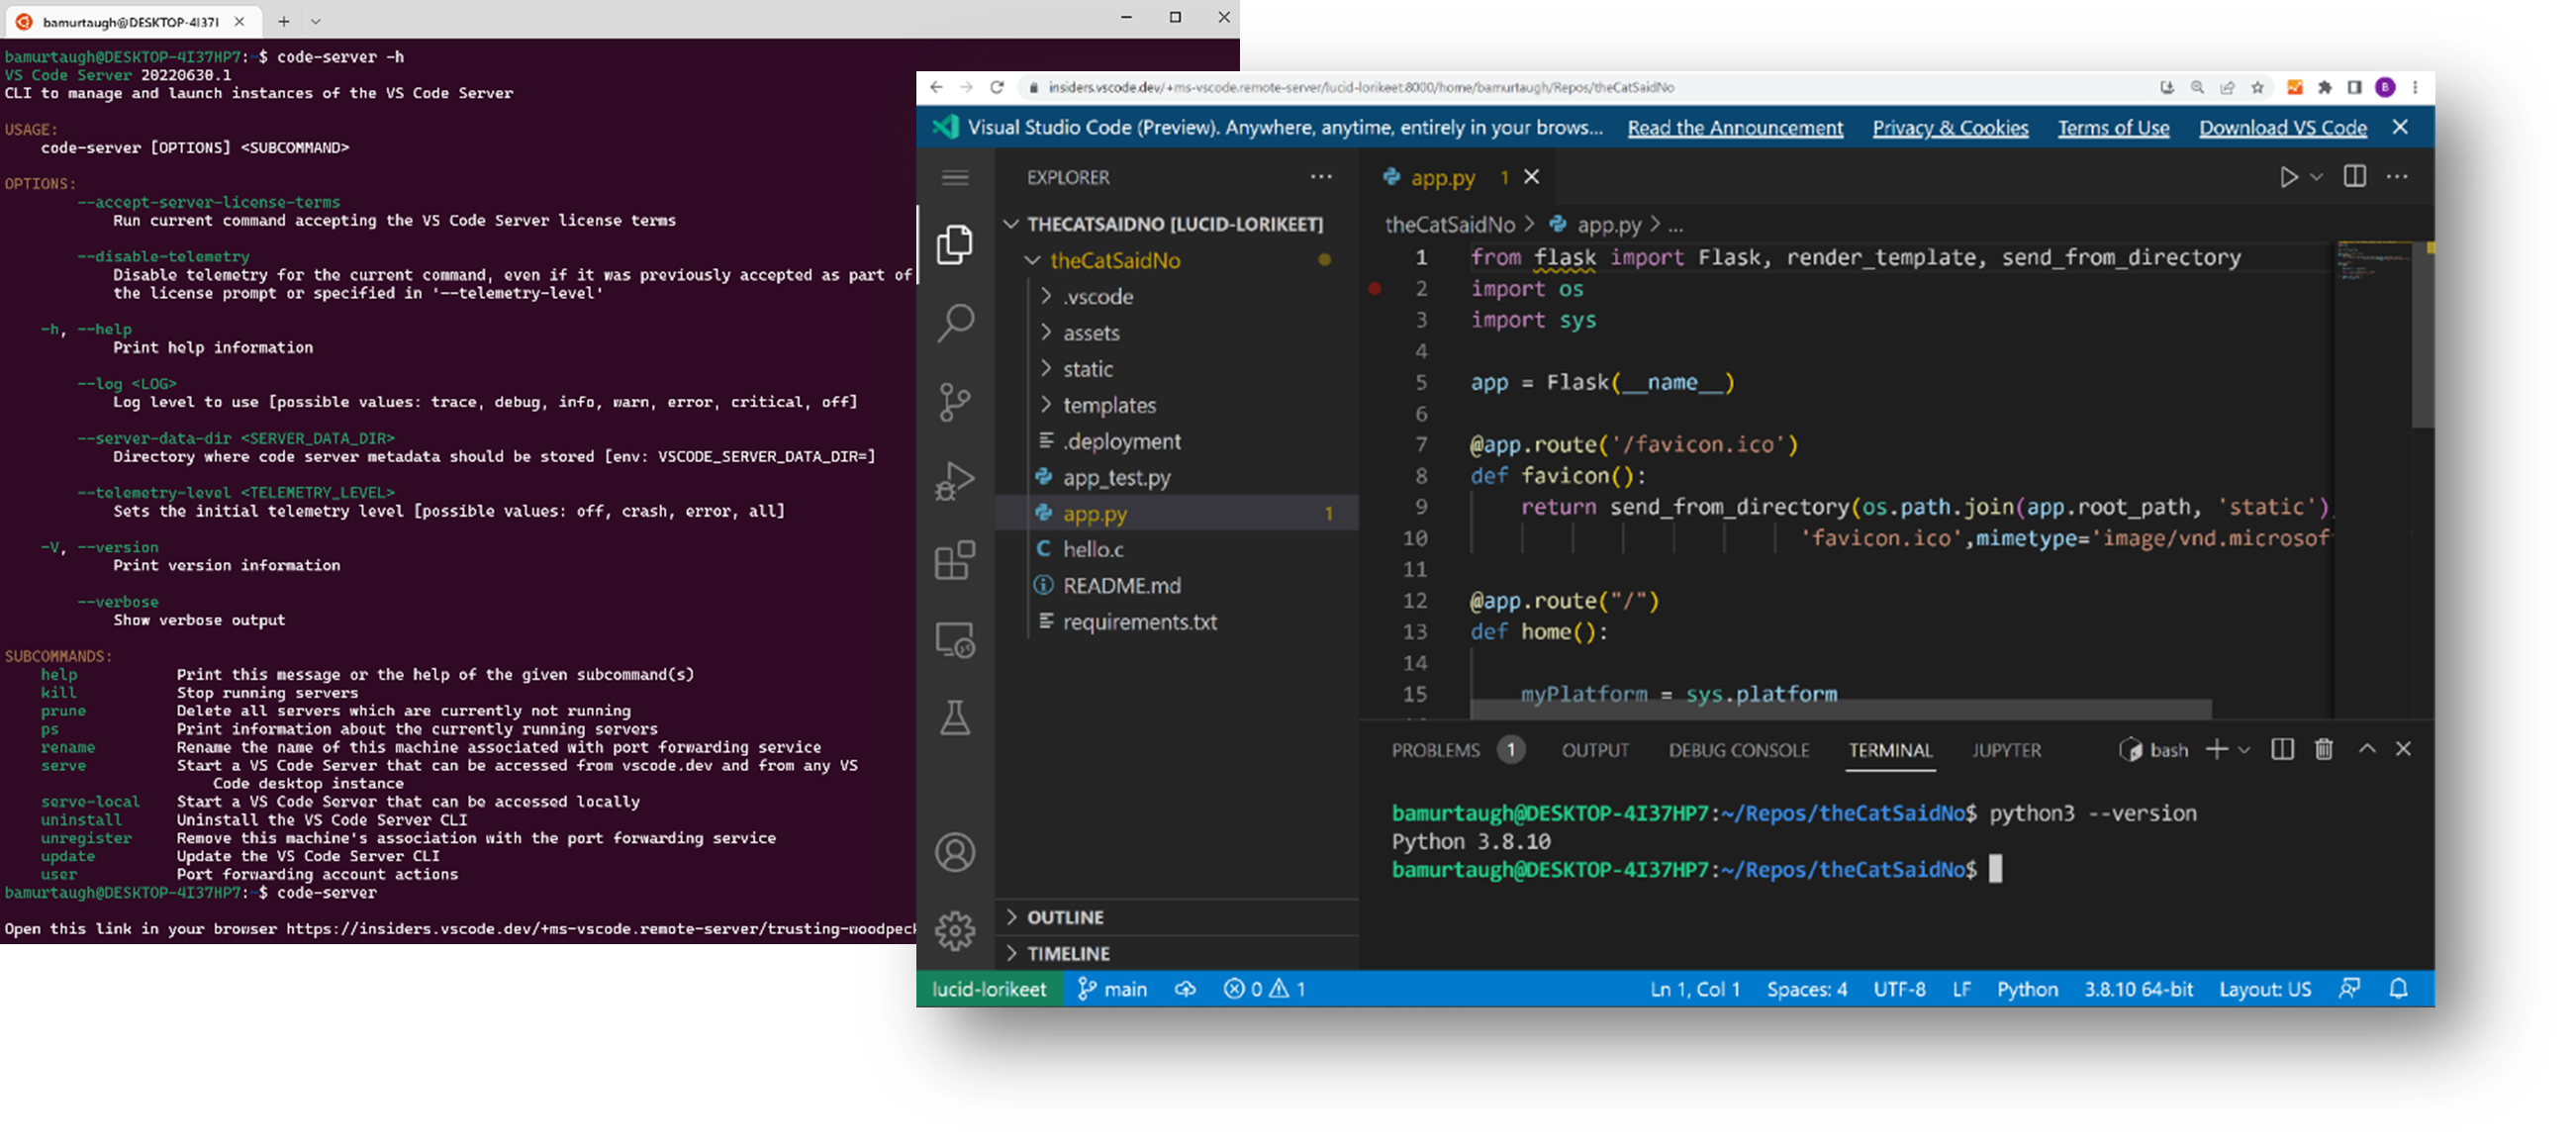
  2. Start the VS Code Server by running the following command in your WSL terminal:

    code-server
    

    Tip: Run code-server -h to see all the available commands to launch and manage the server.

  3. Your WSL distro will communicate with vscode.dev through a secure tunnel, which allows you to connect to your computer from vscode.dev, no matter what network you’re on.

    You’ll be provided a device code and URL to authenticate your GitHub account into the VS Code Server’s secure tunneling service.

    Please enter the code 7644-1186 on https://github.com/login/device
    

    Authenticate into the tunneling service by entering the device code at the provided auth URL.

  4. If this is your first time launching the VS Code Server from this WSL instance, you’ll be prompted to enter a name for your connection. The CLI will suggest a fun default “adjective-noun” name (examples shown below), which you can choose to accept too.

    ? What would you like to call this machine? (elegant-pitta) >
    
  5. After authenticating and providing a machine name, the CLI spins up a server instance and generates a vscode.dev URL. To connect to your WSL instance, you can open this URL on any device.

    Note: You can also connect to your WSL instance directly from vscode.dev: Open the Command Palette (F1) in vscode.dev and run the command Remote Tunnels: Connect to Remote.

Congratulations, you’ve successfully installed and run the VS Code Server! The connection is fully established once you visit the generated vscode.dev link. Your WSL distro’s files should be present in the VS Code Explorer, and you can start coding against it from vscode.dev.

A preview of a larger journey

The VS Code Server is currently a private preview. In this early preview, the code-server CLI is distinct from the code CLI you use today to launch the desktop VS Code, to install extensions, and more (run code -h from the terminal 😊). This is just the first step along the path towards a fully unified code CLI that lets you manage both the desktop and the server.

We’re excited for you to try out the VS Code Server. You can learn more about it, including the architecture, other commands, implementation details, and scenarios, in its documentation and intro video. If you have any issues or feedback, please file an issue in the VS Code Remote Development GitHub repo, and you can Tweet us your thoughts @code.

Happy Coding!

Brigit Murtaugh, @BrigitMurtaugh


Waymo robotaxi pulled over by Phoenix police after driving into the wrong lane


A police officer pulled over a self-driving Waymo vehicle in Phoenix after it ran a red light and pulled into a lane of oncoming traffic, according to dispatch records.

The incident took place on June 19, but local media including Arizona Republic released bodycam footage of the traffic stop this week, showing the vehicle weaving in traffic before eventually pulling over into a parking lot. The footage also shows the officer’s point of view as he walks up to an empty car.

The dispatch records (which are written in all caps) say the vehicle “FREAKED OUT” and that the officer was ultimately “UNABLE TO ISSUE CITATION TO COMPUTER,” according to Arizona Republic.

A Waymo spokesperson told TechCrunch in a statement that the vehicle “encountered inconsistent construction signage” and “briefly entered an unoccupied oncoming lane of traffic,” which it occupied for about 30 seconds after it was blocked from navigating back to the correct lane.

“The entire event lasted approximately one minute and there were no riders in the vehicle,” the spokesperson said.

The Alphabet-owned robotaxi company has voluntarily recalled software twice this year after crashes. The safety of its software is also under investigation by federal regulators.

Gifts Binder


Printables are such an AMAZING gift to give to others. They are so personal and thoughtful. Everyone I make printables for absolutely loves them and appreciates the thought that went into them.

In this binder, I want you to have everything you need to give a gift, no matter what occasion it is!

Whether that’s a wall art printable you print, frame, and wrap and put a gift tag on or a lunch box note you put in your children’s backpacks.

Maybe it’s a printable gift box that you stuff something cool inside (teens love $$) or coupons that you cut out and give to your kids.

Maybe it’s a book you bought and you print out a bookmark to put in the book before wrapping. 

There’s a ton of things you can do when giving gifts with printables and this 330+ page Gifts Binder has you covered from top to bottom!

Gifts Binder

Gifts Binder Stars

What sections you’ll find in the Gifts Binder pdf…

  • Stickers
  • Gift Tags
  • Cards
  • Wall Art
  • Lunch Box Notes
  • Bookmarks
  • Valentine Cards
  • Banners
  • Gift Boxes
  • Birthday Signs
  • Coupons

My Favorite Pages

It’s kind of hard to choose favorite pages in this Gifts Binder. I think all of them would make the perfect gift so I’m a little biased, but I do have a few favs. 

  • Wall Art

Frame this adorable alphabet Wall Art. What a great baby gift to decorate a nursery room with, right? Or give it to your teacher friend so they can decorate their classrooms (even homeschooling moms would love this!) They could even cut out the letters to make a game for their kids!!!

Gift Binder - Wall Art

  • Stickers

You need Stickers to add to a gift or an envelope? No problem! These colored stickers will make any gift brighter!

Gift Binder - Stickers

  • Gift Tags

Print and cut these super cute Gift Tags. Punch a hole at the top and add a string to attached to your gift. Easy and super cute!

Gift Binder - Gift Tags

  • Bookmarks

I always enjoy receiving books as a gift, especially Christian books!!!, as well as giving them as a gift (here are a few of my favorite books). Just by adding Bookmarks, makes a great gift set and adds a special touch; don’t you agree?

Gift Binder - Bookmarks

  • Cards

Cards always are a nice way to personalize your gift with a special message. The Cards included in the Gifts Binder are for various occasions and includes all the holidays you can possibly think of. A great way for your loved one to feel extra special! 

Gift Binder - Cards

See what others are saying about the binder…

Gifts Binder Reviews

Grab your Gifts Binder here.

Gifts Binder

How to Find the Best Eero Wi-Fi Mesh Router for You (2024)


Using an Eero mesh system without the Eero Plus subscription limits you to a basic set of options. You can schedule Wi-Fi downtime, set up a guest network, and use your Eero as a smart home hub. That might be enough for most, but here’s what you get if you subscribe. First, it’s worth noting that Eero used to offer a two-tiered subscription. Eero Secure was $3 per month or $30 per year and included advanced security, content filtering, ad-blocking, activity insights, and VIP support. Eero Secure+ was $10 per month or $100 per year and added third-party apps 1Password (password manager), Encrypt.me (VPN), and Malwarebytes (antivirus), as well as DDNS for remote network access. 

Select internet service providers still offer Eero Secure, but the only option for everyone else is the rebranded Eero Plus, which includes everything listed above for $10 per month or $100 per year. The subscription also now includes Internet Backup, which allows you to add secondary backup networks (alternative Wi-Fi or hotspot connections) that the system can use, should your main Wi-Fi network go down. 

Eero Plus is relatively expensive considering features like parental controls and real-time security are often provided for free by router manufacturers like Asus and Linksys. If you need the bundled apps, Eero Plus is arguably worth it, but even if it’s the only way to get the best Eero experience, it’s hard to justify such a high cost. Thankfully, in keeping with the brand ethos, everything is super easy to use, and the parental controls are among the best. Keep an eye out for the frequent discount offers. If you feel the subscription cost is too high, we suggest you choose a different mesh system

Ys X: Nordics Gets October 25 Launch Date


NIS America revealed this week that the highly anticipated Ys X: Nordics is finally hitting the West on October 25, 2024.

Adol’s latest adventure includes a fairly important seafaring component (there’s even naval battles!) and our red haired hero is joined by the Norman pirate Karja, effectively giving us two heroes in one story (something that’s reflected by the gameplay thanks to the cross action system)

Embark on a high seas adventure rich with action and exploration in Ys X: Nordics! Experience the perils of Obelia Gulf through the eyes of Adol Christin and his unexpected ally, the pirate Karja Balta, as they help save the people of the gulf from the mysterious immortal monsters known as the Griegr.

Feature List

Two Heroes, One Story: Bound by unexpected circumstances, the young adventurer Adol and the Norman pirate Karja must work together to determine the fate of Obelia Gulf and its people.

Cross Action System: Swap between controlling Adol and Karja independently or together. Combine their unique strengths to overcome enemies, and build up the Revenge Gauge to unleash devastating attacks.

The Power of Mana: Harness the unique abilities of Mana to overcome challenges. Grapple and slide through dungeons, demolish obstacles, create new platforms, and uncover hidden treasures and critical points.

Sailor’s Delight: The sailing ship known as the Sandras takes your exploration to new levels. Ocean travel, naval battles, and discovering uncharted islands are all made possible with this seaworthy vessel.

Showcasing 3D Architectural Rendering Projects for Your Business with a Winter Theme


The frosty weather conditions during winter months exude a unique mood paired with a sense of magical wonder. The sparkling snow, the chilly breeze, and the glistening scenery create an enticing and gorgeous atmosphere. Showcasing 3D architectural rendering projects for your business with a winter theme lets you capture the mysticism of winter to elevate your design and offer your audience an immersive and visually stunning experience.

Art of texturing for snowy landscapes

One of the most critical aspects of coming up with an inspiring and authentic winter rendering is none other than the art of texturing snowy landscapes. The layered approach is the most popular choice, featuring footprints in the snow, tire tracks, and plants covered with snow growing from the clay-rendered ground plane. The method allows the 3D visualization firm to create other environments aside from winter landscapes, including fall, summer, and spring.

Blending mode techniques are used when texturing snowy landscapes to produce the preferred aesthetic for textures. This allows better control in creating 3D renders that depict various weather, environments, and seasons, such as winter. For example, you can include realistic details such as tire tracks or footprints in the snowy landscape to create a more engaging and immersive scene that draws your audience into the heart of your winter rendering.

RELATED: What are Architectural Rendering Costs, Rates, and Pricing for Companies?

Play of light in 3D winter scenery

Light has a critical role to play when it comes to defining the mood and atmosphere of winter scenes. Attractive angles, cooler color temperatures, and soft shadows characterize winter light that all contribute to achieving a pristine albeit cold atmosphere. The sun’s lower position in the sky during winter further enhances the effects, casting dramatic patterns of light and long shadows. All of these can make 3D architectural rendering projects more engaging and visually appealing to show the intent of your design during project presentations and for posts on your social media accounts.

Light in winter renderings can also be manipulated to replicate the atmospheric effects of winter by adjusting its elements during various times of the day. 3D rendering designers can showcase the exciting interplay of artificial and natural light. This creates a sense of reflection and stillness, emphasizing introspection and solitude. Techniques like flexible and variable lighting systems help achieve the desired winter mood in 3D architectural renderings that can bring contrast and depth to the project.

winter1

Spruce up 3D rendering with winter vegetation

Winter vegetation builds 3D renderings, adding a particular visual interest and mood to the landscape. Add broadleaf plants, shrubs, evergreen trees, and deciduous trees into your 3D renderings to achieve the desired mood in various environments. You should focus on capturing the elaborate details of frosts on plants to accurately depict frosty or frozen plants in winter rendering, such as the leaves covered with frost or the tantalizing ice crystals. You can also experiment with manipulating shadows and lighting to create a refreshing winter weather and atmosphere. Careful selection and adding freezing season vegetation into the background of your rendering’s initial planning can create an immersive and visually stunning winter landscape guaranteed to capture the audience.

Choice of textures and colors

The choice of textures and colors in winter renderings also significantly impacts your design’s overall atmosphere and mood. A winter palette is essential to achieve a visually realistic and appealing scene. With 3D virtual reality rendering services, it helps convey the rigidity of ice, the fragile condition of barren branches, and the delicate nature of snowflakes as they fall from the sky. Choosing suitable materials and color schemes for the winter palette can create engaging and captivating winter scenery depicting the magical season.

RELATED: 3D Rendering Costs & 3D Visualization Prices for Firms

Choices of materials for warmth

Choosing materials that emphasize comfort and warmth in winter settings is vital for the 3D architectural visualization designer to give your design an inviting and cozy atmosphere. Materials like soft textiles, stone, and wood can provide a relaxing comfort in winter scenes, making the space more tranquil and inviting. The addition of wood can give winter scenes a cozy and warm atmosphere. Meanwhile, adding stone elements offers a sense of stability and solidity. Soft textiles like curtains, cushions, and plush blankets can exude a feeling of peaceful comfort to create a sense of intimacy and coziness that entices the audience to envision themselves in the space. Choosing suitable materials for the frosty season can produce a rendering that evokes a sense of tranquility and comfort to make your design stand out.

winter2

Clever use of exciting colors

Variations of subtle colors in winter scenes are important to produce interest and depth while ensuring your design is balanced. Shades of warm white, grey, lavender, and blue can add more depth to your winter renderings. Composition with objects at various distances can also enhance depth perception further. Achieving the perfect balance between delicate and vibrant hues can help amplify the winter theme while ensuring that it doesn’t detract from the tranquil ambiance often linked with the cold season.

Seasonal props to set the right mood

Seasonal props are crucial in enhancing winter renders’ overall atmosphere and mood. These create a more engaging and immersive experience through different environments and seasons. 3D architectural rendering services can assist you in incorporating holiday decorations, animals, vehicles, and people into your projects. With these props, you can breathe life into your winter scenes, adding a sense of movement and activity to captivate your viewers.

RELATED: What are Architectural 3D Visualization Costs, Service Fees & Rates for Companies?

Add festive features

Adding holiday elements and decorations in winter renders can exude a cozy and festive atmosphere that creates a pleasant and cheerful holiday vibe, making designs more inviting and appealing. You can build a unique, warm mood with the help of different context elements such as festive outdoor decors, flocked foliage, tree figures, and twinkling glass lights. For instance, a house in the heart of the countryside, nature, or a city landscape can be depicted on architectural renders to achieve a visually enticing winter scene that captures the season’s spirit.

The 3D architectural modeling professional can showcase them during weather conditions, such as a pleasant and bright sunny day or a dark and rainy environment. Furthermore, depending on the specific features of the project, elements and weather conditions in specific surrounding environments and geographical locations can all be selected and adapted in 3D models accordingly. The artful selection and integration of thematic décor, like Christmas décor, into architectural renders can also establish the desired mood and give your architectural project that unique winter charm. This will enhance your design’s visual appeal and let your audience form a sense of connection with your project.

winter3

Life in winter wonderland

Adding a sense of life to your winter renders can be easily achieved by carefully placing vehicles, animals, and people. Incorporating such elements into your 3D renders helps you achieve a sense of motion and activity that makes the winter scene more engaging and relatable for the audience. You can also use props to convey different moods or tell a unique story, such as a deserted, snow-covered building or a cozy cabin with a warm fireplace.

Carefully choosing and placing props in winter scenes can help you produce a visually immersive and enticing environment that will draw in more audiences and capture their imaginations. It doesn’t matter if you’re trying to depict serene residences in the countryside or the bustling streets of the metro; the correct props can breathe life into your winter renders to create a sense of movement and activity that will mesmerize viewers.

Achieve emotional impact with weather effects

Weather effects are essential in stirring up certain moods and improving winter 3D renders and their overall atmosphere. The weather emotionally affects house, office, or city designs in renders. For example, the gentle snowfall can create a sense of tranquility, while the rain and howling wind can evoke feelings of desolation and isolation. Meanwhile, cheery sunny days with contrasting solid colors emphasize bright feelings, while dark background scenery can create overwhelming feelings. The mood in rainy environments can change to contemplation and introspection, demonstrating the weather’s power to shape emotions.

RELATED: The Benefits of 3D Architectural Rendering for Companies in the Real Estate Industry

Varied moods of snow

Snow creates a variety of moods in winter renders, from the melancholy and isolation of heavy snowfall to the pleasant tranquility of light flurries. Your choice of colors and lighting can influence the winter atmosphere and the specific depicted snow and weather conditions. For example, an untouched and fresh frosty scene during a bright sunny day exudes a magical sense that can transport the audience to a winter wonderland.

How Cad Crowd can help

Are you ready to use the winter theme to showcase your business’s 3D architectural rendering projects? Cad Crowd can connect you with experts adept at using different themes that will make your projects stand out from the competition.

Wordle today: Answer and hint #1113 for July 6


Let’s get this weekend Wordle won. Whether you want to learn how to turn every guess into a green-seeking miracle, need a helpful hint for the July 6 (1113) game, or would just like someone to tell you what the heck today’s answer is, you’ll find all you need right here.

Today’s Wordle was a strange game of two halves. My first three guesses didn’t seem to do much good at the time—a few yellow letters here and there, but no real clues—and then the fourth did everything other than just hand me Saturday’s answer on a plate. What a relief.

Today’s Wordle hint

(Image credit: Josh Wardle)

Wordle today: A hint for Saturday, July 6

asp.net mvc – Persist Owin login cookies between Visual Studio debug sessions


I have recently switched to a different workstation and on the old workstation my login cookies/session would persist after I rebuild the project so when debugging something I wouldn’t need to always relogin after tweaking the code and rebuilding the solution.

Now on the new workstation, each time I rebuild, I get redirected to the login page of my project and need to relogin. I can see the cookies are still there when I check through Chrome’s dev console but somehow the application ignores them.

Here’s some info about the 2 workstations: old machine was a Win Server 2022 and new machine is Windows 11) and I’m virtually using the same IDE configuration VS 2022, imported the same VS settings, pulled the project from Git, etc. I checked every configuration file I could (IIS Express, Web.config, etc.

The project uses Microsoft.Owin.Security.Cookies and the initialization code looks like this:

public class Startup
{
    public void ConfigureAuth(IAppBuilder app)
    {
        Owin.AppBuilderExtensions.CreatePerOwinContext<ApplicationDbContext>(app, new Func<ApplicationDbContext>(ApplicationDbContext.Create));
        Owin.AppBuilderExtensions.CreatePerOwinContext<ApplicationRoleManager>(app, new Func<IdentityFactoryOptions<ApplicationRoleManager>, IOwinContext, ApplicationRoleManager>(ApplicationRoleManager.Create));
        Owin.AppBuilderExtensions.CreatePerOwinContext<ApplicationUserManager>(app, new Func<IdentityFactoryOptions<ApplicationUserManager>, IOwinContext, ApplicationUserManager>(ApplicationUserManager.Create));
        Owin.AppBuilderExtensions.CreatePerOwinContext<ApplicationSignInManager>(app, new Func<IdentityFactoryOptions<ApplicationSignInManager>, IOwinContext, ApplicationSignInManager>(ApplicationSignInManager.Create));
        IAppBuilder app1 = app;
        CookieAuthenticationOptions options = new CookieAuthenticationOptions();
        string str = "ApplicationCookie";
        options.AuthenticationType = str;
        PathString pathString = new PathString("/Account/Login");
        options.LoginPath = pathString;
        options.Provider = (ICookieAuthenticationProvider)new CookieAuthenticationProvider()
        {
            OnValidateIdentity = SecurityStampValidator.OnValidateIdentity<ApplicationUserManager, ApplicationUser>(TimeSpan.FromMinutes(30.0), (Func<ApplicationUserManager, ApplicationUser, Task<ClaimsIdentity>>)((manager, user) => user.GenerateUserIdentityAsync((UserManager<ApplicationUser>)manager)))
        };
        CookieAuthenticationExtensions.UseCookieAuthentication(app1, options);
        Owin.AppBuilderExtensions.UseExternalSignInCookie(app, "ExternalCookie");
        Owin.AppBuilderExtensions.UseTwoFactorSignInCookie(app, "TwoFactorCookie", TimeSpan.FromMinutes(5.0));
        Owin.AppBuilderExtensions.UseTwoFactorRememberBrowserCookie(app, "TwoFactorRememberBrowser");
    }

    public void Configuration(IAppBuilder app)
    {
        InitApp.Init();
        this.ConfigureAuth(app);
    }
}

The Owin package I use is:

<package id="Microsoft.Owin.Security.Cookies" version="4.2.0" targetFramework="net472" />

as you can see the project uses ASP.NET MVC 4.7.2. The project works well everywhere else, it’s been in production for years to thousands of people with no complains so I doubt it’s about the code but more about my configuration.

I’ve been scratching my head for 24h to figure that small problem. I searched as much as I can, found nothing similar on here or anywhere else. So my last resort is so post here hoping that somebody encountered something similar at some point in their career.

Do not hesitate to ask for more details. Thanks!

How To Ship Oversized Loads: Best Practices For Home Business Entrepreneurs


Home Business Magazine Online

The home business boom shows no signs of slowing down. More and more entrepreneurs are ditching the office commute for the comfort of their homes. But this shift comes with unique challenges, especially when it comes to shipping. You might be wondering how to ship oversized loads. As a home-based business owner, you’re likely dealing with bigger items than the average online shopper. Think furniture, equipment, or artwork. These oversized loads can be a major headache to ship.

You know the pain points all too well: high shipping costs, the constant worry of damage, confusing regulations, and the struggle to find trustworthy carriers. It’s enough to make anyone want to throw in the towel. But there’s a way to navigate this complex world of oversized shipping.

This article gives practical advice and proven strategies to streamline the process and answer the question of how to ship oversized loads. You’ll learn how to ship your large items safely, efficiently, and without breaking the bank. So, whether you’re a seasoned pro or just starting out, get ready to take control of your shipping game.

Understanding Oversized Load Definitions And Regulations

So, what exactly is an “oversized load?” It’s a specific term with legal definitions. Generally, a shipment is considered oversized if it exceeds certain dimensions and weight limits. These limits vary.

Knowing these regulations is essential when considering heavy equipment transport. Local, state, and federal rules all come into play. Ignoring them can lead to hefty fines or major delays. Your oversized shipment can get held up because of a paperwork error. That’s lost time and money.

Plenty of resources are available to help you. Start with the Department of Transportation (DOT) websites. They usually have clear guidelines on oversized load regulations. Check those first before you even think about packing up your shipment.

Preparing Your Oversized Load For Shipping

For packaging and crating, use sturdy materials like wood or metal. You’ll need proper bracing to keep everything secure inside the crate. And remember, weather can be unpredictable, so factor in protection against rain, sun, and wind.

Next is labeling and documentation. Markings need to be clear and easy to read. Include the dimensions, weight, and any special handling instructions. The bill of lading is your shipping contract, so make sure it’s filled out correctly. Depending on your load and route, you might also need permits.

Finally, don’t forget about insurance. It’s an extra cost, but it’s worth it for peace of mind. You’re protecting your investment from damage or loss during transit.

Choosing The Right Shipping Carrier

With your oversized shipment prepped, it’s time to find the right heavy haul trucking company. Choosing a carrier isn’t a one-size-fits-all situation. Several factors come into play. First, look for expertise in oversized loads. You wouldn’t want your shipment in the hands of someone who’s never handled something significantly big.

Next, check the service area. Does the carrier cover your route? Some specialize in certain regions or states. Also, make sure the carrier’s insurance coverage meets your needs. And of course, get quotes from several carriers to compare prices.

You’ll come across different types of carriers. LTL (Less Than Truckload) might work for smaller oversized loads. Specialized carriers are pros at hauling big stuff. Freight brokers act as middlemen, finding the best carrier for you.

Getting quotes is easy. Many carriers have online tools. Don’t be afraid to call and ask questions. Compare quotes, services, and customer reviews before making your decision. It’s your shipment, so choose wisely.

Optimizing Shipping Costs

Shipping oversized loads can get pricey when looking at how to ship oversized loads. First, negotiate rates with carriers. Don’t just accept the first quote you get. Ask for discounts, especially if you’re a repeat customer or shipping multiple items.

Another strategy is consolidating shipments. If you have several smaller loads, combine them into one larger shipment. This can often lead to lower rates. Be flexible with delivery dates. If you’re not in a rush, you might snag a better deal by choosing a less busy time.

But be aware of hidden costs. Fuel surcharges can fluctuate depending on gas prices. Accessorial fees are extra charges for things like liftgate service or residential delivery. These can add up quickly, so factor them into your budget.

Luckily, you don’t have to do all the math yourself. Many online tools and resources can help you estimate shipping costs. Use them to compare prices from different carriers and find the best deal for your budget.

how to ship oversized loads

Photo 184322462 | Travel © Wlodzimierz Dondzik | Dreamstime.com


Tracking And Managing Your Shipment

Most carriers offer online portals or apps to monitor your shipment’s progress. Use them for real-time tracking. It’s also a good idea to stay in touch with the carrier. A quick call or email can clear up any questions or concerns.

Delays can happen due to weather, traffic, or mechanical issues. Proactive communication helps. Check-in with the carrier if you notice any delays. They might have alternative routes or solutions to get your shipment back on track.

When your oversized freight arrives, don’t just sign and walk away. Inspect it carefully before accepting delivery. Look for any signs of damage. If you find any, document it with photos and notes. This will be important if you need to file an insurance claim.

Conclusion

How to ship oversized loads is about being proactive, not reactive. The tips shared herein will help you stay on top at every step. The goal is to get your product to its destination safely and efficiently.

Consider building relationships with reliable carriers for better rates and smoother service. Look into freight forwarding if you’re tackling international shipments. And don’t underestimate the power of shipping software. It can save you time and money in the long run. With the right knowledge and tools, you can turn oversized shipping into a competitive advantage.

The post How To Ship Oversized Loads: Best Practices For Home Business Entrepreneurs appeared first on Home Business Magazine.

No, That Acolyte Planet Is Not Where You Think It Is


Star Wars fans love only one more thing than a mystery: speculating about how that mystery could have connections to other parts of the galaxy far, far away. But for as much as the franchise does indeed share that love of keeping it all connected, it’s not always actually planning on doing that.

Ever since we’ve seen its cluster of islands on The Acolyte, the unknown planet that the Sith Stranger calls home has been speculated by fans as potentially being another key locale: the planet Ahch-To from The Last Jedi. It certainly looks very similar, given the vast oceans and lush, mountainous island outcroppings—although location filming for the planet took place on the Portuguese island of Madeira, rather than Skellig Michael, the Irish island used to film Ahch-To in the Star Wars sequel trilogy. In the latest episode we learned it even has its own Porg-esque local wildlife in the form of the Skura, little beings that look like a mashup of a duck and an anteater. Plus, there would be something incredibly Sith about the idea of dark side users hiding in the shadows where the Jedi would least expect it: the home planet of the first Jedi Temple.

But alas, Star Wars fans craving connection, according to showrunner Leslye Headland, the planet is very much not Ahch-To. “It’s not Ahch-To. I know it’s similar, and it was intentionally supposed to be similar in terms of terrain and feeling isolated and surrounded by water and less lush green and more rocky,” Headland recently confirmed in an interview with Collider. “But the idea is that cortosis is mined on this planet, so I don’t think that’s the case with Ahch-To. Part of the reason this is his home base is that cortosis is a very rare metal. I don’t think we say it explicitly in the show, but that’s a reason it’s not Ahch-To.”

Headland further noted that explicitly only identifying the world as “Unknown Planet” in The Acolyte‘s location cards was an intentional nod to the series’ primary perspective being that of the Jedi Order and the Republic. “It’s an uncharted planet that they haven’t [mapped],” Headland added, touching on an element of the High Republic setting that’s not come up often in The Acolyte, but serves as a major piece of worldbuilding in the transmedia book and comics initiative that established the era: that this is a time period where the Republic and its allies are still expanding territory and charting the galaxy. Just because it’s unknown to them, doesn’t mean people like the Stranger didn’t know about it already—and in knowing it, he got access to a tool like cortosis he could wield against his enemies.

Whether or not the world will remain unknown by the end of The Acolyte‘s first season remains to be seen—the presence of cortosis deposits has had as many fans as those speculating it could be Ahch-To speculating that the world could instead possibly be a canonical version of Bal’demnic, a cortosis-rich ocean world that acted as a base of operations for Darth Plagueis and his master, Tenebrous, in the EU novel Plagueis. For now, sometimes a planet just looks like another planet.


Want more io9 news? Check out when to expect the latest MarvelStar Wars, and Star Trek releases, what’s next for the DC Universe on film and TV, and everything you need to know about the future of Doctor Who.