Master Smartphone Composition in 20 Minutes
Every time a phone or camera manufacturer releases a new product or an updated version of an existing one, they have one goal in mind.
That goal is to create a desire in you and me for that product and as a result, make a sale!
The “old reliable” in this scenario is to push very hard on the concept that:
- Your images/videos are somehow subpar.
- The whole problem would be solved by you buying whatever product they are offering.
Most of us are aware of it, but dang they can get into your head and before you know it, you are pricing models!
The real key to all of this is knowing technically how to get the best out of what you have, because that is the real answer.
Here’s a great example of how to shoot better videos through knowing some of the rules of composition and applying them well.
Trust me, your bank account will thank you!
Why I Script Every 40 Second Reel And What Happens When I Don’t
When you see highly successful creators working with either long form or short form content it is easy to get a false idea of what they are doing.
That false idea is that they are somehow talented in delivering onscreen and for them it’s all just some kind of natural thing they can do and you can’t.
The true picture is that they all use some kind of scripting that is worked out well before they begin to shoot.
It may not be a script in the sense of word for word text written down, but there will be a definite plan in place.
In this video Chris Goor covers the subject and why it is so important.
How to Edit Videos with AI in 2027 – Video Editing for Beginners
This is a reasonably good walkthrough of how to put an entire video together in a sequence of steps that make sense.
Of course it is produced by the folks at PowerDirector so like many editors these days, they are pushing the whole”AI” thing pretty hard.
I tend to ignore a lot of that noise for the most part because it’s coming from the marketing department in order to generate some kind of wow factor in the viewer.
And by viewer I mean potential customer!
Other than that it is a pretty solid set of recommendations that will get you from raw footage to a finished product as efficiently as possible.
How to use the Video Edit by Chat tool in PowerDirector
If you checked out the video above you would have seen a polished and sanitized version of working with some of the AI tools in PowerDirector.
It would be naive to think that CyberLink would present their product any other way!
What you saw there was reasonably accurate but not exactly how every experience is going to go.
In this video you can get a more realistic sense of working with at least one of the AI features in the program.
The tool is the Edit by Chat feature.
Filmora Beat Ramping Tutorial – How to Speed Ramp to Music Beats
This is a rather cool little tool that has been added to Filmora recently.
We are probably all familiar with the concept of speed ramping by now but just in case, here’s the deal.
Speed ramping is a feature that allows you to speed up or slow down the playback of a clip or sequence.
Before speed ramping was tool unto itself, you had to use keyframes to mark a spot where the clip would speed up then add other keyframes to have that change increase or decrease incrementally.
That way you could get a smooth speeding up or slowing down rather than an abrupt change of speed.
Speed ramping as a feature eliminates the need for that so that you just apply it, adjust it and you are good to go.
The inherent problem with this is that if there is any audio attached to the video file, that too would be made to play faster or more slowly with you having no real control over it.
This resulted in people sounding like your drunk uncle at a party or everyone becoming The Chipmunks!
The tool Filmora has added to address this is called Beat Ramping and works in a similar way to Speed Ramping, only this one if for music.
Check the video below for what it is, how to use it and what kinds of projects it is suited to.
No Editing Experience? Here’s How to Make Your First Video in Filmora
This is a handy step by step beginners tutorial covering the creation of a completed video for absolute newbies.
Whether you are already using Filmora or are totally new I always recommend checking out videos like this.
More importantly, when these types of videos are posted by the makers of the software they are even more significant especially when it comes to Filmora.
Of all the software I tend to keep an eye on, Filmora is easily the one that is the most aggressively developed with update coming almost fortnightly if not weekly.
What that means as a user is that the habits and strategies you have employed to get you to where you are, may not still be the most efficient way of doing things.
I tend to treat these back to basics videos as a refresher in the software so if I am doing OK, great!
However if something has changed and I can now do it fast or easier, then that’s great too!
The 4 Cutting Techniques Every Video Needs in CapCut (Pro Editors Use Them All)
This is a very good “back to basics” tutorial from Dina and Agnes this week.
Although they often post about using simple features within CapCut to pull off effects that look very professional, they too recognize one basic thing.
That thing is that if you do not know how, when and why to execute cuts correctly, no amount of fancy schmancy effects are going to save you or your project!
Basic Training for Adobe Premiere Elements 2027, Part 1 of 8
Last week Steve Grisetti started off his updated tutorials for the new version of Adobe Premiere Elements 2027.
That video was an introduction to some of the newer Generative AI tools they have added so this week we start the real training.
This is Part One of his usual eight part series introducing the interface and some of the tools new users would be most likely to need first.
Resolve Grading in One Node
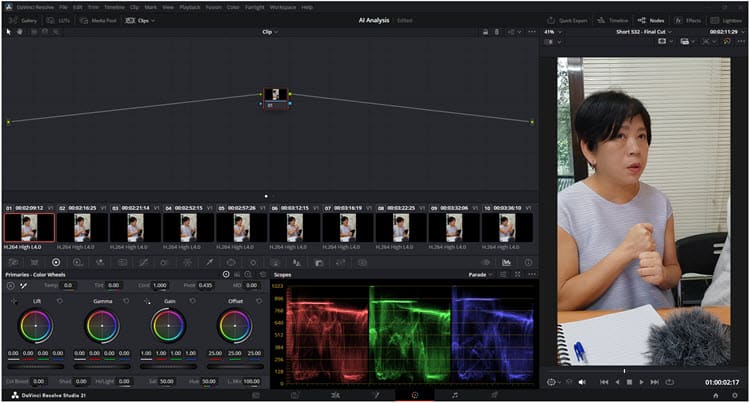
Probably the best choice around at the moment for color correction and grading is DaVinci Resolve and this includes the free version.
However actually working out how to use it is another matter entirely.
I know this because when I first started using it, there were many minutes spent just staring blankly at the computer screen in a sort of numb state.
The the problem then worsens when you try to find some online help to get it all under control.
Before you know it, you are knee deep in all sorts of complications and still trying to work out what a Node is.
Well this week I came across this really good article that is a straightforward step by step walk through a color correction.
It is all done using one node so you don’t even have to have the nodes showing on the screen!
10 Mistakes That Make Your Videos Look Amateur – DaVinci Resolve
OK, so this is anything but a DaVinci Resolve tutorial even though it is demonstrated using that software.
This is just a bunch of simple little mistakes I see a lot of people make very consistently.
As an editor it is your job to pick these up and eliminate them before a viewer gets to the see the video.
Remember, as an editor you need to gain experience in spotting and handling mistakes.
The reason for that is that an audience will most likely not spot them BUT!
They will “feel” something is wrong and they will click away in a heartbeat!
Key Takeaways
- Master smartphone composition by understanding the fundamentals instead of chasing the latest products.
- Successful creators often script their content, which helps in delivering polished videos.
- Learn video editing and utilize tools like PowerDirector and Filmora for efficient results.
- Beginner tutorials can guide you in using software effectively, especially with frequent updates.
- Avoid common mistakes in editing to enhance video quality, ensuring that audiences remain engaged.