The best fitness trackers for 2025


Fitness trackers are a solid option if you really want to hone in on tracking, well, your fitness. Some of the best fitness trackers also include additional sensors to track things like stress, sleep and other advanced health metrics. Sure, you could opt for the best smartwatch, but if you’re not interested in all of the extra features they offer, a fitness tracker might be a better (and more affordable) option.

Accurate workout and activity tracking is what fitness trackers do best; most include a pedometer to track your steps throughout the day. They might not look as glamorous as an Apple Watch, but they do a particular job well. We’ve researched and tested a good selection of the most popular fitness trackers out there to help make your decision a little easier.

Image for the large product module

Fitbit

Tracker: Fitness, heart rate, ECG, SpO2, skin temperature, stress, sleep | Supported OS: Android, iOS | Max battery life: 7 days | Size: Small, large | Water resistant: Yes

While we haven’t given the Fitbit Charge 6 the full review treatment yet, we feel confident recommending it as the successor to our previous top pick, the Charge 5. The company added a few new features to the mix here, namely a more accurate heart rate monitor, the ability to pair with exercise machines via Bluetooth and a physical side button that can be used in tandem with the touchscreen to navigate the device’s interface. The Charge 6 has 20 exercise modes for tracking, and thanks to Fitbit’s parent company Google, you can skip through and control YouTube Music playback, provided you have a YouTube Music Premium subscription.

Otherwise, the Fitbit Charge 6 is very similar to the Charge 5 that came before it. Key to its appeal is that it’s decidedly not a smartwatch. That means it has a slightly lower profile on the wrist and lasts days on a single charge while tracking activity and monitoring your heart rate, step count and sleep. It also has a full-color AMOLED display and a relatively thin design, which makes it feel fairly premium when compared to other fitness trackers.

Other perks include contactless payments with Fitbit Pay and Google Wallet, plus a handy integration with Google Maps that lets you see turn-by-turn directions on your wrist. But make no mistake — built-in GPS remains the star of the show here. If you’re looking for a wearable that can accurately map out runs and bike rides while also keeping track of your heart rate and other stats during each workout, the Charge 6 is a great option for anyone looking for durability and function in a health tracker.

Pros

  • Built-in GPS
  • More accurate heart rate monitor
  • Seven-day battery life
Cons

  • No integration with Apple Health
  • Some data hidden behind Fitbit Premium paywall

$120 at Adorama

Image for the large product module

Garmin

Tracker: Fitness, heart rate, SpO2, stress, sleep | Supported OS: Android, iOS | Max battery life: 7 days | Size: 122-188 mm (small/medium), 148-228 mm (large) | Water resistant: Yes

A more subtle-looking fitness band alternative is the $150 Garmin Vivosmart 5. It’s thinner than the Fitbit Charge 6 and fits in a bit better with bracelets and other jewelry you might wear regularly. But its attractive design is only part of its appeal — Garmin knows how to track fitness, and the Vivosmart 5 is proof that you don’t need to drop hundreds on one of the company’s in-depth fitness watches to get a capable device.

It has a lot of the same features as the Charge 6, except for a built-in GPS. It does support connected GPS, though, so you can map outdoor runs and bike rides as long as you bring your phone with you. The Vivosmart 5 tracks all-day heart rhythm thanks to its heart rate sensor, plus sleep data and workouts, and we’ve always appreciated how many workout profiles Garmin has to choose from, including exercises like strength training. The pedometer function tracks your steps throughout the day, ensuring that even light activities contribute to your fitness goals.

You can customize which show up on your device and change them whenever you want. You’ll also get additional health and wellness information like Garmin’s Body Battery score, which tells you how long after a hard workout you’ll need to wait until you can train at peak performance again, blood oxygen levels, sleep stage data, women’s menstrual cycle monitoring and more. If you’re looking for a well-rounded activity tracker, the Garmin vívosmart 5 has it all.

The biggest disadvantages to fitness tracking with the Vivosmart 5 are the aforementioned lack of built-in GPS, plus its slightly harder to use mobile app. But on the flip side, Garmin devices can sync with Apple Health, whereas Fitbit devices still don’t have that feature.

Pros

  • Slim design
  • Excellent workout tracking features
  • Customizable on-device workout modes
  • Syncs with Apple Health
Cons

  • Connected GPS only
  • Cumbersome mobile app

$150 at Adorama

Image for the large product module

Xiaomi

Tracker: Fitness, heart rate | Supported OS: Android, iOS | Max battery life: 16 days | Size: 135mm–210mm | Water resistant: Yes

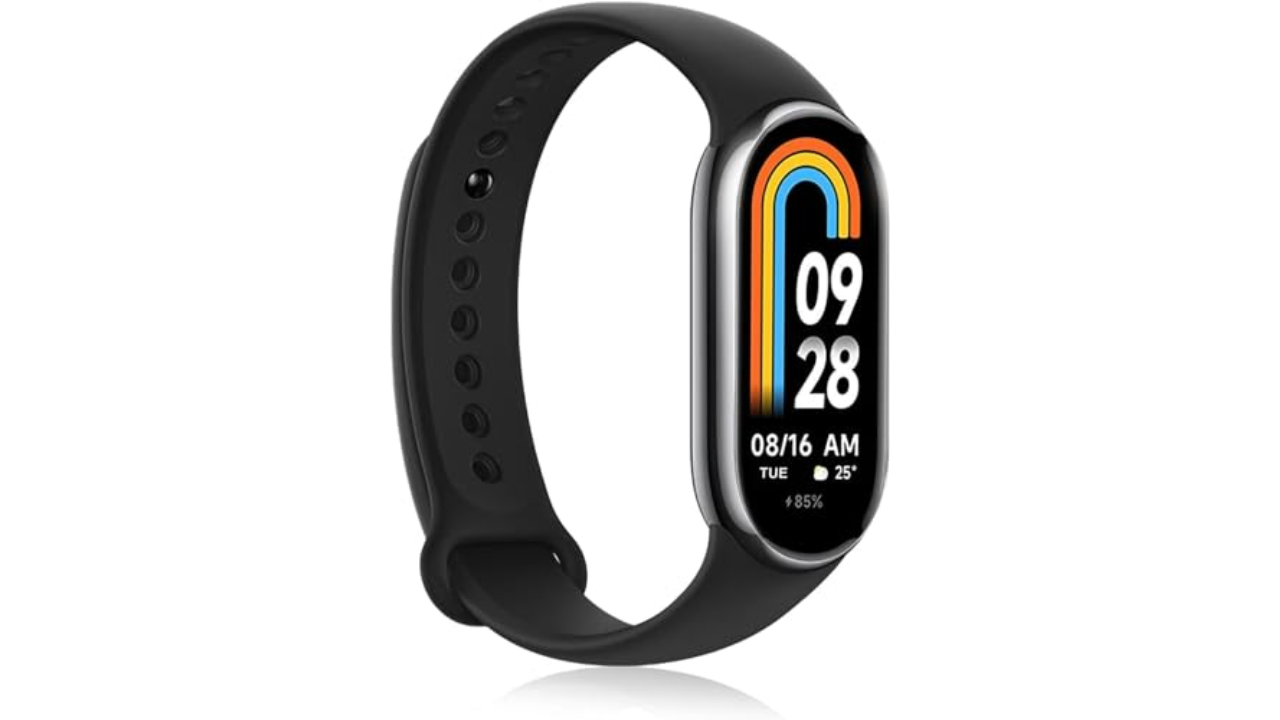
Engadget tested some of the cheapest fitness trackers you can buy, all coming in at under $100. At the top of the list is the Xiaomi Band 8, which beat the Fitbit Inspire 3 and the Amazfit Band 7, namely due to its many sport tracking modes, unique “pebble” running mode and free and accurate sleep monitoring features. It’s also quite comfortable and fairly stylish with its sleek and nimble design. It also has a quick-charge feature that makes it easy to wear for 10 to 14 days (depending on usage) before it runs out of juice. Importantly, the watch made it really easy to track niche exercises straight on the watch face without being too distracting during workouts. And like the other fitness trackers on this list, it works with both Android and iPhone too.

Pebble mode is a standout feature as it lets you attach the tracker to your shoe using the included running clip accessory, and it did a good job of reporting information about your pace and cadence directly on the display upon completing a run. More detailed insights are also viewable on your smartphone through the Mi companion app. When the Band 8 is on your wrist, it makes it easy to set up workout goals related to time, distance or calories burned per session for activities like deadlifting or skateboarding.

While the Amazfit Band 7 was only beaten by a hair in terms of its exercise tracking capabilities, the Xiaomi Band 8 had a real edge when compared to the Fitbit Inspire 3. Whereas Fitbit’s device was limited to only six pre-loaded exercise shortcuts, the Xiaomi Band 8 had more than 150 exercises you could track directly on the wearable straight out of the box. The Inspire 3 also blocked me from getting more detailed insights about my sleep and recovery because that information lives behind the Fitbit Premium paywall. Xiaomi’s devices, on the other hand, provided in-depth sleep reports with curated advice on how to improve your resting hours free of charge. — Malak Saleh, reporter

Pros

  • Comfortable
  • Easy to use UI
  • Detailed workout reports
  • Unique “Pebble” mode

$43 at Amazon

Image for the large product module

Photo by Daniel Cooper / Engadget

Tracker: Fitness, sleep | Supported OS: Android, iOS | Max battery life: 18 months | Size: N/A | Water resistant: Yes

All of the previously mentioned fitness trackers are attractive in their own way (bonus points to those that have interchangeable bands), but they share a similar look. There aren’t many alternative designs for these devices anymore. The $70 Withings Move watch is an exception, and one of the most traditionally fashionable fitness trackers you can get. It’s an analog watch face with a couple of health monitoring features including step, calorie, distance and sleep tracking, connected GPS, auto-recognition for more than 30 workouts and a water-resistant design. But we really love it for its long battery life: it’ll last up to 18 months before the coin cell needs a replacement. Although this means there’s no charger to juice the battery back up, you can pick up a replacement coin cell relatively cheaply.

Pros

  • Attractive analog design
  • All-day activity and sleep tracking
  • Months long battery life

$70 at Withings

The answer seems simple: Fitness trackers are best at monitoring exercise, be it a 10-minute walk around the block or that half marathon you’ve been diligently training for. Obviously, smartwatches can help you reach your fitness goals too, but there are some areas where fitness bands have proven to be the best buy: focus, design, better battery life, durability and price.

When I say “focus,” I’m alluding to the fact that fitness trackers are made to track activity well; anything else is extra. They often don’t have the bells and whistles that smartwatches do, which could distract from their advanced health tracking abilities. They also tend to have fewer sensors and internal components, which keeps them smaller and lighter. Fitness trackers are also a better option for those who just want a less conspicuous gadget on their wrists all day.

Battery life tends to be better on fitness trackers, too. While most smartwatches last one to two days on a single charge, fitness bands offer between five and seven days of battery life — and that’s with all-day and all-night use even with sleep tracking features enabled. Many fitness trackers also slot nicely into your existing ecosystem, syncing seamlessly with your smartphone, other fitness apps and cloud storage to keep all your data in one place.

When it comes to price point, there’s no competition. Most worthwhile smartwatches start at $175 to $200, but you can get a solid smart band starting at $70. Yes, more expensive bands exist (and we recommend a few here), but you’ll find more options under $150 in the fitness tracker space than in the smartwatch space.

If you need a bit more from your wearable and don’t want to be limited to a fitness or activity tracker, a smartwatch may be the best buy for you. There are things like on-watch apps, alerts and even more robust fitness features that smartwatches have and the best fitness trackers don’t. You can use one to control smart home appliances, set timers and reminders, check weather reports and more. Some smartwatches let you choose which apps you want to receive alerts from, and the options go beyond just call and text notifications. Just make sure your smartwatch is compatible with your Android or iPhone, however, before purchasing, as not all of them work with both operating systems.

But the extra fitness features are arguably the most important thing to think about when deciding between a fitness tracker and a smartwatch. The latter devices tend to be larger, giving them more space for things like GPS, barometers, onboard music storage and more. While you can find built-in GPS on select fitness trackers, it’s not common.

If you’re someone who’s seriously training — say for a race or an endurance challenge — a dedicated running watch may be worth considering. These often provide more in-depth cardio analytics, recovery insights, and real-time pace data that go beyond what standard trackers can deliver.

The Fitbit Inspire 3 strips out all the luxury features from the Charge 6 and keeps only the essential tracking features. You won’t get built-in GPS tracking or Fitbit Pay or Spotify control but you do get solid activity tracking, automatic workout detection, smartphone alerts and plenty more. The updated version has a sleeker design and includes a color touch display and connected GPS, the latter of which lets you track pace and distance while you run or bike outside while you have your phone with you. When compared to the Charge 6, the Inspire 3 is more fashionable, too. Its interchangeable bands let you switch up the look and feel of your tracker whenever you want, and it’s slim enough to blend in with other jewelry you might be wearing. We were also impressed by its multi-day battery life: Fitbit promises up to 10 days on a single charge, and that checked out for us. After four days of round-the-clock use, the Inspire 3 still had 66 percent battery left to go.

The battery life of fitness trackers can vary depending on the model and its features. On average, most fitness trackers last between five to seven days on a single charge. Basic models with limited features could stretch up to 10 days or more. However, more advanced trackers with features like continuous heart rate monitoring, GPS, or always-on displays may need recharging after one to three days. If you’re using GPS or streaming music through your fitness tracker, you’ll find that this drains the battery faster. By using these features less, or turning them off, you’ll extend battery life.

VS2022 sign in returns "Could not find a WAM account"


I am trying to sing in with my Microsoft account (Personal) in Visual Studio 2022 17.7.3 (latest) and I get the following error message:

enter image description here

I can sign in using the same credentials in the same VS2022 build in another PC

I can sign with a different account (hotmail for example) in this PC

I have re-installed visual studio

I have removed the account from the system configuration and tried to sign in again

I have successfully signed in with this account in this PC in a previous VS2022 build

I have successfully signed in with this account in this PC with lastest VS2019

Any ideas what might be hapenning?

One of Elon Musk’s longtime VCs is suing his former employer after allegedly being fired


Josh Raffaelli, who has deep roots as a Silicon Valley investor and has backed a number of Elon Musk companies, is suing his former employer, the massive trillion-dollar AUM Brookfield Asset Management, reports The New York Times. 

Much of Raffaelli’s complaint concerns how Brookfield covered pandemic-related real estate losses and alleges the company fired him after he filed a whistleblower complaint at the SEC. His suit makes allegations like fraud and bribery, while Brookfield vehemently denies any wrongdoing, it told The Times.

In February, Brookfield quietly shuttered the venture capital unit run by Raffaelli and rolled some assets into another unit, Bloomberg reported at the time. One of Raffaelli’s complaints in the suit is that Brookfield didn’t buy as much stock in Musk-owned companies as he had secured the ability to buy.

Raffaelli had deals to buy into Musk companies like SpaceX, xAI, and the Boring Company, the suit alleges. And his Brookfield fund was a big backer of Musk’s takeover of Twitter, Bloomberg reported.

The lawsuit is a very public battle for Raffaelli, who previously worked as a partner at the VC firm then known as Draper Fisher Jurvetson. (Today, it’s a collection of funds.) While at DFJ,  Brookfield helped that firm make investments into Musk companies like SolarCity (acquired by Tesla), SpaceX, and Tesla.

Banana Chocolate Mini Cakes – Desserts With Stephanie


These Banana Chocolate Mini Cakes are full of rich, complementary flavors and make an ideal single-serve treat. Baked in mini cast iron skillets, they deliver both a delightful taste and a charming, eye-catching presentation.

banana chocolate mini cakes in single serving cast iron skillets

This post may contain affiliate links. Please refer to the terms page for more information.

The cake is packed with fresh banana flavor, creating a moist and tender base. Each mini cake is finished with a generous layer of rich chocolate frosting for the perfect sweet contrast.

Jump to:

Ingredients

Banana cake ingredients

Gather the following ingredients to make the banana cake portion of this dessert:

ingredients needed to make chocolate banana mini cakes including buttermilk, flour, baking soda, salt, vegetable oil, granulated sugar, an egg and bananas
  • All-purpose flour – sift your flour if necessary to remove any lumps
  • Baking soda and salt – be sure to use fresh baking soda. King Arthur has a great article here on how to test for freshness.
  • Granulated sugar
  • Bananas – use ripe bananas for the best flavor. This recipe requires ¾ cup of mashed bananas, which is about two medium-sized bananas.
  • Egg – use a large, room temperature egg
  • Vegetable oil
  • Buttermilk – You only need 2 tablespoons of buttermilk for this recipe. If you don’t have any, you can make your own. Just mix ½ teaspoon of white vinegar into 2 tablespoons of whole milk. Let it sit for about 30 minutes. The milk will curdle a bit and become tangy—just like buttermilk.

See recipe card for quantities.

Chocolate frosting ingredients

Gather the following ingredients to make the frosting:

ingredients needed to make chocolate frosting including chocolate, heavy cream, corn syrup and butteringredients needed to make chocolate frosting including chocolate, heavy cream, corn syrup and butter
  • Chocolate – use bittersweet chocolate chips.
  • Heavy cream
  • Unsalted butter – use softened butter
  • Light corn syrup

See recipe card for quantities.

Instructions

Banana cake instructions

Before preparing the banana cakes, lightly grease six 4-inch mini cast iron skillets with baking spray or melted butter, and preheat the oven to 350°F (180°C).

flour, baking soda and salt mixed together in a bowlflour, baking soda and salt mixed together in a bowl

1 – Combine flour, baking soda and salt in a bowl. Whisk well to combine. Set aside for later.

mashed bananas and sugar in a mixing bowlmashed bananas and sugar in a mixing bowl

2 – Mash the bananas until mostly smooth with minimal lumps. Combine granulated sugar and bananas in a large mixing bowl. Stir well until combined. If using an electric mixer, combine using the paddle attachment.

eggs added to mixing bowl to make banana cake battereggs added to mixing bowl to make banana cake batter

3 – Add eggs to the bowl. Mix until well combined, scraping the sides and bottom of mixing bowl as needed.

oil and buttermilk added to mixing bowloil and buttermilk added to mixing bowl

4 – Add buttermilk and eggs to the bowl. Mix until well combined, scraping the sides and bottom of mixing bowl as needed.

dry ingredients added to mixing bowldry ingredients added to mixing bowl

5 – Add the dry ingredients (flour, baking soda, and salt) to the mixing bowl and stir until just combined. Avoid overmixing, as it can result in dense or tough cupcakes.

two skillet pans filled with cake batter and two pans without cake battertwo skillet pans filled with cake batter and two pans without cake batter

6 – Divide the batter evenly between six 4″ cast iron skillets. Bake at 350℉ (180℃) for 18 – 20 minutes.

Frosting and assembly instructions

This frosting is rich and fudgy without being overly sweet. Allow about 30 minutes for it to set to a spreadable consistency.

1 – Combine heavy cream and corn syrup in a heat-proof liquid measuring cup. Bring to a boil in the microwave. Alternatively, heat the cream and corn syrup over your stovetop in a saucepan.

cream added to bowl to make frosting for banana chocolate skillet cakescream added to bowl to make frosting for banana chocolate skillet cakes

2 – Immediately pour boiling cream mixture over the chocolate pieces and allow to rest for 5 minutes. This will soften the chocolate a bit and make the mixing process easier. Gently stir the cream and chocolate until the mixture is smooth.

ingredients added to bowl to make chocolate frosting for mini banana cakesingredients added to bowl to make chocolate frosting for mini banana cakes

3 – Next, add softened butter and stir until smooth. Set the frosting aside and let it rest at room temperature until it reaches the consistency of a creamy peanut butter – this will take approximately an half an hour.

4 – Using a pastry bag or a spoon, generously frost each mini cake. For an extra touch of flavor and visual appeal, top with a sprinkle of chopped nuts and a fresh banana slice just before serving. Tip: If the frosting firms up too much, microwave it for 10 seconds at 50% power to restore its smooth, spreadable texture.

banana chocolate cakes in mini cast iron skilletsbanana chocolate cakes in mini cast iron skillets

Variations

These banana chocolate skillet cakes are easily adaptable to suit different tastes and dietary preferences. Here are a few ideas to get you started:

  • Chocolate chips – craving more chocolatey flavor? Stir in ½ cup of mini chocolate chips after incorporating the flour.
  • Nuts – roasted nuts add delicious texture to these cakes. Try peanuts, walnuts, pecans, or your favorite variety—simply roast, chop, and stir in ½ cup as the final step in preparing the batter.
  • Gluten-free – for a gluten-free option, substitute the wheat flour with a 1:1 gluten-free baking flour—there’s no noticeable difference in taste or texture.
banana skillet cake with a portion removed from skilletbanana skillet cake with a portion removed from skillet

Equipment

Gather to the following equipment to make these banana chocolate mini cakes:

Storage

These treats taste best within two days of making them. To keep them fresh, store them in an airtight container in the fridge. When you’re ready to serve, take them out about an hour beforehand so the frosting has time to soften.

FAQ

What is the best way to mash a banana?

The best way to mash a banana is to peel it, place it in a bowl, and using a fork or potato masher, press down and mash until smooth, or until you reach your desired texture. For extra-smooth banana, mash it on a flat plate before transferring to your bowl.

More individual serving size desserts

Want more recipes you can make in single servings? Check these out:

I hope you enjoy these Banana Chocolate Skillet Cakes as much as my family and friends have over the years!

📋 Recipe

banana chocolate cakes in mini cast iron skilletsbanana chocolate cakes in mini cast iron skillets

Banana Chocolate Mini Cakes

These Banana Chocolate Mini Cakes are bursting with complementary flavors and make the perfect individually sized dessert. Baked in mini cast iron skillets, they offer a charming and impressive presentation.

Prep Time 30 minutes

Cook Time 20 minutes

Cooling and assembly 30 minutes

Total Time 1 hour 22 minutes

Course Dessert

Cuisine American

Servings 6 4″ cast iron skillets

Calories 565 kcal

Ingredients 


Banana cupcakes

  • ½ Cup Granulated sugar
  • ¾ Cups Bananas, mashed approximately 2 medium ripe bananas
  • Cup Vegetable oil
  • 2 Tablespoons Buttermilk see comment in Recipe Notes below on how to make your own buttermilk
  • 1 Large Egg room temperature
  • 1 Cup All-purpose flour sift if necessary to remove any lumps
  • 1 teaspoon Baking soda
  • ½ Cup Salt

Chocolate frosting

  • ½ Cup Heavy cream
  • 2 Tablespoons Light corn syrup
  • 6 Ounces Bittersweet chocolate chopped into chunks
  • 3 Tablespoons Unsalted butter softened

Instructions 

Banana cakes

  • Preheat oven to 350℉ (180℃)

  • Lightly grease each cast iron skillet with melted butter or baking spray.

  • Combine flour, baking soda and salt in a bowl. Whisk well to combine. Set aside for later.

  • Mash the bananas until mostly smooth with minimal lumps.

  • Combine granulated sugar and bananas in a large mixing bowl. Stir well until combined. If using an electric mixer, combine using the paddle attachment.

  • Add egg to the bowl. Mix until well combined, scraping the sides and bottom of mixing bowl as needed.

  • Add oil and buttermilk. Mix until well combined.

  • Add the dry ingredients (flour, baking soda, and salt) to the mixing bowl and stir until just combined. Avoid overmixing, as it can result in dense or tough cupcakes.

  • Optional – stir in any additional ingredients you want such as walnuts, peanuts, chocolate chips, etc…

  • Divide batter between 6 skillets.

  • Bake for 18 -20 minutes, or until cakes are fully risen and a toothpick inserted in the center comes out clean.

  • Place cakes on a rack and allow to cool completely before adding frosting.

Chocolate frosting

  • Place chocolate in a large heat-resistant bowl.

  • Combine heavy cream and corn syrup in a microwave safe dish. Place in microwave and bring to a low boil. (alternatively, heat in a saucepan over your stove top).

  • Pour cream/corn syrup over chocolate. Let stand for 5 minutes, then whisk until smooth.

  • Add softened butter to bowl. Stir until smooth.

  • Allow icing to sit at room temperature and cool until it is firm enough to spread or pipe (approximately ½ hour).

  • Use a pastry bag or spoon to spread frosting over each cake.

  • Optional – sprinkle with roasted peanuts, add slices of brulee bananas…

Notes

Storage – These treats taste best within two days of making them. To keep them fresh, store them in an airtight container in the fridge. When you’re ready to serve, take them out about an hour beforehand so the frosting has time to soften.
Buttermilk – You only need 2 tablespoons of buttermilk for this recipe. If you don’t have any, you can make your own. Just mix ½ teaspoon of white vinegar into 2 tablespoons of whole milk. Let it sit for about 30 minutes. 

Nutrition

Calories: 565kcalCarbohydrates: 54gProtein: 6gFat: 37gSaturated Fat: 17gPolyunsaturated Fat: 8gMonounsaturated Fat: 10gTrans Fat: 0.3gCholesterol: 71mgSodium: 9645mgPotassium: 224mgFiber: 3gSugar: 34gVitamin A: 534IUVitamin C: 0.1mgCalcium: 53mgIron: 3mg

Keyword banana cake, banana chocolate dessert, skillet desserts

Samsung confirms big durability upgrade for Galaxy S25 Edge – and it’s mostly good news


Samsung Galaxy S25 Edge

Kerry Wan/ZDNET

Honey, wake up. The latest Samsung Galaxy S25 Edge news just dropped, and it’s a big one for those with slippery hands. Ahead of the virtual Samsung Unpacked event on Monday, the Korean giant has shared that the Galaxy S25 Edge will debut with the new Corning Gorilla Glass Ceramic 2.

Also: The best Samsung phones to buy in 2025

Samsung said in a Thursday press release that the new glass display material “features crystals intricately embedded within its glass matrix, enhancing the durability and crack deflection capabilities of the display cover.” Considering how slim the Galaxy S25 Edge is expected to be, a stronger, more resilient screen cover is definitely warranted.

While Samsung isn’t sharing much else about how much more shatter or scratch-resistant the new material is compared to previous versions, it can be inferred that Gorilla Glass Ceramic 2 will perform similarly to its predecessor, which launched only a little more than a month ago.

For reference, Corning tested the original Gorilla Glass Ceramic to survive 10 repeated drops from one meter on surfaces replicating asphalt. If the Gorilla Glass Ceramic 2 is any better, then the Galaxy S25 Edge should be able to withstand the casual waist-high drop, slip from the table, or outdoor tumble a little better than previous Samsung Galaxy phones.

Also: Samsung now sells refurbished Galaxy S24 Ultra, S24+, and S24 at discounted prices

I still have my concerns about a more shatter-resistant screen, with its most notable trade-off being how scratch-prone the phone becomes. My Galaxy S25 Ultra, which I’ve been using on and off for about five months now, can attest to that theory.

It would also go a long way if Samsung applies a similar (if not the same) anti-reflective coating as the Galaxy S25 Ultra on the Galaxy S25 Edge. The reduction in glare and light reflections makes a meaningful difference in user experience, especially when outdoors.

What else has been confirmed so far

Ahead of the Monday Unpacked event, Samsung also confirmed a few things about the Galaxy S25 Edge. While its dual camera system won’t suggest it, the upcoming handset is heavily focused on photography. “Even with its slim form, Galaxy S25 Edge’s 200MP wide lens continues Galaxy’s iconic camera experience,” Samsung hinted in a Wednesday press release.

Whether the second camera lens on the new model is a telephoto, ultrawide, or a mere macro sensor remains unanswered.

Also: I saw Samsung’s thinnest Galaxy phone ever at MWC — and it made my devices feel outdated

As for the rest of the phone’s hardware, Samsung has confirmed that the Galaxy S25 Edge will be “portable and lightweight without sacrificing power and innovation.” Here’s to hoping that “power” refers to battery life, which remains a disadvantage as phones become slimmer, and the laws of physics simply don’t allow there to be larger-sized lithium-ion batteries to fit within the form factors.

Samsung Galaxy S25 Edge at MWC 2025

Kerry Wan/ZDNET

For reference, the upcoming iPhone 17 Air is expected to feature a smaller-than-usual battery and potentially require a dedicated battery case to keep it running for a full day. If the future of slim phones lives in thicker, plastic-built protective covers, then I’m not exactly sure if we’re moving things forward with these innovations.

When is Samsung’s May Unpacked event?

Samsung will be hosting its Virtual Unpacked event for the Galaxy S25 Edge on Monday, May 12, at 8pm ET. Is Samsung hoping we’ll kick back to the live stream after dinner? Maybe.

But a more reasonable explanation is that it’s targeting the demographic it knows will most likely adopt the lighter, slimmer form factor of the S25 Edge: Koreans, who will be tuning in at a more friendly Tuesday morning broadcast.

Also: I’ve tested every Samsung Galaxy S25 model – and my favorite isn’t the Ultra

Unlike most Unpacked events, which feature several new Galaxy products, expect this virtual one to be on the shorter side. If we’re lucky, we’ll hear about the rest of Samsung’s hardware roadmap in 2025. But with the company’s annual summer Unpacked event just a few months away, I wouldn’t be surprised if they hold their cards close to their chest. After all, teasing a tri-foldable phone or an XR headset would potentially steal the thunder of the ultra-slim Galaxy phone.

And if there’s one thing Samsung or Apple don’t want to do, it’s lose interest in their ultra-slim phone aspirations before they even hit the market. After all, both companies (and the others who follow suit) will need to deliver handsets that surpass expectations and convince the masses that maybe the future of mobile is something that fits in pockets a little easier, even if it’s at the expense of endurance and the number of cameras available.

Right now, those who are interested in the Galaxy S25 Edge can reserve a preorder to receive a $50 Samsung credit. You don’t have to commit to buying the phone after making the reservation, but if you do, you’ll save $50.

Looking for the next best product? Get expert reviews and editor favorites with ZDNET Recommends.


Which Upscaling Is Better for Your Gaming PC?


DLSS vs FSR: What’s the Real Difference?

In modern PC gaming, maximizing performance without compromising image quality is a major goal—especially with increasingly demanding titles and higher-resolution displays. Two technologies leading the charge are NVIDIA’s DLSS (Deep Learning Super Sampling) and AMD’s FSR (FidelityFX Super Resolution). In this DLSS vs FSR comparison, we’ll explore how each upscaling method works under the hood and what it means for gamers looking to boost frame rates.

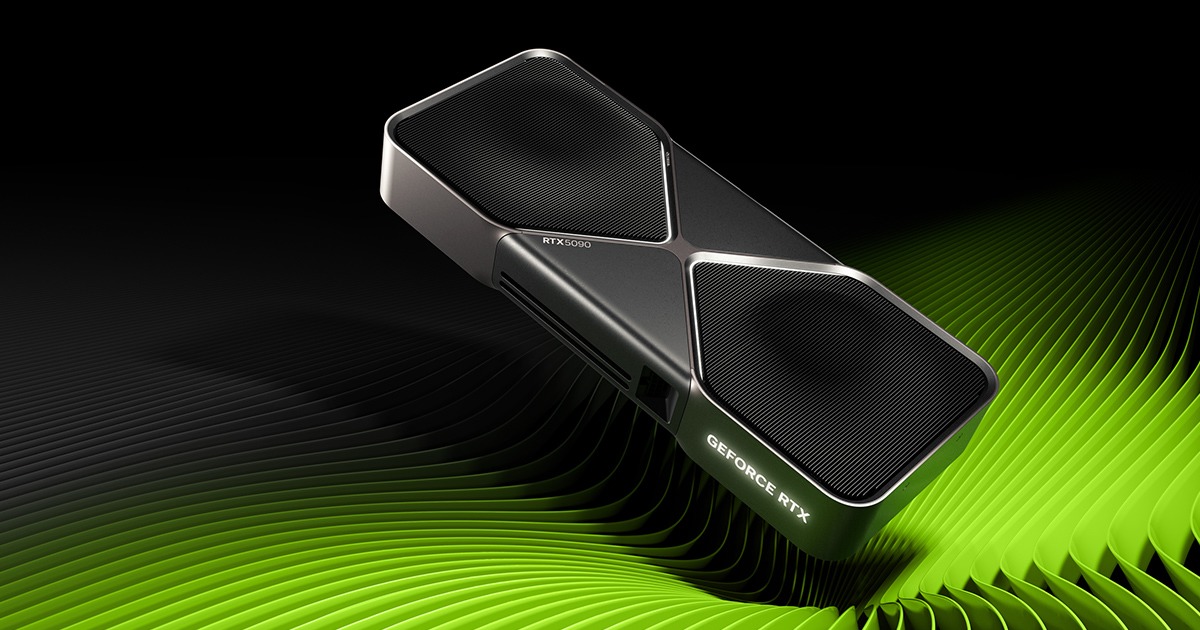
The RTX 5090 offers the most advanced version of DLSS
Image courtesy of NVIDIA

What Is DLSS and How Does It Work?

DLSS is NVIDIA’s proprietary AI-based upscaling technology, available on GeForce RTX GPUs (RTX 20 series and newer). It leverages Tensor Cores—specialized AI processors built into RTX GPUs—to perform real-time image reconstruction using deep learning models trained on super-resolution images.

Here’s how DLSS improves performance:

  1. Lower Internal Rendering Resolution: The game engine renders frames at a lower resolution (e.g., 1080p instead of 4K).

  2. AI Upscaling: A neural network trained on thousands of high-resolution frames reconstructs the image to a target resolution (e.g., 4K).

  3. Temporal Feedback: DLSS uses data from multiple previous frames (motion vectors, depth buffers) to reduce artifacts and increase temporal stability.

DLSS 2.x introduced a generalized neural network that doesn’t require per-game training, significantly expanding support. DLSS 3 goes further, introducing Frame Generation, where entirely new intermediate frames are synthesized using AI—allowing performance gains even in CPU-limited scenarios.

Radeon 9000 Series GPUs offer the newest version of FSR
Image courtesy of AMD

What Is FSR and How Does It Work?

FSR, developed by AMD, takes a more open and hardware-agnostic approach. It does not require dedicated AI hardware and works on a wide range of GPUs, including many older AMD and NVIDIA cards.

FSR has evolved over several iterations:

  • FSR 1.0: A spatial upscaler that uses edge detection and contrast-aware sharpening to upscale lower-resolution frames to a higher resolution. It is fast and easy to implement but lacks temporal data, which can lead to aliasing and flickering.

  • FSR 2.x: Introduces a temporal upscaling pipeline, using motion vectors, depth, and color buffers to deliver improved reconstruction quality. Like DLSS, it reconstructs a high-resolution image using information from previous frames, but it does so without machine learning.

  • FSR 3.x: Adds Frame Interpolation, similar to DLSS 3’s Frame Generation, allowing the GPU to generate additional frames using motion vectors and other data. However, since it lacks AI acceleration, performance and image quality may vary depending on the scene and motion complexity.

  • FSR 4: Available exclusively on Radeon RX 9000, FSR 4 uses an AI accelerated upscaling algorithm to deliver image quality improvements over previous versions of FSR to rival DLSS 4’s improvements.

DLSS vs FSR: Key Differences

Feature DLSS FSR
Hardware Requirement NVIDIA RTX GPUs Works on most modern GPUs (excludes FSR 4)
Upscaling Method AI-based super resolution Spatial and temporal reconstruction
Frame Generation DLSS 4 (AI-based) FSR 4 (AI-Accelerated)
Image Quality Generally superior due to neural net High quality, but varies per implementation
Game Support Widely supported on modern AAA titles Also widely supported, often easier to implement

Conclusion

In the DLSS vs FSR debate, NVIDIA’s DLSS remains the gold standard for upscaling and frame generation—delivering the best image quality and performance, especially with DLSS 4. However, AMD’s FSR offers a more accessible and flexible alternative, supporting a wide range of hardware and still offering impressive gains, especially with FSR 3 and 4.

.

The following two tabs change content below.

This content was written by the expert Velocity Micro staff.


How To Survive Fortnite’s Painfully Slow Star Wars Meta


Fortnite‘s first-ever Star Wars season brought with it one of the biggest meta shifts in the game’s history by tossing out almost the entire loot pool and replacing it with Star Wars weapons. The only items left over from Chapter 6 Season 2 are standard healing items and shockwave grenades–in other words, things that never go away. Otherwise, it’s a whole new ballgame out there.

The biggest surprise, however, is not really the guns themselves, but the lack of quick movement items. In Season 2, we had the Kneecapper and two different types of rockets that we could use to squirrel our way out of all sorts of dire situations. Escape was always possible with that loot pool. But those days are very much over.

For the Star Wars season, shockwave grenades are now the lone common movement item. You can train with a hologram character to get a lightsaber that will allow you to sprint a little bit faster, but this is something only a handful of players will have the chance to do each round of battle royale. You can also use Slap Juice to give yourself unlimited sprint for a short period, which works well in conjunction with the lightsaber, but Slap doesn’t make you move any faster on its own. So no, you’re not whining without cause–this season is a lot slower paced than Season 2 was.

For Build players who can throw up a wall to defend themselves at any moment, the shift in pace isn’t that big of a deal. But for those who play Zero Build, the new slow meta will constantly leave you exposed to enemy fire without many options if you get caught off guard. And with the comically overpowered IQA-11 Marksman Blaster in the game ready to two-shot you in an instant from a hundred meters, getting caught out in the open usually means big trouble. But we’ve got you. Here are some key tips for surviving in Fortnite’s slower Star Wars meta.

1. Carry shield bubbles

Shield bubbles are the kind of item that skilled sweaty players love and everyone else tends to forget about–in terms of loot priority, folks often put them behind weapons, healing items, and movement. Really, though, shield bubbles have always been extremely useful whenever they’ve been part of the Zero Build meta–they were just less than essential when folks were flying all over the place during fights.

In the slower Star Wars meta, though, shield bubbles are essential. Whether you’re just walking across an open field or trying to resurrect your teammate after a fight, having shield bubbles to throw down at the right moment can make or break a round, especially now when you can’t usually run away very easily.

2. Travel using vehicles

In a slow meta like this one, it’s not the best idea to use shockwave grenades purely for getting around–you should save those for stressful situations when you really need them. When you’re just trying to get around quickly, like when you’re way outside the circle and the storm is closing in, it’s better to drive a car or fly an X-Wing or TIE Fighter. Those vehicles can protect you from gunfire, and they move much faster than you will on foot. Plus, while you’re in one, you can simply run away from every fight if you want to.

3. Use lightsabers primarily for defense

By holding the alt-fire button, you can deflect incoming fire with your lightsaber, and if you hit the jump button while in the defensive stance, you’ll do a little jump dodge that makes you very difficult to hit. You can even spam the dodge maneuver pretty effectively, making yourself obnoxiously difficult to hit even at close range. Even better is that neither of those abilities is a thing you need to train with a hologram for–you can deflect and dodge with any lightsaber you loot off an enemy. But if you do train, Rey’s Force Push ability can become another essential tool because it will throw your enemies back and give you room to move. The bad guys won’t take fall damage from a Force Push, but they won’t be right next to you anymore, either.

Regardless of how you feel about the slow meta, it won’t stick around forever–Star Wars season will be over on June 7, after just five weeks. But the slow meta won’t stay slow even that long, as the May 22 update will add the Mandalorian Jetpack to battle royale for the final two weeks of the season.

eduStreamTV 2025: Vizrt for Education: Professional Production Made Si


Empower your students and media teams with professional-grade production tools! Vizrt brings industry-standard graphics, switching, and automation into the classroom—making it easier than ever for schools to create studio-quality content. From daily news shows to esports and live events, Vizrt makes storytelling simple, powerful, and fun.

eduStreamTV is a three day event with vendors and experts focusing on the way live streaming benefits education in today’s hybrid learning environment. These are tips, tricks, and tools for lecture capture, remote production, and live video streaming in education. We are here to provide you with the tips, tricks, and tools you need for live streaming in the education field. 

Learn More at  🞂 https://edustreamtv.com/

See more video and tutorials 🞂 http://www.videoguys.com

Learn more about Vizrt below:

April 2025 (version 1.100)


Release date: May 8, 2025

Downloads: Windows: x64 Arm64 | Mac: Universal Intel silicon | Linux: deb rpm tarball Arm snap


Welcome to the April 2025 release of Visual Studio Code. There are many updates in this version that we hope you’ll like, some of the key highlights include:

  • Chat

    • Custom instructions and reusable prompts (more…).
    • Smarter results with tools for GitHub, extensions, and notebooks (more…).
    • Image and Streamable HTTP support for MCP (more…).
  • Chat performance

    • Faster responses on repeat chat requests (more…).
    • Faster edits in agent mode (more…).
  • Editor experience

    • Improved multi-window support for chat and editors (more…).
    • Staged changes now easier to identify (more…).

If you’d like to read these release notes online, go to Updates on code.visualstudio.com.
Insiders: Want to try new features as soon as possible? You can download the nightly Insiders build and try the latest updates as soon as they are available.

Chat

Prompt and instructions files

You can tailor your AI experience in VS Code to your specific coding practices and technology stack by using Markdown-based instructions and prompt files. We’ve aligned the implementation and usage of these two related concepts, however they each have distinct purposes.

Instructions files

Setting: chat.instructionsFilesLocations

Instructions files (also known as custom instructions or rules) provide a way to describe common guidelines and context for the AI model in a Markdown file, such as code style rules, or which frameworks to use. Instructions files are not standalone chat requests, but rather provide context that you can apply to a chat request.

Instructions files use the .instructions.md file suffix. They can be located in your user data folder or in the workspace. The chat.instructionsFilesLocations setting lists the folders that contain instruction files.

You can manually attach instructions to a specific chat request, or they can be automatically added:

  • To add them manually, use the Add Context button in the Chat view, and then select Instructions….
    Alternatively use the Chat: Attach Instructions… command from the Command Palette. This brings up a picker that lets you select existing instructions files or create a new one to attach.

  • To automatically add instructions to a prompt, add the applyTo Front Matter header to the instructions file to indicate which files the instructions apply to. If a chat request contains a file that matches the given glob pattern, the instructions file is automatically attached.

    The following example provides instructions for TypeScript files (applyTo: '**/*.ts'):

    ---
    applyTo: '**/*.ts'
    ---
    Place curly braces on separate lines for multi-line blocks:
    if (condition)
    {
      doSomething();
    }
    else
    {
      doSomethingElse();
    }
    

You can create instruction files with the Chat: New Instructions File… command. Moreover, the files created in the user data folder can be automatically synchronized across multiple user machines through the Settings Sync service. Make sure to check the Prompts and Instructions option in the Backup and Sync Settings… dialog.

Learn more about instruction files in our documentation.

Prompt files

Setting: chat.promptFilesLocations

Prompt files describe a standalone, complete chat request, including the prompt text, chat mode, and tools to use. Prompt files are useful for creating reusable chat requests for common tasks. For example, you can add a prompt file for creating a front-end component, or to perform a security review.

Prompt files use the .prompt.md file suffix. They can be located in your user data folder or in the workspace. The chat.promptFilesLocations setting lists the folder where prompt files are looked for.

There are several ways to run a prompt file:

  • Type / in the chat input field, followed by the prompt file name.
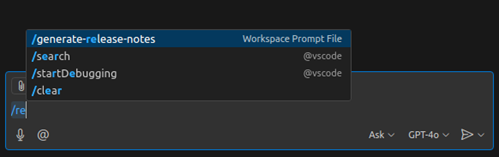
    Screenshot that shows running a prompt in the Chat view with a slash command.

  • Open the prompt file in an editor and press the ‘Play’ button in the editor tool bar. This enables you to quickly iterate on the prompt and run it without having to switch back to the Chat view.
    Screenshot that shows running a prompt by using the play button in the editor.

  • Use the Chat: Run Prompt File… command from the Command Palette.

Prompt files can have the following Front Matter metadata headers to indicate how they should be run:

  • mode: the chat mode to use when invoking the prompt (ask, edit, or agent mode).
  • tools: if the mode is agent, the list of tools that are available for the prompt.

The following example shows a prompt file for generating release notes, that runs in agent mode, and can use a set of tools:

---
mode: 'agent'
tools: ['getCurrentMilestone', 'getReleaseFeatures', 'file_search', 'semantic_search', 'read_file', 'insert_edit_into_file', 'create_file', 'replace_string_in_file', 'fetch_webpage', 'vscode_search_extensions_internal']
---
Generate release notes for the features I worked in the current release and update them in the release notes file. Use [release notes writing instructions file](.github/instructions/release-notes-writing.instructions.md) as a guide.

To create a prompt file, use the Chat: New Prompt File… command from the Command Palette.

Learn more about prompt files in our documentation.

Improvements and notes

  • Instructions and prompt files now have their own language IDs, configurable in the language mode dialog for any file open document (“Prompt” and “Instructions” respectively). This allows, for instance, using untitled documents as temporary prompt files before saving them as files to disk.
  • We renamed the Chat: Use Prompt command to Chat: Run Prompt. Furthermore, the command now runs the selected prompt immediately, as opposed to attaching it as chat context as it did before.
  • Both file types now also support the description metadata in their headers, providing a common place for short and user-friendly prompt summaries. In the future, this header is planned to be used along with the applyTo header as the rule that determines if the file needs to be auto-included with chat requests (for example, description: 'Code style rules for front-end components written in TypeScript.')

Faster agent mode edits

We’ve implemented support for OpenAI’s apply patch editing format (GPT 4.1 and o4-mini) and Anthropic’s replace string tool (Claude Sonnet 3.7 and 3.5) in agent mode. This means that you benefit from significantly faster edits, especially in large files.

The update for OpenAI models is on by default in VS Code Insiders and gradually rolling out to Stable. The Anthropic update is available for all users in both Stable and Insiders.

Base model in chat

We’re gradually rolling out GPT-4.1 as the default base model in chat in VS Code. You can use the model switcher in the Chat view to change to another model at any time.

Search code of a GitHub repository with the #githubRepo tool

Imagine you need to ask a question about a GitHub repository, but you don’t have it open in your editor. For example, you want to know how a specific function is implemented in the microsoft/vscode repository.

You can now use the #githubRepo tool to search for code snippets in any GitHub repository that you have access to. This tool takes a user/repo as extra input. For example, “how to implement factory pattern in TS #githubRepo microsoft/vscode”.

You can also use custom instructions to hint when and how to use this tool, as shown in the following example:

---
applyTo: '**'
---
Use the `#githubRepo` tool with `microsoft/vscode` to find relevant code snippets in the VS Code codebase.
Use the `#githubRepo` tool with `microsoft/typescript` to answer questions about how TypeScript is implemented.
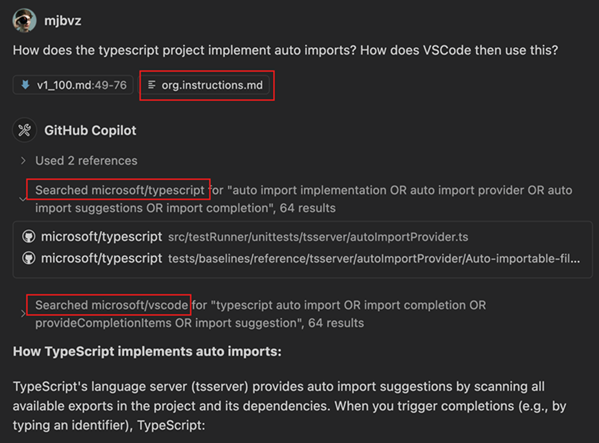
Screenshot showing using the #githubRepo tool in agent mode with hints from instructions files.

If you want to ask about the repo you are currently working on, you can just use the #codebase tool.

Also, the #githubRepo tool is only for searching for relevant code snippets. The GitHub MCP server provides tools for working with GitHub issues and pull requests. Learn more about adding MCP servers in VS Code.

Find Marketplace extensions with the extensions tool

Use the extensions tool (#extensions) in chat to find extensions from the Marketplace. Based on your chat prompt, the tool is automatically invoked, or you can explicitly reference it in your prompt with #extensions. The tool returns a list of extensions that match your query. You can install extensions directly from the results.

Improvements to the web page fetch tool

Last month, we introduced the fetch tool (#fetch) for retrieving the contents of a web page right from chat, and include it as context for your prompt. If you missed that release note, check out the initial release of the fetch tool release note and examples.

This iteration, we have made several big changes to the tool including:

  • Entire page as context: We now add the entire page as context, rather than a subset. With larger context windows, we have the ability to give the model the entire page. For example, it’s now possible to ask summarization questions that require as much of the page as possible. If you do manage to fill up the context window, the fetch tool is smart enough to exclude the less relevant sections of the page. That way, you don’t exceed the context window limit, while still keeping the important parts.
  • A standardized page format (Markdown): Previously, we formatted fetched webpages in a custom hierarchical format that did the job, but was sometimes hard to reason with because of its custom nature. We now convert fetched webpages into Markdown, a standardized language. This improves the reliability of the relevancy detection and is a format that most language models know deeply, so they can reason with it more easily.

We’d love to hear how you use the fetch tool and if there are any capabilities you’d like to see from it!

Chat input improvements

We have made several improvements to the chat input box:

  • Attachments: when you reference context in the prompt text with #, they now also appear as an attachment pill. This makes it simpler to understand what’s being sent to the language model.
  • Context picker: we streamlined the context picker to make it simpler to pick files, folders, and other attachment types.
  • Done button: we heard your feedback about the “Done”-button and we removed it! No more confusion about unexpected session endings. Now, we only start a new session when you create a new chat (⌃L (Windows, Linux Ctrl+L)).

Chat mode keyboard shortcuts

The keyboard shortcut ⌃⌘I (Windows, Linux Ctrl+Alt+I) still just opens the Chat view, but the ⇧⌘I (Windows Ctrl+Shift+I, Linux Ctrl+Shift+Alt+I) shortcut now opens the Chat view and switches to agent mode. If you’d like to set up keyboard shortcuts for other chat modes, there is a command for each mode:

  • workbench.action.chat.openAgent
  • workbench.action.chat.openEdit
  • workbench.action.chat.openAsk

Autofix diagnostics from agent mode edits

Setting: github.copilot.chat.agent.autoFix

If a file edit in agent mode introduces new errors, agent mode can now detect them, and automatically propose a follow-up edit. This means that you don’t have to send a follow-up prompt to ask agent mode to fix any errors. You can disable this behavior with github.copilot.chat.agent.autoFix.

Handling of undo and manual edits in agent mode

Previously, making manual edits during an agent mode session could confuse the model. Now, the agent is prompted about your changes, and should re-read files when necessary before editing files that might have changed.

Conversation summary and prompt caching

We’ve made some changes to how our agent mode prompt is built to optimize for prompt caching. Prompt caching is a way to speed up model responses by maintaining a stable prefix for the prompt. The next request is able to resume from that prefix, and the result is that each request should be a bit faster. This is especially effective in a repetitive series of requests with large context, like you typically have in agent mode.

When your conversation gets long, or your context gets very large, you might see a “Summarized conversation history” message in your agent mode session:

Screenshot showing a summarized conversation message in the Chat view.

Instead of keeping the whole conversation as a FIFO, breaking the cache, we compress the conversation so far into a summary of the most important information and the current state of your task. This keeps the prompt prefix stable, and your responses fast.

MCP support for Streamable HTTP

This release adds support for the new Streamable HTTP transport for Model Context Protocol servers. Streamable HTTP servers are configured just like existing SSE servers, and our implementation is backwards-compatible with SSE servers:

{
  "servers": {
    "my-mcp-server": {
      "url": "http://localhost:3000/mcp"
    }
  }
}

Learn more about MCP support in VS Code.

MCP support for image output

We now support MCP servers that generate images as part of their tool output.

Note that not all language models support reading images from tool output. For example, although GPT-4.1 has vision capability, it does not currently support reading images from tools.

Enhanced input, output, and progress from MCP servers

We have enhanced the UI that shows MCP server tool input and output, and have also added support for MCP’s new progress messages.

MCP config generation uses inputs

To help keep your secrets secure, AI-assisted configurations generated by the MCP: Add Server command now generate inputs for any secrets, rather than inlining them into the resulting configuration.

Inline chat V2 (Preview)

Setting: inlineChat.enableV2

We have been working on a revamped version of inline chat ⌘I (Windows, Linux Ctrl+I). Its theme is still “bringing chat into code”, but behind the scenes it uses the same logic as chat edits. This means better use of the available context and a better code-editing strategy. You can enable inline chat v2 via inlineChat.enableV2

Further, there is now a more lightweight UX that can optionally be enabled. With the inlineChat.hideOnRequest setting, inline chat hides as soon as a request is made. It then minimizes into the chat-editing overlay, which enables accepting or discarding changes, or restoring the inline chat control.

Select and attach UI elements to chat (Experimental)

Setting: chat.sendElementsToChat.enabled

While you’re developing a web application, you might want to ask chat about specific UI elements of a web page. You can now use the built-in Simple Browser to attach UI elements as context to chat.

After opening any locally-hosted site via the built-in Simple Browser (launch it with the Simple Browser: Show command), a new toolbar is now shown where you can select Start to select any element in the site that you want. This attaches a screenshot of the selected element, and the HTML and CSS of the element.

Configure what is attached to chat with:

This experimental feature is enabled by default for all Simple Browsers, but can be disabled with chat.sendElementsToChat.enabled.

Create and launch tasks in agent mode (Experimental)

Setting: github.copilot.chat.newWorkspaceCreation.enabled

In the previous release, we introduced the github.copilot.chat.newWorkspaceCreation.enabled (Experimental) setting to enable workspace creation with agent mode.

Now, at the end of this creation flow, you are prompted to create and run a task for launching your app or project. This streamlines the project launch process and enables easy task reuse.

Accessibility

Merge editor improvements

The merge editor is now more accessible. To learn about available actions, open the accessibility help dialog within the merge editor (⌥F1 (Windows Alt+F1, Linux Shift+Alt+F1)). Key actions include Merge Editor: Complete Merge (⌘Enter (Windows, Linux Ctrl+Enter)) and Toggle Between Merge Editor Inputs (⇧⌘T (Windows, Linux Ctrl+Shift+T)). The currently focused input is also now announced to assistive technologies.

Next edit suggestion enhancements

The new setting accessibility.signals.nextEditSuggestion notifies you when a predicted suggestion is available. Review and accept suggestions through the accessible view (⌥F2 (Windows Alt+F2, Linux Shift+Alt+F2)). Additionally, accessibility.signals.diffLineAdded and accessibility.signals.diffLineRemoved provide audio cues during navigation to make diff review accessible.

Review Copilot user requests from the accessible view

When in agent mode, tool invocations or terminal commands sometimes require user permission to run. Review these actions within the accessible view (⌥F2 (Windows Alt+F2, Linux Shift+Alt+F2)).

Unique accessibility sounds

accessibility.signals.save.sound now has its own distinct sound and no longer shares audio with accessibility.signals.terminalCommandSucceeded.sound.

Editor Experience

Floating window modes

Floating windows in VS Code allow you to move editors and certain views out of the main window into a smaller window for lightweight multi-window setups. There are two new modes a floating window can have:

  • Compact: we hide certain UI elements to make more room for the actual content
  • Always-on-top: the window stays on top of all other windows until you leave this mode

Here is an example of how to turn a floating editor window into compact mode:

We use compact mode by default for when you create a chat in a new window. Combined with the option to have the window always on top, you can always keep the Chat view around for asking questions!

We introduced new commands if you prefer to use keyboard shortcuts for these actions:

  • workbench.action.toggleWindowAlwaysOnTop: to toggle always on top mode
  • workbench.action.enableWindowAlwaysOnTop: to set the floating window always on top
  • workbench.action.disableWindowAlwaysOnTop: to set the floating window to normal
  • workbench.action.toggleCompactAuxiliaryWindow: to toggle compact mode
  • workbench.action.enableCompactAuxiliaryWindow: to enable compact mode
  • workbench.action.disableCompactAuxiliaryWindow: to disable compact mode

Note: even in compact mode you can create complex editor layouts and open other editors.

Secondary Side Bar default visibility

Setting: workbench.secondarySideBar.defaultVisibility

By default, the Secondary Side Bar is hidden when you open a new workspace or window. With the new setting workbench.secondarySideBar.defaultVisibility, you can control if the Secondary Side Bar should open automatically in new workspaces or windows. You can pick from:

  • hidden: this is the default and keeps the Secondary Side Bar hidden
  • visibleInWorkspace: this opens the Secondary Side Bar if you open a folder or multi-root workspace
  • visible: this always opens the Secondary Side Bar

Note that after a workspace or window has been opened, the visibility becomes a workspace state and overrides the setting value. If you close the Secondary Side Bar, it will remain closed in that workspace or window.

Mandatory extension signature verification

Extension signature verification is now required on all platforms: Windows, macOS, and Linux. Previously, this verification was only mandatory on Windows and macOS. With this release, Linux now also enforces extension signature verification, ensuring that all extensions are properly validated before installation.

This change further strengthens security by preventing the installation of potentially malicious extensions. For more information, see the Extension Signing.

Note: Mandatory extension signature verification remains disabled on Linux ARM32 builds due to issue #248308. This is expected to be resolved in the next release.

When an extension is identified as malicious, VS Code now provides links to additional information explaining why the extension was flagged. These “Learn More” links connect users to GitHub issues or documentation with details about the security concerns, helping you better understand the potential risks.

Prevent installation of Copilot Chat pre-release versions in VS Code stable

VS Code now prevents the installation of the pre-release version of the Copilot Chat extension in VS Code Stable. This helps avoid situations where you inadvertently install the Copilot Chat pre-release version and get stuck in a broken state. This means that you can only install the Copilot Chat extension pre-release version in the Insiders build of VS Code.

Command to open a view without focus

Views (tree views and webview views) can now be opened without focusing them. This is useful for extensions and keyboard shortcuts that want to open a view but not take focus away from the current editor. The command is your-view-id.open, and it takes a property bag argument: { preserveFocus: boolean}.

Semantic text search with keyword suggestions (Experimental)

Setting: github.copilot.chat.search.keywordSuggestions

Semantic text search now supports AI-powered keyword suggestions. By enabling this feature, you will start seeing relevant references or definitions that might help you find the code you are looking for.

Code Editing

New Next Edit Suggestions (NES) model

Setting: github.copilot.nextEditSuggestions.enabled

We’re excited to introduce a new model powering NES, designed to provide faster and more contextually relevant code recommendations. This updated model offers improved performance, delivering suggestions with reduced latency, and offering suggestions that are less intrusive and align more closely with your recent edits. This update is part of our ongoing commitment to refining AI-assisted development tools within Visual Studio Code.

Import suggestions

Setting: github.copilot.nextEditSuggestions.fixes

Next Edit Suggestions (NES) can now automatically suggest adding missing import statements in JavaScript and TypeScript files. Enable this feature by setting github.copilot.nextEditSuggestions.fixes. We plan to further enhance this capability by supporting imports from additional languages in future updates.

Screenshot showing NES suggesting an import statement.

Generate alt text in HTML or Markdown

You can now generate or update existing alt text in HTML and Markdown files. Navigate to any line containing an embedded image and trigger the quick fix via ⌘. (Windows, Linux Ctrl+.) or by selecting the lightbulb icon.

Screenshot that shows generating alt text for an image html element.

Variable line heights

It is now possible to define variable line heights on a monaco editor by setting the line height value in the IModelDecorationOptions type. If two line heights are set on a line, the maximum of the two is used on the line.

Note that for simplicity for now, the line height is set only on the first line of the corresponding decoration range. In the following screen recording, lines 24 and 32 are rendered with a larger line height than the default one.

This work is not yet available to extensions, but will roll out after some more testing.

Notebooks

Find and replace history persistence

The Notebook Find control now supports persistent history for both the find and replace input fields. This persists across reloads, and is controlled by the settings editor.find.history and editor.find.replaceHistory.

Drag and drop cell outputs to chat

To enhance existing support for cell output usage within chat, outputs are now able to be dragged into the Chat view for a seamless attachment experience. Currently, only image and textual outputs are supported. Outputs with an image mime type are directly draggable, however to avoid clashing with text selection, textual outputs require holding the alt modifier key to enable dragging. We are exploring UX improvements in the coming releases.

Notebook tools for agent mode

Run cell

Chat now has an LLM tool to run notebook cells, which allows the agent to perform updates based on cell run results or perform its own data exploration as it builds out a notebook.

Get kernel state

The agent can find out which cells have been executed in the current kernel session, and read the active variables by using the Kernel State tool.

List/Install packages

The Jupyter extension contributes tools for listing and installing packages into the environment that’s being used as the notebook’s kernel. The operation is delegated to the Python Environments extension if available; otherwise, it attempts to use the pip package manager.

Source Control

Quick diff decorations for staged changes

To address a long-time feature request, this milestone we have added quick diff editor decorations for staged changes. Now you can view your staged changes directly from the editor, without needing to open the Source Control view.

You can customize the color of the staged changes quick diff decorations by using the following theme tokens: editorGutter.addedSecondaryBackground, editorGutter.modifiedSecondaryBackground, editorGutter.deletedSecondaryBackground.

If you do not want to see quick diff decorations for staged changes, you can hide them by using the Diff Decorations submenu that is available in the editor gutter context menu.

Debugging

Thanks to a community contribution, we now have a context menu in the disassembly view.

Screenshot that shows the context menu in the Disassembly view.

JavaScript debugger Network view

Recent versions of Node.js have enhanced its network debugging capabilities. The experimental network view will be enabled by default on recent versions of Node.js that support it well (v22.14.0 and above).

Languages

Show browser support for CSS and HTML

When hovering over a CSS property, HTML element, or HTML attribute, you now see a summary of how well that property or element is supported across browsers using Baseline.
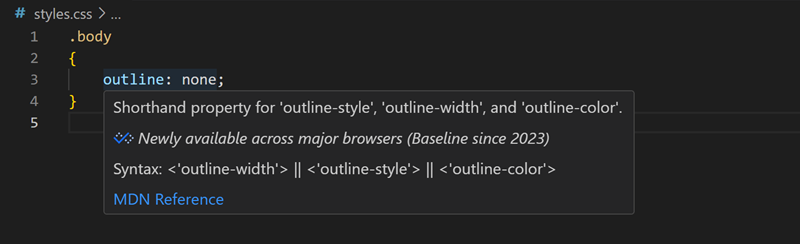
Screenshot that shows baseline browser support in the CSS hover.

Default syntax highlighting for .*.env files

Files with name format .*.env are now syntax highlighted as .ini files.

Expandable hovers for JavaScript and TypeScript (Experimental)

Setting: typescript.experimental.expandableHover

We’ve continued to iterate on the expandable hover feature for JavaScript and TypeScript. This feature lets you use a + and - in the hover control to show more or less type information.

This feature is still experimental but you can try it today by enabling typescript.experimental.expandableHover. You must be using TypeScript version 5.9 or above, for example by installing the TypeScript nightly extension.

Remote Development

The Remote Development extensions, allow you to use a Dev Container, remote machine via SSH or Remote Tunnels, or the Windows Subsystem for Linux (WSL) as a full-featured development environment.

Dev container instructions files

Dev Container features and images now include instructions files describing their tools and configuration. VS Code chat can automatically use this context, improving the relevance and accuracy of its suggestions during development.

Contributions to extensions

Python

Branch coverage support

Branch coverage is now supported in the Testing Explorer for Python! Note that your coveragepy version must be >= 7.7 for this feature. You can upgrade coverage by running pip install coverage==7.7.

Python Environments Quick Create command

The Python Environments extension has added support for Quick Create, making the environment creation process more seamless. Quick Create minimizes the input needed from you to create new virtual environments by detecting the latest Python version on your machine to create the virtual environment and install any workspace dependencies with a single click. This will create a .venv in your workspace for venv-based environments, and .conda for-conda based environments. You can access Quick Create via the Python: Create Environment command in the Command Palette.
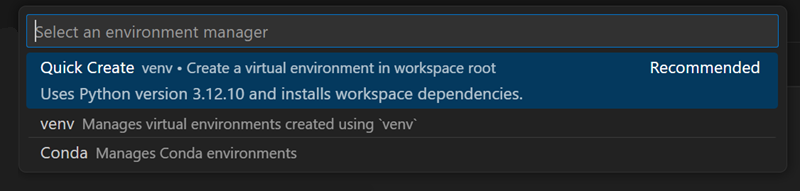
Screenshot showing Quick Create in the Python: Create Environment quick pick.

Python Environments chat tools

The Python Environments extension (preview) now includes two chat tools: “Get Python Environment Information” and “Install Python Package”. To use these tools, you can either directly reference them in your prompt by adding #pythonGetEnvironmentInfo #pythonInstallPackage, or agent mode will automatically call the tool as applicable. These tools seamlessly detect appropriate environment information based on file or workspace context, and handle package installation with accurate environment resolution.

Color picker when using Pylance

Pylance can now display an interactive color swatch directly in the editor for recognized color values in Python files, making it easier to visualize and pick colors on the fly. To try it out, you can enable python.analysis.enableColorPicker. Supported formats include #RGB (like “#001122”) and #RGBA (like “#001122FF”).

Screenshot showing the color swatch displayed in the editor next to #RGB color format.

AI Code Actions: Convert Format String (Experimental)

When using Pylance, there’s a new experimental AI Code Action for converting string concatenations to f-string or format(). To try it out, select the Convert to f-string with Copilot or the Convert to format() call with Copilot Code Actions through the light bulb when selecting a symbol in the string you wish to convert, or through Ctrl + ./Cmd + ..
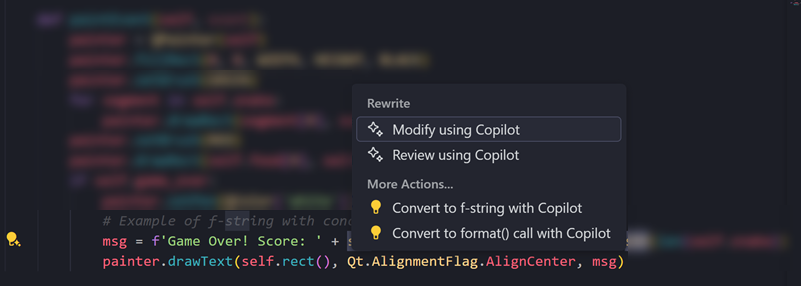
Screenshot showing the convert strings Code Actions, powered by AI.

This experience is enabled via the following setting:

"python.analysis.aiCodeActions": {"convertFormatString": true}

Then once you define a new symbol, for example, a class or a function, you can select the Generate Symbol with Copilot Code Action and let AI handle the implementation. If you want, you can then use Pylance’s Move Symbol Code Actions to move it to a different file.

GitHub Pull Requests and Issues

There has been more progress on the GitHub Pull Requests extension, which enables you to work on, create, and manage pull requests and issues. New features include:

  • Ask questions in chat about the active pull request, such as “Address all comments in the #activePullRequest”.
  • View issues in a webview, just like you can view pull requests.
  • Polish and alignment of the “Pull Requests”, “Issues”, and “Notifications” views.
  • Prepared for the release of GitHub’s Project Padawan by enabling assignment of issues to Copilot, @-mentioning of Copilot, and ensuring it will be displayed properly in the UI.

Review the changelog for the 0.110.0 release of the extension to learn about the other highlights.

Extension Authoring

Text Encodings

We finalized the API for working with text encodings in VS Code.

Specifically, this new API allows you to:

  • Get the current encoding of a TextDocument
  • Open a TextDocument with a specific encoding
  • Encode a string to a Uint8Array with a specific encoding
  • Decode a Uint8Array to a string using a specific encoding

ESM support for extensions

The NodeJS extension host now supports extensions that use JavaScript-modules (ESM). All it needs is the "type": "module" entry in your extension’s package.json file. With that, the JavaScript code can use import and export statements, including the special module import('vscode'). Find a sample here: https://github.com/jrieken/vscode-esm-sample-extension.

Note that ESM support isn’t for the web worker extension host yet. There are some technical challenges that need to be overcome first. We’ll post updates on https://github.com/microsoft/vscode/issues/130367. Stay tuned!

Proposed APIs

Tool calling for images

Last iteration, we added a proposed API so that extensions can attach images and send vision requests to the language model. This iteration, we’ve expanded on this API to allow tool call results to include images as well.

Check out this API proposal issue to see a usage example and to stay up to date with the status of this API.

MCP servers contributed by extensions

Extensions are able to programmatically contribute extensions to the editor by using the new proposed API. This is an alternative to users hardcoding configuration for each server in their settings or mcp.json.

If this API is interesting to you, check out its sample and the API proposal issue to stay up to date with the status of this API.

MCP Tool Annotations

VS Code will now display the human-readable names of MCP servers with tools configured with the appropriate tool annotations. Additionally, tools marked with readOnlyHint: true in their annotations will be allowed to run without requiring user confirmation.

Notable fixes

  • 244939 – Personal Microsoft accounts logs out very quickly (few mins to few hours)

Thank you

Last but certainly not least, a big Thank You to the contributors of VS Code.

Issue tracking

Contributions to our issue tracking:

Pull requests

Contributions to vscode:

Contributions to vscode-css-languageservice:

Contributions to vscode-js-debug:

Contributions to vscode-json-languageservice:

Contributions to vscode-jupyter:

Contributions to vscode-mypy:

Contributions to vscode-notebook-renderers:

Contributions to vscode-pull-request-github:

Contributions to vscode-python-debugger:

Contributions to vscode-python-environments:

Contributions to language-server-protocol:

Contributions to monaco-editor:

Matter 1.4.1 minor release aims to make smart home setups a no-brainer


What you need to know

  • The CSA announced a “minor release” for its 1.4 upgrade that works to improve the setup process for smart home devices.
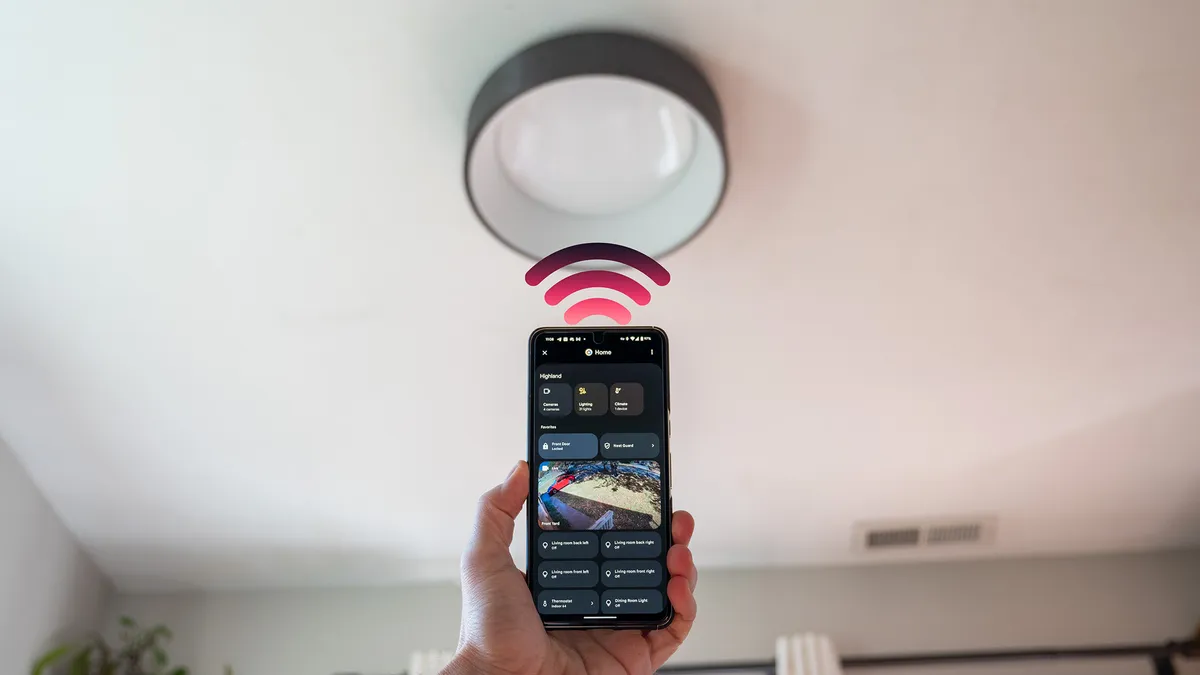
  • Matter 1.4.1 adds support for Multi-Device Setup QR Codes and Onboarding Info in NFC tags, so users have an easier time setting up multiple devices.
  • The connectivity standard’s 1.4 release arrived in November, bringing with it support for batteries, heat pumps, water heaters, and thermostat presets.

The CSA (Connectivity Standards Alliance) is releasing a small upgrade to v1.4 that should impact user setups in a big way.

According to its press release, the CSA is detailing a “minor release” to its v1.4 upgrade that should refine and quicken the setup process for Matter-support devices. The CSA says these updates are “critical” to improving the setup experience users have when opening new smart home devices. This process sees Matter stepping up its support for QR codes by introducing “Multi-Device Setup QR Codes.”