Outdoor productions demand reliable video transmission, even in challenging network conditions. Kiloview P3 and P3 Mini, paired with KiloLink Station Pro, create a lightweight remote production workflow that keeps live feeds moving from the field to the studio with confidence.
Using multi-link bonding, the P3 encoders maintain stable video transmission, while KiloLink Station Pro receives up to eight bonded feeds, decodes them in hardware, and outputs synchronized 3G-SDI with HDMI multiview. The result is a simple, dependable solution for sports, news, events, and other live productions where reliability matters most.
For every new content creator or person making videos that will require them to either be on-camera or recorded on audio, the is one unifying and horrifying point that we all go through.
I do NOT look like that or I do NOT sound like that or… both!
There are specific reasons that occurs and a large part of coming to grips with it is understanding why that happens.
Fair warning though, you are still going to look and sound like that only now you wont have any mystery attached to it!
How to Add an Audio Track to a Video Clip in PowerDirector
Very often when you are navigating around the internet trying to get hold of video and audio assets on the cheap… like me, you often don’t get exactly what you want.
Sometimes you get the right video but no audio ot the right audio but no video.
That in itself is not a huge problem because you can always find something appropriate to complete the picture so to speak.
The real problem arises when you try to manipulate one or the other of these recently matched assets or assets on other parts of the timeline.
These assets tend to behave individually still and often it can all go a bit wacky with stuff moving around when it shouldn’t!
To stop this there is usually a feature in most video editing software that groups or locks those audio and video assets together so that when dealing with them they behave as one entity.
Here’s a look at what I am talking about in PowerDirector and just be aware that other video editors will have different terminology for that same feature.
What (else!) is New in Filmora 15.6? 3 New Features That Improve Your Workflow
This video and the one below that cover a few of the latest updates to Filmora 15.
From my perspective in using the software I am happy to see they have eased back on the whole A.I. thing and refocused on editing features.
The stuff they are coming up with in the main are what it says on the box, which are tools and improvements to speed up and improve workflow.
Filmora 15 Audio Gain Loudness Normalization – Fix Audio in Seconds
This is an interesting tutorial from the folks at Filmora covering the new audio tools available in Filmora 15.
Now strictly speaking these are not totally new tools but they have been updated in a way that makes them far more useful and easy to use.
By the way, yes the voiceover in the video is A.I generated because the guy that made the video doesn’t speak English, so I think we can forgive that!
The problem being addressed here is that often you may have video and audio assets on the timeline that have noticeably different volume levels.
For anyone watching a video that has all that going on, it is very distracting and will kill watch-time in a flash.
Solving that problem is the past would lead to a seemingly endless and frustratingly circular process of individually adjusting clips levels to match.
Once you had all that handled then then you would upload to YouTube or whatever and find that the whole project was either too loud or too soft compared to other videos and again, watch-time dies!
The new tools in Filmora handle all of that by making the clip level normalization and gain work together seamlessly and then have the project level normalization and going do the same.
On top of that it now has clearly marked common normalization levels for services like YouTube (-14Lufs) or Podcasts (-16Lufs).
How to Create a Scanner Effect Unpacking – Movavi
This is just a pretty simple ideas tutorial form the folks at Movavi.
I don’t think any of us are going to be having too much trouble using green screen these days.
What was once a wildly exotic effect only the really cool kids had access to is now so mainstream it is borderline boring!
So this tutorial is not so much how to use green screen but more what to use it on for an effects.
Make a Map Like the New York Times for FREE
Well maybe not necessarily a map like the New York Times but a map anyway.
Probably about once per years I get some kind of project that requires I use, create or do something with a map.
Inevitably that results in me faffing about on the interwebs trying to find resources to do that for free because HEY! I’m not paying for something I only use once a year!
So, you can take the tutorial below at face value and learn how to do what it says or, follow along and steal the location of all the free assets and services in there. Its up to you!
Stuck on YouTube? Ask Me Anything LIVE
Derral Eves has over half a million subscribers on YouTube and the crazy part is that he doesn’t actually target his own channel as his business model!
His own channel is sort of a side gig that comes as a result of the consulting work he does for other channels.
So, why is this even relevant? Well I’m glad you asked!
Derral is one of my absolute go to guys for YouTube content and channel strategies so if you want to expand into that space, this is one of the guys to listen to.
Transform Phone Recordings Into Studio Quality
I have generally liked audio tutorials Mike Russell has put out over the years but for the past your or so things have changed a little.
A lot of his stuff has become shamelessly biased towards whatever product or service he happens to be promoting at the time.
I can understand the need to do this cos lets face it, that rent aint gonna pay itself!
However I also think that only presenting one alternative for a job that many can do is pushing it all a little too far.
So the video below is a good tutorial for handling a phone as an audio recording device and even the workflow suggestion is good as well.
However the final step of taking it to an A.I service is definitely not restricted to Riverside.FM!
My workflow is somewhat similar and goes like this:
Record as best I can using the tips Mike mentions in the video and the best set up I can pull together at the time.
Pull the video and audio into whatever video editor I am using and apply and basic correction that I can.
For example I can sample the background noise and just about every video editor these days has the ability to remove it reasonably well.
I then apply a little compression and normalization to get the levels even.
If need I also go for some de-reverb to get any echoey room sound out.
All the above is done on a best efforts basis on the understanding that the better I can get the audio myself, the better an A.I. service is going to make it sound.
Then when I have done whatever I can I use Adobe Podcast or Filmora 15 or PowerDirector or Movavi or any one of a bunch of A.I. engines that can handle audio.
Key Takeaways
Many content creators feel they don’t look or sound like themselves on camera, which is a common struggle.
Video editing software like PowerDirector offers features to group or lock audio and video assets, ensuring smooth editing.
Filmora 15 enhances workflow with updated audio gain and loudness normalization tools, making it easier to manage audio levels.
Tutorials covering various aspects of video editing, including creating effects and improving audio quality from phone recordings.
Derral Eves provides valuable insights for YouTube strategies, helping creators succeed on the platform.
Build a Complete Live Production System with BirdDog
Whether you’re creating a livestream for a church, producing sports broadcasts, teaching online classes, hosting corporate events, or building a professional video studio, BirdDog offers a complete ecosystem that grows with your production needs.
Instead of replacing your equipment as your workflow expands, BirdDog lets you start with a simple multi-camera setup and gradually build a powerful NDI-based production system. From compact cameras and PTZ cameras to NDI converters, video decoders, and production software, every product works together on the same network.
In this guide, we’ll show you how to build a complete live production workflow using BirdDog.
The easiest way to begin is with a few cameras and a production hub. BirdDog’s MAKI lineup was designed specifically for creators who want professional-quality production without unnecessary complexity.
Meet MAKI Live and MAKI Studio
MAKI Live is a compact 4K camera designed for modern live production. Despite its small size, it delivers impressive performance with:
4K image quality
3x optical zoom
Wi-Fi 6 connectivity
Battery-powered operation
NDI support
SRT streaming
HDMI output
USB connectivity
Pair MAKI Live with MAKI Studio to create an affordable multi-camera production system powered by an iPad (sold separately).
MAKI Studio provides:
Live switching
Smooth transitions
Picture-in-picture
Graphics overlays
Physical control surface support
This combination creates an easy-to-use production environment that can grow into a much larger BirdDog ecosystem.
BirdDog offers several ways to get started.
MAKI Live Single Pack
Perfect for creators needing one camera for:
Streaming
Recording
Webcam use
Mobile production
MAKI Live Bundle
Includes:
Three MAKI Live cameras
Protective EPP carrying case
Ideal for adding multiple camera angles immediately.
MAKI Studio Control Surface
Add tactile production controls with:
Physical switching controls
MAKI Studio software
Professional workflow improvements
iPad sold separately.
Production Combo
The complete starter package includes:
Three MAKI Live cameras
MAKI Studio
Control Surface
This is an excellent foundation for schools, churches, businesses, content creators, and event production teams.
As your productions become more advanced, MAKI Studio integrates seamlessly with BirdDog’s family of NDI PTZ cameras.
PTZ cameras provide several advantages:
Longer optical zoom
Robotic camera movement
Permanent installation
Better coverage of large venues
Higher-end image quality
Whether you’re producing worship services, sporting events, corporate meetings, or educational content, BirdDog has a PTZ camera designed for your workflow.
Before selecting a camera, consider:
Room size
Distance from the subject
Wired or wireless installation
Streaming or broadcast requirements
Available budget
Let’s explore the lineup.
BirdDog X1
The BirdDog X1 is an excellent entry-level Full HD PTZ camera.
Key features include:
Sony 1/2.8-inch CMOS sensor
20x optical zoom
1080p60 video
HDMI, USB-C, and IP outputs
NDI HX2/HX3
SRT
RTSP
RTMP
Built-in NDI decoder
Wi-Fi connectivity
Perfect for classrooms, churches, podcasts, and meeting rooms.
BirdDog X1 30X
Need more reach?
The X1 30X offers:
Sony 1/2.8-inch sensor
30x optical zoom
Full HD video
Built-in NDI decoder
Long-distance coverage
Ideal for auditoriums, sports venues, and houses of worship.
BirdDog X1 Ultra
The X1 Ultra adds 4K production capabilities.
Features include:
Sony 1/2.8-inch sensor
12x optical zoom
4K30 video
Wide field of view
NDI HX2/HX3 support
Perfect for studios and conference rooms.
BirdDog X4E Ultra
Designed for wired installations, the X4E Ultra delivers:
Sony 1/1.8-inch sensor
20x optical zoom
4K60
3G-SDI
HDMI
USB-C
IP video
Professional fixed-install workflow
BirdDog X4 Ultra
The X4 Ultra adds mobility with:
Built-in battery
Wi-Fi 6
4K60
Professional image quality
Excellent for portable productions and temporary event setups.
BirdDog X5 Ultra
For higher-end productions, the X5 Ultra includes:
Sony 1/2.8-inch sensor
20x optical zoom
4K60
12G-SDI
Dual HDMI outputs
Smooth robotic movement
Ideal for broadcast environments.
BirdDog XL Ultra
The flagship BirdDog PTZ camera offers exceptional image quality.
Highlights include:
Large 4/3-inch sensor
Dual-lens camera system
20x optical zoom
40x HD zoom
4K60
Full NDI
Genlock
Timecode
FreeD tracking
Perfect for broadcast studios and virtual production.
BirdDog O4 Outdoor PTZ
Need an outdoor solution?
The O4 is built for demanding environments with:
IP66 weather resistance
Extreme temperature operation
30x 4K zoom
60x HD zoom
500-meter IR illumination
Ideal for sports fields, campuses, and outdoor events.
Once your video is on the network, BirdDog PLAY devices make it easy to display NDI video anywhere.
BirdDog PLAY
A compact HDMI decoder that’s perfect for:
Confidence monitors
Lobby displays
Return feeds
Digital signage
BirdDog PLAY PRO
For larger deployments, PLAY PRO adds:
PoE power
Rugged metal housing
4K60 HDMI output
Permanent installation support
You don’t need to replace your current cameras.
BirdDog 4K converters allow HDMI and SDI devices to become part of your NDI production network.
BirdDog 4K HDMI
Ideal for:
DSLR cameras
Camcorders
Laptops
Presentation systems
Media players
Supports:
HDMI 2.0
Up to 4K60
NDI encoding and decoding
BirdDog 4K SDI
Perfect for professional production equipment.
Features:
12G-SDI
Up to 4K60
NDI conversion
Baseband-to-IP workflows
BirdDog 4K Quad
Built for larger facilities with:
Four configurable SDI channels
Multi-channel conversion
Integrated multiview support
Excellent for broadcast facilities and production trucks.
BirdDog also provides software that simplifies production management.
BirdDog Cam Control
Manage your cameras from one interface by:
Adjusting image settings
Recalling presets
Controlling multiple PTZ cameras
BirdDog Fleet Manager
Monitor your entire BirdDog deployment with:
Device discovery
Network monitoring
Status reporting
Simplified administration
BirdDog Connect
Extend your productions beyond a single location.
BirdDog Connect allows you to:
Link remote studios
Connect distributed production teams
Bring remote video sources into your NDI workflow
BirdDog makes it easy to build a live production system that grows with your needs. Start with MAKI Live and MAKI Studio for an affordable multi-camera setup. As your productions become more advanced, add BirdDog PTZ cameras, integrate existing HDMI and SDI equipment with NDI converters, distribute video using PLAY decoders, and manage everything through BirdDog software.
Whether you’re producing live streams, broadcasts, worship services, educational content, corporate events, sports, or hybrid meetings, BirdDog delivers a flexible IP video ecosystem designed to scale from your first camera to your final display.
If you’re ready to build or expand your BirdDog live production workflow, the experts at Videoguys can help you choose the right cameras, converters, software, and accessories for your application.
Every Panasonic PTZ camera begins with a commitment to precision engineering and quality craftsmanship. Designed, engineered, and manufactured in Japan, these cameras are built through a meticulous development process that emphasizes reliability, performance, and long-term durability.
A behind-the-scenes look at Panasonic’s manufacturing process showcases the people, technology, and attention to detail that help deliver the image quality and dependable operation trusted by broadcasters, educators, houses of worship, and content creators around the world.
After Filming 1,000s of Presenters – The Confident Ones All Did This.
Some people seem to be able to get in front of a camera or phone, hit the record button and off they go!
Smooth, effortless, totally engaging all with the ability to maintain the presence of mind to deliver the message clearly.
I am not one of those people and in fact I have come across very few of those people in my own life!
Now also over the years I have posted a number of tutorial videos from creators covering how to appear natural in front of the camera.
I know that they were all helpful in some way but this week I came across a truly excellent video on the subject.
Its from a former BBC Television cameraman, Chris Goor, who has had the opportunity to observe thousands of people both pro and amateur in front of the camera.
His observations on the subject are incredibly insightful and this guide to appearing confident on camera is probably one of the best I’ve seen.
5 Teleprompter Mistakes Beginners Make (Avoid These!)
I have actually spent the better part of the past few weeks checking out teleprompters because the one I have been using is a bit old now.
Of course it is not as though suddenly the glass on the prompter has worn out or anything like that!
The reason it has become a problem is that when I first bought it, the intention was (and still is) to use a mobile phone to scroll the text.
However over the past few years, mobile phones have gotten larger as far as screen size goes so that prompter has become a bit difficult to deal with.
We have to keep re-sizing the text down to fit the teleprompter screen but in doing so, the text gets harder to read.
So all of that has led down a seemingly endless teleprompter rabbit hole… but that a whole story in itself for another day!
Anyway, regardless of whatever difficulties may occur with them there is actually a whole world of techniques connected to using them so here’s a little advice on the matter.
The Exact YouTube Strategy for 2026!
The guys at Think Media are currently running at about 3.4 Million subscribers on YouTube.
That tells me that when it comes to setting up and running a YouTube channel, they probably know what they are talking about!
One of the basic truths of YouTube is that the basic truths of YouTube are ever changing and evolving because of two main factors.
The first is monetization because at the end of the day, YouTube is a Google product and Google has to show both growth and profit for its shareholders.
The second is that human interaction creates stresses and applies forces to what is popular and what people are looking for and that circles right back to point number one!
Show me the money!
In light of that here’s an updated for 2026 start up strategy for YouTube as well as great tips for an already existing YouTube channel.
Two Methods to Apply Facial Blur to a Video Clip in PowerDirector
Like most things in most video editing software these days, there is always more than one way to skin a cat.
So here’s a tutorial on a couple of ways you can blur out a face, or anything for that matter, in CyberLink PowerDirector.
How to Master the Euphoria Aesthetic – Movavi
Just a quick little tutorial video here from the folks at Movavi.
It simply shows how to create the Euphoria effect that is so popular these days but also there is something else to take note of for any editing software.
You will see they add and effect then add another on top of that.
Finally they adjust the settings of one of the filters to achieve the final result.
The reality is that many, many inbuilt effects and filters these days have settings that you can adjust which can completely change what the effect is doing.
It is always worth the time to have a play with any filter or effect controls to just see what happens!
One of the technical aspects of shooting videos especially with a decent camera is that you have to get the setup and especially the lighting right.
In some ways, shooting with a smartphone is way easier because there is a basic difference between how a phone shoots and how a camera shoots.
The phone shoots on the basis of how it should be.
It uses internal software to attempt correction on the fly and give you the best result possible based on what it “thinks” is the best possible result!
The camera shoots on the basis of how it is.
It is assuming you know what you are doing and whatever or however you are shooting, that’s what you want!
At the end of the day, if the smartphone didn’t get it right, you have limited ability to correct.
If using the camera you didn’t get it right, you have greater freedom to correct due to a larger amount of data being recorded. (Even if you recorded it a bit wrong!)
Correcting footage that is not quite right is an art and science in itself and trust me, there will be tears before bedtime before you get good at it!
However to be honest I have started to cheat a bit using one of the newer tools in Filmora called Relight.
Check it out in the video below but essentially it works like a color correction/grading tool that can be applied to specific areas of a video without having to mask and track.
How To Make Money on YouTube With a Small Channel
This is probably one of the most comprehensive and complete rundowns on exactly how you can generate income from a YouTube Channel.
Usually creators like this are pretty secretive about actual numbers and like to make it all seems way better or easier than it really is!
Refreshingly, this video is quite upfront about the amount views you need to generate income from YouTube ads (Adsense), sponsorships, affiliate links and digital products.
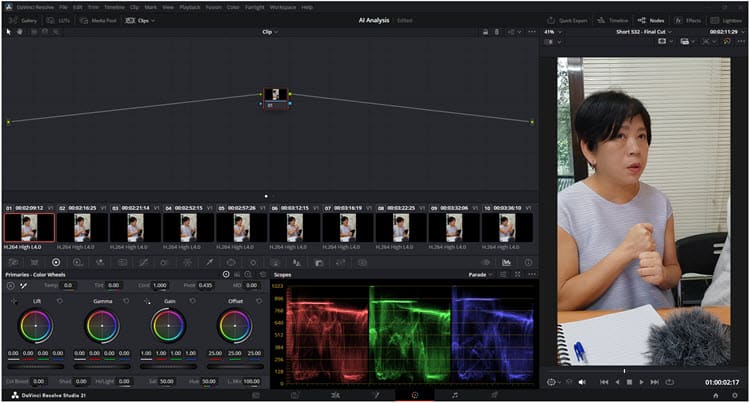
How to Color Grade a Documentary in DaVinci Resolve (Step by Step)
If you have ever thought that your project was getting a bit too complicated and things were beginning to spin out of control, check this out!
One of the steps I often refer to in any project is that of getting yourself and your assets organized.
I know I bang on about this because I am already thinking to myself, “Have I typed that exact sentence before?”
That’s how you can tell you are repeating yourself!
Anyway I wanted to add this one to this weeks Roundup because it illustrates just how important that organizational step really is.
Even a small project will spin out of control without it so look at this project and imagine what the result would be!
DaVinci Resolve 21 FREE – New Features Effects you don’t want to miss
So since DaVinci Resolve 21 came out of Beta and into full release most of the talk around town has been confined to the Studio (Paid) version.
Recently the Free version was similarly updated into full release mode so here’s a rundown of whats new and improved in that version.
Key Takeaways
Tips for engaging confidently in front of the camera while effortlessly appearing natural.
Common teleprompter mistakes beginners make and technical advice for better usage.
YouTube strategies for 2026 highlighting the evolving nature of monetization and viewer engagement.
Tips for shooting professional videos emphasizing lighting and camera setup, comparing smartphone ease with traditional cameras.
The latest features of DaVinci Resolve 21 are reviewed, focusing on improvements in the free version.
Creating professional live streams no longer requires expensive broadcast equipment or a dedicated production team. With Wirecast, creators, businesses, educators, houses of worship, sports organizations, and event producers can turn a Mac or Windows computer into a complete live production studio.
Whether you’re streaming a podcast, worship service, sporting event, corporate meeting, or live show, Wirecast provides the tools needed to produce high-quality multicamera broadcasts with ease.
Why Choose Wirecast for Live Streaming?
Wirecast is a powerful all-in-one live streaming and video production platform that combines professional-grade switching, graphics, recording, and streaming capabilities into a single solution.
Key benefits include:
Support for unlimited live camera sources
Multicamera live production workflows
NDI® and IP camera integration
Built-in graphics and overlays
Remote guest participation
PTZ camera control
ISO recording capabilities
Simultaneous streaming to multiple destinations
Available for both Mac and Windows
From beginners creating their first livestream to experienced broadcasters producing complex events, Wirecast scales to meet virtually any production need.
Produce Professional Multicamera Streams
Wirecast makes it easy to manage multiple camera angles and sources from a single interface.
Users can switch between cameras, add graphics and lower thirds, share presentations, display screen captures, and integrate remote guests into a seamless production.
Popular applications include:
Podcast Production
Create engaging multi-camera podcasts with professional graphics, guest interviews, and live audience interaction.
Corporate Events
Stream presentations, webinars, training sessions, and company meetings with broadcast-quality production values.
Houses of Worship
Deliver high-quality worship services with multiple camera angles, graphics, lyrics, and remote participation.
Sports Streaming
Capture live sporting events with instant replay workflows, scoreboards, and multiple camera feeds.
Wirecast Studio Features
Wirecast Studio provides powerful live production tools for creators and organizations looking to elevate their broadcasts.
Features include:
NDI® input support
Screen capture
IP camera connectivity
RTMP, SRT, RTP, and streaming protocol support
Built-in streaming destinations
Graphics, audio, and video asset support
GPU-accelerated encoding
Virtual Camera and Microphone output
Up to 2 remote guests
Integrated stock media library
Wirecast Studio is ideal for content creators, churches, schools, businesses, and livestreamers looking for professional production tools at an accessible price point.
Wirecast Pro Features
Wirecast Pro includes everything in Studio while adding advanced production capabilities for larger and more demanding workflows.
Additional features include:
Cloud multistreaming
ISO recording
PTZ camera control
Sports production tools
Multi-track audio recording
Up to 7 remote guests
1-17 slot multiviewer output
Wirecast Pro is designed for professional broadcasters, sports organizations, production companies, event venues, and advanced livestream producers.
Wirecast Studio vs Wirecast Pro
Choosing between Wirecast Studio and Wirecast Pro depends on your production requirements.
Choose Wirecast Studio if you need:
Professional multicamera streaming
Graphics and overlays
NDI workflows
Basic remote guest support
Streaming to major platforms
Choose Wirecast Pro if you need:
ISO recordings
PTZ camera control
Sports production tools
Additional remote guests
Advanced monitoring and audio workflows
Get Started with Wirecast Today
Whether you’re streaming from a Mac or Windows PC, Wirecast delivers the flexibility, power, and professional features needed to create engaging live productions.
Explore Wirecast Studio and Wirecast Pro to find the subscription that best fits your workflow and start producing broadcast-quality live streams from virtually anywhere.
Need help selecting the right Wirecast solution? Contact the live streaming experts at Videoguys at 800-323-2325.
This is to me, a very welcome development in the way A.I has been gradually worked into the average video editing workflow.
It is interesting to see how all of this has evolved over time beginning with automation seemingly being the ultimate goal.
It appeared as though the vision was that ultimately the A.I. would be autonomously doing pretty much all the work from start to finish.
Of course that never really took off and it all ended up settling for the A.I. tools we have at the moment.
Personally I think a lot of those tools are kinda useless but the good news is that they are being treated as tools to be used by editors… not as editors!
In the video below you can see in PowerDirector what I think is a very hopeful end game for A.I. and video editing.
They are calling it “intent based” A.I. which is a fancy, schmancy way of saying chat based A.I. within the program to carry out tasks.
10 Editing Cuts Every Video Editor Should Know
I never pass up an opportunity to offer something on the Friday Roundup that takes us all back to basics.
It is so easy these days to get caught up in whatever flavor of the month (year?) that’s being bandied about by influencers and marketing departments,
The truth is that any of these latest and greatest “whatevers” are all ultimately going to rest on the basics.
So in light of that here’s an excellent revisiting of the basic cuts you can use in editing and what purpose each one serves.
Designing a Movie’s World: Mise-en-scène Explained for Beginners
I have to be honest with this entry, there is pretty much nothing here to learn about home video shooting and editing.
In fact if we take it all up a notch and move it to say, YouTube long form video content, still basically nothing to learn!
The only reason I have added it for this weeks Roundup is that I found it to be fascinating so thought maybe you might too.
How to Copy Video from a DVD Disc into PowerDirector
So back in the day, pulling video files off a DVD was a relatively normal kind of thing to do!
Of course we would never try to rip files off copyrighted materials but at that time a lot of us were using DVDs as storage.
Since then things have changed and frankly they have changed monumentally for the better!
The whole DVD thingy was a complication none of us needed!
There are however many, many people these days that have a lot of footage stored on old DVDs still and for some of them they are getting to the point of needing to move or upgrade that storage.
Remember that the original promise of DVDs being a long term storage solution turned out to be a bit of a lie!
The actual predicted time at the longest is 10 to fifteen years but that includes those DVDs being stored in a protected environment involving a fairly stable temperature and as close to total darkness as is possible..
Of course as DVDs have gone the way of the Dodo, modern video editing software has to some degree sidelined actions connected to dealing with them.
Most still retain a straightforward approach to authoring and burning discs but when you try to go the other way, not so simple!
You can see how to do it in PowerDirector below.
How to Record Screen in Filmora 15.6
Filmora recently updated to version 15.6 and as part of that update they added enhancements to the Screen Recorder tool.
The app has had an attached screen recorder for as long as I can remember and this is the first time in my memory that it has been updated or changed in any way.
The module itself is actually a standalone piece of software that is launched from inside the Filmora interface and has always been a pretty good piece of kit.
I don’t do many screen recording type videos myself so I thought the best way to show you all about it is to leave it to someone who does.
So here ya go!
I Let AI Make My Thumbnail (Because I Suck At It)
One particular stumbling block for many YouTube creators, TikTokers, Insta-hopefuls and others is that of thumbnails.
The harsh truth is that those platforms may very well present your video to an audience for their consideration, but your thumbnail and title are going to finish the job and get that click.
Now don’t go thinking that I am in some sort of position to be educating anyone on thumbnails!
Trust me, nothing could be further from the truth!
I certainly know they are important but I have no idea how to design one that actually works.
Which brings us to this video from Gripps2211 demonstrating an A.I. service I can get on board with!
Sony ZV-E10 in 2026: 3 Mistakes Beginners Make
About two years ago now I stopped using mobile phones for shooting video and moved up to using a Sony ZV-E10.
At the time it was touted as the ideal camera for what I was shooting and additionally my brother in law said we should get it!
Now that would seem a little foolish on the surface, that I would be just listening to my brother in law, but in reality he is actually a pro cinematographer.
On top of that he advises the Taiwan education ministry on their art department purchases nationwide with regards to what audio-visual equipment they use.
So at the end of the day, I totally lucked out with the ZV-E10 and it has served me very well but that’s just me and my situation.
Probably a timely point at which to tune in to a decent DaVinci Resolve 21 Q&A so I guess Jason Yadlovski is as good as any!
Actually the real reason is that DaVinci Resolve 21 has been out for a few weeks now and users have had a chance to go into it a bit deeper by now.
Most of the YouTubers that cover Resolve have done their “Whats new” videos and have tried to anticipate viewer questions but at the end of the day its best to ask them directly.
So these are some of the most common questions being asked about DaVinci Resolve 21 and mostly, what the answer are.
Key Takeaways
This article discusses the evolution of AI in video editing, focusing on how PowerDirector incorporates chat-based AI tools for editing tasks.
It revisits essential editing cuts that every video editor should master, emphasizing the importance of basic techniques.
The article explores how to extract video from DVDs using PowerDirector, highlighting the challenges of outdated storage methods.
It details the recent updates to Filmora’s screen recorder, showcasing its functionality and improvements.
Lastly, it features insights on camera selection for beginners, the significance of thumbnails, and a Q&A about DaVinci Resolve 21.
The Roland V-1-4K is a compact yet powerful 4K video switcher designed for content creators, corporate AV, education, houses of worship, and live event production. It delivers professional-grade video and audio capabilities without the complexity of traditional broadcast systems, making it an excellent choice for both experienced operators and first-time users.
Five HDMI inputs with built-in scalers allow you to connect cameras, laptops, presentation systems, and other video sources without worrying about matching resolutions or frame rates. Five HDMI outputs—including dedicated Program, Preview, and Multiview outputs—plus two independently scaled outputs provide the flexibility to connect monitors, projectors, recorders, and external displays with ease.
As a leader in professional audio, Roland equips the V-1-4K with XLR microphone inputs, embedded HDMI audio support, RCA outputs, and a dedicated headphone output for monitoring. This integrated audio workflow helps simplify live productions and livestreams while maintaining professional sound quality.
One of the V-1-4K‘s most impressive features is Region of Interest (ROI) cropping. Using a single 4K camera, you can create up to four independent HD camera angles, giving your production a dynamic multi-camera look while reducing equipment costs and simplifying setup.
For graphics, Roland’s free Graphics Presenter software makes it easy to add lower thirds, titles, logos, and images directly into your production. When it’s time to stream, simply connect the USB-C output to your computer and the V-1-4K appears as a webcam source for OBS, Zoom, Microsoft Teams, and other popular streaming platforms—no additional capture device required.
With dedicated hardware controls, physical buttons, and Roland’s signature T-bar transitions, the Roland V-1-4K provides a fast, reliable, and intuitive production experience for professional 4K video switching and livestreaming.
Learn more about the Roland V-1-4K and find the right live production solution at Videoguys.
One of Wirecast’s core strengths is that it scales without changing. The same software powers a solo webcam stream and a multi-camera broadcast production — you’re just adding inputs and operators as your production grows. Here’s what each level actually looks like in practice.
The simplest Wirecast workflow. Even with just a webcam, Wirecast adds immediate value: lower thirds, logo overlays, a professional background, and preset streaming to your platform of choice — all things a raw webcam stream can’t do.
Who this is: Creators starting out, business professionals elevating their video call presence, educators recording or streaming solo lessons.
Operator count: 1
Level 2: Two-Camera Podcast
Setup: One camera + two people + two microphones → capture card → Wirecast
A two-person podcast setup with one operator doubling as a participant. One wide camera covers both hosts; switching happens between that wide shot and any close-up framing. Two microphone channels are managed independently for level control and muting.
This is the first setup where Wirecast’s layer system earns its keep — audio on its own layer, lower thirds ready to fire independently of camera cuts, logos persistent throughout.
Who this is: Podcast producers, interview shows, two-person commentary streams.
Operator count: 1 (also participating in the show)
Level 3: PTZ + Audio Mixer — Intermediate Production
Now you have real production flexibility. Two PTZ cameras with saved presets give you wide and tight shots that can be recalled instantly. One person switches; a second monitors audio levels on the physical mixer.
The PTZ cameras multiply your effective shot count: with a wide shot on one camera and preset positions (close-up, medium, over-shoulder) saved on the second, two cameras behave like four or five distinct shots. Wirecast’s built-in PTZ control handles pan, tilt, zoom, and preset recall without a separate hardware controller if needed.
Who this is: Houses of worship, small corporate studios, education productions, sports coverage.
Operator count: 2 — one switching, one on audio and cameras
Level 4: Multi-Producer Broadcast
Setup: Multiple camera operators + director calling shots from a multiviewer + dedicated Wirecast producer for graphics/switching + full audio operator
This is the full broadcast production model. Camera operators cover individual positions. A director reads the multiviewer and calls shots. The Wirecast operator executes graphics, overlays, lower thirds, and transitions. Audio runs independently.
Wirecast didn’t change between Level 1 and Level 4. The software is doing the same things — capture, switch, graphic, stream — just across more sources, more operators, and more complex live events.
Who this is: Sports broadcasts, large venue live events, professional production companies, and universities with broadcast programs.
Operator count: 4+ with defined roles
The Key Insight: Wirecast Grows With You
Starting at Level 1 doesn’t lock you into it. Every workflow addition — a second camera, a PTZ, an audio mixer, a second operator — plugs into the same Wirecast setup you already know. You’re not learning new software as you scale. You’re just expanding what you already understand.
The upgrade from Wirecast Studio to Pro follows the same logic: same interface, more advanced features unlocked when your production needs them.
Ready to build your Wirecast production setup? Call 1-800-323-2325 or visit videoguys.com for bundle packages.
5 Easy Editing Tricks for More Powerful Storytelling
Most beginning editors start off learning the basic concept of making cuts in their videos to create a finished project.
Once they have learned to do that, the emphasis tends to go a little off course at that point and they start drifting into that vast wasteland I like to call, transitions!
The problem is that their intended goal is that of keeping the viewer engaged but the whole “transitions” thing leads them off into the undergrowth, possibly never to be seen again.
The real key to all of this is learning why and when to cut rather than how.
If you take a look at the video below on editing techniques to improve storytelling you will notice that in most cases he uses a straight cut.
No fancy swirly, spinny transitions or masking effects, just straight cuts.
The difference is where and why each cut in being made and what purpose it is serving to the story.
How to Design J-Cut and L-Cut Transitions in Powerdirector
One of the absolute basics anyone should be learning as a new video editor is the use of J-Cuts and L-Cuts.
You should learn why they are the most common cuts in pro editing and how to do them.
So for the second part of that equation, the how, check out the video below because although they seem kind of simple, they are pretty easy to mess up!
As far as the why goes, heres the short version.
Both the J-Cut and the L-Cut are cut points where either the video cuts just before the audio or the audio cuts just before the video.
Youll see in the demo below which is which so I am not to ramble on about it here!
The reason it is so powerful and is used like flour in a bakery is that they both mimic real life.
In real life, you are constantly receiving visual and auditory information but you are rarely receiving both visual and auditory information from one source at the one time.
If a dog barks at you when you are on the street you will most likely hear the dog before you see the dog.
If you are in a crowded room at a party you will be seeing then hearing then hearing then seeing and only on a very few occasions will the hearing and seeing happen simultaneously.
J-Cuts and L-Cuts reflect that reality of life and provide a very polished and professional edge to your videos without your audience being aware of why that is.
6 AI Tools That Make Video Editing 10X Faster
These are six tools in PowerDirector that I can totally get onboard with.
Its not because they are A.I and all the cool kids are using them or that they are creating my videos for me!
Its because they do what I want A.I. to do and that is to take boring, repetitive or just plain fiddly tasks off my hands and get them done painlessly.
A.I as a tool for creators and not a replacement of them is where we should be going right now.
How to Improve Audio Quality in Filmora (4 Easy Steps)
This is a run-through of some of the main audio tools you can find in Filmora 15 at the moment.
I say at the moment because Filmora gets updates pretty fast so who know whats coming next.
Anyway I dont think I need to bang on and on about the importance of audio in video creation.
Its one of those invisible factors to the audience that makes them think something is wrong without really identifying what it is thats wrong.
Whether they realize it or not, they quickly switch off.
What’s New in Filmora 15.6 – Teleprompter and Pen Tool Animation
When I added the item above, showing the audio tools of Filmora 15, I mentioned half seriously some thing about them updating frequently.
As so here we are! There is a new update to Filmora 15 which takes it to version 15.6.11.
In this new version there are a couple of very interesting enhancements to at least two of the tools already in the program.
The first is that they have added a teleprompter capability to the screen capture module.
This module is actually a stand alone program that you can, obviously, use to capture whatever it is you are doing on you computer screen.
What they have done is add the capability of having a teleprompter style overlay running while you are doing you screen capture.
This is a great feature for people using the program to do demonstration videos who can now read their script or cue sheet while doing the demo.
The second one is very cool and although is presented as an enhancement to the Pen tool (which it is) it is actually a way to manually draw motion paths.
So rather than try to explain it just watch Jacky’s video showing what it can do.
Fix Wrong Aspect Ratio Color Match Photos with AI! (Easy NoteGPT Tutorial)
Last week I spoke about no longer using A.I. features as part of the selection process for video editing apps.
This week I have another video tutorial showing why I no longer consider A.I. capabilities as being a particularly important part of that process.
These days there are many, many iterations of A.I. models for us to use and each of them have their own specialities, strengths and weaknesses.
Including all of them into an editing program’s interface would just be silly at this point especially given they are all easily accessible online.
So here’s another super quick and effective A.I. workflow from Gripps2211 working inside Corel VideoStudio and using external A.I. to manipulate his assets how he wants.
Learning Resolve? Don’t Make These Beginner Mistakes!
There are two main hurdles you have to get over if and when you start editing videos for whatever reason.
The first is actually learning how to work your way around the editing software you are going to be using so that you can actually edit!
The second and less obvious is that without a workflow, things can go downhill at an alarming rate!
Knowing where to start and why, followed by the next logical step in the sequence and why will get you to where you want to be way faster and without a whole lot of pain and with your sanity and enthusiasm for the activity (relatively!) intact.
Here’s great video from Casey Faris that walks through each step of the correct sequence and why and gives a great foundation to get you started off right.
On top of that he is also offering access to his free course for beginners which I recommend wholeheartedly.
VHS Tape Effect – DaVinci Resolve
Like most effect specific tutorials, I always watch and learn from them on the basis that I probably wont actually use that effect!
I know that seems a bit strange but what I am more interested in with these kinds of tutorials is how the effect is achieved, not the effect itself.
I have found over the years that whilst learning how to pull off an effect, you inevitably go through a bunch of steps involving tools and settings within the software.
The key here is to learn the tools and not so much the effect.
This one for example is how to manually recreate an old VHS tape effect.
Personally? Couldnt care less about an old VHS tape effect!
How Daniel gets there? Very interesting.
Key Takeaways
Beginners should focus on when and why to cut in video editing, rather than just learning transitions.
Mastering J-Cuts and L-Cuts enhances storytelling by mimicking real-life audio-visual experiences.
AI tools in video editing should alleviate mundane tasks instead of replacing creators.
Improving audio quality is vital for audience engagement and spans multiple tools in Filmora.
Updates in Filmora 15.6 include new features like a teleprompter and enhancements to the Pen tool.