We’ve done a lot of AutoCAD tips over the years. In fact, we’re approaching a milestone later this year (stay tuned). We thought it would be worthwhile to pick out some that can help you become a power user more quickly. You’ll even get links to blog posts that go into more depth on the topic.
So, if you’re interested in upping your game, here are some tips to help you become an AutoCAD power user.
Some commands in AutoCAD may not be used as often, so AutoCAD provides a quick refresher on how they work.
If you hover over a command in the Ribbon, the short ToolTip will appear. If you keep hovering over the command icon, the extended ToolTip will appear.
An explanation of the command is given, and an illustration of how to use the correct input sequence is provided. Occasionally, the image is even animated for 3D commands. And you have a lot of flexibility on how they’re displayed.

Bonus Tips:
Tiptoe Through the ToolTips: Tuesday Tips With Frank
Rollover ToolTips: Tuesday Tips With Frank
A Grip is often faster than a command to edit an object. Depending on the object, the default action is usually either Move or Stretch.
Hovering over the Grip displays other editing options, depending on the object. To launch an edit command, simply select one from the pop-up list or click on the Grip for the default action. Hold Shift while selecting multiple grips.
When a grip is active (a “hot” grip), you can select it and right-click on it to access additional options like Rotate, Scale, and Mirror. In addition, you can specify a basepoint or reference distance, as well as copy the object as you edit it. All of this can be done directly from the selected object.
Bonus Tip:
Have You Tried: AutoCAD Grips – Just Grip It!
3. Take advantage of AutoCAD keyboard shortcuts that can improve your productivity
- Bypass the Enhanced Attribute Editor to quickly edit an Attribute. Hold down the Control key when selecting the Attribute, and it will highlight similar to Single Line Text for editing.
- Clean up corners quickly using Fillet or Chamfer by holding down the Shift key when selecting the second object.
- Hold down the Control key when selecting an object to override any active Lock UI settings and move or close palettes or toolbars.
Bonus Tip:
Learn about all the AutoCAD keyboard shortcuts.
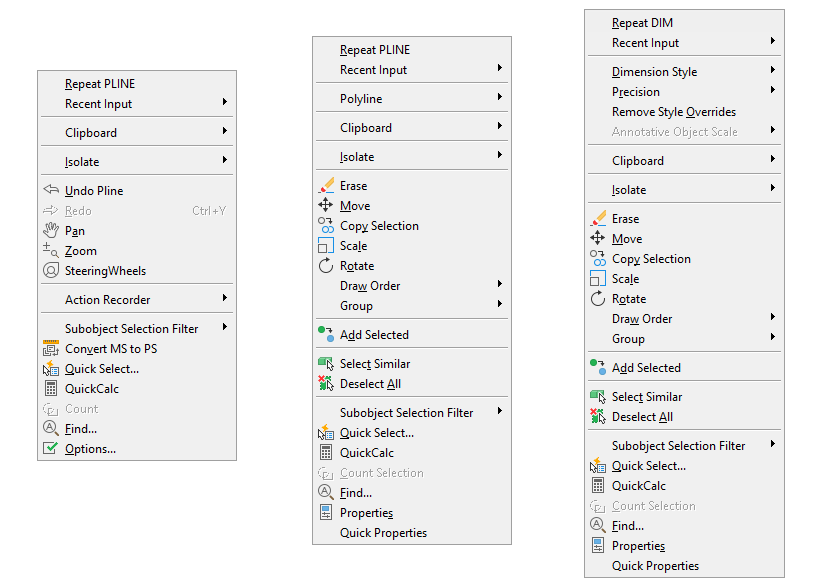
Contextual popup menus are a productivity enhancement favorite. The commands in the menu will be specific to your selection since they’re contextual.
With this method, a single, quick right-click will still function as ENTER, but if you hold down the mouse button longer—a quarter of a second by default—you’ll get the contextual popup menu instead.
Bonus Tip:
With the time-sensitive, right-click feature, you can have the best of both worlds if you use a mouse to right-click as ENTER. Simply call up the Options dialog box, select the User Preferences tab, and then select the Right-Click Customization button. The control for time-sensitive right clicks will appear in another dialog box.
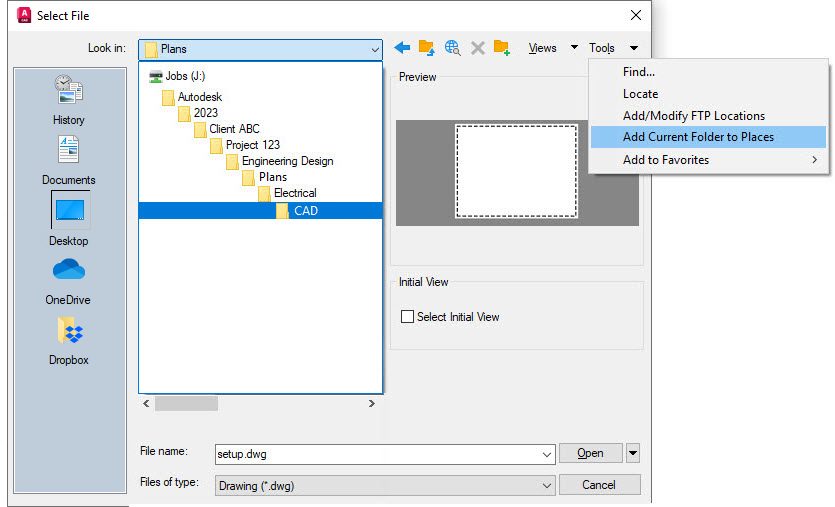
5. Avoid endless project folder navigation by setting Places in the Open dialog
Whenever you have multiple icons with the same name – like “CAD” – you can right-click the icon, select Properties, and change the name to something more meaningful.
Bonus Tip:
Favorite AutoCAD Places: Tuesday Tips With Frank
6. Identify the differences between drawings and Xrefs with DWG Compare
DWG Compare allows you to quickly view the differences between drawings. All objects in both drawings will be shown as gray, those not in the current drawing will be red, and those only in the current drawing will be green.
The comparison feature has also been incorporated into Xrefs. Don’t waste time with endless email or DM threads trying to figure out what was updated. When you get the notification that something has changed, let Xref Compare show you what is different.
DWG Compare can also insert Revision Clouds, which may speed up your change process by pre-defining color, style, and size preferences.
Bonus Tips:
DWG Compare – Dare to Compare: Tuesday Tips With Frank
Xref Compare: Tuesday Tips With Frank
7. Use Quick Select to easily select multiple objects based on their properties
The Quick Select dialog allows you to build powerful queries to quickly select only the objects you want. You can access the QSELECT command at any time from the right-click pop-up menu.
Do you need to find every Circle with a diameter of 4.25? Every Polyline that is not closed? Every Block instance whose Z scale is higher than 1? All this and more are easy to achieve by using Quick Select.
Selecting all matching entities with QSELECT allows you to perform edit commands or modify common properties across the set.

Bonus Tip:
AutoCAD Quick Select: Tuesday Tips With Frank
8. Speed up your workflow by copying objects from your external references with the Copy Nested Objects command
Copy objects from an Xref into your drawing without opening the Xref, copying to the clipboard, closing the Xref, and pasting it back in.
You can reach directly into the Xref to select the objects you want to copy with the Copy Nested Objects command. It’s found in the Additional Tools pulldown of the Modify panel of the Ribbon.
Bonus Tip:
You also won’t need to open the Block Editor, as Copy Nested Objects works on Blocks, too.
NCOPY – Swipe Text and Objects From External References: Tuesday Tips With Brandon
9. Customize command aliases to better suit you with the Alias Editor
You can change the default command aliases in AutoCAD to match your preferred one. We’re all different, so if your mind says “C” means Copy instead of Circle, go ahead and change it.
In the Tools panel of the Express Tools, select Aliases Editor to add, remove, or edit command aliases. Click Edit and remap either “C” or Circle to match your preference.
In a similar fashion, you can add aliases to your favorites. For example, you might often use PDF Import. Just click the Add button, choose an alias, and map it to the PDFIMPORT command.
Bonus Tip:
Be the Office Rock Star With the AutoCAD Command Alias Editor: Tuesday Tips With Frank
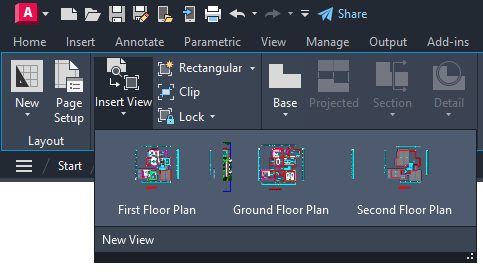
The Insert View tool is located in the Layout tab of the Ribbon. You can select the View you want and then drag it onto your layout using the Insert View tool.
When you drop the View into your Layout, it will automatically scale itself based on the Annotation Scale. You can also set the scale before dropping the View into your Layout or use the triangular scale grip when it is placed.
This method saves you the important step of locking the Viewport, as it does it automatically for you!
Bonus Tip:
Named Views – An Old Dog With New Tricks: Tuesday Tips With Frank
More Tuesday Tips
Check out our whole Tuesday Tips series for ideas on how to make AutoCAD work for you. Do you have any favorite AutoCAD tips? Tell us in the comments!