In this eduStreamTV 2026 session, James F. speaks with Judy Zuo from Kiloview about how NDI-powered AV over IP workflows are transforming educational video production, lecture capture, sports streaming, and campus-wide media distribution. The discussion highlights how schools and universities are using Kiloview solutions to create scalable, flexible, and low-latency production environments built around IP-based workflows.
Judy walks through Kiloview’s complete AV-over-IP ecosystem, including NDI encoders, decoders, media gateways, centralized network management tools, and scalable infrastructure solutions designed specifically for educational applications. These technologies allow schools to simplify deployment, improve workflow flexibility, and reduce the complexity often associated with traditional broadcast and AV systems.
The session also explores Kiloview’s cellular bonding technology, including the P3 and P3 Mini wireless bonding encoders. These portable solutions help schools and production teams maintain reliable live streams from remote locations, athletic fields, auditoriums, and campus events by combining multiple network connections for more stable video transmission.
Judy shares real-world education case studies featuring campus studios, auditoriums, and live sports production environments that demonstrate how educational institutions are using Kiloview technology to modernize media workflows while reducing infrastructure costs. By leveraging NDI and IP-based production systems, schools can support a wide range of live production and streaming applications with greater scalability and operational efficiency.
Watch this eduStreamTV 2026 session to learn how Kiloview is helping schools and universities build modern AV-over-IP production environments with NDI workflows, centralized video management, and cellular bonding technology for reliable live streaming and campus media production.
Make Eyes Pop on Camera with This Simple Lighting Trick
One tiny little detail that is often missed on lighting tutorials is the idea of positioning one of your lights to cause a little reflection in the subject’s eye.
One of the most obvious examples of this is when beauty vloggers use a ring light situated directly in front of them.
The reflection of that ring light in their eyes creates a very desirable effect adding beauty to those eyes.
In a three point lighting setup you can usually get that light right by positioning the key light then checking the image to see if it is there.
That effect by the way, is called a catch light or an eye light and is anotehr of those little touches that can really elevate the look of your subject.
Transform Your Simple Room Into an Interview-Style Set
This is another great video from Gabriel VIP this time looking at setting up an area to look professional given that the space you have is limited.
Very often you will see tutorials on the subject of setting up for an interview style video that on the surface looks great but when you try to apply in, it all falls to pieces.
The reason for that is that many of us do not have the luxury of being able to spread everything out in a large dedicated space.
In the end, by the time you have crammed everything in, you can barely fit yourself!
So here’s a more realistic look at the subject.
How to break clips into scenes in PowerDirector with Scene Detection
These days most of us have access to a bunch of storage space on our phones and cameras for shooting videos.
That wasn’t so much the case “back in the day” so we all had to consider to at least some degree, whether or not what we were going to shoot was something we would actually use.
Nowadays it’s a matter of shoot first regardless and we’ll sort it all out in our editing software later.
Personally I think that’s a good thing because it allows (forces?) the newcomer to review what was shot from an editing point of view rather than the original shooting point of view.
On the downside though this can become a rather tedious task involving scrubbing through seemingly endless footage most of which may end up being discarded.
Fortunately within PowerDirector at least there are a couple of tools available to the budding creator to assist in this task.
Those tools are the “Scene Detection” and “Precut” modules demonstrated in the video below.
How to Make Youtube Thumbnails with AI (In Depth Guide)
Now this is a use of A.I. I can really get onboard with because it treats the A.I aspect of the process as a tool and not the process itself.
One of the keys to success on YouTube, and there are sooo many, is the creation of compelling thumbnails.
If your thumbnails suck you will never get that click through which means your video will go nowhere.
If you talk to any successful YouTuber you will soon learn that behind the design of their thumbnails lies a whole bunch of research into many, many things.
Stuff like the expected audience, data on what that audience is responding to currently, possible audiences that they may not be aware of and on and on.
That kind of market research takes access to big data from the platform itself and a lot of work or… you could tap into A.I. to do it!
That’s very much what this tutorial is about plus a proven strategy for directing A.I. to make those thumbs for you.
The Real Reason Your Videos Don’t Get Views
This is another video for this week covering the importance of thumbnails as well as titles for YouTube videos.
It doesn’t really matter how many times YouTube serves up your content to users they think will be interested.
If the title isn’t appealing and the thumbnail isn’t attractive to them you will not get that click to start them watching.
You could have the most awesome video on YouTube but it will amount to nothing if no-one clicks to play.
Can This YouTube Channel Really Make $100,000 a Month?
Of course if you have spent any time at all trying to create and run a successful YouTube channel then you would have come across a bunch of people claiming outrageous earnings.
Some of them may be telling the truth, some of them… maybe not!
What I do know is that I have been watching this space for a long time now and there are certain individuals that have been around for a long time who are still being successful.
Those people are the ones that will openly acknowledge that although those big numbers can be real, there is work to be done before that can happen.
Derral Eves is one of those people and someone who I know for certain has the knowledge and experience to make those results happen.
In the (long!) video below he takes an existing channel and live, goes through what the owners would need to do to take them to that level.
Well worth watching if this is what you are wanting to achieve.
DaVinci Resolve 21 Quick Tip: Remove Silence FAST
Now that my wife is basically editing her own videos these days I have been reduced to the “color and audio processing” guy for her.
Trust me, I am not complaining!
The workflow is that I take the raw footage, normalize the audio, color correct then fine tune the audio all in DaVinci Resolve.
The only real problem at that point is that because that footage was recorded in 4K at 100mbps the files are still pretty big.
Eventually those files have to make it on to my wife’s computer and whilst not trying to be mean here, that thing is a cluttered mess!
For her, space is at a premium so I have to try to keep those files as small as I can.
One way I do that is by removing all the silences in the original file using that feature in Resolve.
Like most things in Resolve it is very controllable but you have to know what the settings are actually going to do.
Here’s a run through of the tool.
Free Animated Circles & Arrows – Daniel Batal
Recently Daniel Batal posted a #Short on YouTube showing how to use some inbuilt features in DaVinci Resolve to create animated circles and arrows.
While he was recording the #Short he of course created a few animated circles, arrows etc. cos’ that’s what he was doing!
Anyhoo a few of his followers asked is he could provide them with those assets he had created.
The link to the file is here: https://drive.google.com/file/d/1tOIrGJGNH8zgC3gJkvsk_ytyfgy89WXG/view?usp=sharing
Instructions for how to get them into Resolve are in the video.
Because it is Resolve you can save stuff like that for future use so he has posted them for anyone to download.
Key Takeaways
Use a light positioned to create a catch light in the eyes for better camera appeal.
Transform a limited space into a professional-looking interview set with effective positioning.
Leverage PowerDirector’s Scene Detection and Precut tools to streamline video editing.
Utilize AI to create compelling YouTube thumbnails that attract clicks and improve video visibility.
Download free animated circles and arrows for DaVinci Resolve to enhance your video projects.
When you look at a lot of the videos that well known creators produce and upload, they all look pretty slick from the outside.
Because of that, when you first start out for yourself, you tend to get the idea that they are these super smooth presentation experts that never screw up!
The truth is that they, like everyone else mess up lines and takes over and over and have no inherent ability that you and I lack.
What they do have is experience through practice, repetition and the ability to smoothly edit out mistakes, again through experience and practice!
So to get things back in perspective, especially if you are new, here’s a close look at what a YouTube presentation or tutorial video really looks like in the making.
AI Background Remover vs Green Screen – PowerDirector
Now that we have moved into the era of A.I. background removal it would seem that green screen footage is no longer needed.
It would be nice to think that way but in reality the effectiveness of one over the other is still going to be determined on a case by case basis.
Although A.I. is improving in leaps and bounds it still has trouble with things like hair lines or instances where the subject is not clearly distinct from the background.
The downside for green screen is that in most cases you really have to shoot your footage very well against a very evenly lit background otherwise you won’t get a good key.
That’s why for my money I still think the green screen in PowerDirector is one of the best around at the consumer level.
It allows you to select up to three shades of green from your background to get a very accurate key which greatly reduces the need (but does not eliminate!) for pro level lighting on that background.
Seedance 2.0 or VEO 3.1 Put to the Test
Recently the people at CyberLink posted a video showing the differences between various A.I. models for creating different assets inside their interface.
This week we have something similar from Filmora and this is a good thing.
When you have access to three or four different A.I. models to create an asset or do some kind of work for you but, they cost you credits you have to buy, it’s best if you know what is what.
Each A.I. model will give you results that are quite different and each one has strengths and weaknesses depending on the type of content you want it to create.
So here’s a comparison in Filmora for the Seedance 2.0 and the VEO 3.1 models for you to check out.
Unlock the secret to creating the viral Color Wheel Trend Effect
OK, take a deep breath and get ready!
This is a tutorial from the people at Filmora covering a specific task or effect as part of an ongoing series they seem to be creating.
Now the reason for the deep breath is because of the speed at which they pump the instructions at you, this is not presented at a slow or leisurely pace!
However in spite of that, it is a solid tutorial showing how to pull off a very popular effect right now.
Having said that it is important to bear in mind that to me, the effect achieved is not the end product of the tutorial.
The real value lies in the use of the tools and techniques available to you as an editor so that you can use them in your own way.
How to Write Video Descriptions for Any Platform
These days you have to optimize every single aspect of an uploaded video if you want to have it appear in search or get presented on YouTube to an audience.
The problem has always been that in the short term, spammy “gaming the system” type strategies often worked giving rise to the idea that doing those things was beneficial.
In almost every case of those strategies, the long term effect was that the algorithms caught up, and those videos or channels ended up being cast into the wilderness!
Video descriptions are one of the more obvious examples of this and have undergone quite the evolution over the years.
Getting them right takes an understanding of what the search engines actually want while at the same time making them appealing to humans.
This Movie Poster Moves – Fusion for Noobs!
I have probably said this a million times but if you are using DaVinci Resolve as your editing software and not using the Fusion Page, you are leaving way too much on the table.
For my money (actually it’s free!) the two pages in Resolve that raise it above the crowd are the Color Page and the Fusion Page.
The problem with both of them is that they are pro level tools and were designed with pro’s in mind, which is a complicated way of saying they are really complex at first sight!
However once you understand how they work and what they can do, it’s a whole new world.
In the video below Daniel Batal takes you step by step through quite a complex exercise in Fusion but had the humanity to explain exactly what he is doing and why as he goes.
It is by far one of the better tutorials I have seen for the Fusion Page even if the project itself is not really something you would be doing, well worth the time to watch.
How Sound Changed Editing Forever – The Birth of Cinematic Sound
This looks like it is going to be a pretty interesting series from the folks at Film Editing Pro.
They usually put out very high quality content as far as tutorial and instructional videos go so I am looking forward to this one.
In this first video they cover historically the beginnings of cinematic sound which is something we all take for granted these days.
Best Times to Post Videos on Social Media in 2026
Given the current levels of competition for when it comes to posting to YouTube, Instagram or whatever, you really need to know the fine details.
Of course there are the usual suspects like Titles and descriptions but the bottom line is that if you can leverage an advantage then you need to do it!
So that brings us to timing your posts to maximize the impact that post has and to make sure it has the best possible chance for distribution.
How Lighting Changes Emotion in Film (Interview vs Cinematic vs Horror)
This is a very basic but at least easy to follow exercise in lighting.
I thought it was useful to add because it shows the way different lighting setups directed at faces can dramatically change the mood being conveyed.
I see a lot of videos online where I just know the creator was going for some kind of beauty/seductive look on the subject and ended up making them look like an axe murderer!
Key Takeaways
Creators often face challenges while filming, as they edit out mistakes to present polished videos.
AI background removal technology competes with green screen, but effective use depends on specific scenarios.
Filmora compares A.I. models like Seedance 2.0 and VEO 3.1 to help users choose the right tool for their needs.
Lighting dramatically influences the mood in videos, showcasing how different setups can affect the perception of subjects.
Optimizing video descriptions and posting times improves visibility and engagement on platforms like YouTube and Instagram.
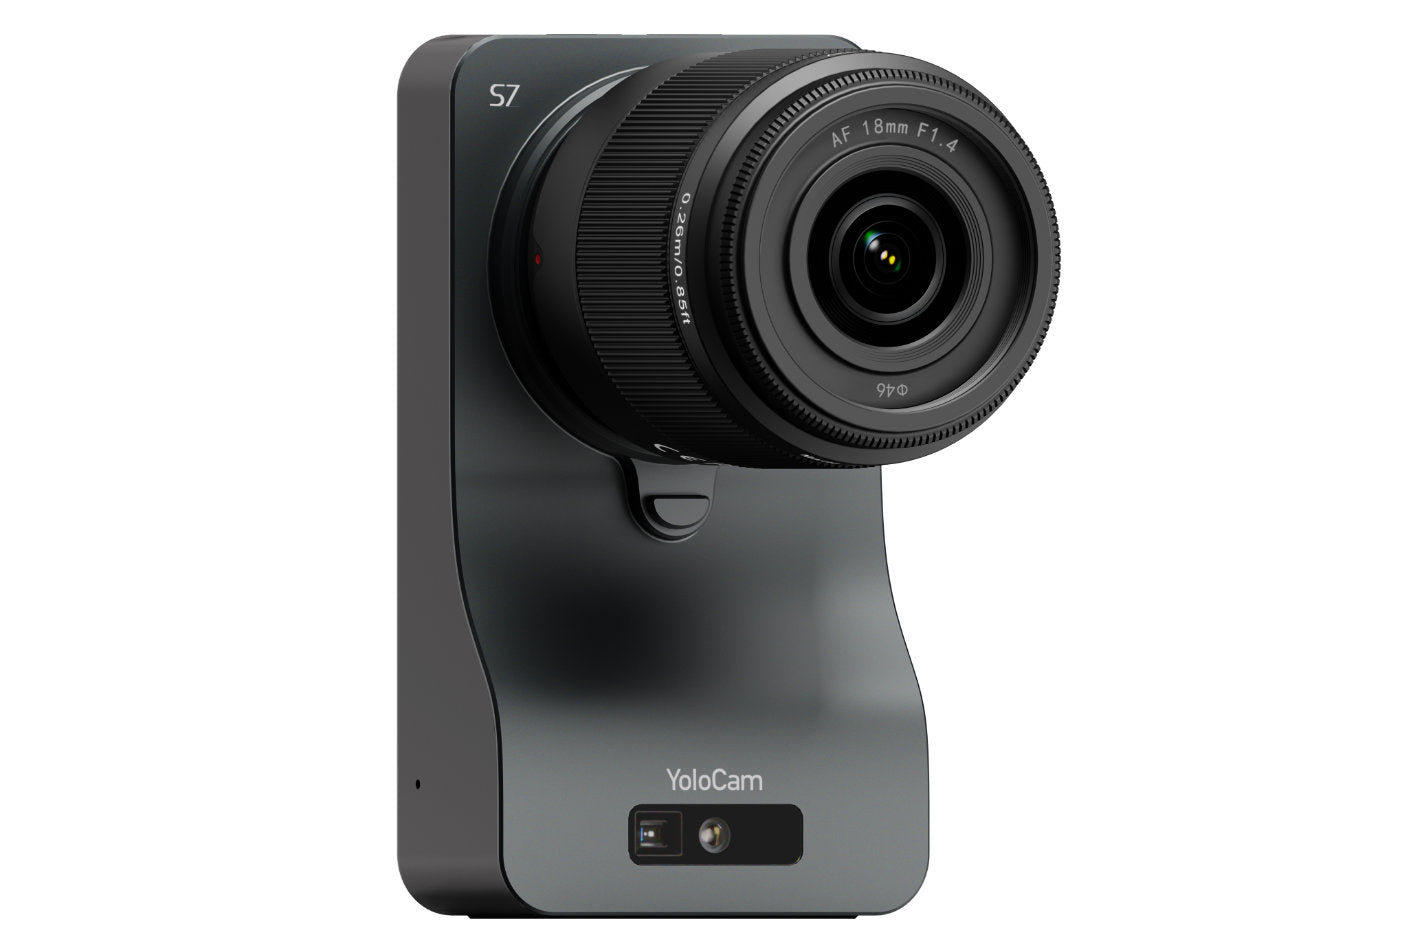
In this article by Jose Antunes for ProVideo Coalition, YoloLiv announces its new 18mm F1.4 Micro Four Thirds (MFT) lens, purpose-built for the YoloCam S7 streaming camera. While the S7 impressed users with its 4K60 video, strong image quality, and interchangeable lens design, many creators struggled to find the right lens. This new release solves that issue by offering a dedicated, ready-to-use option that simplifies setup and enhances performance.
Developed in response to user feedback, the lens is part of YoloLiv’s broader effort to create a complete streaming ecosystem. Following the success of the YoloCam S3 webcam, the company designed this lens to fully optimize the S7’s capabilities. With a fast F1.4 aperture, users can achieve professional-looking visuals, including smooth background blur and improved low-light performance.
The lens features a compact, lightweight design with a 7-element optical structure, including aspherical and low-dispersion elements, plus nano coatings to reduce flare and ghosting. It supports both autofocus and manual focus, offers an aperture range from F1.4 to F22, and includes a stepper motor for smooth, precise focusing.
Read the full article by Jose Antunes for ProVideo Coalition HERE
Learn more about YoloLiv YoloCam S7 and MFT Lens HERE
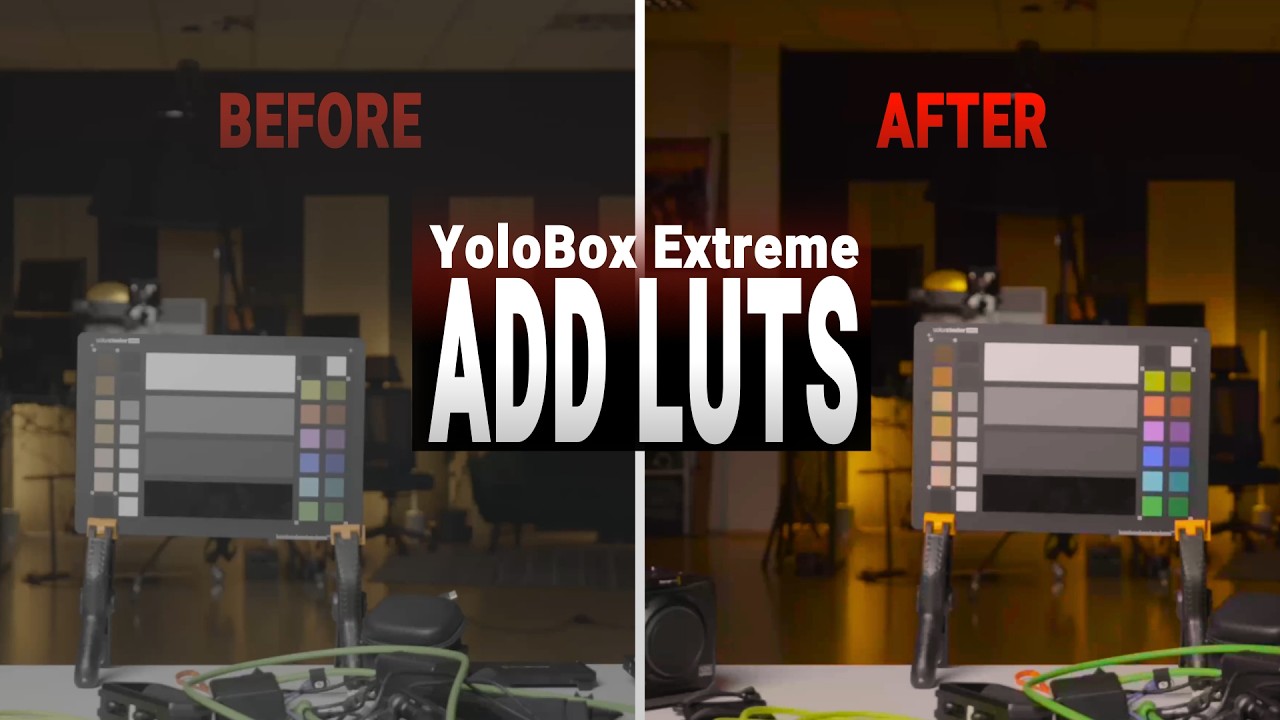
Can you add LUTs to the YoloBox Extreme? Yes—and it’s easier than you might think.
In this video, PhotoJoseph demonstrates how to load a custom .cube LUT file, adjust its intensity, and apply real-time color grading directly to your live camera feed.
Whether you’re shooting in V-Log, S-Log, or another flat profile, the YoloBox Extreme lets you enhance your image on the fly—no external monitor or software required.
Watch the demo to see how simple it is to upgrade your live production with built-in LUT support.
A few years back now I started shooting videos for my wife who wanted to start her own YouTube channel.
Up until that point I was mainly involved in editing videos and as far as shooting them went, it was strictly “point and shoot” family and friends stuff for me!
So the style of video that I was going to be learning and shooting for YouTube was a single person in front of the camera in maybe medium shot or medium close up.
To light something like that all the advice I came across was to just slap up a three point arrangement and we are all good to go.
The reality proved to be something entirely different!
Available lights, how much space is there, what are you shooting with, what is the focal length of the camera lens, how can you position the person in that available space to light them… I mean the variables seemed to just go on and on!
Each one of those variables meant some kind of compromise in some other aspect of the overall activity.
So in light of that I came across this video from Gabriel VIP that covers this exact subject in great detail taking all of those variables into consideration.
3 Steps to Turn Any Idea into a Story
When it comes to anyone achieving any sort of success in the world of online video I tend to see one set of factors pushed while one simple one falls away.
What gets pushed are the technical aspects of optimizing videos, recording them and uploading a certain way, understanding search algorithms and the list goes on… and on!
The one that gets missed is one of the most basic points of video creation and that point is story.
We humans just loves us some story and if you give us story, we will wait around till the end to find out what happens.
I’m sure I am not alone in saying that I have watched some pretty awful movies in my day and while watching them have said to myself and others, man, this is a really crappy movie!
Yet despite that… I watched until the end because once I am following the story, I have to see it through to find out what happens!
And even if the ending was just as crappy, I still feel correct in having persevered through to resolution.
So in light of that here’s what I think is a very good walkthrough on working out what the story is for any video.
How to Crop a 16×9 Video and Save the Output in a 9×16 Format
Converting a 16:9 (landscape) video to a 9:16 (portrait) video is a relatively simple process these days but there are a few things you need to keep in mind.
First up is that often when you add 16:9 footage to the timeline, your editing software assumes you want to operate at 16:9 from start to finish.
So you have to let it know that’s not what you are doing!
The other thing to keep in mind is that often as you go from 16:9 to 9:16, when you crop the video you may also have to zoom in on it to fill the new frame size.
That zoom-in may be minimal with no real effect on your footage or it may be extreme resulting in loss of quality (resolution).
It always helps to record your video if you can at the highest possible resolution available to you in order to preserve quality.
As an example I shoot my wife’s videos at 4K widescreen all the time on the understanding that at some point I may re-use that footage in a short form 9:16 video..
Often she will want portions of those long form videos cut into pieces for YouTube shorts, Instagram Stories etc.
In that case I set up projects that are at 1080p resolution in 9:16 and using the 4k footage I can zoom in and crop easily with no real loss of quality.
How to Use Speed Ramp Like a Pro (Filmora Editing Tips)
Last week I added a tutorial from the guys at Movavi showing a few tips on how to speed ramp effectively.
This week the folks at Wondershare posted their own speed ramping tutorial and have added what I think are some great points to the conversation.
The key point they are pushing is that if your footage has not been shot with speed changes in mind, you may not get the results you imagined!
For example if you shoot at 30fps and want to slow the footage down, the motion is going to get very blurry in the process.
On the other hand if you are shooting with the intention of speeding the motion up, then your camera movement and even the movement in the frame has to be really smooth.
Any sudden movements or jerkiness within the shot will only be accentuated in fast motion.
Check out the video for some well considered tips related to speed ramping.
How to Cut a Video Simply
For anyone just starting out in the world of video editing, even the simplest action can seem like a bit of a nightmare!
Let’s face it, all video editing software user interfaces are unbelievably confusing in the beginning because of one key reason.
Video editing software can not mimic anything familiar to the new user from the real world.
Microsoft Word looks like a piece of paper in a typewriter, the drawing tools in Canva look like a sheet of paper with some pens and stuff.
There is nothing like that for video editing so… it’s all a bit confusing!
In the video below from the folks at Movavi you can see how to at least make those first basic cuts without chopping everything to pieces, losing it all (and your mind!) and starting again!
The (Real) Secret to Getting Beautiful iPhone Cinematography
Whether you want to go with Theodore Roosevelt saying, “Comparison is the thief of joy” or Mark Twain’s, “Comparison is the death of joy” the result is always the same.
And trust me when I say no-one understands that concept better than your average marketing guy in just about any company anywhere!
The reason I say this is because of the video below created by Zac Ramelan who has been producing videos at a pro level for years now.
In that video he points out that yes, you can create a fully cinematic, Hollywood level video with an iPhone.
All you really need on top of that is a million dollar budget and you are good to go!
When you compare those results with an iPhone to your own results I think we can safely say that any joy has made its way down the toilet!
So in the video he strips away that million dollar budget to make his own short movie but in the process delivers the real lesson.
The phone he uses to record the video is not the make/break point of the process.
The real driver of that process is the technical skill and creative ideas the person making the video brings to the table.
DaVinci Resolve 21 Quick Tip: Fix Your Audio Levels Fast
Over the past year or so I have been using various A.I driven tools to correct or enhance the audio on some of the projects I have been working on.
One thing that I have noticed very clearly is that as far as most of those solutions go, the better the quality of what you input, the better the output will be.
For example I have one client who sometimes finds himself recording video well away from any studio scenario.
Usually that means audio recorded though the onboard microphone of his smartphone and on top of that he is often either outside or in a noisy environment somewhere.
If I feed that audio into an A.I. tool like Adobe Podcast, I will get pretty decent results.
However, if I clean that audio up just a little in DaVinci Resolve or similar by taking out some background noise, adjusting levels, maybe doing a little Eq work before I send it off, the results are way, way better!
Here’s a little video from Jason Yadlovski showing how to clean up and level an audio track fast.
DaVinci Resolve 21 Can Now Animate Anything to Audio (No Plugins)
This is a preview of one of the features inside the new version of DaVinci Resolve to be released… soon?
However the official “latest version” is still Resolve 20.
Black Magic have generally followed this release path where they create the new version, test it, release as a beta to the public for a few months, go back to the drawing board for bug fixes then finally release the full version.
Anyhoo, a few brave souls (not me!) have installed the beta and are posting their experiences online.
Here’s one from Jason Yadlovski showing one of the new features.
Amazing Effects in Classic Films – How Did They Pull It Off?
This episode 12 in a regular series (irregularly posted!) by the folks at Film Riot.
These days it is becoming more and more a matter of being able to write a precise SFX prompt into an A.I. video model to create astounding SFX.
So I like to go back in time to when dinosaurs roamed the earth and the special effects department did not have things like A.I or even CGI!
A time when some really smart thinkers used a comprehensive knowledge of their craft to think up effects techniques all done with their human brains!
Key Takeaways
This week’s Friday Roundup covers various aspects of creating and editing videos for YouTube, starting with a lighting setup masterclass.
It emphasizes the importance of storytelling in video creation, suggesting that a compelling story keeps viewers engaged.
Readers can learn how to convert 16:9 videos to 9:16 format while maintaining quality by using high-resolution footage.
Additionally, the article discusses effective speed ramping techniques and basic cutting methods for beginners.
Finally, it highlights new features in DaVinci Resolve 21 for audio animation and quick audio level adjustments.
When I first started shooting footage for my wife for her YouTube channel I really didn’t know too much about shooting in that specific situation.
I was always more an editing guy than a video shooting guy!
So when I began I figured out some of the things I thought I needed and slapped it all together and off we went.
As time passed I learned some hard (and very expensive!) lessons.
Right now I have a great setup PLUS, a whole bunch of stuff I didn’t really need!
I cannot stress the value enough of having a dedicated space already set up for shooting YouTube talking head style videos.
So if you are creating this kind of content then the video below is an excellent walk-through of what you really need and how to do it for very little money.
Create a Talking Avatar That Sounds Just Like You
PowerDirector have recently introduced a new capability into their already impressive A.I. driven tools.
This one is especially good for anyone wanting to make videos that do not include their own face… or any face at all for that matter!
The feature combines the ability of making avatars or still images turn into videos with the ability to clone you own voice.
The result is you can add some text, choose and avatar and then the newly created character will speak for you.
How to Speed Up or Slow Down Video
One of the easier ways to pace your video edits so as to reflect what is happening is by speeding up or slowing down the footage.
In most video editors this is a pretty easy operation and you can see it in action in the Movavi video editor video below.
However as you watch that video it is important to note a few of the pitfalls you can run into when adjusting the speed of any clip.
Like most things in the video editing process, speed adjustments are not a one size fits all proposition.
Dull Spring Footage? Try This Color Grading Technique
First up, let’s be clear about this tutorial from the folks at Filmora.
Sure it says it’s about “Spring Footage” but in reality it is a very good walk-through of how to color correct footage that seems somewhat dull straight out of the camera.
It covers two recent addition or improvements in their color tools which are the HDR color adjustments and using the color curves.
Both of these tools are borderline pro features but like most things, they are totally useless unless you know how to use them! So this is how to use them.
Back in the day when I first started my video editing journey and dinosaurs roamed the earth the prospect of creating a travel map was quite daunting!
I am not going to go into how it was done here, but let me just say it took a few hours and the result were less than impressive!
These days it is a whole different story and if you check out this video from Filmora, the results are pretty amazing.
DaVinci Resolve 21! What’s New?
There has been quite a lot of noise this week about the release of DaVinci Resolve 21 and all the new features.
Just to keep things real here, bear in mind that this is not an actual update yet.
The is the pre-release of version 21 into beta testing to the general public.
This allows both free and studio users of the program to have a play with the new one while Black Magic can gather usage and bug information from a far wider dataset.
If you are running version 20 right now and check for updates through the user interface, you will be told you are on the latest version… and that’s because you are!
So in light of that here’s a taste of some of the features and upgrades that are inside this beta release.
Most interesting for me is the new Photo Page which now provides a dedicated space for dealing with images both individually and in groups.
A lot of people have been using Resolve as a photo editor because of the awesome tools available in the Color Page.
This new dedicated Photo Page I believe, is just the beginning because the folks at Black Magic don’t tend to half-ass stuff like this.
I think over the next few months the capabilities of that new page will start to take shape fully.
How to Stay Organized As A Creator
When the average person starts off with creating videos it is usually common for their projects to be very simple.
Most often it is a single footage file shot pretty much in one session, some music, some still images and a voice track.
However as time passes those simple projects begin to become more and more complex.
They start adding b-roll, footage from different sources, multiple music sources, recorded voice overs and the list goes on.
Once that starts to happen things tend to get very complicated very fast!
It is at that time that they either get frustrated with the process and lose interest or they get organized and keep going.
From my observation there is generally no middle ground there!
Everyone has their own way of getting organized but what I have found is that the best way to do it is to copy someone who has a track record working with complex projects.
Casey is someone like that so here’s how he does it.
Camera Movements for Beginners
Over the past year or so there have been some pretty impressive advancements in the field of footage stabilization.
Many cameras, especially action cam style ones have some very impressive stabilization built in while at the same time, editing software has also been catching up.
The result of this has been a greater ability for the average person to engage in both “run and gun” style shooting as well as adding camera movement without the need for expensive equipment.
So now that we can all move around a bit more, here’s a tutorial on some camera movement basics to get you started!
Why Wide Shots Feel So Cinematic
If you take a look around this website you will probably notice a few articles on the types of shot used in making videos and how they work.
There’s this one here:
and another one here:
Whilst both of those articles are absolute works of genius (by me) they are essentially at an introductory level.
For a deep dive into the Wide Shot, take a look at the video below for a meatier take on it.
Key Takeaways
This week a comprehensive guide for creating a $100 cinematic YouTube studio setup for talking head videos.
Introducing a new feature in PowerDirector that allows users to create talking avatars that can mimic their voice.
Speed up or slow down video footage easily whilst remaining aware of potential pitfalls during adjustments.
New features in DaVinci Resolve 21, including a dedicated Photo Page for better image management.
Emphasizing the importance of staying organized as a creator, especially as projects become more complex.
One of the questions that may come up for you when you move up to a dedicated video shooting camera like a DSLR or an MILC is that of lenses.
There used to be an assumption not too long ago that a Prime Lens (fixed focal length) was always going to be better than a Zoom Lens (variable focal length).
At that time it was true because making zoom lenses that were technically accurate was incredibly difficult both in design and manufacturing.
These days with modern technology it is a different story but like most things, it’s not all black and white!
For example I have a Sony ZV-E10 which came with a kit lens that ranges from 16mm to 50mm focal lengths and across that range it can produce very good results… BUT!
Because it is a kit lens and has to be produced cheaper, the maximum aperture (f3.5) can only be achieved at the 16mm focal length setting.
As soon as I zoom into say 23mm the aperture automatically adjusts to f4.5 or f5.0 and I cannot increase it meaning I have to add more light or increase the ISO.
Additionally if I shoot at certain focal lengths I get very slight aberration which is noticeable if floor and wall joins are visible at the edge of the frame.
As I say, it is not a bad lens but it is not a great one either!
So long story short, that pretty much sums up the whole zoom lens/fixed lens debate… it still comes down to what you are will to pay for!
Here’s a more considered take on the whole thing.
How Lens Focal Length Affects Your Storytelling
One of the first “tears before bedtime” moments I ran into once I armed myself with a fancy schmancy MILC camera for shooting was the subject of lenses.
When you are shooting with a smartphone that’s a subject never comes up!
Suddenly I had to wade my way through focal lengths, fields of view, crop factors, sensor sizes and all manner of technical wizzbangery!
It took a while but at least now I think I have at least some level of knowledge on the whole thing but would dare trying to explain it to another human!
So for the safety of everyone else, here’s a reasonably straightforward explanation of the whole lens shebang.
What’s New in Filmora 15.3.10 – Hue vs Saturation, AI Templates & More
So of course there is a recent update to Filmora because there is always a new update to Filmora!
Two things really stand out in this one which is covered in detail in the video below.
Those two things are the new color controls and the improved Portrait Cutout tool.
The color tools they have added are another step towards Filmora moving closer and closer towards giving fully pro color tools a run for their money.
Adding Hue vs. Saturation curves is a real game changer but the icing on the cake is the inclusion of a selection tool in the package.
That means you can select an exact color or color range and adjust only that in the tool, very cool!
The other one is the refinement of the Portrait Cutout tool which in itself is all well and good but!
It also shows that Filmora are still developing and working on their existing A.I toolset rather then just throwing them out their for marketing purposes then moving on to the next.
PowerDirector Single & Multi Trim Tutorial – Video Editing Basics
This is the latest in a series of revamped into tutorials CyberLink have been creating for PowerDirector over the past year.
Whilst these are all excellent videos the one hurdle you may (or may not) have to get over is the A.I. generated narration!
To me it’s kind cheesy but despite that the tutorials are solid!
This one covers the single and multi trim modules for cutting clips to your requirements.
I personally use these tools for rough cuts before I add clips to the timeline then use the regular methods for making final fine adjustments.
How to Copy and Paste Keyframe Attributes in PowerDirector
PowerDirector like most advanced video editing software, allows for you to copy and paste certain attributes from one clip or asset to another on the timeline.
This can be a great time saver under most circumstances but you really need to have a decent understanding of how it works and what some of the pitfalls may be.
As I said, it can be a great time saver but it is not strictly speaking a one size fits all action.
Here’s a look at it is action.
Your Video Files Are a Mess — Here’s the Fix
One of the key lessons I learned very early in my video editing journey was from a good friend of mine who was a pro video editor.
That lesson was that before you touched anything with your editing or added anything to the timeline you must always get your assets organized.
In fact at a pro Hollywood level the organization of assets including footage, audio, images and everything else being added is an exercise taking weeks not hours!
So even if your projects are quite simple, getting organized is a great investment in your own sanity!
The problem is no-one really tells you HOW to get organized, just that you “should” get organized.
So here’s a video from the guys at Movavi giving some pretty solid suggestions as to how you can do that.
Buying a Microphone for Filmmaking in 2026 – Buyers Guide
When I first started out shooting videos back in the day when dinosaurs roamed the earth, things in the audio department were pretty dire!
None of the known video editing software had any real ability to deal with audio in any meaningful way other than to increase or decrease the volume and even then there was no keyframing.
On top of that the selection of microphones ranged from affordable garbage to incredibly expensive pro level stuff.
There were absolutely no in between or mid range selections to be made!
These days it is a different story especially when it comes to microphones where you can choose from a vast range of capabilities and applications.
In fact right now the only real problem is working out which one is right for you.
I wrote a full article on the subject that you can read right HERE but in the meantime the video below covers the current state of things pretty well.
And just in case you were wondering, the microphone I am mainly using and have been for over a year now is the Hollyland Lark M2.
Film Lighting for Beginners
This is a continuation of the series from Bluelight Media that I have been posting in the Friday Roundup for the past few weeks.
The video this week covers lighting for beginners and this one more than the others tends to focus a little further towards the fully pro end of the spectrum.
In that sense a lot of the information is not necessarily directly applicable to our end of the market but the basics of lighting remain constant nonetheless.
My take on tutorials like this is that I may not necessarily use the techniques in my videos but I will certainly use the information to improve my own understanding and results.
A Beginner’s Guide to Mastering Keyframing in DaVinci Resolve – YouTube
When it comes to modern video editing software probably one of the most useful and powerful features that was introduced was that of keyframing.
This feature alone not only added a whole range of post production capabilities to any editors bag of tricks but also reduced the workload in doing so immeasurably.
Of course when it comes to keyframing and DaVinci Resolve, keyframing takes on a whole new level!
I use keyframing often in Resolve and I know I haven’t even scratched the surface in what I actually could do so here’s a video from Daniel Batal on the subject.
This is a deep, deep dive into keyframing and in particular how it now operates given recent updates to the user interface.
Key Takeaways
The article explores the pros and cons of Zoom vs. Prime lenses for video shooting, noting modern technology has changed previous assumptions.
It discusses the impact of lens focal length on storytelling and technical knowledge needed for video production.
Filmora 15.3.10 introduces new color controls and an improved Portrait Cutout tool, enhancing its AI capabilities.
PowerDirector offers tutorials on keyframe attributes and trimming clips, emphasizing their practical applications in editing.
The article covers tips for organizing video files, selecting microphones, and basic lighting techniques for beginners.
Discover more from The DIY Video Editor
Subscribe to get the latest posts sent to your email.
Lately, I’ve felt like doing just about everything in my business…
except making YouTube videos.
I know, I know.
That sounds a little ridiculous coming from someone who literally teaches people how to build their business with YouTube.
But…
creative ruts happen to everyone even the people who are supposed to have it all figured out.
And honestly?
I don’t think it’s always a bad thing.
Sometimes when the motivation to create disappears, it’s actually a signal to step back, rethink things, or focus on other parts of your business that need attention.
The pressure to constantly produce content can make it feel like something’s wrong if you’re not in that “create, create, create” mode all the time.
Today I’m sharing about creative ruts, business distractions, and why consistency isn’t always easy…
even for a video strategist.
We’ll dive into my latest projects, why I love simple talking-head videos, and how I’m automating my business for more freedom.
If you need a boost to get back on camera, this episode is for you!
VIDEO: What I’ve Been Doing Besides Making Videos
Some product links in this post are affiliate links, and I will be compensated when you purchase by clicking our links. Read my disclosure policy here.
Why It’s Normal to Hit a Creative Wall on YouTube
Even if creating content feels simple on the surface, it’s actually doing two very different things at once.
On one hand, you’re being creative, coming up with ideas, communicating clearly, and connecting with your audience. On the other hand, your content has to be strategic, helpful, and aligned with your business goals.
That tension is where the resistance comes from.
I started to realize that what I was experiencing wasn’t laziness or inconsistency… it was more like creative friction. The kind that happens when your brain is trying to be both expressive and productive at the same time.
And instead of pushing through it with content that wouldn’t be my best work, I allowed myself to pause and shift my focus.
The Simple YouTube Experiment That Still Works in 2026
When I first started this video podcast, it wasn’t because I had a perfect strategy. It was actually an experiment.
At the time, YouTube was dominated by fast-paced, highly edited videos: constant movement, sound effects, text flying across the screen. And while that style works, I started wondering what would happen if I did the opposite.
What if I just hit record and talked?
No overproduction. No complicated editing. Just clear ideas, shared consistently.
What I discovered surprised me. Not only did those videos perform well, but they also felt sustainable. I didn’t feel burnt out trying to keep up with trends or over-edit every piece of content. I could simply show up, share value, and build trust with my audience.
That approach has worked strategically, algorithmically, and most importantly, it’s something I actually enjoy doing.
But even with a simple system like that, there are still seasons where creating content feels harder than it should.
For a long time, creating videos felt easy. I would choose a topic, outline what I wanted to say, and press record. It became part of my routine.
Then something shifted.
Week after week, I found myself asking, Do I really have to record a video right now? And before I knew it, I had skipped multiple weeks of content.
What made it even more frustrating was that I wasn’t out of ideas. I had a full list of topics ready to-go titles, research, even thumbnails. Everything was prepared… except my willingness to actually record.
That’s when I realized this wasn’t about productivity. It was something deeper.
Creative work requires both expression and purpose. You’re not just creating for fun, you’re creating to serve, to teach, to grow a business. And sometimes, those two sides don’t flow together easily.
That tension is where resistance shows up.
And instead of forcing my way through it, I decided to lean into a different kind of productivity.
What I’ve Been Building Behind the Scenes
Even though I haven’t been consistently posting YouTube videos, I’ve been fully invested in other areas of my business that directly support long-term growth.
Hosting the All In On YouTube 2026 Workshop
One of the biggest things I focused on recently was hosting my All In On YouTube 2026 workshop, which turned out to be one of the most energizing experiences I’ve had in a long time.
It wasn’t just about teaching it was about helping people take immediate action. And what I loved most was seeing how quickly momentum built. Creators were updating thumbnails, improving their content, and getting new views on videos they had already published.
That experience reinforced something important: growth doesn’t always come from creating more content. Sometimes it comes from improving what already exists.
The workshop also brought new members into the Video Brand Academy community, which created a ripple effect of energy, ideas, and progress inside the community.
Another area I’ve been spending time on is catching up with updates in Descript, which I use regularly for editing and tutorials.
The challenge isn’t using the tool; it’s how quickly it evolves.
There’s this quiet hesitation that creeps in when you create tutorials in a fast-changing environment. You start to wonder if what you’re teaching today will still be accurate tomorrow.
That feeling can slow you down more than you expect. But it’s also a reminder that perfection isn’t the goal. Progress is.
Being a creator means adapting, even when things aren’t perfectly stable.
Starting a Second Channel for Creative Freedom
I also started a second YouTube channel called Bots Mean Business, focused on AI.
This channel isn’t strategic in the traditional sense. It’s not carefully planned or optimized. It’s simply a space where I can explore ideas that excite me.
And that excitement matters more than you might think.
Even though the channel is small, it’s given me a creative outlet that feels fun again. It’s reminded me what it’s like to create without pressure, which is something every content creator needs from time to time.
Building the Video Brand Toolkit App
One of the most exciting things I’ve been working on is building an app using AI tools, specifically through Mind Pal and Base 44.
This app, called Video Brand Toolkit, houses custom workflows and chatbots that I’ve created to help with things like:
Writing YouTube descriptions
Generating video titles
Structuring content ideas
Creating scripts and funnels
The difference now is that everything is saved and personalized. Instead of starting from scratch every time, users can return to their workflows and continue where they left off.
This is something I created specifically for members inside Video Brand Academy, and it’s one of the biggest behind-the-scenes projects I’ve worked on lately.
Rebuilding My Email Marketing System
If there’s one system that has continued to support my business, even when I’m not posting consistently, it’s my email list.
I use Kit (formerly ConvertKit) to run an automated email system that delivers content to subscribers over time. Recently, I completely reworked this system to make it more effective and more aligned with how I create content now.
Instead of relying on writing new emails every week, I’ve built an evergreen system that continues to nurture my audience automatically.
This is what allows my business to keep moving, even during seasons where content creation slows down.
It’s also a reminder that YouTube is powerful for visibility, but your email list is what creates stability.
What This Means for You as a Creator
If you’ve been feeling like you’re falling behind because you’re not posting consistently, I want you to hear this clearly:
You’re not failing. You might just be in a different phase of growth.
There are seasons where you’re creating. And there are seasons where you’re building.
Both matter.
Here’s what I want you to take away:
Your strategy should support long-term sustainability, not just short-term output
You don’t have to force content when you’re not in the right headspace
Behind-the-scenes work is still business growth
How Video Brand Academy Helps You Stay Consistent (Without Burning Out)
Everything I’ve been building—whether it’s workshops, tools, or systems feeds into Video Brand Academy.
Inside, we focus on helping you grow your YouTube channel in a way that actually supports your business, not overwhelms it.
That includes:
Weekly live coaching calls
Personalized feedback on your channel
Strategic guidance on what to create next
Support in turning your content into leads and sales
It’s not just about making videos. It’s about building a system that works even when you don’t feel like hitting record.
If you’ve been in a season where you don’t feel like making YouTube videos, take that as a signal not of failure, but of transition.
For me, this season has been about building, refining, and exploring new ideas that will ultimately make my content stronger.
And now, coming back to YouTube feels exciting again.
So instead of forcing yourself to create when it feels heavy, ask yourself what your business actually needs right now. You might find that the work you’re doing behind the scenes is just as valuable as the videos you’re not posting.
And when you’re ready to hit record again, you’ll show up with more clarity, more confidence, and a strategy that actually supports you.
If you want help building that kind of strategy, I’d love to support you inside Video Brand Academy.
If you have an online business with a course, program, or any other kind of offer, and you’re not currently generating consistent sales on autopilot, I’d like to introduce you to the hands-off YouTube funnel that has made me over $20k on a $147 course! That way, you too can make consistent sales of your offer, with the beauty and simplicity of organic, evergreen traffic from YouTube! Start here with my free “AIT Method” training.
The TriCaster Mini X with Control Surface Bundle is a compact, all-in-one live production solution that lets creators produce professional-quality video from anywhere. Supporting sources from smartphones to 4K cameras, it delivers powerful software-driven workflows with studio-style control in a portable, easy-to-use system.
$10,595.00 reg. $9,995.00 SPECIAL Limited Time Only!
A complete turnkey hardware & software system for streaming
4 HDMI inputs & 8 x IP video inputs via NDI
4K60 production capabilities
NDI network connectivity for flexible AV over IP workflows
Award winning TriCaster software
Viz Flowics for professional graphics
The Vizrt Advantage
Accessibility Mini X gives producers everything they need right at their desk—switch, stream, record, add graphics, use virtual sets, and more. Professional live video production made simple for anyone with a story to tell.
Flexibility From cameras to microphones, off-the-shelf HDMI devices connect directly to the powerful Mini X in minutes to create professional level productions – without having to purchase any new equipment.
Scalability Built with NDI at its core, the Mini X is an easy to use, yet scalable solution that can be simplified or expanded, as necessary – even by using a Viz Connect Solo Converter – offering limitless possibilities.
Ready for Tomorrow’s Production Needs, Today
Live Link Live Link allows users to render web pages directly into the TriCaster and pull any web page elements into a production without the need for a 3rd party application. From graphics or images on a web page to videos from your organization’s internal training platforms
All-in-One The TriCaster Mini X continues the all-in-one desktop form factor of the TriCaster Mini with increased power and capabilities, including access to 8 external sources with 4 integrated HDMI inputs and supporting modern resolutions up to 4Kp30.
Social Media Integration Share live and on-demand content directly to Facebook, LinkedIn, Twitter, Vimeo, YouTube, and more—complete with comments and hashtags. With integrated DataLink™, pull social posts and photos into on-screen graphics for a fully interactive experience.