Built-in Agent Skills Bring .NET and Azure Expertise into Visual Studio


Visual Studio now includes built-in Agent Skills, created by experts from the .NET and Azure teams, to help you better customize your agentic workflow and complete development tasks more efficiently, starting with the 18.8 Release. Agent Skills are reusable capabilities that enable your agent to perform structured tasks more reliably (to learn more about what are Agent Skills, see this previous post).

We’ve heard that getting started with skills can feel unclear, especially when deciding which ones to use and how to apply them. To simplify this experience, we’ve introduced a set of built-in skills for common .NET and Azure scenarios, so you can immediately benefit from them in your workflow.

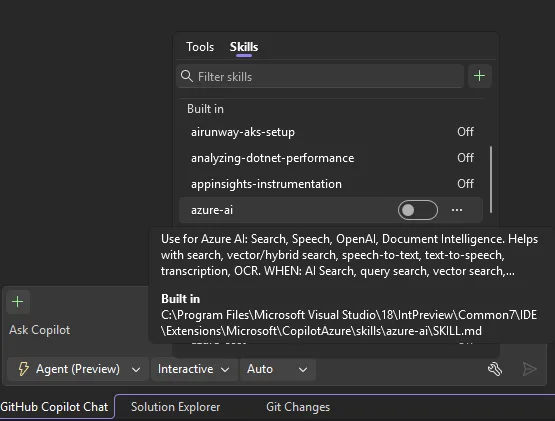
You can find these skills in the Built-in category in the tool picker. Hover over each skill to view its description and path, or use the three-dot menu to open the full skill or its folder location. These skills will only appear when the corresponding .NET and Azure development workloads are installed in Visual Studio.
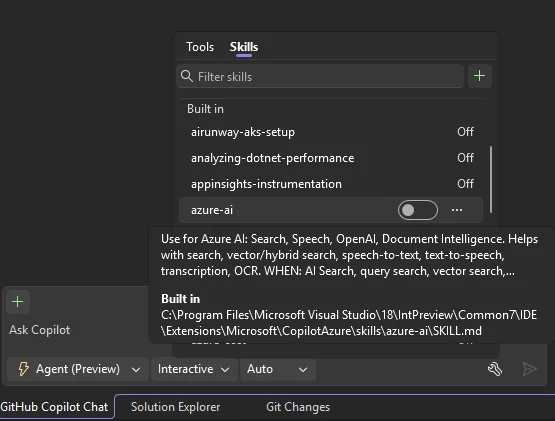
From tool picker pop up, showing the Skills tab which includes a built-in category of skills. The cursor is hovered over the "azure-ai" skill which displays a tool tip that includes the description and path of this skill.

Currently, built-in skills are off by default, so you can review and enable only the ones that suit your tasks. We are actively evaluating the effectiveness and cost of enabling these skills by default. As we transition into the new usage-based billing model for Copilot, we want to make sure every token you spend is meaningful and are tracking efficacy through a dashboard. We will turn on the skills when we find evidence that these skills would improve your agent performance.
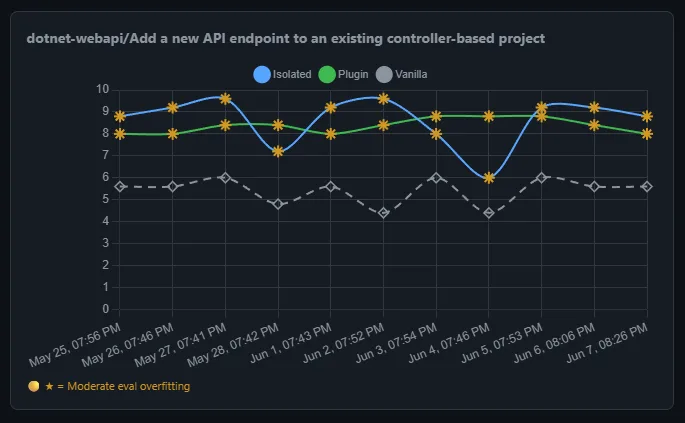
A chart displaying the evaluation result of dotnet-webapi skill.

If you want to learn more about Agent skills and built-in skills in Visual Studio through live demos, please watch our VS Live Toolbox show featuring this topic!

.NET Skills

The dotnet/skills provides skills that help agents be more successful no matter what type of .NET app you are working to develop, taking you from scaffolding new applications to adding new features, to diagnosing issues with existing applications, whether you are working in ASP.NET Core or MAUI or developing AI-based applications.

Included with Visual Studio, we are first providing you with dotnet-webapi and analyzing-dotnet-performance.

1. Get more from your API development

When you are working with ASP.NET Core HTTP APIs, the dotnet-webapi skill guides creation and modification of endpoints with correct HTTP semantics, OpenAPI metadata, and error handling. This helps you get clean, modern .NET code from the agent on the first pass.

Try it: “Add an endpoint to the API to handle moving the entries from current to archived. Include proper error handling.”

2. Review the performance of your application

For every .NET developer, performance of the application you’re building is extremely important. With the analyziing-dotnet-performance skill, agents can more easily scan .NET code for ~50 performance anti-patterns across async, memory, strings, collections, LINQ, regex, serialization, and I/O with tiered severity classification.

Try it: “Review this application for performance optimization opportunities and provide me with the top 3 changes I should make for the biggest improvement.”

Azure Skills to Try First

The Azure skills covers the whole journey of getting an app onto Azure—from scaffolding infrastructure to securing, analyzing, and extending it with AI. If you’re not sure where to start, here are a few built-in skills that fit naturally into a Visual Studio developer’s workflow. Each one packages real Azure expertise—workflows, decision trees, and guardrails—so your agent does genuine Azure work instead of handing back generic cloud advice.

1. Go from app to deployed: azure-prepare → azure-validate → azure-deploy

These three skills form one deployment chain that hands off automatically:

  • azure-prepare generates the infrastructure your app needs—Bicep or Terraform, azure.yaml, Dockerfiles, and managed identity.
  • azure-validate runs preflight checks before anything deploys—configuration, Bicep/Terraform, RBAC and managed identity permissions, and a what-if/build verification—so problems surface before they hit Azure.
  • azure-deploy executes the deployment (azd up, azd deploy, Bicep, or terraform apply) with built-in error recovery instead of leaving you stuck on a cryptic message.

The result: a single path from “it builds locally” to “it’s running in the cloud.”

Try it: “Deploy my ASP.NET Core app to Azure Container Apps with managed identity.”

2. Analyze logs and telemetry with azure-kusto

Once your app is live, query its data in Azure Data Explorer (Kusto/ADX) with KQL for log analytics, telemetry, and time-series analysis. Describe what you want in plain language and let the agent write and run the query—the fast way to answer “what happened, when, and how often.”

Try it: “Query my logs for the error rate per endpoint over the last 24 hours and show the spikes.”

3. Build and ship AI features with microsoft-foundry

Adding AI to your app? This skill takes you end-to-end with Microsoft Foundry: discover and deploy models, create and invoke agents, run evaluations, and fine-tune—removing the guesswork around which model fits, how to deploy it, and how to wire up an agent.

Try it: “Deploy my hosted agent to Foundry.”

We hope these built-in skills could further improve your agentic workflow. Please give them a try, and let us know if they were helpful for your workflow. Also let us know what additional built-in skills you would like to see, or how we can future support your agentic workflow in Visual Studio!


Visual Studio Geeks | Policy enforced deployments for your Kubernetes resources


As your team starts to deploy resources to Kubernetes regularly, it becomes necessary for you as a cluster administrator to maintain good standards and consistency of the Kubernetes resources. Be it, ensuring all the resources have set of labels, or ensuring you only pull images from your enterprise container registry. Gatekeeper is a well known policy enforcement tool using Open Policy Agent (OPA) – which is a opensource, Cloud Native Computing Foundation (CNCF) project.

But did you know you can validate policies on your Kubernetes manifests before you deploy them on to the cluster? In this post, we will see how we can govern our deployments using Conftest and OPA policy agent.

However, Gatekeeper is installed on the cluster and thus ensures no policy is broken at deployment time. This means that any validation of policies happen only when you are trying to deploy resources to cluster. While this ensures that no resource violates the policy, you would like to know about these policies much earlier in your CI/CD pipeline. Doing policy validations much to the left of your deployment pipeline ensures your deployment going smooth when necessary.

This is where Conftest helps. Conftest relies on OPA and policies are written using Rego – thus the policies you write for Gatekeeper will be compatible with Conftest. But more importantly with Conftest, you can validate your local manifests against OPA policies locally and ensure your resources are compliant before you deploy them.

Installation

Installation is really easy if you are on Mac – For other platforms refer to the documentation

brew install conftest

Folder structure

By default, Conftest expects you to maintain your policies under policy folder at the same location as your Kubernetes resources. If you prefer a different path, you will want to pass it using CLI or set environment variable CONFTEST_POLICY.

📂 src
    📂 k8s
        📄 deployment.yml
        📄 service.yml
        📁 policy
            📄 replica.rego
            📄 labels.rego
    📂 app
        📄 main.ts
        📄 package.json

Writing Policies

As mentioned previously, policies are written in Rego. I struggled to write policies initially and constantly went back to documentation. However, once you write couple of policies, you will get a hang of it. Take a look at the simple policy to check every deployment has at least 2 replicas.

package main

deny_replicas[msg] {
    input.kind == "Deployment"                          # check if it is a Deployment
    input.spec.replicas < 2                             # And the replicas are < 2
    msg := "Deployments must have 2 or more replicas"   # show the error message and fail the test
}

input is the complete yaml document from our deployment yaml (see below) and we we are checking if kind is equal to Deployment. If its deployment, we move to next line in the constraint and check if spec.replicas is less that 2.

apiVersion: apps/v1
kind: Deployment
metadata:
  name: mynodeapi-dep
  labels:
    app: dep-k8s-nodejs-api
spec:
  replicas: 1
  selector:
    ...

You can write other policies similar to the one above to validate various aspects of Kubernetes resources. Let us see few examples.

This policy validates our resources have the required labels and fail if any labels from required_deployment_labels object are not found.

package main

import data.kubernetes

name = input.metadata.name

required_deployment_labels {
	input.metadata.labels["app.kubernetes.io/name"]
	input.metadata.labels["app.kubernetes.io/instance"]
	input.metadata.labels["app.kubernetes.io/version"]
	input.metadata.labels["app.kubernetes.io/component"]
	input.metadata.labels["app.kubernetes.io/part-of"]
	input.metadata.labels["app.kubernetes.io/managed-by"]
}

violation[msg] {
	input.kind == "Deployment"
	not required_deployment_labels
	msg = "Must include Kubernetes recommended labels: https://kubernetes.io/docs/concepts/overview/working-with-objects/common-labels/#labels"
}

Reference container images only from our enterprise Azure Container Registry

package main

deny[msg] {
    input.kind == "Deployment"
    some i
    image := input.spec.template.spec.containers[i].image
    not startswith(image, "myacr.azurecr.io") # validate images start with endpoint for our container registry
    msg := sprintf("image '%v' comes from untrusted registry", [image])
}

As you can see rules can be very powerful.

Testing

The command to test resources using Conftest is conftest test <PATH>. Since I would like to test all resources under k8s folder, I pass folder path as below.

Running this you will see the output as below (ignore other errors as I have other policies). The test failed because we have set deny rule if spect.replicas < 2 and in our case our deployment yaml has replicas: 1 (see spec section in the deployment yaml above).

Conftest failing due to policy violation

Using Conftest in GitHub Actions

Making Conftest work in your Continuous Integration (CI) process is simple. For demo purposes, I am using GitHub Actions in my repo here. If you run the tests, you will see the action fails with errors – see the output

My action workflow looks like below.

name: build

on:
  push:
    branches: [main]
  pull_request:
    branches: [main]

  workflow_dispatch:

jobs:
  build:
    runs-on: ubuntu-latest

    steps:
      - uses: actions/checkout@v2

      - name: install conftest
        run: |
          wget https://github.com/open-policy-agent/conftest/releases/download/v0.30.0/conftest_0.30.0_Linux_x86_64.tar.gz
          tar xzf conftest_0.30.0_Linux_x86_64.tar.gz
          sudo mv conftest /usr/local/bin
          rm -rf conftest_0.30.0_Linux_x86_64.tar.gz

      - name: run conftest
        run: |
          conftest test $/k8s

Conclusion

As you can see, Conftest lets you validate and govern your Kubernetes resources efficiently and can easily be integrated with your CI workflows. This lets your team standardise the common practices, go through PR review process before eventually deploying to the cluster. Once deployed to cluster, you can use Gatekeeper to validate as well to full proof your workloads.


Visual Studio Geeks | Creating KEDA Scalar in Azure Container Apps using Azure Portal


In this post, I would like to show you how we added custom scaling with KEDA using the Azure Portal — Thanks to the KEDA scaler, we have a dynamic scaling pool, which automatically scales when there are more jobs in the queue and scales back down when demand reduces.

We run our Azure DevOps Build agents inside a container. This has allowed us to package various tools like kubectl, helm, and terraform are installed and available inside the agent image, which gives us control over versions of the tools we use — as we can execute our continuous integrations with consistent configuration. Also, adding any new tool is just adding installation instructions to the Dockerfile and publishing a new image.

Microsoft has detailed documentation on running Azure DevOps agent inside a container here

Further, we are running our agents as an Azure Container App, which has freed us from maintaining a dedicated AKS cluster and lets us dynamically scale the agents — a new agent per pipeline job with the help of custom scaling rules and KEDA.

Creating an Azure Container App

Creating an Azure Container App can be done in a variety of ways — Terraform or any other IaC code, Azure CLI, or through Portal. We are using Terraform internally, but for the sake of this post, I am showing creating using the portal.

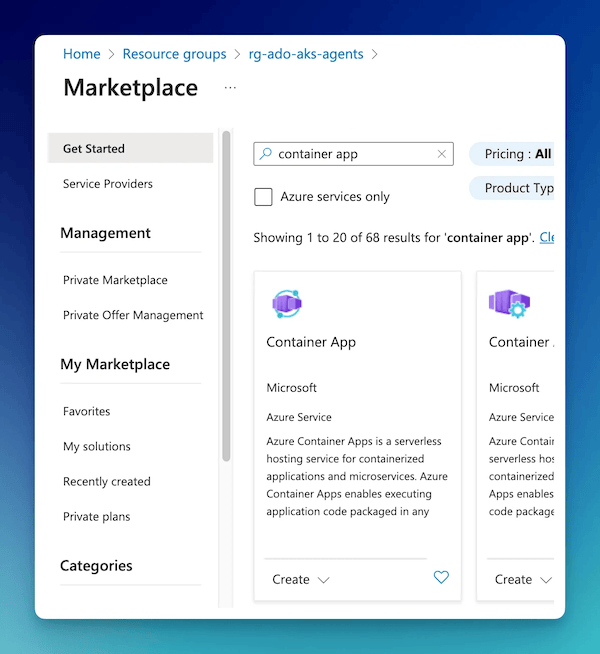
So, search for the service and select Container App.

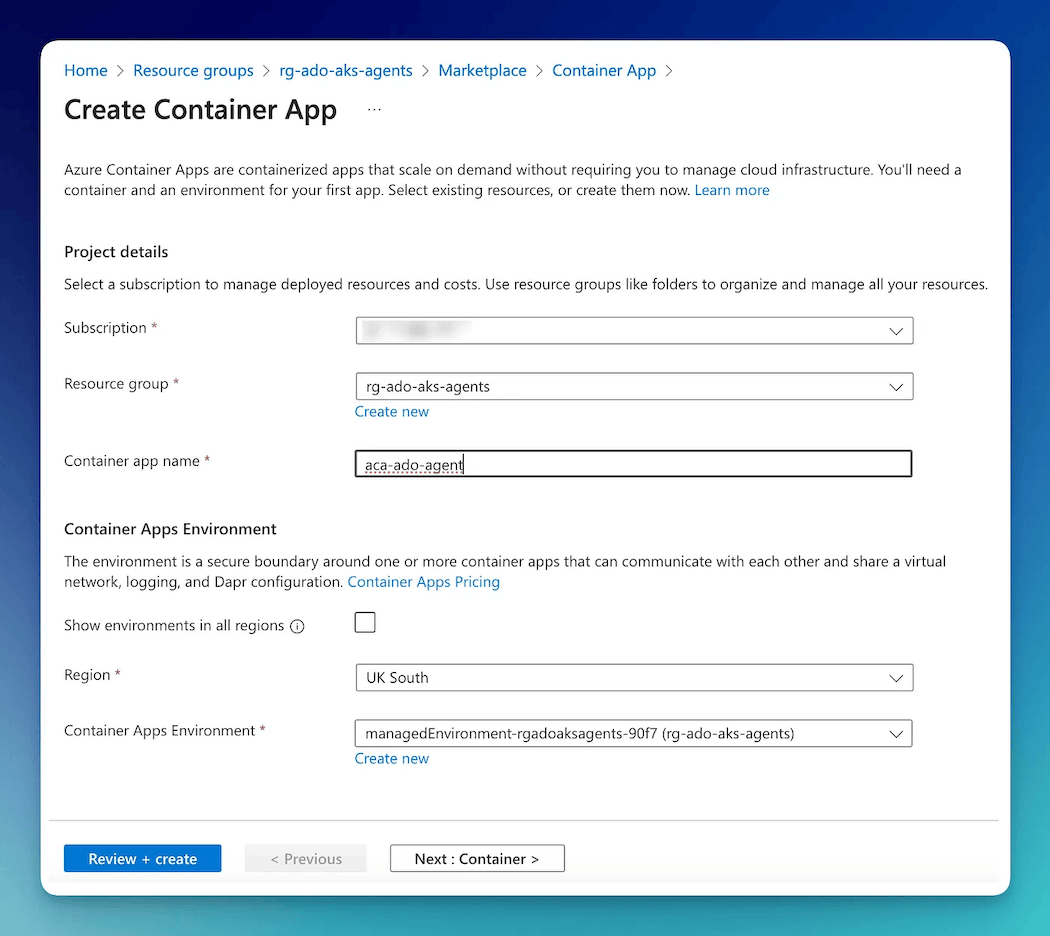
The first step is the provide the name and select a region and Container Apps environment. I have decided to use the existing environment below.

configuring the container app

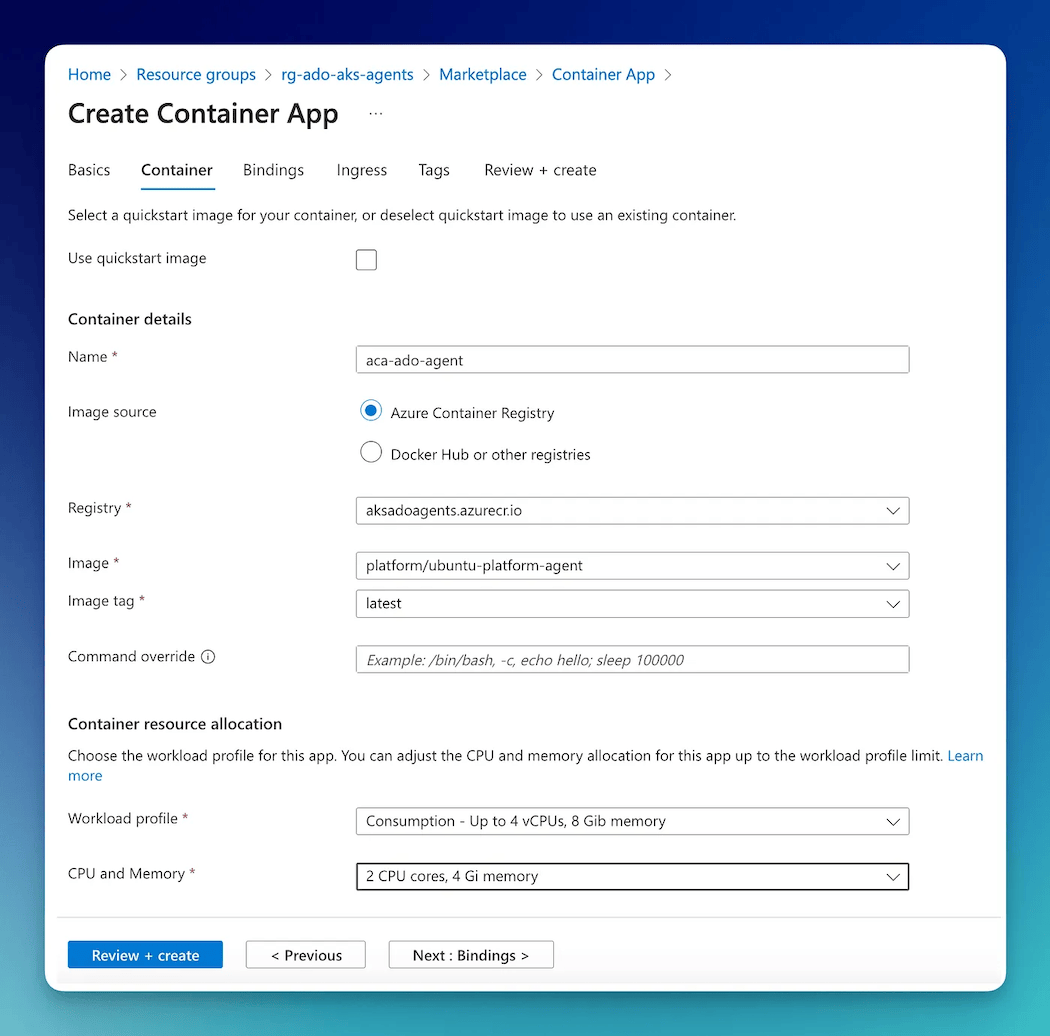
The next tab in the wizard is about the container. Our team-specific image is in our internal Azure Container Registry and the wizard fills the drop-downs for easy selection.

The only change I have made here is, changing the CPU and Memory values as needed for the image — Notice I am using Consumption Plan as we know this team does not need high-performance agents.

As conveyed previously, this feature of allocating individual CPU and Memory configurations has great benefits over AKS. For example, we have a separate container app with a dedicated workload profile for running CPU and Memory-intensive jobs.

specify the container

The rest of the wizard is left at defaults as I do not have any bindings or Ingress to configure.

This should get your container app running.

Create a secret to store Azure DevOps PAT

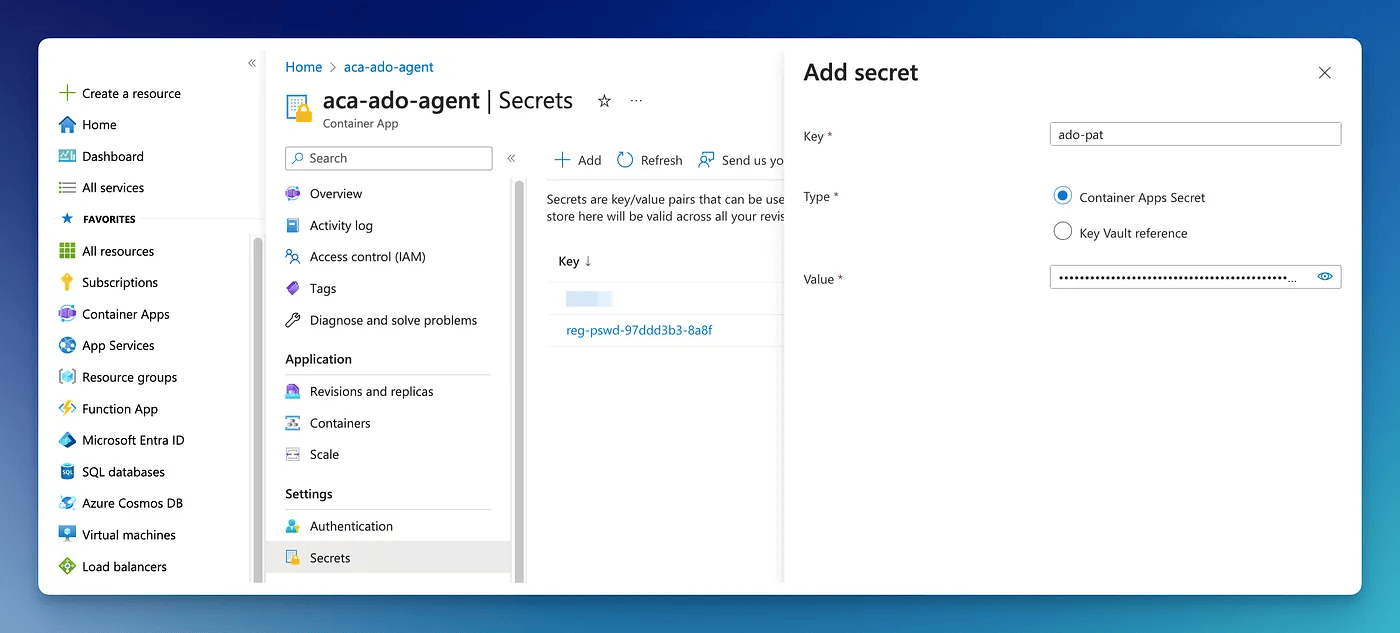
The first step in the container app is to Add a secret and store our Azure DevOps PAT (Personal Access Token). PAT is needed for the Azure DevOps build agent to connect to our Azure DevOps service. Later in the post, we use this PAT to let KEDA authenticate to our Azure DevOps service to monitor the Agent Pool for new jobs.

Add PAT as a secret

Create a new revision

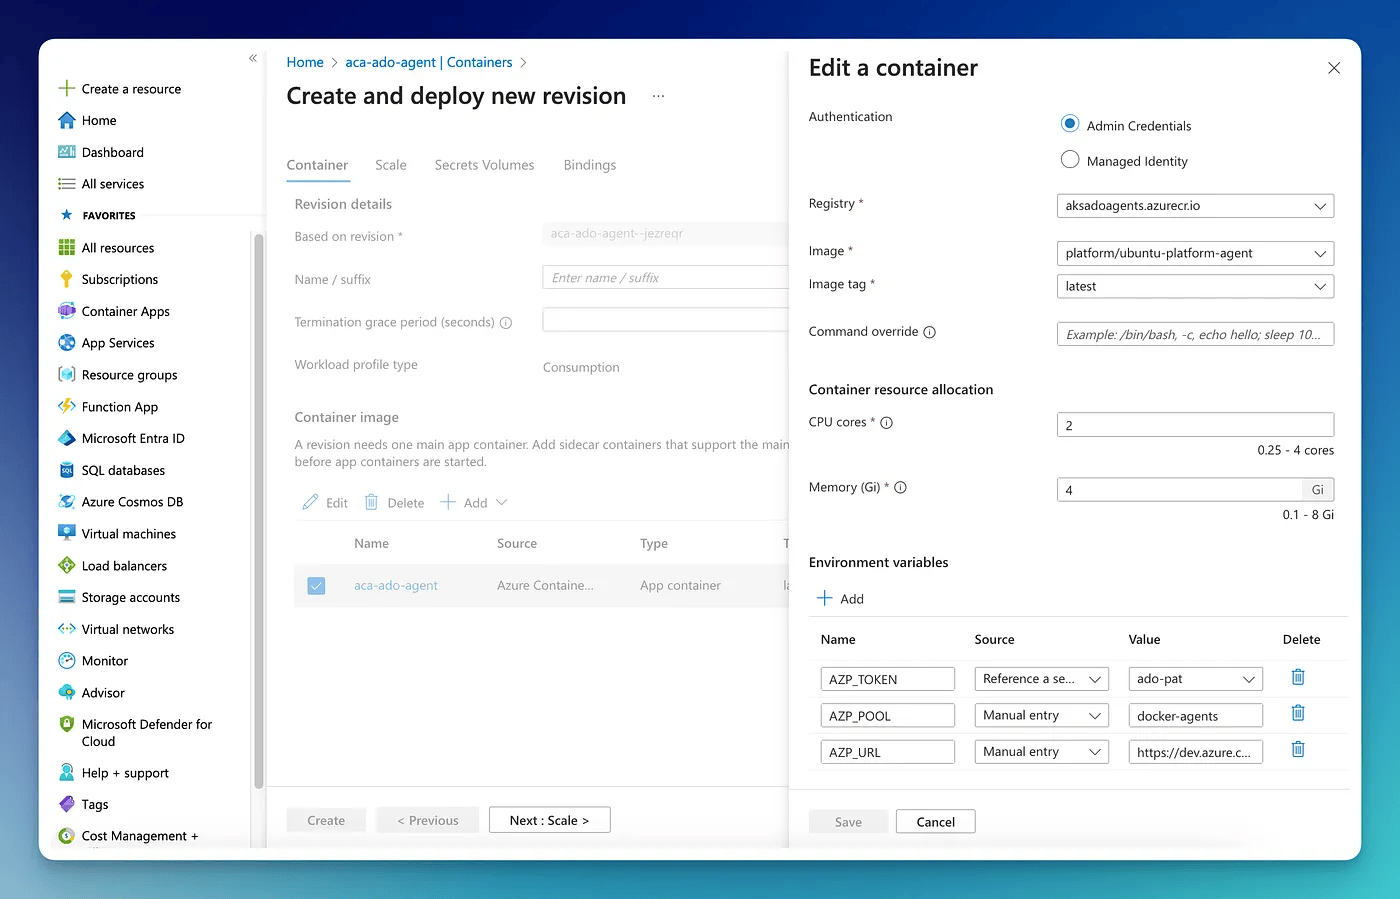
The next step is to edit the container and define the few environment variables that are required for the container (for more on these specific environment variables refer to this documentation).

Notice, for AZP_TOKEN the source is set as Reference a secret as I want value for that to come from the secret defined in the previous step.

Edit container environment variables

Create a custom Scale rule

The next and final step is to define the custom scale rule — which in our case is KEDA.

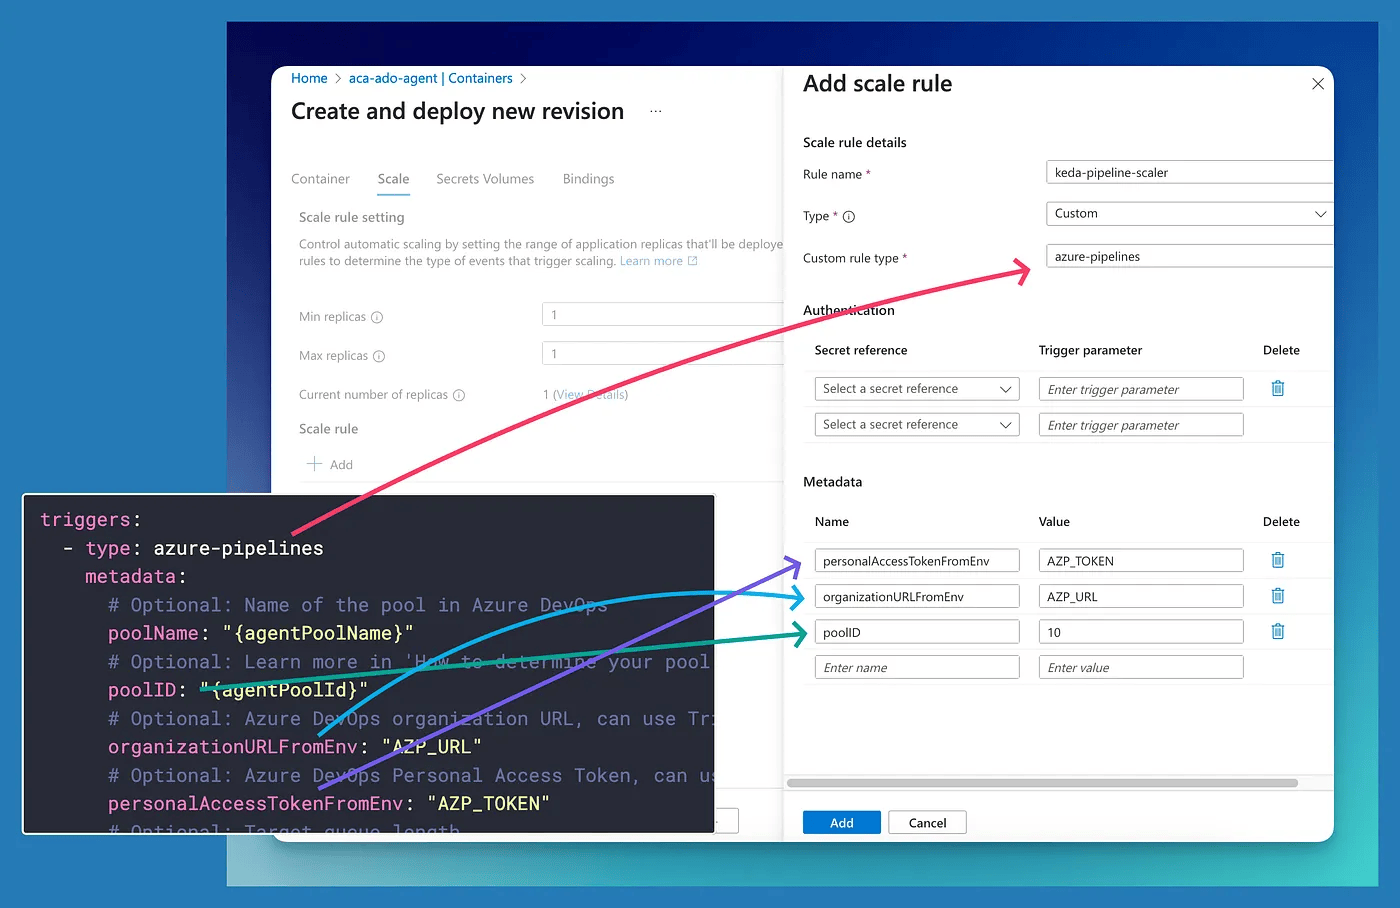
So in the Scale tab, click +Add and then enter the details below

  1. Rule name: This is the name for the custom scale rule, can be anything.
  2. Type: Custom
  3. Custom rule type: This is defined with the Scaler definition. I am using Azure Pipelines scaler, so this should match type field of the Scaler definition.

Next, we need to add a few metadata values so that KEDA knows which agent pool should it monitor for new jobs. These will come from metadata keys of the scaler definition.

  1. peronalAccessTokenFromEnv: This lets KEDA authenticate with our Azure DevOps service to monitor the Agent Pool. The value is PAT we defined in the secret previously — which has been passed to the container as an environment variable, so we use that environment variable.
  2. organizationURLFromEnv: This is our Azure DevOps organization URL, again we set this as an environment variable in the previous section.
  3. poolID: This is the Azure DevOps pool ID which KEDA should monitor. Refer to the scaler docs on how to get this.
Add metadata for the scaler

That is it for the post. Hope you found it useful.

Conclusion

In this post, I showed how we added custom scaling with KEDA using the Azure Portal. Thanks to the KEDA scaler, we have a dynamic scaling pool, which automatically scales when there are more jobs in the queue and scales back down when demand reduces.


Visual Studio Geeks | Exploring GitHub Advanced Security for Azure DevOps


It has been a few months since GitHub Advanced Security (GHAS) has been made generally available for Azure DevOps. During this time, I’ve engaged with numerous customers eager to implement GHAS within their Azure subscriptions. In this post, I wanted to show you a quick way to set up GHAS within Azure DevOps and explore the features available.

Enabling Advanced Security in Azure DevOps

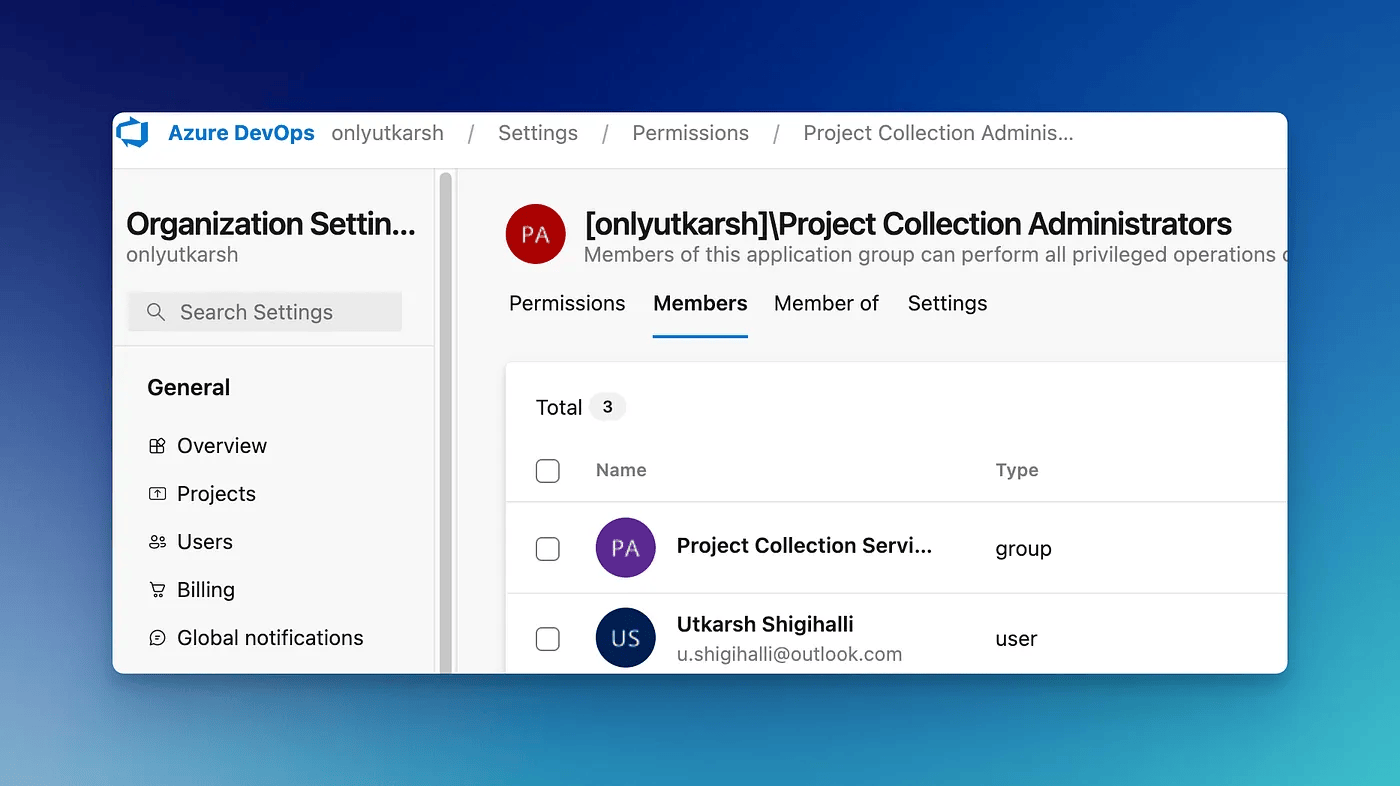
This is easy, however, you need to be a member of the Project Collection Administrator group. You can verify that from Organization Settings -> Permissions and then the Members tab. You should see your name.

Once you have verified you are a Project Collection Administrator, you are ready to enable GHAS.

You can enable GHAS either individually per repo or across the organisation for all the repositories.

If you want to enable it for all the repositories in your organization, you will need to go to organization settings and then the Repositories section and enable it there.

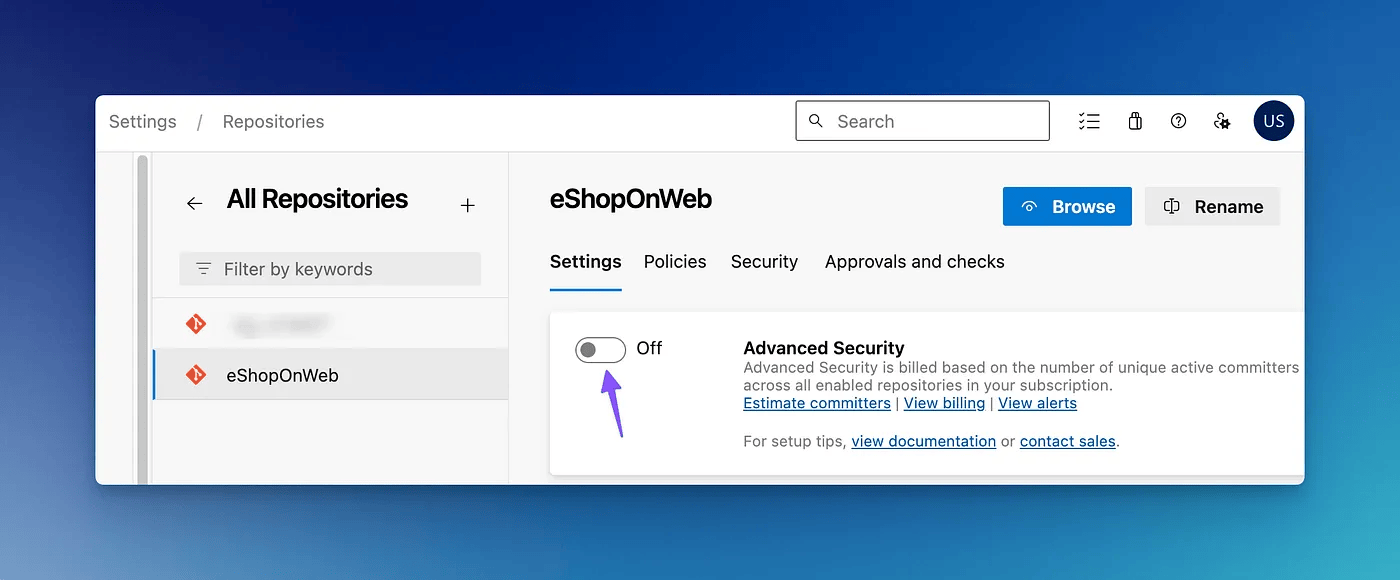
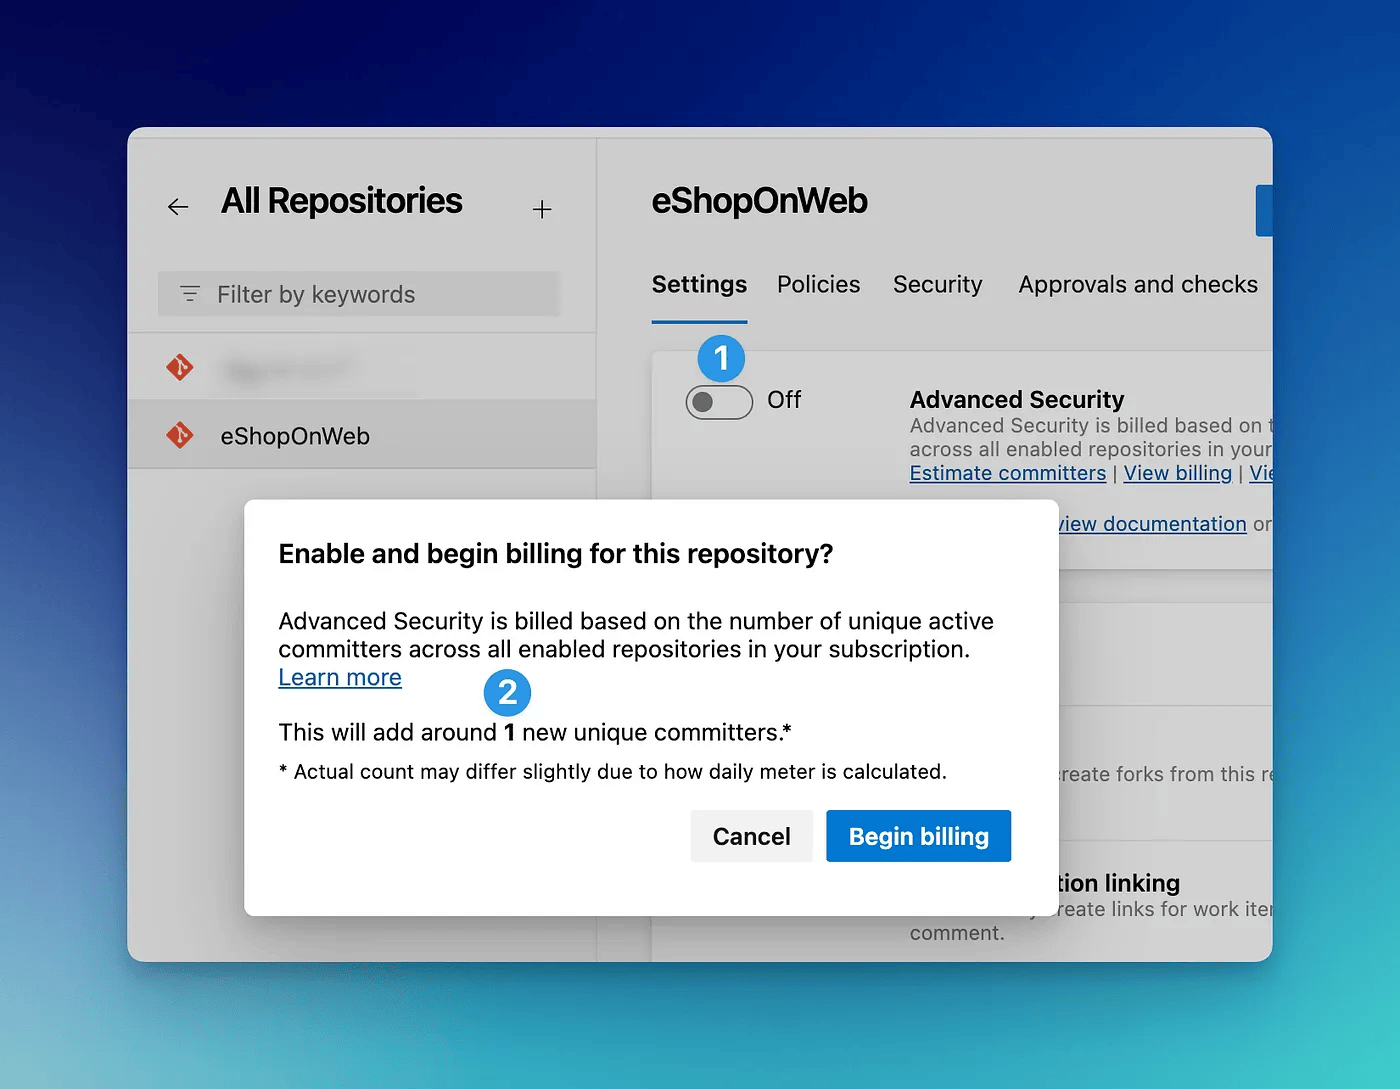
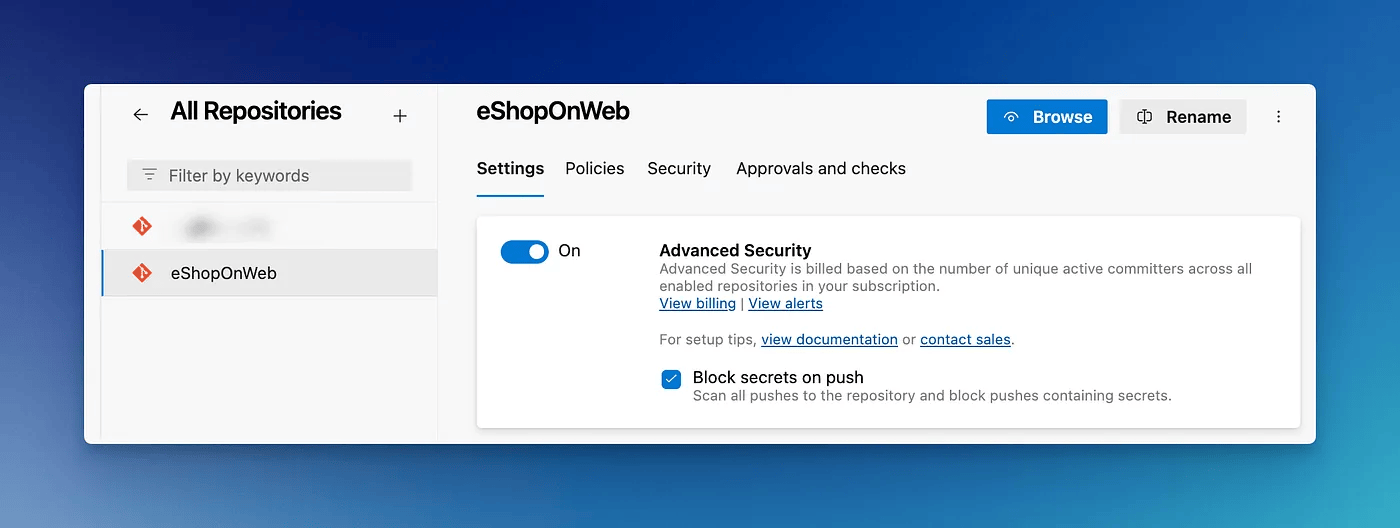
For this post, I am enabling it only for a single repository. Once you click the Advanced Security flag (1), you will be prompted to show the number of committers you will be billed against (more on billing below). This repository has only me committing to it, so it has correctly identified 1 active committer (2).

Once you click Begin billing GHAS should be enabled.

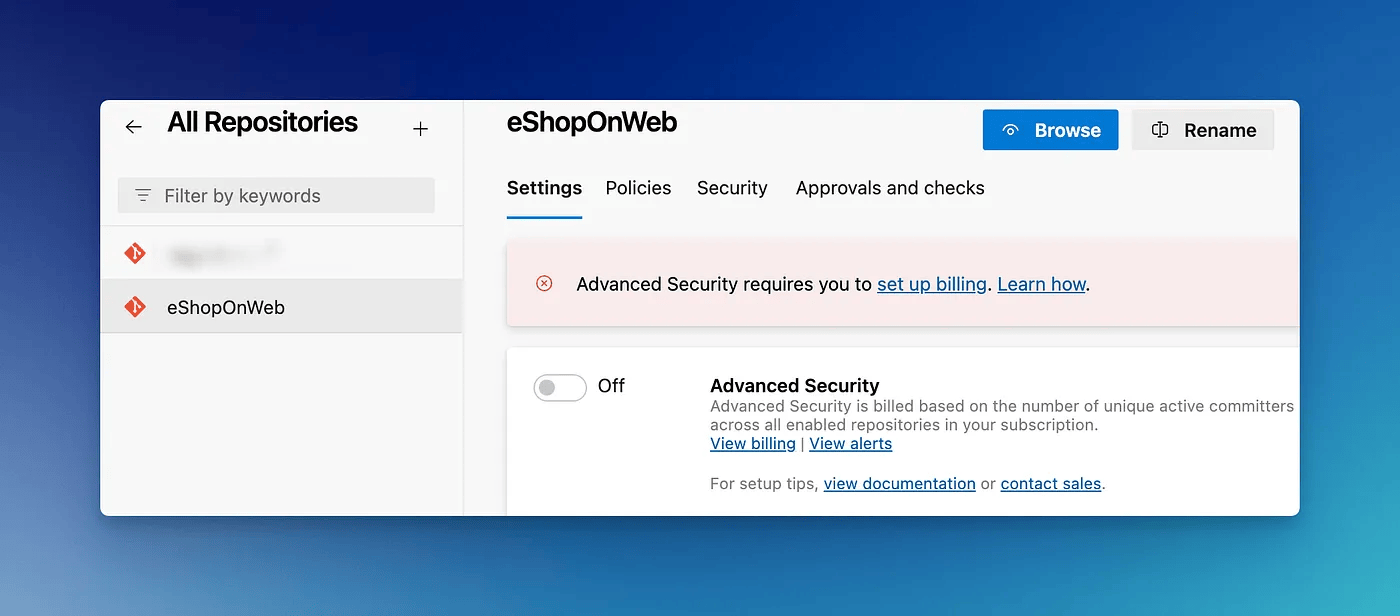
If your ADO instance does not have a linked and active subscription, you might get the below error.

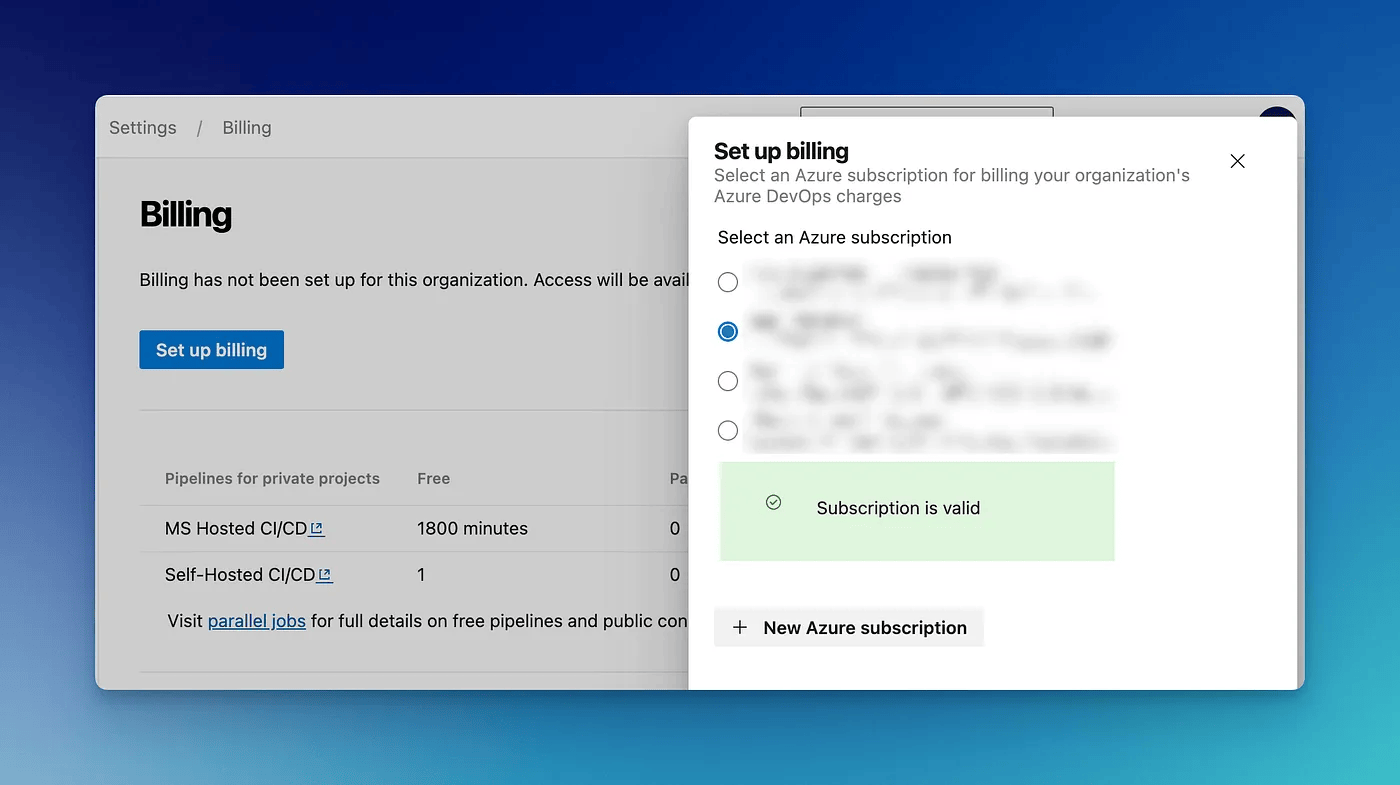
You will need to select an active Azure subscription under the Billing tab under organization settings in ADO.

Once you select a valid subscription, you will be able to enable GHAS for the repositories.

Exploring GHAS features

Block secrets on push

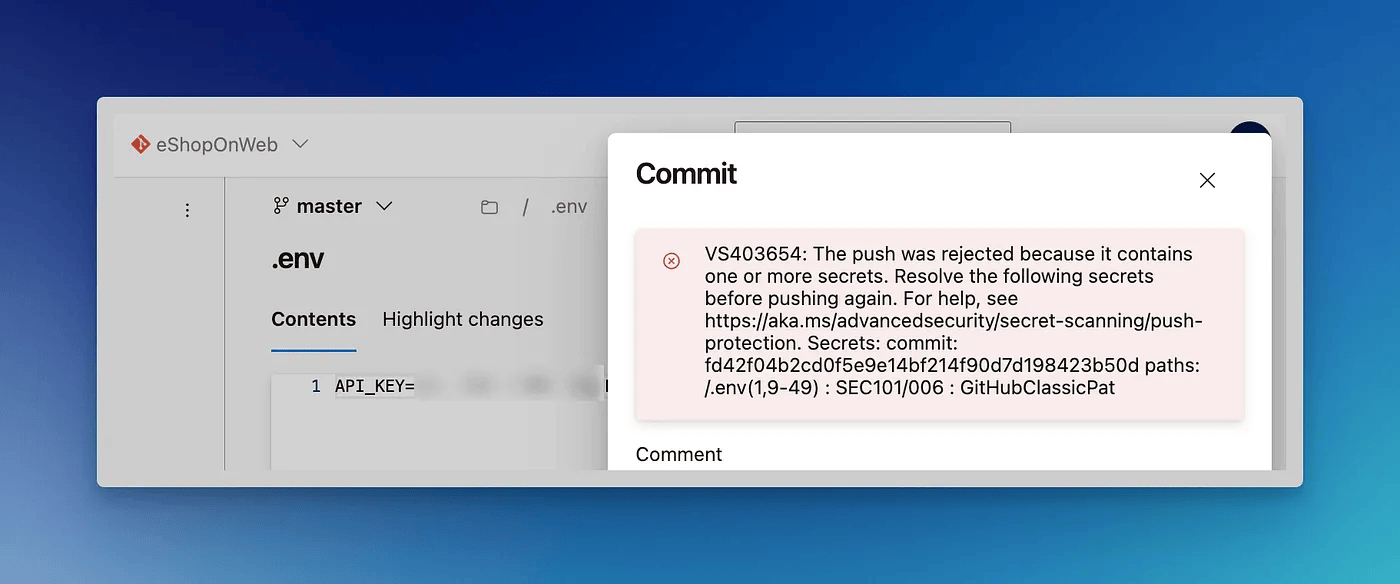
Once you enable GHAS, by default Block secrets on push feature is enabled too. With this setting enabled, ADO will automatically check any incoming pushes for embedded secrets and reject them automatically. Not only works on CLI, but it works on the web interface too.

For a simple test, below I am trying to commit a file with the GitHub API key, and it was rejected.

Note that at the time of writing this GHAS supports secrets push protection only for certain service providers. Although secrets from the majority of service providers are supported, I was surprised to see GitLab personal access token is not supported yet.

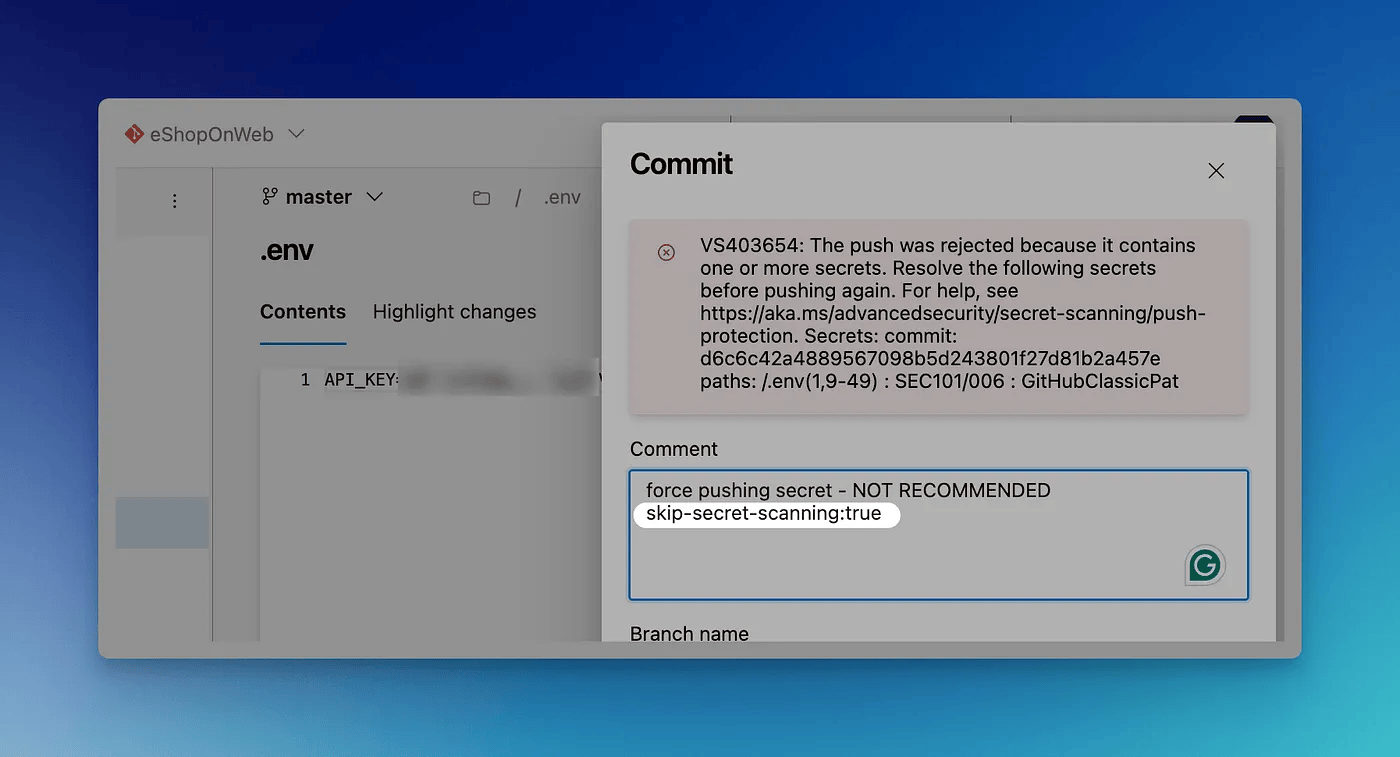
Although not recommended, there is a way to push a secret that has been blocked. To push, you need to have skip-secret-scanning:true in your commit message.

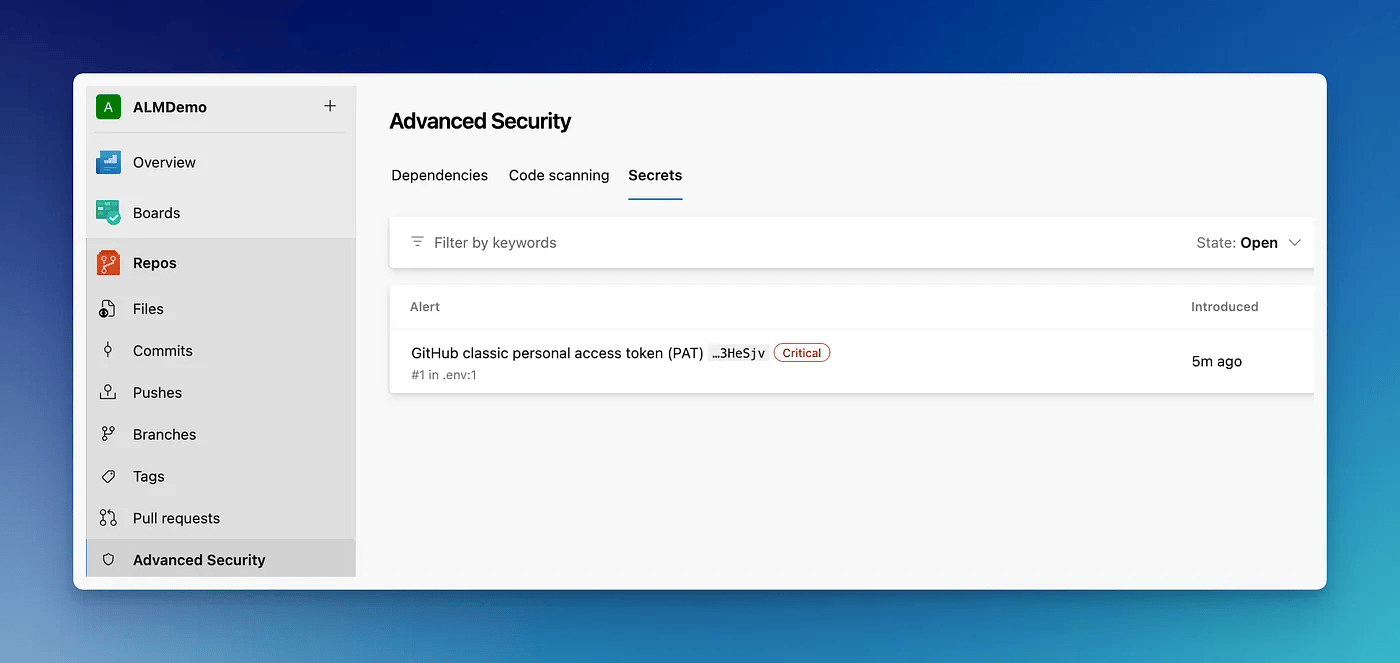
This will allow the secret to be committed, however, it will be caught in the Secret scanning alert (more on that below).

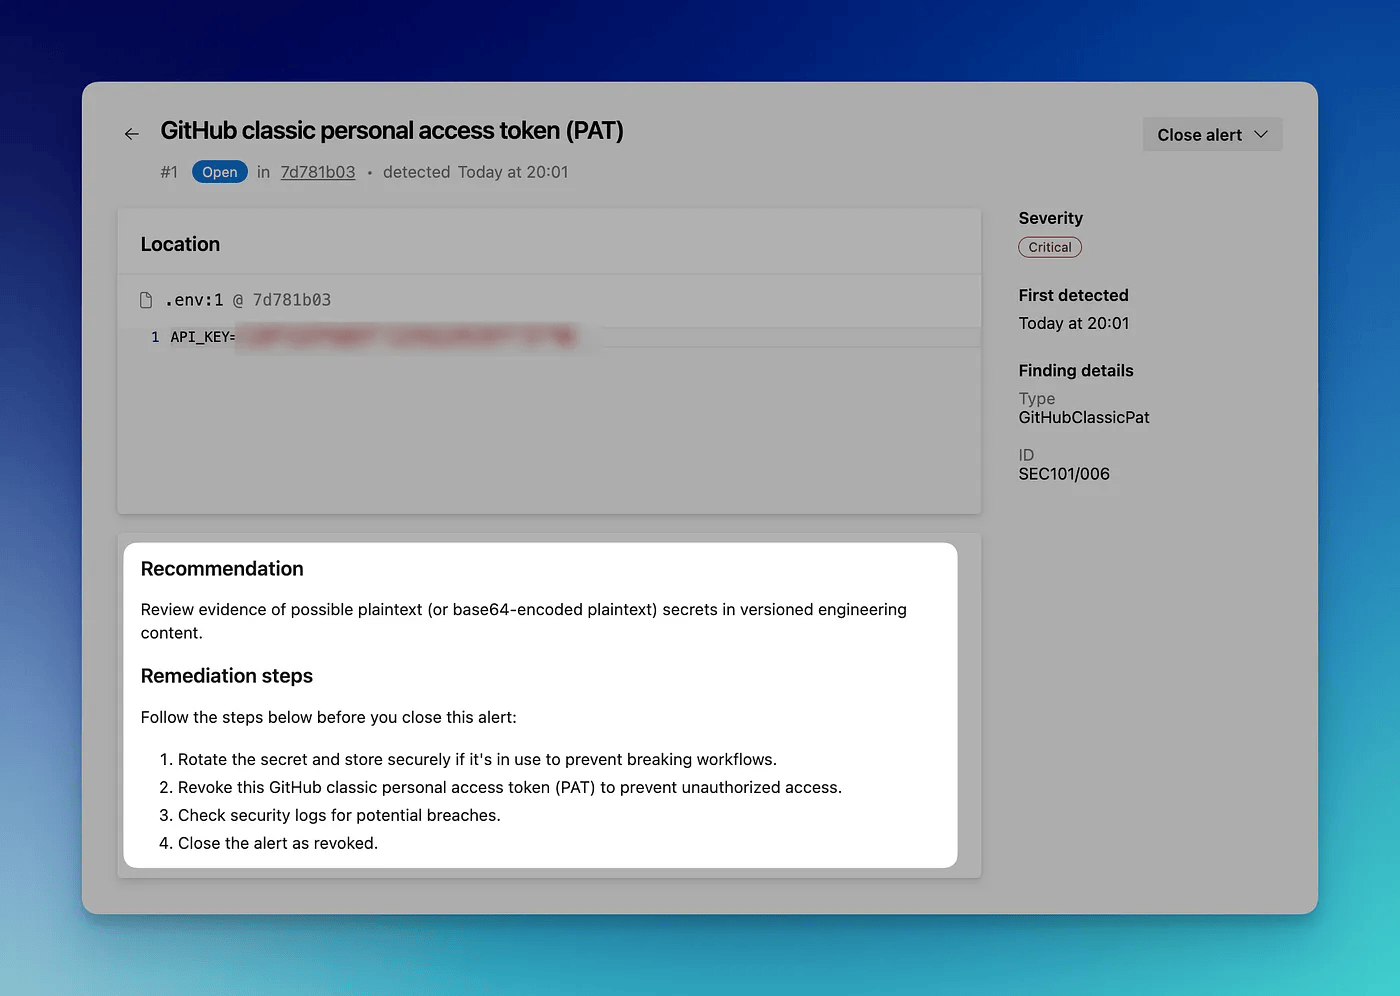
The great thing about GHAS is that clicking on the alert will give you remediation steps too.

Dependency Scanning and Code Scanning

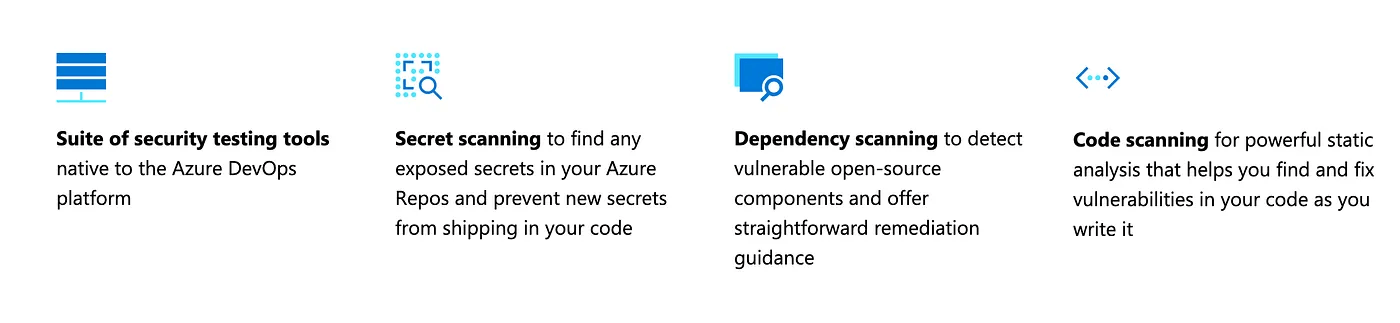
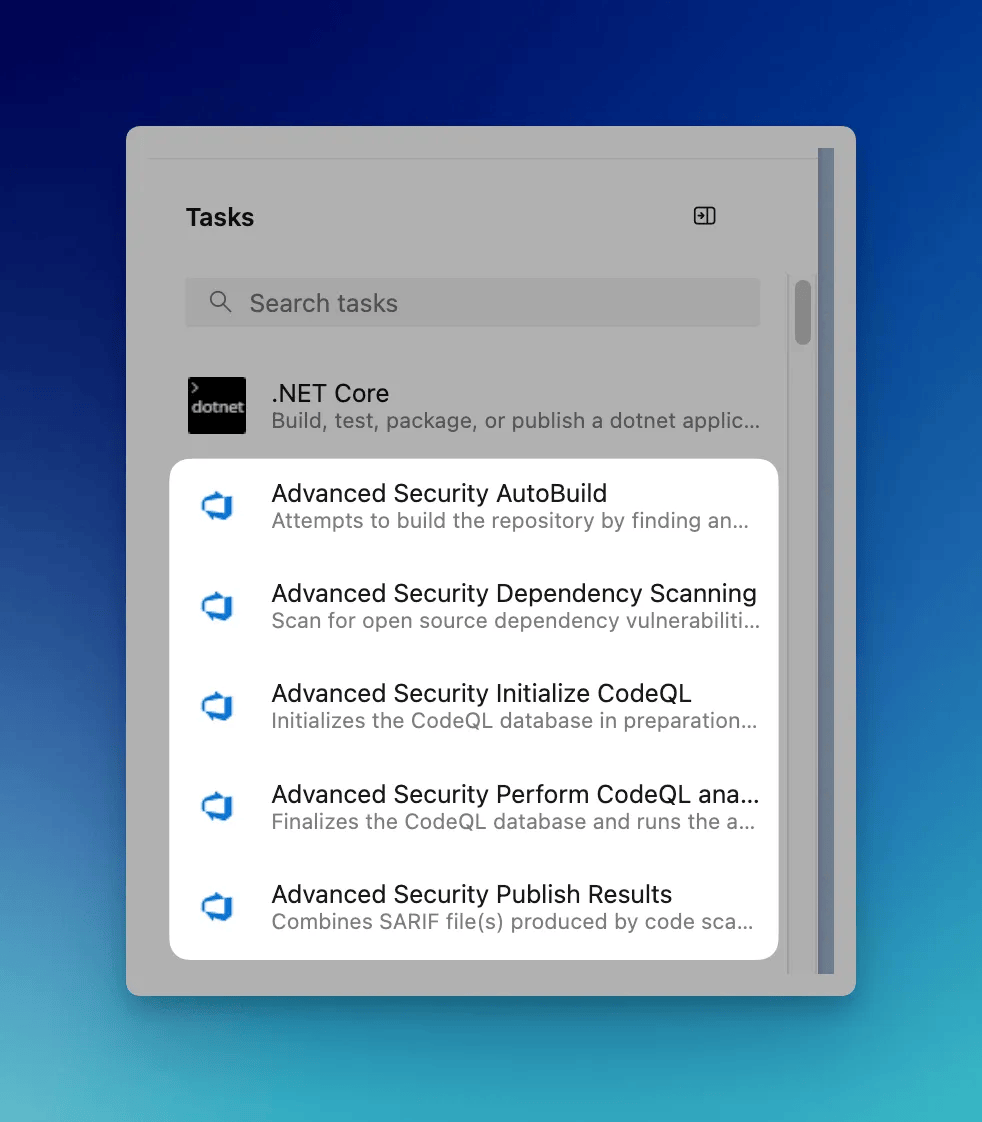
Dependency and Code scanning are additional features of GHAS. Dependency scanning will scan any vulnerabilities in your repo from your open-source dependencies. Code scanning will scan your source code (from supported languages) for vulnerabilities.

Both these tasks are enabled through pipeline tasks. On any GHAS-enabled repo, you will be able to run the pipeline with these tasks and get the status of the repo.

You can create a pipeline and add the tasks for dependency and code scanning.

However, this post has already gotten super long than I intended it to be, I will probably do another post and explore both of those functionalities in detail.

Pricing

GHAS for Azure DevOps is a paid product and is available only for Azure DevOps Services. For Azure DevOps Service linked to an Azure Subscription, this will automatically be visible in your billing for subscription. At the time of writing this, it costs 49$ per active committer per month.

That is it for this post. Thank you for reading. 🎉