OpenAI just pulled off a dramatic pivot—and it could have profound implications for the future of artificial general intelligence (AGI), AI funding, and even global social systems. Continue reading “OpenAI Cancels Its For-Profit Plans”
OpenAI just pulled off a dramatic pivot—and it could have profound implications for the future of artificial general intelligence (AGI), AI funding, and even global social systems. Continue reading “OpenAI Cancels Its For-Profit Plans”
Editor’s note: This post is part of the AI On blog series, which explores the latest techniques and real-world applications of agentic AI, chatbots and copilots. The series also highlights the NVIDIA software and hardware powering advanced AI agents, which form the foundation of AI query engines that gather insights and perform tasks to transform everyday experiences and reshape industries.
AI agents powered by large language models (LLMs) have grown past their FAQ chatbot beginnings to become true digital teammates capable of planning, reasoning and taking action — and taking in corrective feedback along the way.
Thanks to reasoning AI models, agents can learn how to think critically and tackle complex tasks. This new class of “reasoning agents” can break down complicated problems, weigh options and make informed decisions — while using only as much compute and as many tokens as needed.
Reasoning agents are making a splash in industries where decisions rely on multiple factors. Such industries range from customer service and healthcare to manufacturing and financial services.
Modern AI agents can toggle reasoning on and off, allowing them to efficiently use compute and tokens.
A full chain‑of‑thought pass performed during reasoning can take up to 100x more compute and tokens than a quick, single‑shot reply — so it should only be used when needed. Think of it like turning on headlights — switching on high beams only when it’s dark and turning them back to low when it’s bright enough out.
Single-shot responses are great for simple queries — like checking an order number, resetting a password or answering a quick FAQ. Reasoning might be needed for complex, multistep tasks such as reconciling tax depreciation schedules or orchestrating the seating at a 120‑guest wedding.
New NVIDIA Llama Nemotron models, featuring advanced reasoning capabilities, expose a simple system‑prompt flag to enable or disable reasoning, so developers can programmatically decide per query. This allows agents to perform reasoning only when the stakes demand it — saving users wait times and minimizing costs.
Reasoning AI agents are already being used for complex problem-solving across industries, including:
Many customers are already experiencing enhanced workflows and benefits using reasoning agents.
Amdocs uses reasoning-powered AI agents to transform customer engagement for telecom operators. Its amAIz GenAI platform, enhanced with advanced reasoning models such as NVIDIA Llama Nemotron and amAIz Telco verticalization, enables agents to autonomously handle complex, multistep customer journeys — spanning customer sales, billing and care.
EY is using reasoning agents to significantly improve the quality of responses to tax-related queries. The company compared generic models to tax-specific reasoning models, which revealed up to an 86% improvement in response quality for tax questions when using a reasoning approach.
SAP’s Joule agents — which will be equipped with reasoning capabilities from Llama Nemotron –– can interpret complex user requests, surface relevant insights from enterprise data and execute cross-functional business processes autonomously.
A few key components are required to build an AI agent, including tools, memory and planning modules. Each of these components augments the agent’s ability to interact with the outside world, create and execute detailed plans, and otherwise act semi- or fully autonomously.
Reasoning capabilities can be added to AI agents at various places in the development process. The most natural way to do so is by augmenting planning modules with a large reasoning model, like Llama Nemotron Ultra or DeepSeek-R1. This allows more time and reasoning effort to be used during the initial planning phase of the agentic workflow, which has a direct impact on the overall outcomes of systems.
The AI-Q NVIDIA AI Blueprint and the NVIDIA Agent Intelligence toolkit can help enterprises break down silos, streamline complex workflows and optimize agentic AI performance at scale.
The AI-Q blueprint provides a reference workflow for building advanced agentic AI systems, making it easy to connect to NVIDIA accelerated computing, storage and tools for high-accuracy, high-speed digital workforces. AI-Q integrates fast multimodal data extraction and retrieval using NVIDIA NeMo Retriever, NIM microservices and AI agents.
In addition, the open-source NVIDIA Agent Intelligence toolkit enables seamless connectivity between agents, tools and data. Available on GitHub, this toolkit lets users connect, profile and optimize teams of AI agents, with full system traceability and performance profiling to identify inefficiencies and improve outcomes. It’s framework-agnostic, simple to onboard and can be integrated into existing multi-agent systems as needed.
Learn more about Llama Nemotron, which recently was at the top of industry benchmark leaderboards for advanced science, coding and math tasks. Join the community shaping the future of agentic, reasoning-powered AI.
Plus, explore and fine-tune using the open Llama Nemotron post-training dataset to build custom reasoning agents. Experiment with toggling reasoning on and off to optimize for cost and performance.
And test NIM-powered agentic workflows, including retrieval-augmented generation and the NVIDIA AI Blueprint for video search and summarization, to quickly prototype and deploy advanced AI solutions.
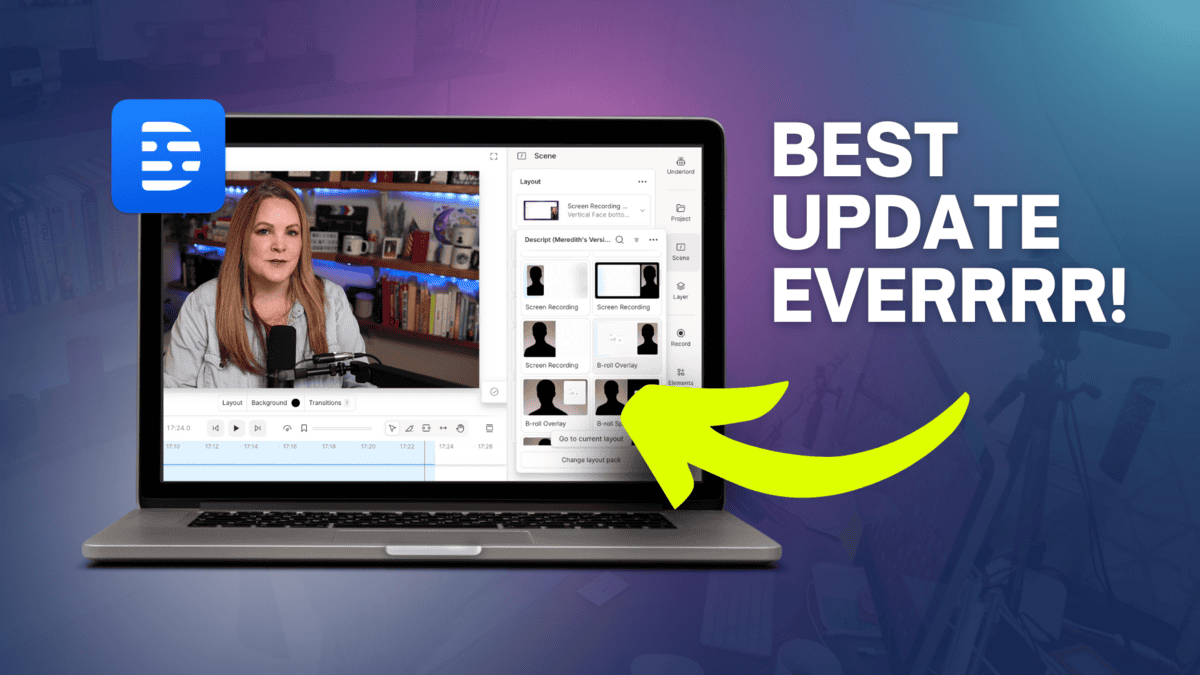
Descript recently released new and updated layout packs, and it’s something I’ve been hoping for!
With the new layout packs and smart transitions, you can easily create smooth, polished videos in less time.
This is one of the best Descript updates I’ve seen in a long time and I’m loving it!
Some product links in this post are affiliate links, and I will be compensated when you purchase by clicking our links. Read my disclosure policy here.
As a content creator, I’m always on the lookout for tools that can streamline my workflow and enhance the quality of my videos. Today, I’m thrilled to share some exciting news: Descript has finally introduced polished layout templates, and they’re even better than I could have imagined! Let me walk you through this game-changing feature and show you how it can revolutionize your video editing process.
Descript has just rolled out a collection of polished, animated layout packs that make video editing smoother and more professional than ever. These aren’t just the standard templates you might be used to-they come with built-in, seamless transitions and are designed to save you hours of manual tweaking. With just a click, you can add sophisticated animations to your timeline, instantly elevating the look and feel of your content.
Descript has always offered layout templates, but what’s new and revolutionary are the pre-built template packs with smooth, seamless transitions that polish your edit without requiring you to fiddle with advanced settings. Previously, creating these kinds of transitions was possible but time-consuming and clunky. Now, with just a click of a button, you can apply professional transitions directly to your timeline and adjust from there.
These layout packs are essentially collections of templates that share the same aesthetic or design feel. What would have taken 15-20 minutes to set up from scratch now happens instantly!
What’s truly remarkable about these new templates is their ease of use. With just a single click, you can add a polished layout to your timeline and then make adjustments as needed. This is a massive improvement over the previous method, which was often clunky and time-consuming.
If you’re new to Descript, scenes are one of the most important features — and one of the most misunderstood.
A scene is simply a signal that something new should happen visually in your video. You can create a scene by pressing the slash (/) key in your script. This adds a “signpost” that tells Descript when to insert a new layout or transition.
Once you’ve set your scenes, you can apply animated layouts from the new packs directly at those points. It’s as easy as picking a template, clicking to apply it, and customizing it from there.
Scenes are one of the most powerful yet often misunderstood features in Descript. They act as signposts in your video, indicating where you want something different to happen in the frame.
Creating a scene is simple:
1. Position your cursor where you want the change to occur in your script.
2. Press the slash (/) key on your keyboard.
3. You’ll see a faint visual line appear on the timeline, marking the scene boundary.
Now that we understand scenes, let’s dive into how to use these new layout templates effectively.
1. Open the Scenes menu.
2. Navigate to Descript > Choose Layout.
3. Browse through the available layout packs.
4. Select the desired template.
Once applied, you’ll notice that Descript automatically creates the necessary transitions and animations, saving you valuable time and effort.
After applying a template, you can easily customize it to fit your needs:
1. Replace placeholder media with your own content.
2. Adjust the size and position of elements.
3. Modify cropping and other visual effects.
Descript has also added Smart Transitions (currently in beta). These allow you to use smooth transitions with your own layouts without using Descript template packs. While I’ve found them slightly finicky during testing, they hold promise for even more customization options.
One of the most exciting aspects of these new layout packs is the ability to customize them to match your brand.
1. Duplicate an existing layout pack.
2. Replace background images and gradients with your own designs.
3. Update text elements with your preferred fonts and colors.
4. Add your logo to speaker layouts.
By following these steps, you can create a fully branded template pack that’s ready to use in all your future videos.
Updating backgrounds, gradients, and images across an entire layout pack is as simple as replacing a file. Want to swap out that default black-to-white gradient for your signature color? Just upload your new background, and it’s instantly applied to every relevant layout in the pack.
You can even add your logo to speaker layouts, animate its entrance, and fine-tune its placement within the intuitive Descript editor.
Descript’s new animated layout packs have truly transformed my editing process. They save me time, reduce frustration, and let me focus on what matters most: creating engaging, professional videos that reflect my brand. Whether you’re a seasoned editor or just starting out, these tools make it easy to look good, sound good, and feel confident on camera.
The ability to customize these templates to match my branding is particularly exciting. It means I can maintain a consistent look across all my videos while still benefiting from the time-saving features of these pre-designed layouts.
Descript‘s new polished layout templates are a game-changer for content creators. They offer a perfect balance of professional design and easy customization, allowing you to create stunning videos in less time than ever before.
If you’re a Descript user, I highly recommend exploring these new templates and seeing how they can enhance your video editing workflow. And if you’re new to Descript, there’s never been a better time to give it a try!
Remember, this is just one of many Descript tutorials I’ve created. If you want to learn more about making the most of this powerful software, be sure to check out my other videos and don’t forget to grab my updated Descript cheat sheet.
Don’t forget to check out my full Descript tutorial series and grab my updated Descript cheat sheet for even more tips and tricks.
Take your video editing to the next level- start using Descript‘s animated layout packs today, and let your creativity soar!
Plan, build, test, and fix — all from one prompt.
Agent mode is now available in public preview for all users in Visual Studio 17.14. Agent mode in Visual Studio allows you to define tasks using natural language, with Copilot autonomously planning, editing your codebase, invoking tools, and iterating to resolve issues. Unlike Copilot Chat or Edits, agent mode doesn’t stop at one suggestion or file edit but works iteratively until the task is complete.
Agent mode doesn’t just help you write code — it helps you finish the job. All of this is done iteratively, meaning that Copilot will continue to examine and perform your task on its own output and the result of that output until it completes your prompt. This means agent mode can:
We’re also simplifying the Copilot experience by making agent mode the new default way to apply code changes. You can think of agent mode as the next evolution of Edits which developers have come to love in GitHub Copilot chat with even more power!
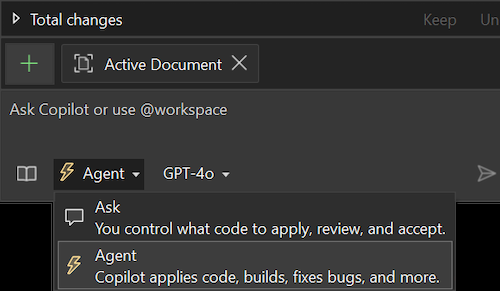
Agent mode is off by default in this preview phase. To turn it on:
Agent mode is a powerful tool that can be applied in many scenarios. It can create apps from scratch, refactor code across multiple files, write and run tests, generate documentation, integrate new libraries, implement terminal-heavy tasks, and answer questions about complex codebases. It enhances productivity by orchestrating your development flow while keeping you in control. When determining if agent mode is the right tool for the job, consider the following.
Once you’ve determined that agent mode is the right tool for the job, you just need to give it a good prompt. Here are some example prompts to give you an idea of what you can ask the agent to do:
A key to better, more accurate responses from Copilot is providing it with sufficient context about your preferred coding standards, team preferences, libraries, and more. You can provide this context with custom instructions. The custom instructions feature enables you to automatically add pre-specified contextual details to your chat questions. To configure custom instructions, follow the documentation instructions.
This release further extends the power of agent mode by supporting Model Context Protocol (MCP) servers. MCP servers provide additional context to the Copilot agent and give it access to tools, data, and resources. The MCP website describes MCP as a universal adaptor for AI applications. In the same way that a universal adaptor lets you connect your physical devices to accessories, MCP lets you connect AI applications to other data and tools without needing to build a custom connection to each data source. For example, you can connect directly to your database and analyze schemes, pull in information for GitHub repos such as issues and pull requests, automate end-to-end testing with Playwright, or you can even build your own with several SDKs including C#! Here are a few other examples of what you can do with MCP servers:
Interact with your cloud environment: For example, the official Azure MCP server gives access to list, query, and interact with services and tools like Azure Storage, Cosmos DB, the Azure CLI, and more.
Query and manage database: Execute queries against Cosmos DB containers, get Azure Storage container properties and metadata, and manage blob containers and blobs.
Search and manage version control platform: For example, the GitHub API allows batch creation of issues or batch updates of files, can search for code and issues across GitHub repositories, and more.
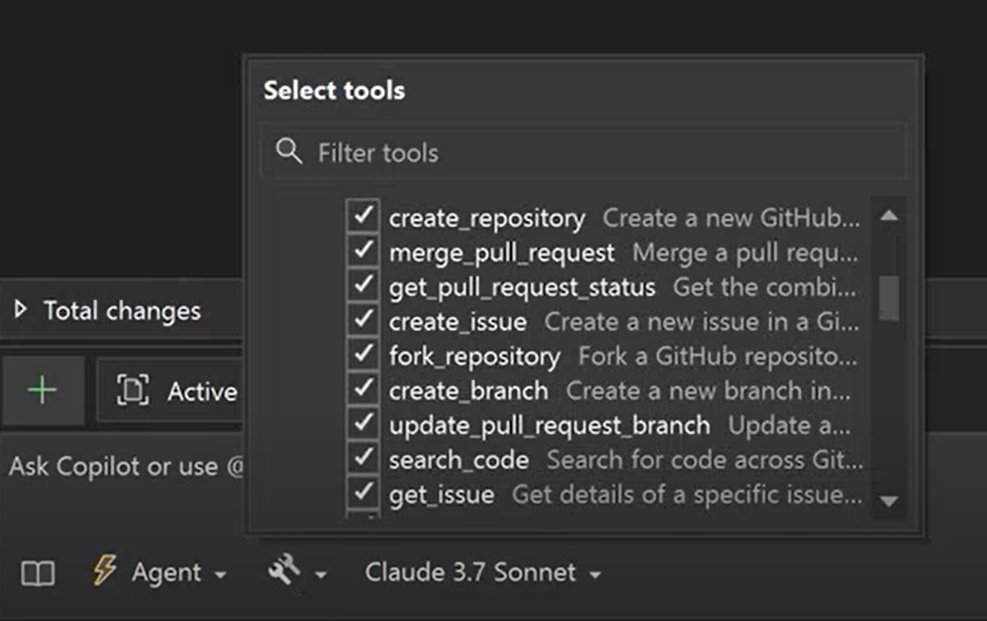
We’re constantly evolving to get Copilot features out so that you, the developer, are never behind. As such, we’re excited to announce that Visual Studio is moving to a monthly release schedule for Copilot updates. You can access the latest Copilot updates by continuing to update Visual Studio to the latest version.
Stay connected with everything Visual Studio in one place! Visit the Visual Studio Hub for the latest release notes, YouTube videos, social updates, and community discussions.
Your feedback helps us improve Visual Studio, making it an even more powerful tool for developers. We are immensely grateful for your contributions and look forward to your continued support. By sharing your thoughts, ideas, and any issues you encounter through Developer Community, you help us improve and shape the future of Visual Studio.
We’re excited to announce a big surprise for the AI community — TechCrunch Sessions: AI is getting a limited-time discount to broaden the number of people who can attend and learn from some of the brightest minds in the industry.
For just $292, you can get a general admission ticket — plus a 50% discount on a second — to attend our flagship AI-centric event at UC Berkeley’s Zellerbach Hall on June 5. We’re looking for everyone from those working in the industry to founders, academics, AI die-hards, and beyond to get the chance to learn from and engage with a full day of programming, including:
And that’s on top of our consistent focus on networking opportunities, with attendees getting the chance to set up 1:1 sessions, meet with peers and potential partners, and start the relationships that lead to big deals down the road.
When the event itself is done, you’ll also get the chance to keep the momentum rolling with side events hosted by partners across Berkeley, California, including Tanka, Toyota, and MyHomie. Just because our event is done doesn’t mean your perks for getting a ticket should, after all.
Remember, this pricing is a limited-time offer, so act now and head here to reserve your slot at one of the most exciting events within the AI space this year!
Reflecting a global trend towards greener living and sustainability, home-based businesses are increasingly becoming more eco-conscious. Operating a home-based business means that you are effectively merging your living and working spaces, which opens up a unique opportunity to implement green measures across both areas.
With growing awareness about carbon footprints and a myriad of energy-saving options available, many entrepreneurs are already weaving eco-consciousness into their everyday business operations. Building a sustainable business also means working towards energy efficiency, which is not just beneficial for the environment, but can bring down monthly expenses too.
While many think of turning to solar power panels or electric vehicles when considering going green, there exist simpler and equally effective methods to optimize energy usage, like battery energy storage systems (BESS). A BESS is an excellent way for home-based businesses to control their energy use and contribute to environmental conservation
A BESS is much more than simply a collection of batteries. It is a sophisticated system designed to manage energy storage and consumption dynamically. During off-peak hours, when energy is cheapest, the system stores power to use it during high-demand periods. Moreover, a BESS allows home-based businesses to make use of renewable resources like wind or solar power, storing the excess energy produced for later use. It can provide a critical back-up during power outages too, a crucial consideration for businesses relying heavily on electrical devices.
One of the most straightforward strategies for managing energy consumption is to use energy-efficient equipment. Investing in energy-rated computers, printers, and other necessary electronics ensures that you use less electricity. While the initial price tag may be higher than traditional models, the long-term savings, both financially and environmentally, make them an excellent investment for your business.
In the age of IoT (Internet of Things), smart home technology opens up opportunities for increased efficiency. Smart thermostat systems can optimize the heating and cooling of your house, reducing energy wastage. Similarly, using smart lighting systems, where you can control the intensity and timings of the lights, helps in avoiding unnecessary energy consumption.
A sustainable home-based business is also a paperless one. Entrepreneurs can significantly reduce their paper consumption by conducting a digital-first business – communicating via email, maintaining digital records, billing online, and more. Going paperless is not only good for the environment but also makes data management more accessible and less time-consuming.
Adopting sustainable (Eco-Conscious) practices is incomplete without implementing recycling measures. Entrepreneurs should aim to minimize waste as much as possible, reusing items wherever feasible, and recycling whenever necessary. Purchasing recycled products whenever available is also a fundamental aspect of a green business.
If resources and regulations allow, home-based businesses should consider switching to green energy suppliers. These companies generate energy from sustainable resources like wind, water, or sunlight. Choosing a green energy plan provides a promising way to reduce carbon footprint while fostering renewable energy production.
Running a home-based business offers entrepreneurs a great opportunity to reduce their environmental impact effectively. Adhering to sustainable practices not only projects a responsible brand image, but it also manages to save resources. Coupled with the increasing ease and affordability of installing energy-saving technologies, there’s never been a better time for home-based businesses to go green. By incorporating strategies like installing a BESS, utilizing energy-efficient equipment, implementing smart home integrations, promoting a paperless environment, and recycling, entrepreneurs can begin their journey towards an eco-conscious, energy-efficient, and sustainable future.
Find a Home-Based Business to Start-Up >>> Hundreds of Business Listings.
Android 16, the next major revamp for Google’s smartphone operating system, has already reached platform stability. And now that all the key changes and upgrades have been locked in place, Google has finally shed light on its public release, sort of.
During a press briefing for The Android Show ahead of the Google I/O developers conference, a Google executive confirmed that the stable build of Android 16 will land on Pixel phones in June, with a fresh aesthetic makeover in tow.
It won’t feature the entire design UI overhaul with the new Material 3 Expressive elements in one go, as Google apps will continue to adapt it in the subsequent months. However, a beta build of Android 16 that lands later this month will give users a taste of the changes to come.
Google says Material 3 Expressive is the company’s “most researched update to the design system since its launch in 2014.” It embraces a youthful new UI design with bolder colors that brings over a dozen changes to elements such as app bars, button groups, and navigation bar, among others.
In addition to a June release schedule for Android 16 on Pixel devices, Google also revealed that it will land on Samsung phones later this Summer. That is likely going to begin with a beta program for One UI 8, which has already been spotted testing on Samsung’s flagship phones.
As far as features go, Android 16 brings a host of notable changes. For photography enthusiasts, they will be greeted with new temperature and tint adjustment controls for more precise grading controls in the camera app, alongside a hybrid auto-exposure system. Support for the Advanced Professional Video (APV) codec is also part of the package to allow high-quality video recordings.

“Android 16 adds the capability for users of LE Audio hearing aids to switch between the built-in microphones on the hearing aids and the microphone on their phone for voice calls,” says Google. Notably, it enables support for the Wi-Fi 6 802.11az standard, which is more secure and scalable.
The Live Updates system in Android 16 introduces a new, and more minimalist approach to notifications that cover ongoing activities such as navigation and food delivery. Extensions, now going by the name “apps,” will also be a huge part of Android 16, allowing the Gemini assistant to get work done across different apps.
It already supports the Google suite of apps, such as Docs, Drive, Gmail, and Maps, alongside a small number of third-party options like Spotify, but more names will adopt it later this year. I already have the latest beta build running on my Pixel 9, and will soon report on the design and functional changes as the final set of changes start appearing in the coming weeks.
I’m not usually susceptible to sudden flashes of feeling ancient, but counting the number of years since id rebooted Doom did the job. 2016 was a long time ago, so long that it predates me owning a gaming PC. Back then, I was still shackled to consoles for anything more demanding than Team Fortress 2, so that’s where I picked up Doom ’16. It was OK, but I didn’t see what all the hype was for, and didn’t even like it enough to see it through.
After finally getting a capable PC a few years later I picked Doom back up, and this time it was sublime. Every element of id’s reimagined FPS that I’d chafed against with a PS4 controller—its speed, vertical arenas, emphasis on hot-swapping guns—created beautiful music with the precision of a mouse and keyboard. Doom ’16 and its follow-up Doom Eternal were undeniably PC games first.
Doom: The Dark Ages is a console game first.
The Dark Ages is a more grounded (literal and figurative) take on modern Doom. As I wrote in my 80% Doom: The Dark Ages review: “The Dark Ages is the trilogy’s sharpest zag yet—recasting the Slayer from a meaty fighter jet, ducking and dashing past the hordes of Hell, to a stalwart tank, smashing shield-first into the action.”
The new combat loop revolves around the Shield Saw, a new block button permanently bound to right-click. The shield feels great, and the ability to block incoming damage changes the calculus of Doom’s crowd control, but playing with mouse and keyboard, I was put off by new constraints tailored around a slower, thumbstick-y experience.

I can’t unsee how profoundly horizontal The Dark Ages is. This iteration of the Slayer can sprint, but the dashes and double jumps of Eternal are gone, as are spaces that take advantage of that mobility. He’s functionally a Call of Duty protagonist, and not the kind with a cool jetpack.
The arenas of The Dark Ages are wide, flat battlefields with fewer death pits and high grounds than the prior games. A dull change if you ask me, but one that makes a lot of sense for the console version: A Doom with less jumping is a Doom that asks you to take your thumb off the stick less often.
Similarly, The Dark Ages has way fewer Cacodemons, Revenant stand-ins, or other airborne threats that necessitate looking up. Demons don’t give chase as much as they used to. Lines of shielded Hell soldiers stand still, patiently waiting to be blown up while a Mancubus stands its ground launching plasma balls. Despite the presence of precision weapons, The Dark Ages does not demand snappy aiming or targeting weak points. With a mouse, nailing shots that used to blow off a Carcass’ cannon in Eternal feels like slamming the gas pedal on a car just to top out at 30mph.
Controller comfort would also explain why The Dark Ages completely changed how guns work. Gun upgrades have moved away from hot-swappable mods (like Eternal’s auto shotgun/grenade launcher combo) in favor of passive upgrades.

Free of the mod system’s complexity, and having folded the chainsaw’s role into standard melee, id was able to dedicate a button to swapping between two guns of the same ammo type. It’s a significant win for controller players, dramatically reducing time spent looking at a weapon wheel.
The old way of hot-swapping guns with the number keys was always perfectly comfortable on a keyboard, so PC players see no benefit from streamlining. Other simplifications are way less subtle—between fights, The Dark Ages rarely puts you in any danger of falling off a cliff or even slightly missing a jump, a concern made obvious by how its new “shield jump” mechanic (where you throw the shield across certain gaps and press a button to leap toward it, seen below) is an automatic escort from one point to another.
If you manage to fall off the world, you’re teleported back without even a health penalty—a far lighter touch than Doom ’16, which straight up killed you.
The result is, I think, the least thrilling Doom of id’s modern trilogy, but I can’t deny how much better The Dark Ages plays on a controller than Eternal or even the mechanically simpler Doom ’16.
Through no small sacrifice, id no longer crowds its buttons with multiple types of grenades, a sword, a flamethrower, and an awkward d-pad action just to swap weapon mods. Wide arenas and that ever-present block button compensate for slower thumbstick turn speeds. The Dark Ages gives players the room to take a mental snapshot of the action in a way that was less accessible with Doom 16’s claustrophobic hallways and Eternal’s finger gymnastics.
I think id went overboard with the streamlining—maybe inspired by The Dark Ages being a Game Pass product first and foremost—but the beauty of id making these FPSes so different from each other is that each one is destined to have its staunch defenders for years to come. Personally, I’m planting my “Eternal was peak” flag and hoping the next chapter of Doom is tailored around a keyboard.

The Galaxy S25 Edge has officially arrived with a slim build and hefty price tag to match, so I’ve gathered six of the best preorder deals from across the web below. From epic trade-in opportunities to free storage upgrades and beyond, keep reading for the best ways to save cash on this Samsung phone before it hits store shelves on May 30th. So far, I’ve seen offers like $800 off with eligible trade-in at Samsung, or this Verizon deal that gets you the Edge for FREE if you add a line and trade in an eligible device. Not too shabby for a phone that isn’t even out yet!
In case you missed the big announcement yesterday, the Galaxy S25 Edge boasts most of the same great specs found in the rest of the S25 series — including a Snapdragon 8 Elite chipset and all the latest AI-boosted software features — and packs them into an unbelievably thin, lightweight device. The only catch is that this lightweight build comes at the expense of battery life. Still, the S25 Edge is destined to earn a place among the best Android phones released this year, and thanks to the following preorder deals, you might get it for pretty cheap too.
This Homemade Pear Compote is easy to make and super versatile. Spoon it over ice cream, cakes, yogurt, or pancakes for a sweet touch. It also pairs surprisingly well with savory dishes—try it with pork chops or shrimp for a delicious twist.

This post may contain affiliate links. Please refer to the terms page for more information.
This compote is made with fresh pears, cozy spices, and a touch of sweetener. It’s cooked on the stovetop until it thickens and turns beautifully glazed.
Gather the following ingredients to make this spiced pear compote recipe:

See recipe card for quantities.
Just follow the easy steps below, and you’ll have a delicious homemade pear compote ready to enjoy with all kinds of dishes:

Step 1 – Peel, core and chop pears into ¼” cubes. Place pears, honey, lemon juice, brown sugar, cinnamon and cloves in a saucepan. Stir to combine.

Step 2 – Place saucepan over medium heat and bring to a low boil, stirring often.

Step 3 – When the mixture starts to boil, turn the heat down to low and let it simmer for about 40 minutes. Stir it every few minutes. The pears should be tender and covered in a thick syrup.

Step 4 – Spoon the compote into a heat-safe container and let it cool down to room temperature. Keep it in the fridge until you’re ready to use it.
Feel free to adjust this recipe to suit your preferences. Here are some ideas to inspire you:
I recommend the following equipment to make this spiced pear compote:

For best results, store the homemade pear compote in an airtight container in the refrigerator for no more than 4 days.
For longer storage, freeze it for up to 2 months. When ready to use, thaw in the refrigerator overnight.
Be careful not to overcook the pears—you’re aiming for tender, not mushy.
Using a heavy-duty saucepan is ideal, as it distributes heat evenly and helps the pears cook consistently. The pears are ready when you can easily pierce them with a fork, but they still hold their shape.
Looking for some yummy recipes to serve the compote with? Try these:
I hope you enjoy this homemade pear compote as much as my family and friends have over the years!

This Homemade Pear Compote is easy to make and super versatile. Spoon it over ice cream, cakes, yogurt, or pancakes for a sweet touch. It also pairs surprisingly well with savory dishes—try it with pork chops or shrimp for a delicious twist.
Peel, core and chop pears into ¼” cubes.
2½ Cups Chopped pears (approximately 4 – 5 medium pears)
Place pears, honey, lemon juice, brown sugar, cinnamon and cloves in a saucepan. Stir to combine well.
1 Tablespoon Honey, 2 Tablespoons Brown sugar, ½ teaspoon Ground cinnamon, ¼ teaspoon Ground cloves
Place saucepan over medium heat and bring to a low boil, stirring often.
When the mixture starts to boil, turn the heat down to low and let it simmer for about 40 minutes. Stir it every few minutes. The pears should be soft and covered in a thick syrup.
Spoon the compote into a heat-safe container and let it cool down to room temperature. Keep it in the fridge until you’re ready to use it.
Calories: 284kcalCarbohydrates: 76gProtein: 1gFat: 1gSaturated Fat: 0.1gPolyunsaturated Fat: 0.4gMonounsaturated Fat: 0.3gSodium: 8mgPotassium: 447mgFiber: 11gSugar: 55gVitamin A: 91IUVitamin C: 18mgCalcium: 50mgIron: 1mg