On Monday, University of New Mexico Health Sciences Center information technology teams identified a cybersecurity threat around 11 a.m. and began containment efforts. From 12:30 to 2:30 p.m., the health system temporarily diverted ambulance traffic to other hospitals in Albuquerque and Santa Fe, while outpatient surgeries and appointments were suspended for the remainder of the day as teams worked to protect the network. Notably, UNM Hospital is New Mexico’s only Level I trauma center.
In an update provided by the UNM Health Sciences Center the following afternoon, officials said critical electronic systems were back online. “All UNM Health hospitals are fully open, ambulance traffic has returned to normal operations, and clinics have resumed regularly scheduled appointments and procedures,” the update stated. “Their assessment determined that the event affected some end-user devices but did not penetrate core systems or servers. Teams worked with external partners to secure the network and notified state and federal law enforcement.”
Classes at the UNM School of Medicine, College of Nursing, College of Pharmacy, and College of Population Health remained canceled on Tuesday, and nonessential Health Sciences Center employees were asked to remain home. A later update added, “Classes and research activities at the UNM Health Sciences Center resumed Wednesday and clinical operations across all UNM Health facilities are fully functional.”
The incident remains under criminal investigation, which may have limited what the university has shared publicly. UNM has not described the event as a ransomware attack.
BYOD Claims Responsibility and Offers an Apology
While all of this was going on, a hacker group called BYOD also listed the University of New Mexico on its data-leak site, which operates as a Tor hidden service. The post claimed 36,000 machines were compromised across the main campus and the hospital sector, along with two Oracle databases, Oracle HR and Payroll systems, student records, internal emails, electronic health record rosters, and other data. Additionally, it claimed to have every student and employee’s personally identifiable information, including Social Security numbers.
“This is your entire network and infrastructure compromised, the entire university COMPLETELY,” the listing said, according to a republication via Dark Web Informer. “Anyways, you know where to find us (contact tab). We will take you down when communication has been established between our team and yours.”
On Tuesday, BYOD published an update offering free decryption keys for remaining locked devices in the hospital sector only. The full message read:
“We are offering the decryption key for the remaining of locked devices for free (ONLY for the hospital sector) we did not know that it was running machines related to assisting patients in real-time, (we would keep it locked if it was appointments, patient information + research data only), we are still going to keep the data, but we will provide the decryption key for the hospital sector only. Feel free to contact us on Session. To any patient that was affected, please provide us proof, and we will pay you up to $2500 each for the inconvenience. We are sorry once again. We have morals and we have a heart, we are not villains, but we will still continue to hold companies responsible for bad security leading to the compromise of any customer data. That’s the whole reason why we came about and we plan to keep it that way.”
Following a cybersecurity incident, those responsible may attempt to exploit public concern through additional scams, including false offers of payments or compensation. pic.twitter.com/0nfSoRj3UB
It is unclear whether BYOD provided any decryption assistance that contributed to the restoration of systems at the UNM Health Sciences Center. The UNM Health Sciences Center did not immediately respond to a request for comment on that point from Gizmodo at the time of publication. The university’s public statements have not confirmed the claims from BYOD, so the full extent of those claims remains unverified at this time.
The closest thing to a public statement regarding BYOD was included in a Wednesday update from UNM, which stated, “Following a cybersecurity incident, those responsible may attempt to exploit public concern through additional scams, including false offers of payments or compensation.”
The statement also claimed, “UNM did not make concessions with any group behind the threat.”
What is BYOD?
BYOD is a relatively new ransomware group that emerged roughly a month ago. According to BleepingComputer, the group’s leak site lists six victims so far, including T-Mobile, and it has already published data it claims to have stolen from three of them. The group has described its activity as a form of “pentesting” intended to expose vulnerabilities and hold data controllers accountable.
One of its earlier targets was Trump Mobile, where the group posted a database of what it claimed was 3,615 customer records. Reporters and security researchers later verified parts of the data as authentic. The leaked file contained real names, email addresses, phone numbers, physical addresses, and order details. According to International Cyber Digest, records associated with Trump Organization Chief Information Officer Eric Brunnett and U.S. Congressman Mike Kelly were included in the data. BYOD alleged the breach occurred after malware infected a device at partner company Liberty Mobile, and claimed Trump Mobile responded by saying it had no security team to handle the incident.
Public apologies and offers of free decryption keys from ransomware groups are uncommon, but they’re not completely unprecedented. In January 2023, the LockBit group formally apologized for an attack on Toronto’s Hospital for Sick Children after an affiliate violated internal rules against targeting medical institutions. LockBit stated it had blocked the affiliate and released a free decryptor. The hospital later said it had not paid a ransom and was restoring systems from backups.
What is virtual staging, and how does it benefit real estate businesses? In the competitive world of the real estate market, the first impression lasts when it comes to browsing online. It can make or break the deal when deciding which homes will be the first to visit among the lists. Having a listing of photos is considered as one of the most powerful marketing tools that can be utilized by real estate agents and sellers. Make your property listing be more appealing by connecting with vetted professionals in Cad Crowd now.
Virtual staging
Where empty rooms can be difficult to visualize, may appear small to the naked eye, and it can be expensive to physically furnish an empty property, virtual staging for architecture services come in. It is the process of digitally transforming and furnishing photographs of the real and existing rooms with the help of editing software and 3D furniture models. Virtual staging makes it possible for the professionals to have a realistic feature, decor, lighting enhancements that could make the empty home feel alive. When it is correctly done, it makes it easier for the buyers to have an outlook and vision of how the space can be used without the need of having the real property into the property.
However, it should be known that virtual staging is not totally used as a replacement for the traditional staging in any circumstances. Understanding how it works, what it costs, and when to properly use it provides the opportunity to help the sellers make smart decisions when it comes to marketing. Rather than having the physical appliances such sofas, tables, beds, artworks, rugs, and lamps into the room, the 3D designers are able to put them into photographs while integrating the works of the camera perspective, room dimensions, natural lighting, shadows, furniture scale, and lastly with the interior style. The result of it is an image that appears to be professionally decorated despite the actual room being empty.
Both of these services are usually perceived as confusing.
Virtual staging means working with the real photographs of the existing properties. An example of this is when a vacant living room is photographed; the furniture that is desired to be seen in the space can be digitally added to create the vision. A Full CGI rendering would depict making an entire environment in the digital world. Commonly, it can be applied to homes that have not been built, new developments, architectural visualization, and with pre-construction marketing. Instead of merely editing photographs, every wall, floor, and furniture piece is generated in 3D.
Why virtual staging has become so popular
A lot of homebuyers opt to browse and search online for their needs, or they sometimes look online for inspiration for their homes. Professionally staged photos stand out right away when buyers quickly peruse dozens of listings. 3D visualization services help the buyers when it comes to understanding the room proportions, imagining the placement of the furniture, visualizing the lifestyle possibilities, seeing the function of the awkward spaces, and having an emotional connection with the property. When the furniture is not present in the room, a lot of rooms could appear smaller than they actually are. Thus, proper staging allows visual reference points that could make it easier to comprehend and understand.
How does virtual staging work?
Step 1: Photograph the Empty Property
Having a high quality virtual staging can make the photographs appealing. The professionals could capture the living rooms, bedrooms, kitchens, dining rooms, home offices, and the outdoor spaces. When the images are done correctly, it could result in better images. The use of proper lighting, camera angles, and high resolution also adds up to making the virtual furniture appear to be more realistic.
Step 2: Analyze the Space
Every 3D architectural rendering designer studies the room carefully. The designers tend to identify every camera angle, floor dimensions, ceiling height, lighting direction, window placements, and the architectural style to help them plan on what’s the best move to apply. With this information, it guarantees that the furniture is placed naturally.
The professional designers have the freedom in inserting realistic furniture models. They carefully check if it matches the perspectives, furniture scales, material textures, color palette, lighting, shadows, and reflections. The goal of the virtual staging is to have every piece appear as it was physically present in the room, making it more lively, attractive, and welcoming for the buyers.
Step 4: Post-Production
It would be easier to attain realism when final edits are made and generated in a way that is flawless. It may include shadow refinement, color correction, reflection adjustments, brightness balancing, object cleanup, and enhancements of minor lighting. Having to apply quality control with 3D architectural visualizations helps prevent editing errors or furniture that looks unrealistic in the photographs, making it unusable.
Virtual staging costs
In every service, pricing could depend on what a client would want, including factors such as image quality, revisions, room complexity, and provision of the service.
Service
Typical Cost
Professional Virtual Staging
It would cost about $30-$200 per image
AI Virtual Staging Tools
Approximately it would cost for about $12–$39 per image (or subscription equivalent)
Physical Home Staging
The cost will be $1,500–$5,000+ for the first month, and additional ongoing monthly furniture rental and for other related costs
The professional services typically consist of the design consultations, furniture style selection, high quality 3D assets, revision rounds, and manual editing that could provide a much better realism. The AI tools can be inexpensive, but usually offer fewer customization options and have a less reliable output.
An advantage of using virtual staging is the speed and efficiency of doing the tasks.
Service
Typical Turnaround
Virtual Staging
24-72 hours
Physical Staging
7-14 days
The physical staging would typically require scheduling, styling, removal after the scale, moving crews, and the delivery of the furniture. On the other hand, with 3D rendering services and virtual staging eliminates almost all of the logistical challenges that could hinder the overall process of the product.
Why is virtual staging delivering better ROI?
It is not just popular because it is widely used, is known as a more economical choice, and can provide the client with an excellent return on investment. Reports in industry have shown that the staged homes do attract the interest of the buyers, which leads to selling faster, compared to upstaged homes. However, results may vary per market, and with the help of good presentations, it can improve the engagement, which in turn, will result in having more clients.
An example of this is that when applying physical staging, it would cost thousands, but with virtual staging, it would cost less for the overall listing. Comparing these two stages, the return on the lower-cost option is significantly higher as a small initial investment is needed. Yet, it does not always mean that virtual staging is the better option. It is better to depend on the property, the selling strategy, and the target buyers to know what is best to use.
When does virtual staging beat physical staging?
It is not always the best option to hire an architectural visualization designer for virtual staging, but when a situation arises, it can be a great help, especially as it provides speed, flexibility, and affordability, compared to traditional physical staging. It is one of the best marketing solutions for residential properties.
It is hard to figure out an empty and vacant room. An empty room may feel less inviting, and the buyers have a hard time seeing it. The use of the virtual furniture aids in improving the overall space, as one can visualize what is the best layout of the furniture to put. The empty rooms can be transformed into one of the welcoming spaces.
Budget conscious sellers
Rather than having a costly furniture rental, the sellers could easily market the properties without spending a lot. Having virtual staging applied in the works can be one of the smartest options for starter homes, mid-priced listings, and rental properties.
Remote cost
Some of the buyers relocate from other places. They browse the place online, where the first impressions take place.
Easy updates and design flexibility
Virtual staging makes it easier for the 3D architecture designer to modify the styles, colors, and room layouts without the need of moving a piece of furniture inside the room. The sellers can change the layout depending on the target audience. An example of this is changing the layout from the modern style to a farm house, it can be updated more easily than in the physically staged room.
Virtual staging beats traditional physical staging when it comes to affordability, speed, and flexibility, as it has a top priority in online marketing. This is the best option to utilize for many residential properties, as it balances the cost and the marketing impact.
Physical staging is still the best choice despite its own limitations. Buyers tend to visit the location of the property in person as they would want to see the place and experience it. The visitors tend to appreciate the layouts of the furniture, room layout, and the atmosphere of the place, which a virtual staging cannot offer. Physical Staging helps in creating the overall experience during tours or visits. It would help in envisioning what it would be like to live in the place. It also helps the buyers easily understand the proportion of the rooms, as it can impress them during the visit.
The hybrid approach: the best of both worlds
With ongoing advancements in architectural design services, a lot of experienced real estate professionals use both of the methods and integrate them. An example of this is to physically stage the main living room, dining area, and virtually stage the secondary bedrooms, home office, and the other rooms. By utilizing these strategies, it can reduce costs while still having the experience of the buyers in the room. It is best since it offers an effective balance between the budget, speed, and the quality of the presentation. The hybrid approach recognizes the approach of the virtual and physical staging as a complementary strategy. Without spending a lot, the marketing can still happen, making the properties stand out without having to fully furnish the room.
AI virtual staging versus professional virtual staging
The use of artificial intelligence makes virtual staging faster and more accessible compared to before. Yet, it could generate AI images and professionally designed virtual staging that are not identical to it.
AI virtual staging
professional virtual staging
Lower Cost
Higher Quality
Very Fast generation
Manual Attention to detail
Limited furniture Control
Custom furniture selection
May produce unrealistic proportions
Accurate scale and perspective
Fewer revision options
Multiple revision rounds available
Can struggle with complex rooms
Better handling of difficult layouts
Ideal for large volumes
Ideal for premium listings
The use of artificial intelligence is helpful as it can offer speed, and it is affordable to use, especially when there are many staging images that should be produced at once. If you’re keen on checking precision, consistency, and polished marketing images, hiring a professional 3D architectural visualization designer is still the better option.
It should be understood that the goal of having virtual staging is to improve the presentation and not to mislead buyers. It is important to be responsible for clearly labeling the visually staged photos, avoiding editing that could alter the structure of the property; it should also be noted that defects or damages should not be hidden, and ensure that the furniture is scaled realistically.
There are rules in the market that should be followed, such as the Multiple Listing Services (MLS) regulations, some may demand listing images that have been digitally altered to be exposed. Before publishing the virtually staged images, the real estate experts and professionals should review the applicable advertising regulations and local MLS guidelines. It is crucial to be transparent in many ways, as it can prevent misunderstandings and build trust with the buyers.
Tips for getting the best results for virtual staging
Having the right professionals and tools can help bring a project that is high quality. To have the best results, start with professional real estate photography as it could enhance the images, have a furniture style that could best match the architecture of the home, have realistic designs rather than having complex ones that are hard to achieve, and does not feel authentic. Build a consistent design across all the rooms, and request for revisions if the furniture scale or the hues are highly unnatural and do not belong to the place, as well as disclose the images when it is virtually staged. Even with these small changes, it could have a significant effect when it is collectively made, as it can also boost credibility and effectiveness in listing photos.
Is virtual staging worth it?
Some would agree, some would not. This would depend on the purpose and the goal. Virtual staging from an expert interior rendering designer does offer an affordable way to have the empty spaces transform into inviting, well designed and planned interiors, which can engage the buyers in visualizing their potential homes. On the other hand, the physical staging offers its advantages, especially in the world of the luxury properties, open houses, and events when the buyers want to visit their home in person. It would still be dependant on the project’s budget, property type, and the goal in choosing the best stage to use.
Working with the professional virtual staging experts
A high quality virtual staging would require more than a simple digital furniture present in a room. It should have a realistic perspective where it could inspire the buyers to choose it. Cad Crowd allows partners with experienced professional freelance 3D design experts who can virtually stage the photos according to the goal and purpose of the project. It can offer a personalized collaboration that could integrate with the details of the images, as it aligns with the marketing goals, making it represent the property accurately.
Using Cad Crowd makes it easy to have an output that is associated with the needs of the projects. Whether choosing an AI assisted staging, or a professional virtual staging, or the hybrid ones, it is important to apply the value of transparency and accuracy in providing a quality output. This could help in making the buyers connect more with the property while still trusting the overall process.
How Cad Crowd can help
The use of virtual staging has become widely known in modern real estate. It is one of the cost effective marketing tools that could help enhance the images, listings, and portfolios. The agents and the sellers can highlight a home’s potential without incurring the costs and hassles of moving actual furniture by digitally furnishing real estate photos. While physical staging continues to offer unparalleled impact during in-person showings, it is an appealing option for many listings due to its quicker turnaround times, cheaper costs, and powerful online presentation. For many properties, the best overall outcomes are obtained by carefully combining the two methods. Find the best freelancer for the job with Cad Crowd to bring your property photos to life. Contact us for a free quote.
MacKenzie Brown is the founder and CEO of Cad Crowd. With over 18 years of experience in launching and scaling platforms specializing in CAD services, product design, manufacturing, hardware, and software development, MacKenzie is a recognized authority in the engineering industry. Under his leadership, Cad Crowd serves esteemed clients like NASA, JPL, the U.S. Navy, and Fortune 500 companies, empowering innovators with access to high-quality design and engineering talent.
With less than a month to go until its release, fans have learned a fair amount about Grand Theft Auto 6, and it still seems like they’ve only gotten to know a small portion of what’s coming in this gargantuan game. A recent interview unveiled interesting facts about improved police response, NPC reactions, a dynamic weather system, and realistic public transportation. As more details are revealed, fans are continuously blown away by Rockstar’s attention to the small things in the game.
Rockstar has been working on GTA 6 for many years, allowing them to reach a perhaps unprecedented level of detail. Leonida is a hyperrealistic world with intricate, interconnected systems that regulate the lives of its digital inhabitants. In GTA 6, committing crimes isn’t only about going guns-blazing. Players will have to plan ahead so they don’t find themselves in a bad situation. And if Jason and Lucia end up attracting too much attention from law enforcement, the police will display new methods of arrest.
New GTA 6 exclusive shows police dogs and realistic bus routes
GTA 6 characters Lucia Caminos and Jason DuvalRockstar Games
In an exclusive report, Edge Magazine sat down with Rockstar North co-studio head Rob Nelson, and witnessed how much harder it will be to escape the police’s grasp in GTA 6. Not only are the cops able to identify you based on your last sighting (especially if you’re spotted by CCTV), but they can also find you easily thanks to car trackers and NPC reports. If you’re spotted, then be prepared to face not only human officers but also the K9 unit, which the police will sic on criminals.
In the gameplay witnessed by Edge’s reporter, Jason and Lucia are on the run following a motorcycle crash after a robbery. A K9 unit quickly joins the pursuit, and one of the Alsatians jumps on Jason, pinning him on the ground. So, if you have a hard time shooting dogs in a game, get ready to spend a lot of time in jail in GTA 6.
Cops aren’t the only problem when committing crimes in Grand Theft Auto 6. Each NPC has distinct traits and will react differently to Jason and Lucia’s actions. While some are more inclined to back away, others may attack them — whether they’re a victim or a passerby. Therefore, players will also have to pay attention to NPCs that might try to play the hero, as not all of them will cower in fear.
Response to crime is just one of the many systems that have been taken to the next level in Grand Theft Auto 6. Public transportation in Leonida is also impressively realistic, as both the bus and train have their own routes and timetables. Phil Hooker, head of development, has put a lot of hours into making sure that these systems are working as intended — perhaps even better than in real life. “I’m obsessed with making sure they always turn up,” Hooker told Edge.
It’s not all about experiencing the chaos of Leonida; players can sit back on the bus as they wait to arrive at their stop. The bus ride is the perfect opportunity to relax and watch the clouds. GTA 6‘s dynamic weather system is a massive improvement over GTA 5: cloud systems move independently and are shaped by wind, humidity, fog, time of day, and season.
Continuity and trust let Rockstar build its biggest project
Image: Rockstar Games
Grand Theft Auto 6 is a major success without being out yet, in large part thanks to Rockstar’s incredible teamwork. Many of its developers have worked together for decades and can see how they fit into such an enormous project without being explicitly told what to do. Each team could make significant progress on their areas without waiting for instructions from above. As Rob Nelson puts it, “The teams individually had a strong idea of what they wanted to evolve. It didn’t need to come from us saying, ‘We need to do this’, or ‘We need to do that’.”
To make GTA 6, it was crucial for Rockstar to guarantee continuity and trust, learning from previous titles and retaining valued team members. This is what has allowed for employees such as Hooker to look at the final product and say, “We’ve made what we wanted to make.”
Choose how proactively Copilot offers inline suggestions.
A helpful suggestion at the wrong moment can still feel like an interruption. When you’re completing a familiar pattern, you may want Copilot to anticipate several changes ahead. When working through delicate logic, you may prefer Copilot to scope its changes to the statement at hand and leave the next decision to you.
Community feedback about inline suggestions made both preferences clear: some developers wanted fewer suggestions, while others wanted Copilot to do more. No single default could satisfy everyone. In earlier posts about training the 3-in-1 inline suggestions model covering Completions, NES, and Long-Distance NES (part one, part two), we explained how developer feedback helped us improve the default experience. This strong default is a great starting point, but developers differ in how much assistance they prefer. We wanted to let them tailor their experience to their own preferences.
Configurable eagerness gives developers more control over how proactively Copilot offers inline suggestions. We trained the inline suggestions model to support three modes: low, medium, and high eagerness. In this post, we’ll explain how we defined and trained those behaviors, what our first approach taught us, and how on-policy distillation (OPD) and reinforcement learning (RL) made the feature easier to carry forward to future models.
Introducing configurable eagerness
We define eagerness along two dimensions: how often the model offers a suggestion and the size of each proposed edit.
Eagerness setting
Intended behavior
Low
Offer fewer suggestions and favor smaller, more conservative edits.
Medium
Provide the current ‘default’ level of assistance.
High
Offer suggestions more proactively, including larger edits when appropriate.
These settings guide how Copilot behaves rather than imposing strict limits on suggestion timing or size. Low eagerness still offers complete, useful suggestions; it’s simply more conservative. High eagerness may propose more and larger suggestions, but only when that work is relevant to the user’s current task.
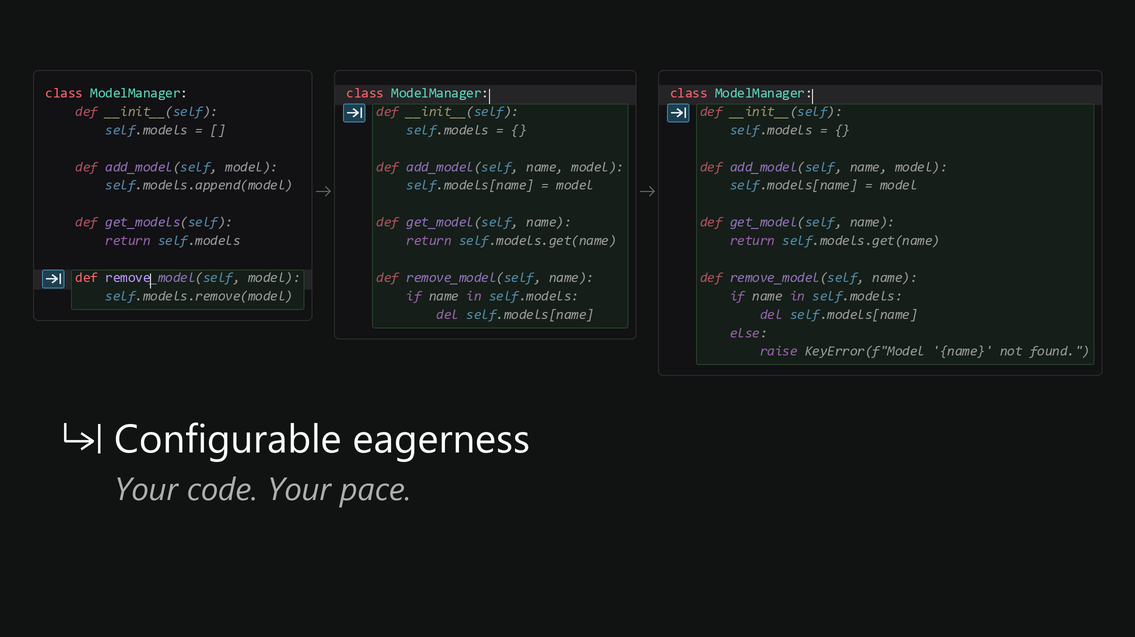
This demo shows a simple example: from the same starting point (class ModelManager:), each setting produces different behavior. Low eagerness proposes five small, incremental suggestions and leaves it to the developer to decide which methods to add and what validation they need. High eagerness proposes three larger suggestions that anticipate follow-on work, such as raising a KeyError when attempting to remove a model that doesn’t exist.
Figure 1. Low, medium, and high eagerness while building a ModelManager class.
To train these behaviors, we needed a measurable definition of eagerness. Because our model outputs suggestions in a diff-based format, we used edit distance (the number of characters changed by a suggestion) as a proxy for eagerness, capturing both edit size and frequency1.
One model, three modes
We considered training a separate model for each eagerness level, but this approach would have multiplied future deployment and upgrade complexity. Instead, we trained one model to produce all three behaviors (low, medium, and high eagerness), conditioned on a lightweight control tag:
Eagerness setting
Control tag
Low
<|aggression|>low<|/aggression|>
Medium
No change
High
<|aggression|>high<|/aggression|>
We trained the model to interpret this tag as an eagerness control: it produced more conservative suggestions for low eagerness and more proactive suggestions for high eagerness, while preserving its default behavior for medium.
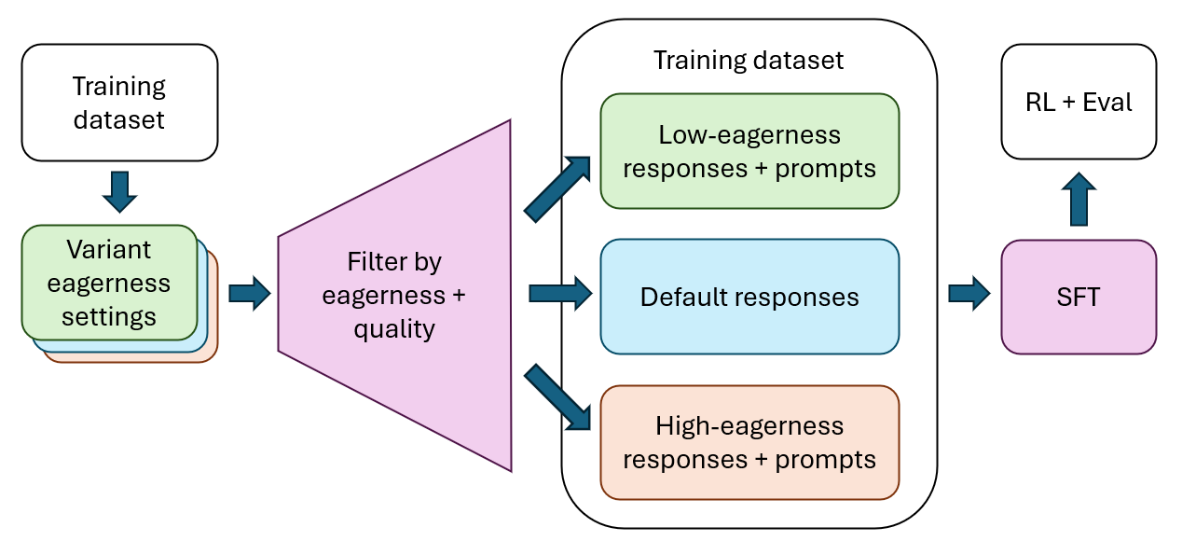
We started with supervised fine-tuning (SFT). For every training prompt, we sampled responses from variants of the model with varying levels of eagerness, filtered to high-quality responses, and ordered the responses by edit distance to produce examples of low, medium, and high eagerness for each prompt in the dataset.
Figure 2. Supervised fine-tuning for configurable eagerness.
The training dataset is sent to model variants with different eagerness settings, and their responses are filtered by eagerness and quality into low-eagerness responses with prompts, default responses, and high-eagerness responses with prompts. These three groups form the dataset for SFT, followed by RL and evaluation.
This approach fit naturally into our existing reinforcement-learning pipeline. Most of the work happened during supervised fine-tuning, with only minimal changes to the RL setup:
SFT taught the model the new low-, medium-, and high-eagerness behaviors.
RL improved overall suggestion quality while preserving those learned behaviors.
Making configurable eagerness portable across models
The SFT approach worked, but it had two limitations that made it difficult to scale: it depended on pre-existing model variants with different eagerness levels and required retraining on responses from those models. Adding the feature to an improved base model would therefore mean training new models and then retraining from scratch. We needed a way to preserve a new model’s default behavior while adding only the low- and high-eagerness modes.
The key insight was that instead of relying on multiple model variants, we could use the production model to generate and compare multiple variants of a suggestion.
To make eagerness portable across future base models, we separated the behavior we wanted to preserve from the behavior we wanted to change. The training objective had two parts:
For medium eagerness, match the behavior of a reference inline suggestions model.
For low and high eagerness, move edit distance below or above the reference model’s medium prediction while preserving suggestion quality.
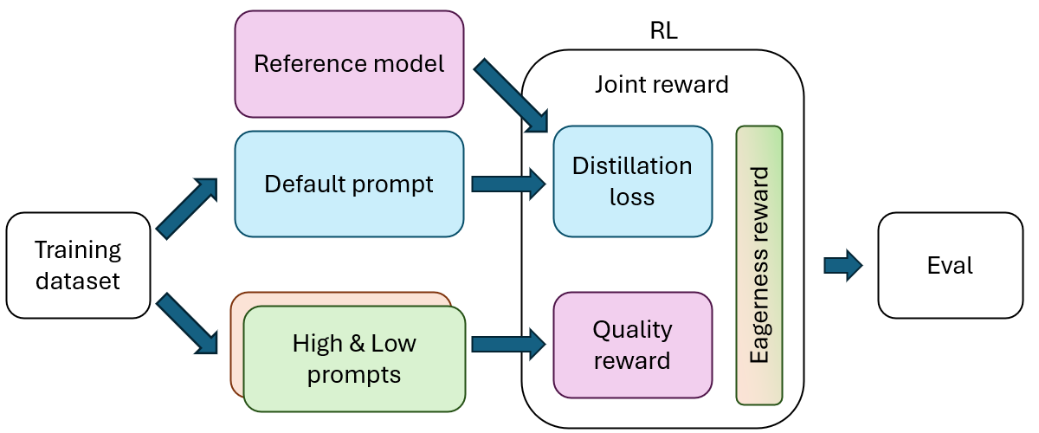
Figure 3. Portable post-training with on-policy distillation for configurable eagerness.
The training dataset branches into default prompts and low- and high-eagerness prompts. Default prompts and the reference model contribute the distillation objective, while low- and high-eagerness prompts contribute quality and eagerness rewards; the combined objective feeds RL and evaluation.
For medium eagerness, we used on-policy distillation (OPD) to preserve the reference model’s default behavior2. The model under training generated responses, and the reference model supplied token-level probabilities on those same generated prefixes. Training then minimized the difference between the two models’ predicted token distributions, encouraging the model to behave like the reference. This taught the model to match the reference on its own generated responses at medium eagerness, while low- and high-eagerness modes were learned through their rewards.
For low and high eagerness, we reused the quality graders developed for the 3-in-1 model’s SFT and RL, then added a relative eagerness reward based on the response’s edit distance compared to the reference model’s medium response. Low eagerness was rewarded for proposing a smaller edit than the reference. High eagerness was rewarded for proposing a larger one. In both cases, the quality reward prevented the model from optimizing edit distance at the expense of usefulness.
Mitigating reward hacking
Reward hacking occurs when a model finds a way to increase its measured reward without producing the behavior the model developer intended to encourage. During development, we observed such failure modes in both of the new eagerness settings and added mitigations for each.
High eagerness: An early reward design did not apply the quality grader to the low- and high-eagerness modes. In that training run, the model sometimes proposed unrelated functionality or unnecessary formatting changes while increasing edit distance, as seen in the example below.
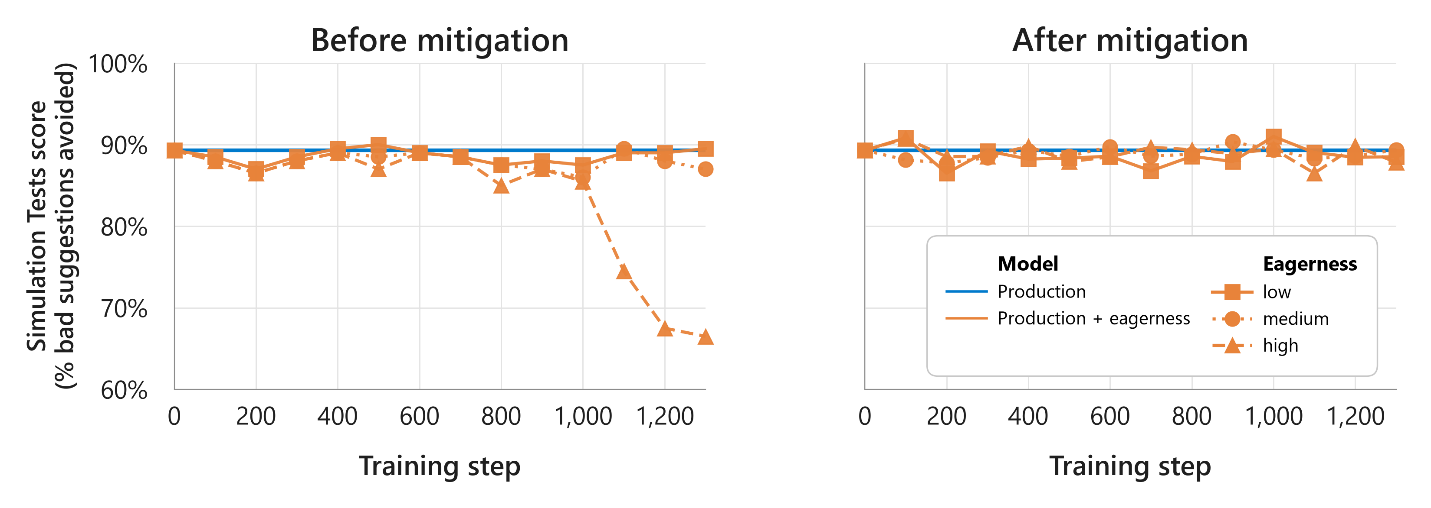
We addressed this failure mode by balancing eagerness rewards with rewards from the RL quality grader, plus added instructions to allow legitimately broader edits. Our offline Simulation Tests (STests) caught this issue.
Figure 4. Example of an over-eager suggestion before mitigation. The model unnecessarily added caching and expanded the service’s API.
Figure 5. Benchmark results before and after mitigating excessive suggestions on the STests benchmark.
The chart plots training steps against the percentage of bad suggestions avoided, on a scale from 60% to 100%. The production baseline stays near 89%; before mitigation, the high-eagerness score falls to about 66% by the final plotted step, while low and medium eagerness remain near the baseline. After mitigation, all three modes stay near the baseline.
Low eagerness: One training run produced smaller measured edits partly by minifying suggestions: removing whitespace and delimiter characters or shortening variable names while maintaining syntactic correctness. This is technically shorter code but is much less desirable! We mitigated this behavior in two ways:
We normalized whitespace and delimiters before calculating edit distance, which removed any possible advantage from deleting whitespace.
We added LLM-based grading for less deterministic cases involving variable names and delimiters.
We baked this into our evaluations by adding a deterministic minification check to the training and evaluation pipeline so this failure mode can be screened in subsequent runs.
Before mitigation
After mitigation
class ModelManager: # user typed # model suggestion def __init__(self):self.models=[] def add(self,m):self.models.append(m)def main(): m=ModelManager() m.add("model1")main()
class ModelManager: # user typed # model suggestion def __init__(self): self.models = [] def add(self, model): self.models.append(model)def main(): m = ModelManager() m.add("model1")main()
Figure 6. Example of minification before and after mitigation.
Online results
We evaluated the configurable model in A/B experiments against the production 3-in-1 model. The results below highlight statistically significant changes. No other key metrics changed significantly from the baseline.
Low eagerness
Medium eagerness
High eagerness
29% lower dismissal rate and 28% shorter suggestions than medium eagerness.
No key metrics changed significantly from the baseline.
40% increase in accepted and retained characters, 40% more suggestions shown, and 22% longer suggestions than medium eagerness3.
These findings indicate that the configurable model behaved as intended: low eagerness was more conservative, high eagerness was more proactive, and medium preserved the default experience.
What we learned
Pluggable features simplify development and deployment. The key was separating what should change (eagerness) from what should remain stable (base-model quality). Instead of embedding eagerness in the full SFT recipe, the post-training approach starts from the production model, preserves its default behavior through the reference objective, and adds targeted objectives for low and high eagerness. That separation lets us carry the feature forward without rebuilding the entire training recipe.
Dogfooding findings should become regression tests. As with the Qualitative Must-Haves benchmark, internal use surfaced issues that offline examples alone could miss because timing, cached suggestions, and surrounding tools all affect the experience. For example, several examples of reward hacking were caught during dogfooding. We turned those findings into repeatable checks and used them to monitor the final model’s quality.
What’s next
Configurable eagerness is a first step toward inline suggestions that adapt to each developer and task. We’re exploring two directions:
Automatic eagerness: Adjust how proactively Copilot offers suggestions based on the current context, while keeping developers in control of the experience.
Learning from experience: Use signals from rejected, modified, or corrected suggestions to reduce repeated errors and better align future suggestions with a developer’s intent.
The goal isn’t simply to suggest more or less code. It’s to provide the right level of assistance for the moment, and improve that fit over time.
Try it out
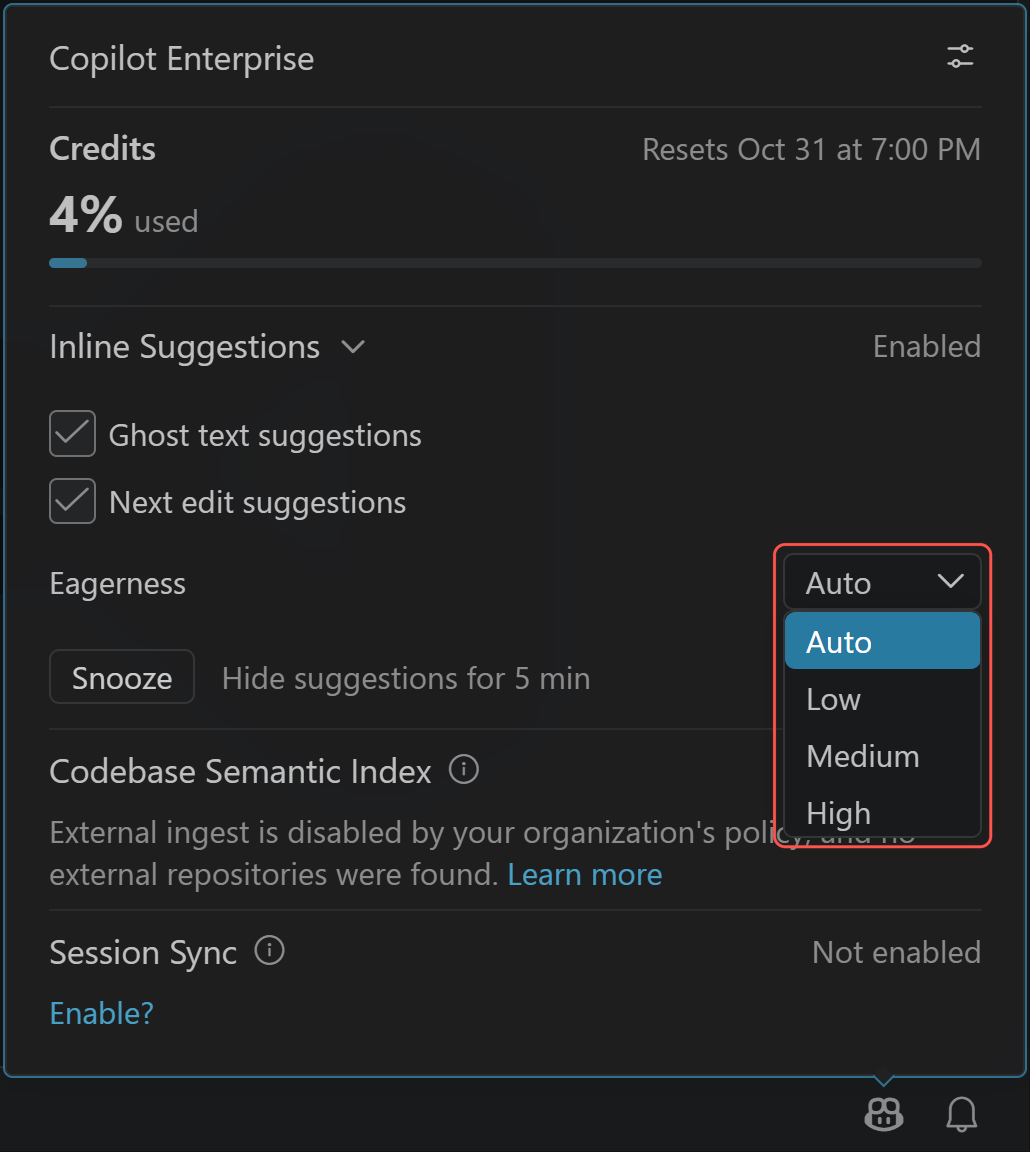
Configurable eagerness is available to paid GitHub Copilot subscribers in VS Code. Update to the latest version of VS Code, confirm that Next Edit Suggestions are enabled (they are on by default), then open the Copilot settings menu and choose an Eagerness setting. Try each mode to find the level of assistance that works best for you, and please share your feedback in the VS Code repository.
Help shape what’s next
We’re constantly working to improve the model, and your feedback can help. Sign up to participate in our user studies and help shape future improvements.
Thank you to the developer community for your ongoing feedback that shaped configurable eagerness, and to the combined teams of researchers, engineers, PMs, and designers across VS Code, GitHub Copilot, and Microsoft for their contributions, testing, and support throughout development.
Special thanks to Alexandru Dima, Julia Gong, Satarupa Guha, Yu Hu, Ben Liggett, Shengjie Ma, Gaurav Mittal, Elsie Nallipogu, Vedha Ranganathan, and Nick Trogh for their insightful feedback on this blog post.
Happy coding! 💙
[1] A no-edit response has distance zero, while a nonzero distance counts the characters changed in a proposed edit, so the distribution reflects both how often edits are proposed and how much they change.
[2] Here, the reference model and the model under training share the same base architecture; our application of distillation preserves behavior from the reference model rather than compressing a larger model into a smaller one.
[3] Raw dismissals were also higher alongside the increase in shown suggestions, but dismissal rate did not change significantly.
The new MacBook Pro with PROLED XDR Display, announced on Wednesday and available on Nov. 6, brings touchscreen control to Apple’s most premium laptop. Pricing starts at $2,899 for the entry-level M5 Pro with the smaller 14-inch display, or $3,399 for the 16-inch model, before any applicable education discounts.
If you go ham on Apple’s preorder configurator and max out the processor, memory and storage, the price balloons to an eye-watering $14,549. That’s wild, especially in today’s economy. Will anyone actually spend that?
Fully loading the M5 MacBook Pro
Let’s see what it means to reach that top-tier configuration of the new touchscreen laptop, starting with the larger, more expensive 16-inch PROLED XDR model at $3,399. Color doesn’t affect price, so take your pick of silver or space black.
The first upgrade you’ll pay for is Nano-texture glass, an antireflective glass finish physically etched at the nanometer scale to diffuse ambient light and eliminate glare, for an additional $150.
Then, stepping up from the M5 Pro’s 20-core GPU to the M5 Max’s 35-core GPU brings the total to $4,949. Bumping to the even more potent 40-core GPU adds another $300, while unlocking horsepower for complex tasks like gaming, video editing and AI-driven operations such as machine learning and coding. (In our testing, CNET found that the Max 40-core is the best fit for pro creatives who work with 8K or raw video, data scientists and intensive users of generative AI imaging and video.)
Next comes memory and storage, which is where things get really expensive. Our starting M5 Max configuration comes standard with 48GB of unified memory and 2TB of storage, but we can pump those numbers considerably. Upgrading to 128GB of memory adds $2,000. Going for 16TB of storage adds $7,000, the most expensive upgrade on the list, roughly doubling the price of the machine.
Pricey high-capacity memory and storage were par for the course long before the RAMpocalypse, but the current AI-fueled spike in RAM and solid-state storage prices has made things worse.
“It’s so expensive because 16TB drives cost a fortune, as does 128GB, and professionals have been paying those workstation prices for years,” Lori Grunin, CNET senior editor for computers and gaming hardware, told me.
Maxing the RAM boosts bandwidth and performance, allowing the Mac to more easily work with the massive files used in high-resolution video, complex 3D models, large datasets and complex mathematical equations. The extra terabytes of storage mean more and larger files can be saved to the device, since neither the MacBook’s memory nor storage can be upgraded after purchase.
All in, our fully loaded MacBook Pro M5 Max with 16-inch PROLED XDR Display comes to $14,549.
Grunin said she’d want more for the money. “For that price, I’d expect the M5 Ultra chip,” she said. “But I don’t think they can put the Ultra in a laptop yet.”
The top-spec MacBooks are aimed at companies that can absorb the high costs of high-capacity storage and memory.Apple
These upgrades aren’t for everyday people
So who buys a laptop that costs more than a used car? Is this just a flex for the super-rich?
“It’s for people who don’t have to pay for it,” said CNET Managing Editor Joshua Goldman.
Configured-to-order, powerful mobile workstations like these are most commonly bought through enterprise procurement by companies, startups and institutions — so the employer is paying, not the individual. Think engineering and architecture firms, Hollywood VFX and post-production houses or AI, machine learning and data science teams. They have big budgets, can put the extra digital horsepower to use and can easily absorb the exorbitant price.
For context, Grunin pointed me to a Dell Precision workstation that I was able to trick out to over $18,000. Five-figure enterprise-scale machines from HP or Lenovo are also not out of the question.
Yes, there will be well-heeled individuals buying at this level, but they’re a relatively small slice of the pie. More likely, the majority of the new touch-enabled MacBook Pros sold will be at still-expensive but easier-to-fathom prices.
Antuan Goodwin
Senior Writer, Electrified Cars
Antuan has nearly 20 years of expertise and experience testing hundreds of cars, including electric, hybrid, plug-in hybrid, hydrogen, and traditional combustion vehicles.
See full bio
Yes. Putting a hard drive in the freezer, placing wet electronics in rice, repeatedly powering up a failing drive, or attempting unproven DIY repairs can make data loss worse and reduce the chances of successful recovery. If important files are at risk, the safest response is usually to stop using the device, power it down, and have it professionally evaluated.
When photos, business documents, tax records, or years of personal files suddenly disappear, it is understandable to search for a quick fix. Unfortunately, the internet is full of data recovery myths that can turn a recoverable problem into permanent data loss. PC Geeks helps Frisco-area customers diagnose computer and hard drive problems without relying on risky shortcuts. As a local, family-owned computer repair company, PC Geeks performs its repair work in-house and provides data recovery for desktop and laptop hard drives. The goal is simple: determine what actually went wrong, protect the data that may still be recoverable, and recommend the safest next step.
Common Data Recovery Myths That Can Put Your Files at Risk
The most important rule after suspected drive failure is to avoid making the problem worse. A logical problem, such as deleted files or file-system corruption, is very different from physical damage involving a hard drive’s mechanical components. What seems like a harmless internet trick may create additional problems before a technician ever sees the device.
Does Putting a Hard Drive in the Freezer Really Work?
No, putting a failing hard drive in a freezer is not a safe data recovery method. The so-called “freezer trick” comes from anecdotes about older mechanical hard drives temporarily becoming accessible after cooling. Even if a particular drive briefly responds afterward, that does not make freezing a reliable or safe recovery technique.
One major concern is moisture. Moving an extremely cold drive into warmer air can create condensation. Moisture and sensitive electronic or mechanical components are a bad combination.
If a hard drive is clicking, grinding, disappearing from the computer, or failing to spin up normally, avoid experimenting with temperature changes. Power it down and have the problem diagnosed instead.
Professional data recovery guidance follows the same cautious principle. Ontrack advises users not to turn on devices suspected of severe physical damage and to shut them off immediately if they produce ticking sounds.
Does Putting a Wet Laptop or Drive in Rice Help?
Rice is not an effective repair for liquid-damaged electronics. It may absorb some moisture from the surrounding air, but it does not remove liquid contaminants or address corrosion occurring inside a computer, phone, or storage device.
iFixit specifically advises users to skip rice when dealing with liquid-damaged electronics. Its repair guidance notes that rice and similar desiccants do not remove contaminants left behind by a spill and may allow corrosion-related damage to continue.
If a laptop or external drive gets wet:
Disconnect external power when it is safe to do so.
Do not keep turning the device on to “see if it works.”
Do not use a hair dryer, oven, or other high-heat method.
Avoid relying on rice as a repair.
Have the device professionally evaluated, especially when the files are valuable.
This matters in North Texas, where moisture is hardly unusual. National Weather Service climate data for the Dallas-Fort Worth area shows normal annual relative humidity of about 66 percent, while Frisco’s 1991-2020 precipitation normal is 42.08 inches per year.
Can I Keep Restarting My Computer to Get My Files Back?
Repeatedly restarting a computer with a physically failing hard drive can increase the risk of additional damage. If the drive is making unusual mechanical noises, becoming intermittently detectable, or causing the system to freeze, every additional attempt may place more stress on failing components.
One restart after an unexpected software problem is very different from repeatedly forcing a malfunctioning drive to boot. Warning signs that should make you stop include:
Clicking, ticking, grinding, or unusual mechanical sounds
A drive that repeatedly disappears from the operating system
Extremely slow file access combined with errors
Frequent freezes while accessing the drive
A computer that no longer recognizes the drive
Recent impact, liquid exposure, or other physical damage
If the data is irreplaceable, minimizing further use is usually more important than getting the computer to boot one more time.
What DIY Data Recovery Mistakes Should I Avoid?
The biggest mistake is experimenting on the only copy of important data. A recovery attempt that modifies, stresses, or physically alters the original drive can make a professional recovery more difficult.
Avoid these common pieces of bad advice:
Opening a hard drive yourself: Mechanical hard drives contain extremely sensitive internal components. Opening the enclosure outside an appropriate environment can introduce contamination.
Freezing the drive: Temperature changes and condensation can create additional risks.
Hitting, tapping, or shaking it: Physical force is not a repair method and can worsen mechanical damage.
Repeatedly reconnecting a clicking drive: More operating time can mean more stress on damaged components.
Running random repair utilities immediately: Software tools may be appropriate for certain logical failures, but they are not a universal solution. Writing changes to a damaged or unstable drive can complicate recovery.
Formatting when prompted: If a computer says a drive must be formatted before use, do not format it when you need the existing files.
The safest response depends on why the data became inaccessible. Diagnosis should come before recovery attempts.
What Should I Do When a Hard Drive Fails in Frisco, TX?
If the drive contains important data, stop using it and get an evaluation before attempting DIY fixes. That is especially important after physical damage, unusual noises, liquid exposure, or sudden hardware failure.
For Frisco residents and businesses, losing access to a computer can affect far more than convenience. The City of Frisco currently estimates its population at roughly 249,500, and the city’s comprehensive planning materials identify information technology, software, hardware, cybersecurity, artificial intelligence, and analytics among its innovation focus areas. In a growing, technology-dependent community, reliable access to business and personal data matters.
PC Geeks provides data recovery and computer repair from its Frisco location on Main Street, about five minutes from the Dallas North Tollway. The company serves Frisco as well as surrounding communities including Little Elm, Prosper, The Colony, Carrollton, Lewisville, and Plano.
Data Recovery FAQ
Can freezing a hard drive permanently damage it?
It can introduce additional risks, particularly from condensation and temperature changes. The freezer trick is not a recommended substitute for proper diagnosis and professional data recovery.
Should I use rice after spilling water on my laptop?
No. Rice does not remove contaminants left by liquid and does not stop internal corrosion. iFixit specifically recommends skipping rice when dealing with liquid-damaged electronics.
Should I turn on a clicking hard drive to see if it still works?
Avoid repeatedly powering up a drive that is clicking or showing signs of physical failure. Ontrack recommends immediately shutting down a device that produces ticking sounds when physical damage is suspected.
Can deleted files always be recovered?
No. Recovery depends on factors such as the type of storage device, why the files disappeared, whether new data has overwritten them, and whether the device has physical damage. Stopping use quickly can help preserve recovery options.
Protect Your Data Before a Myth Makes the Problem Worse
When important files disappear, doing less can sometimes protect your chances of getting them back. Skip the freezer, forget the bag of rice, and resist repeatedly restarting or experimenting with a failing drive. A proper diagnosis can identify whether the problem is logical, electronic, or mechanical before additional damage occurs.
Ready for professional data recovery in Frisco, TX? Contact PC Geeks today and let an experienced technician evaluate the problem before a DIY fix puts your files at greater risk.
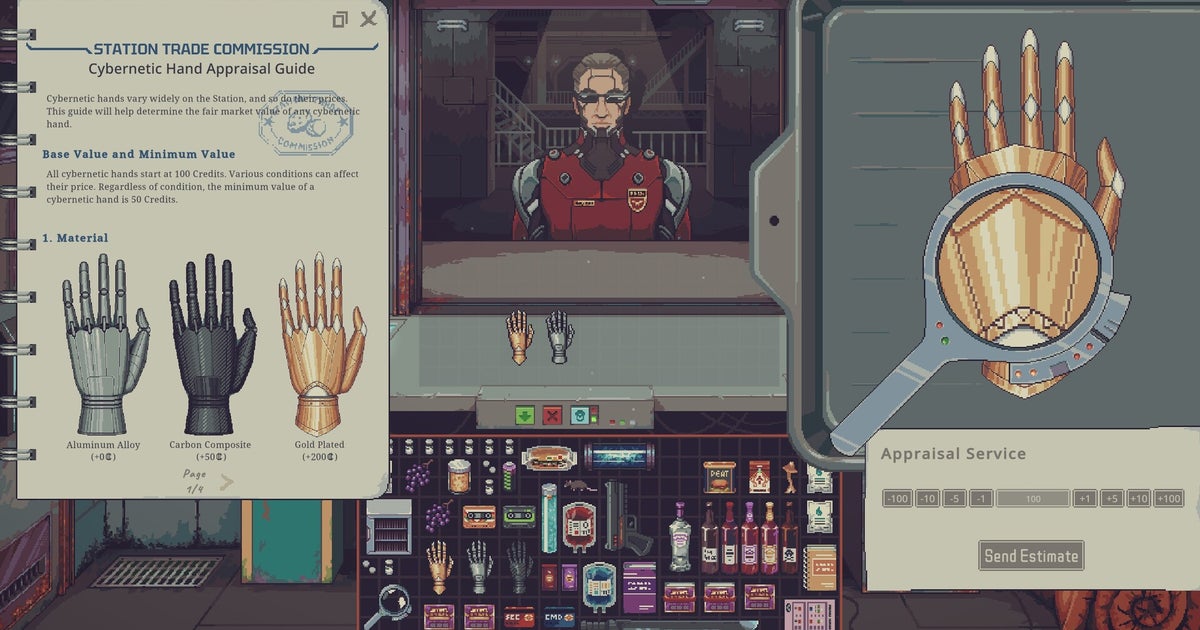
I have so far not been shivved, shanked, brain fried, hazed, wasted, ironed, short-circed, flat-lined or even complained at in Probably Stolen – Cyberpunk Shopkeeper Sim, but I’m sure it’s just a matter of time.
In this neuromantic kiosk game from Questing Goose Studio, you’re a new store owner aboard a backwater space station. Each day, you roll up the shutter and do business with a procession of shady types, ranging from janitors with unappetising beards to sexy cowled folk with Main Character tattoos. The basics are simple enough, for all the overwhelmingly menu-led presentation: buy what you can afford, according to your instinct for the wider market, sell what you can fit into the customer’s budget. But things quickly get complicated.
When we gathered at GitHub Universe in October 2025, working with agents in VS Code was still relatively new. A year later, working with agents has become the new normal. A single developer can put several agents to work on different problems, keep coding while those tasks move forward, and check back in to review the results. Work can continue on another machine, in another app, or in the cloud after your laptop closes. The editor that helps you write code is also becoming the place where you coordinate much more of the work it takes to ship software.
Imagine handing off a feature to Copilot, while an agent using the Claude harness investigates a bug, then opening the running app in a browser that both you and the agent can see and control. Project instructions and tools give those agents the context to work, and the Agents window brings their progress and changes together for review.
When you hand a task to an agent, it shouldn’t matter which app you’re using to launch the task. When you switch to another tool, the task should continue running. Over the last releases, we’ve worked to make these connected, continuous experiences across VS Code and other Copilot apps become reality.
In this blog post, we’re zooming into how far VS Code has come since the last Universe, and what you can do with it today.
Agents that keep working
Developers can hand off more of the work without handing over the decisions that matter. We built on our Language Server Protocol and Debug Adapter Protocol experience to create the Agent Host Protocol (AHP), which just went 1.0.
Just as a language server makes code completion and Go to Definition available to different editors, an Agent Host brings agent functionality into an independent process. It manages sessions and provides access to multiple harnesses, models, files, and terminals.
AHP lets clients connect to those sessions and stay in sync. Cloud sessions run on GitHub’s infrastructure, so closing your laptop doesn’t stop them. You can continue the same session in VS Code, the GitHub Copilot app, GitHub Mobile, github.com, or Copilot CLI. And because the protocol is open, anyone can build a client that works with the same live sessions as VS Code.
Choosing your agent
The agent harness is what coordinates the agent loop and connects the language model to context and tools.
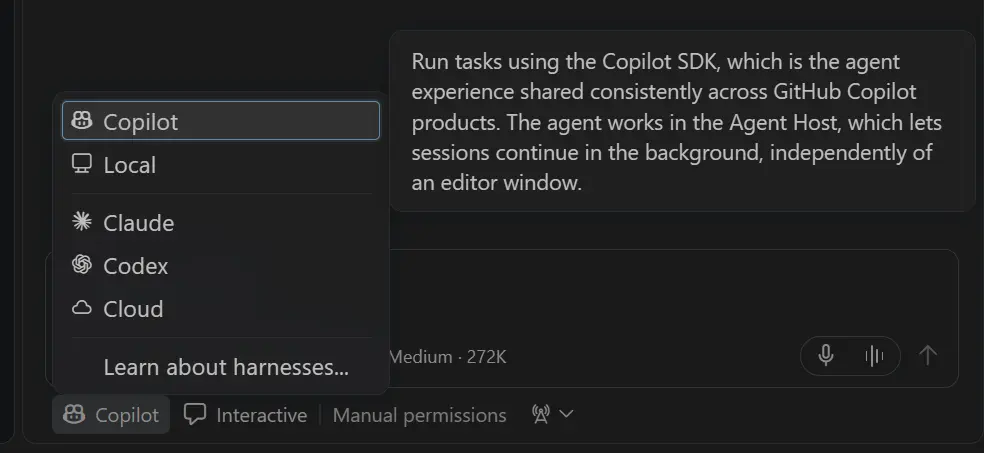
We combined our Local VS Code harness with the Copilot CLI harness to create the new Copilot harness, now the default for new sessions in both the editor and Agents window. Built on the Microsoft Copilot SDK developed by GitHub, it brings more consistent agent behavior across VS Code, Copilot CLI, and the GitHub Copilot app. This also means that you can reuse your agent customizations across different Copilot experiences without modifications.
You can also use the Claude and Codex harnesses in VS Code through the Agent Host. Each runs on its provider’s own agent harness, with its own runtime and capabilities. VS Code brings their sessions together in one place, where you can manage work across agents without requiring every agent to work the same way.
Choosing your model
Access to multiple models remains one of Copilot’s pillars. The model picker lets you select from Copilot and bring your own key models. You can specify options like reasoning effort and context size to optimize the model configuration for the task.
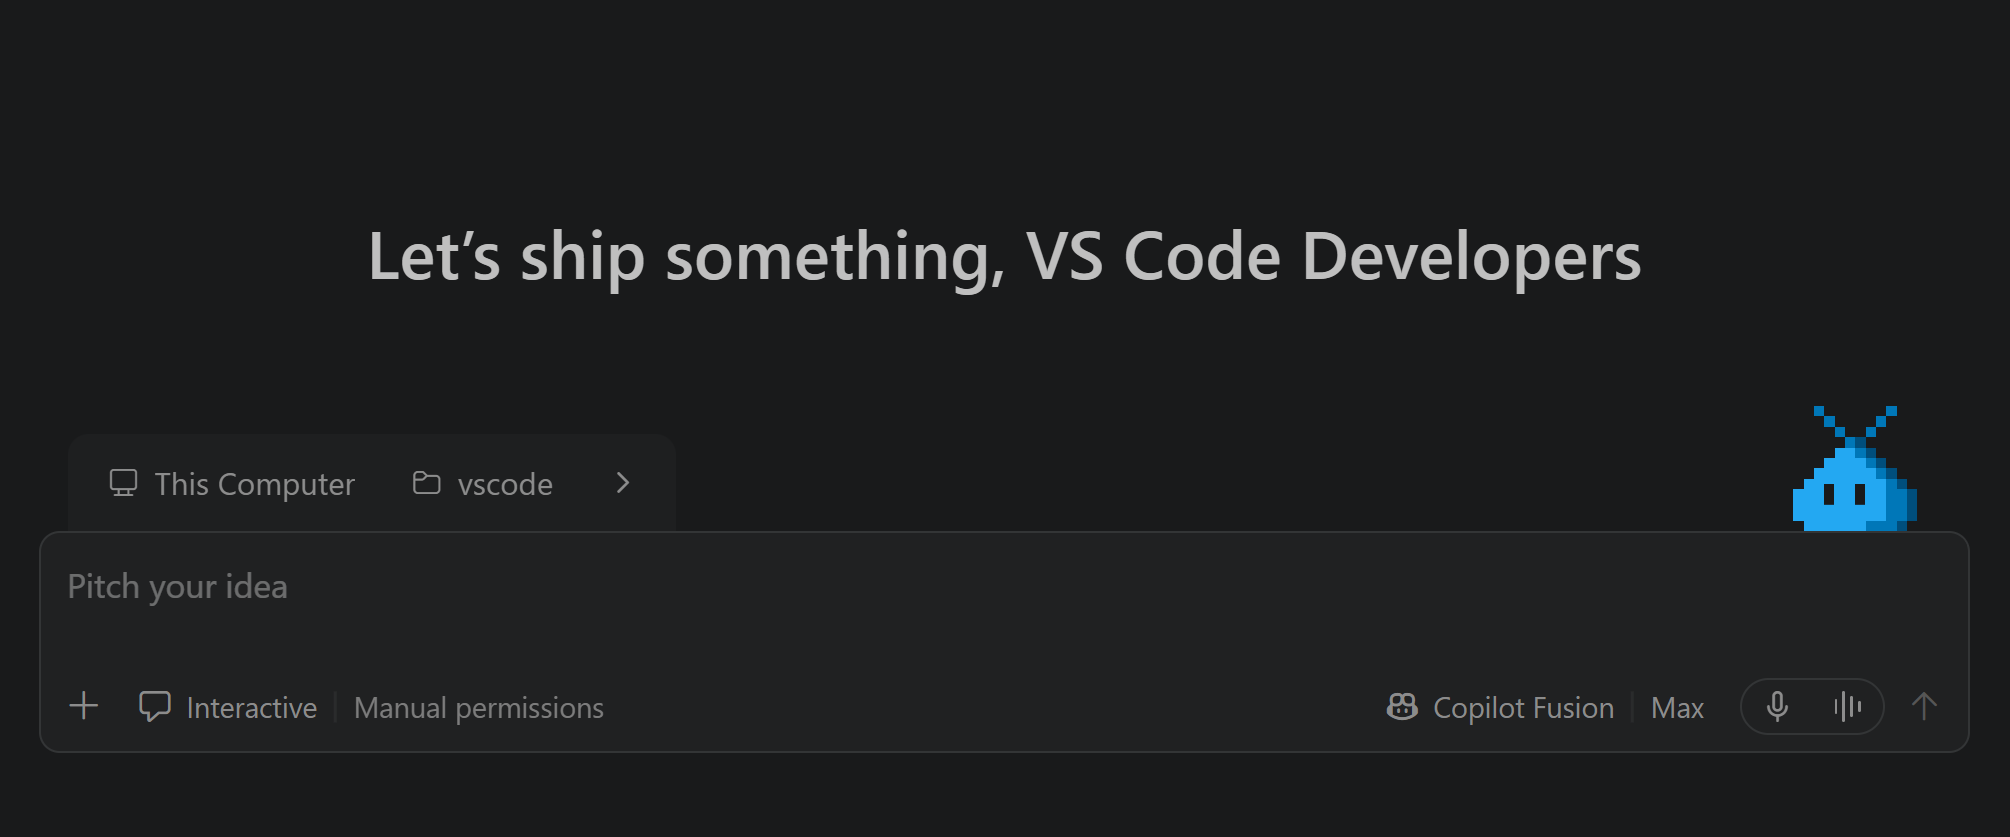
As newer and more capable models become available, choosing the right model for the task is becoming more and more difficult. Maybe one model is not the best for each part of the task. Copilot Fusion autonomously chooses one model or orchestrates a set of models to solve the task at hand. In the Agents Window, you can also use the Compare Models feature in Preview to run different models and harnesses on the same task, review results side by side, and combine the best ideas. Together, these options help you balance speed, cost, and quality.
Managing parallel work
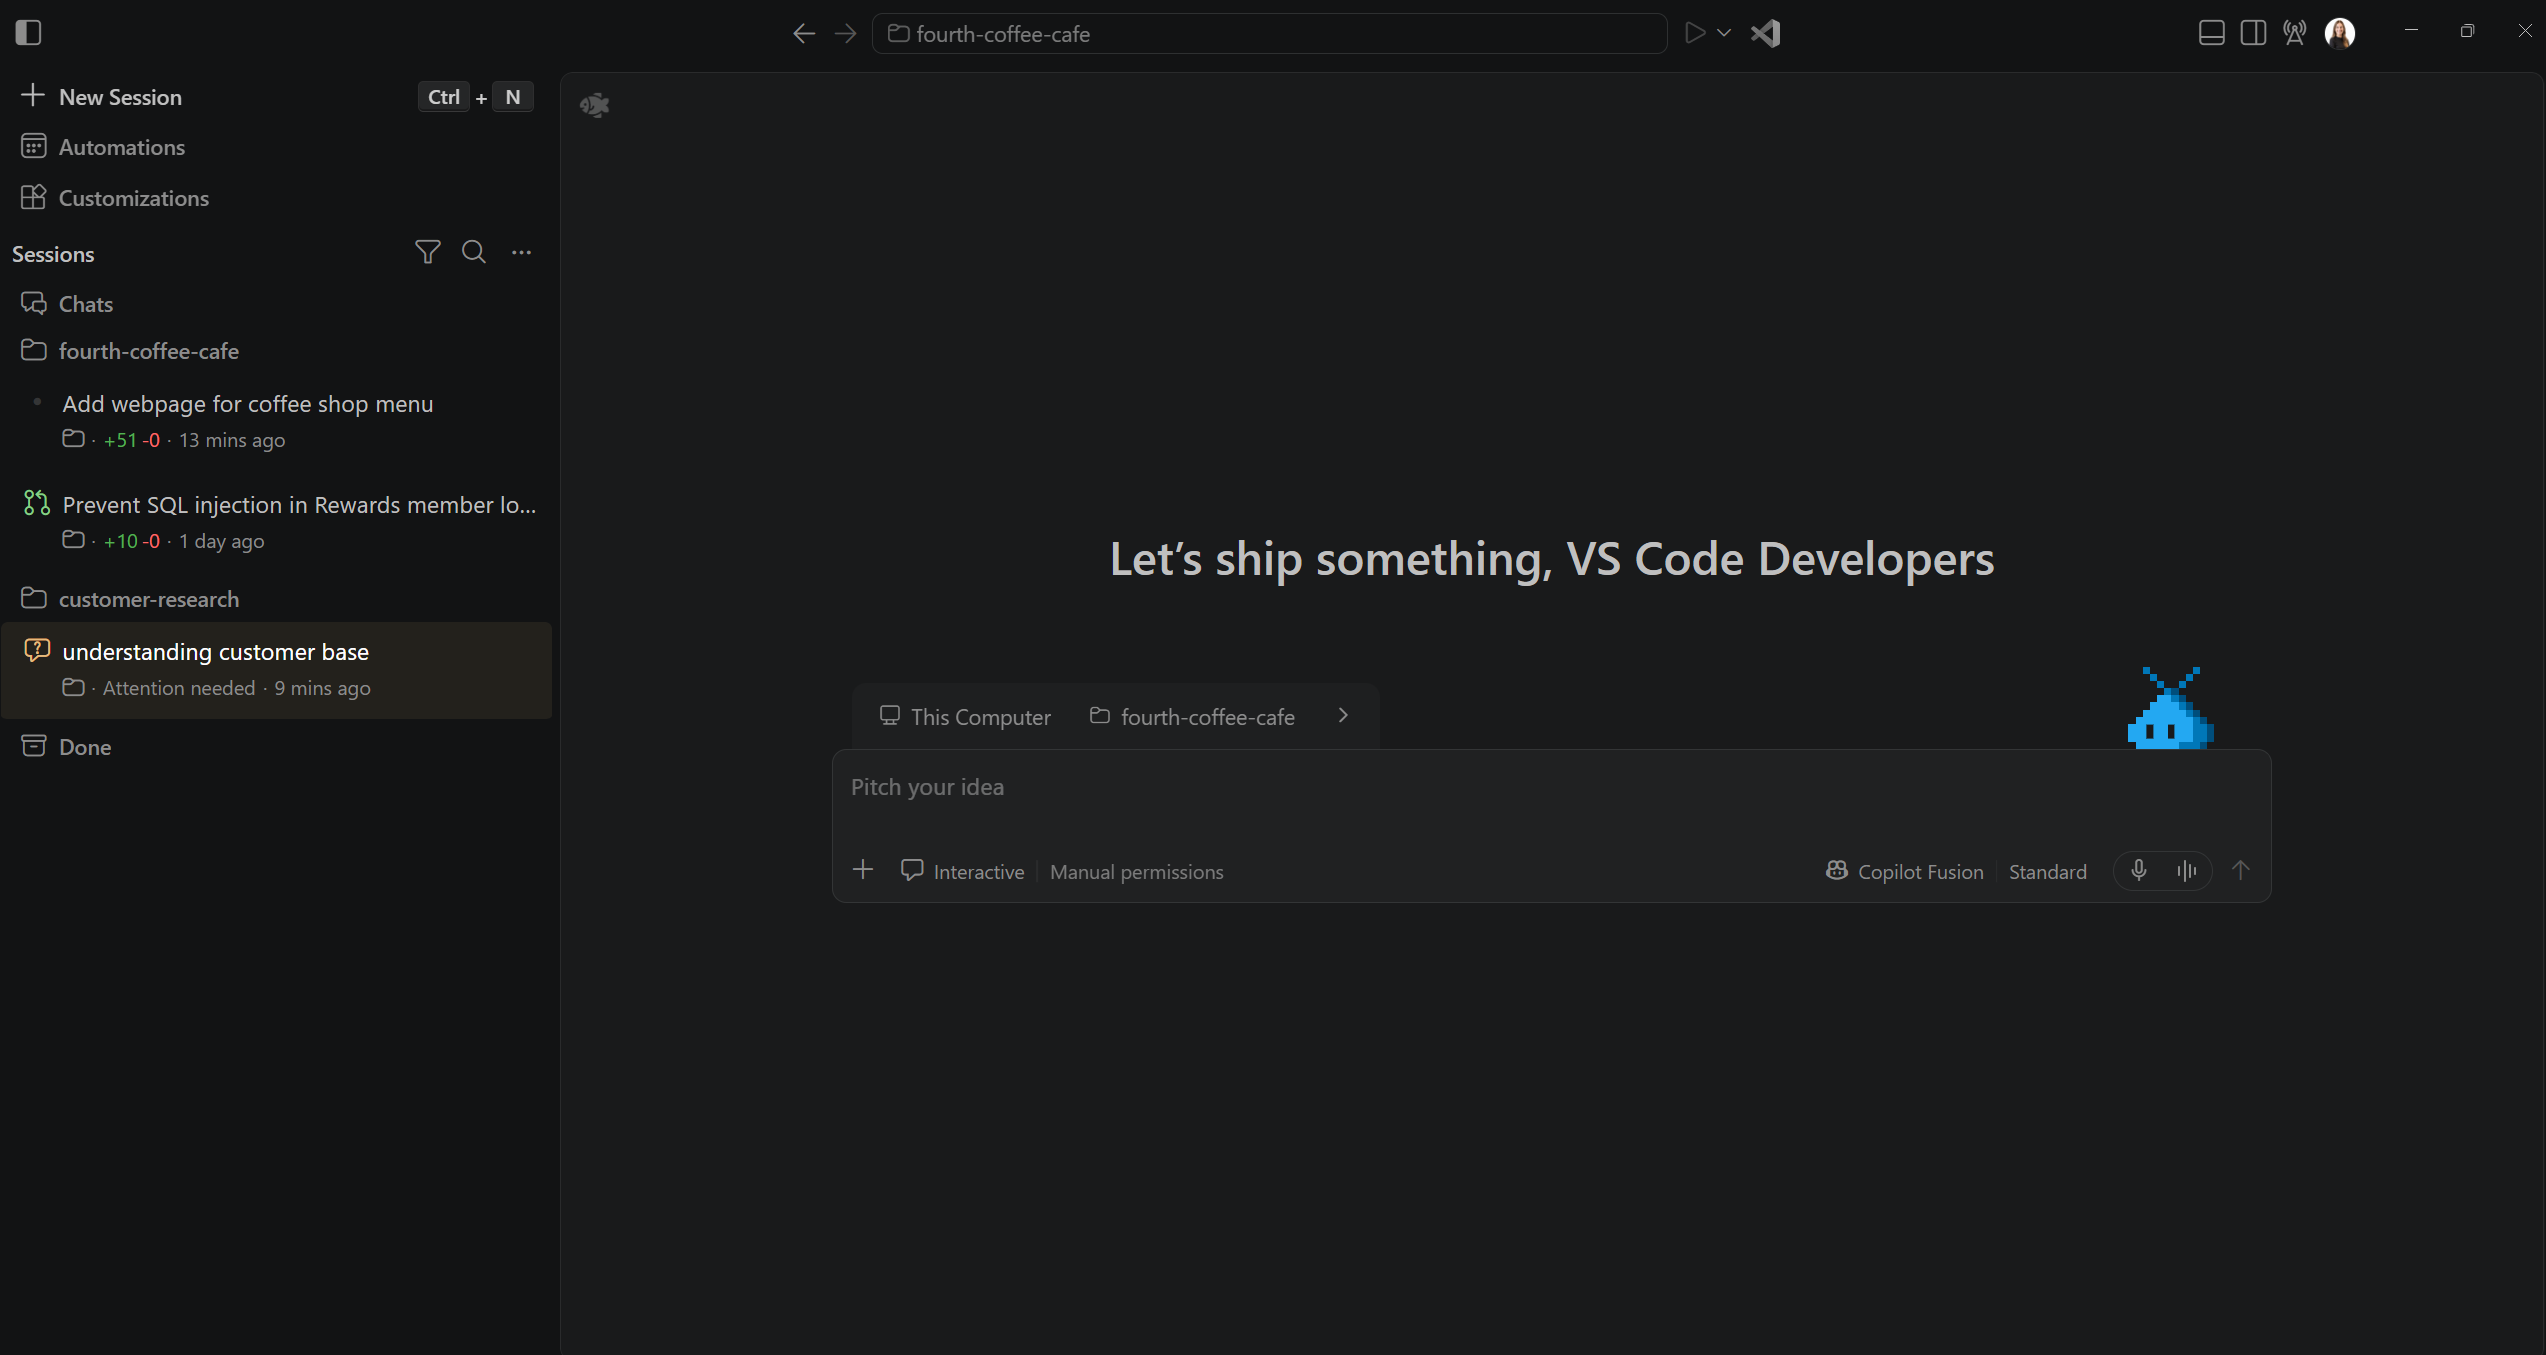
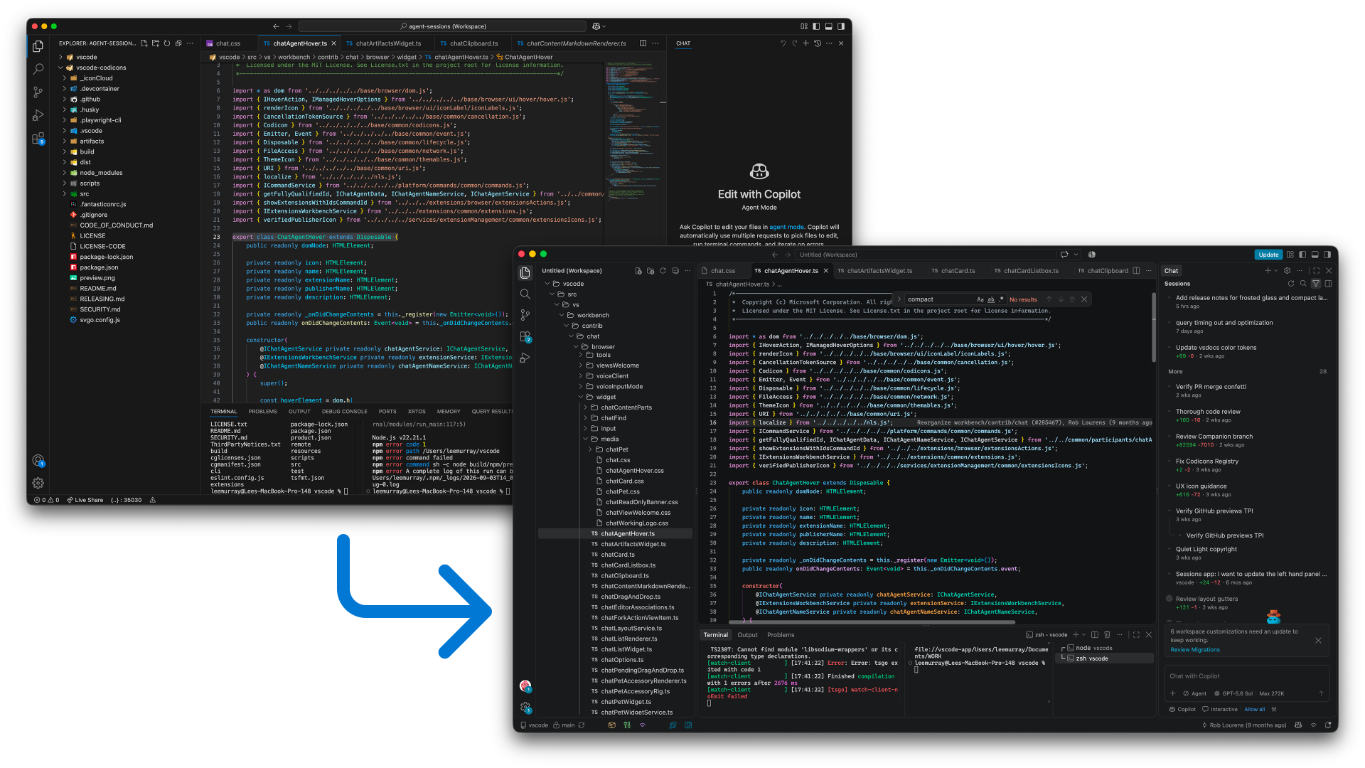
The work we started with Agent HQ in VS Code has grown into the Agents Window, a dedicated space to manage agents across all your workspaces and environments. Run agent sessions in parallel, follow progress, and review changes from a single interface. Seamlessly switch between the editor and the Agents window without starting over. Both views stay in sync with the same live Copilot session. For recurring tasks, use automations, either locally or in the cloud. To avoid conflicts, worktrees help you keep changes isolated between agents.
And when you need to dive into the code or run a debugging session, you can switch to the editor and back to the Agents window at any time. Your active sessions remain running uninterrupted.
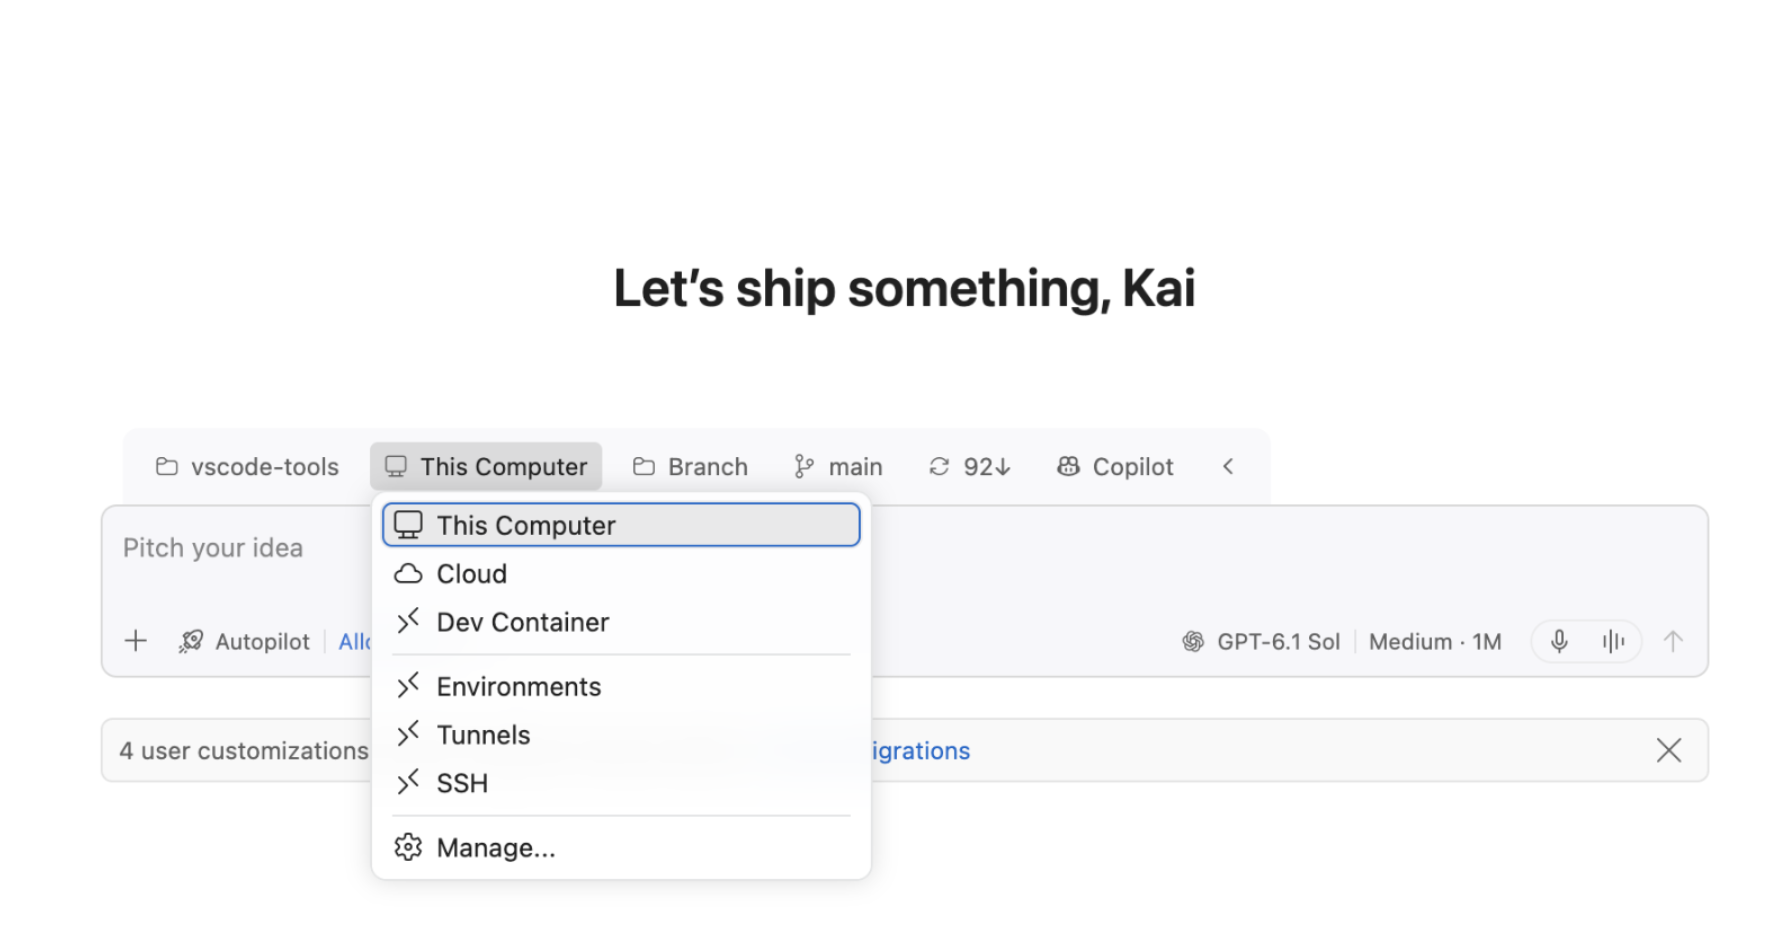
The Agent Host is a separate process that lets the Agents window connect to multiple agent sessions at once, including those on remote machines over SSH or dev tunnels, or sessions running in the cloud. Remote agents use that machine’s code, tools, and dependencies and keep working after you disconnect, as long as the machine and host stay running.
Shaping your agents
Instructions, skills, hooks, custom agents, and plugins help agents understand your project conventions and workflows. Projects already customized for the Claude Code or OpenAI Codex developer tools can use that setup with their respective harnesses, without rebuilding it for VS Code.
Copilot connectors, now in preview, bring context from services such as Slack, Notion, and Microsoft Learn into your agent sessions without requiring you to install or manage an MCP server. Connect once and reuse the connection across supported Copilot clients signed in with the same account. Connectors work with the Copilot harness and are available on all Copilot plans. For Business and Enterprise plans, administrators must allow editor preview features.
For organizations, managed settings apply policies across teams, while sandboxing can restrict agent access to files and network resources.
Beyond the chat
The integrated browser gives you and your agent a shared view of a page, so you can both see and interact with it without leaving VS Code. Your agent can use Playwright to test a workflow, check the results of its changes, and help identify web accessibility issues.
Some workflows are easier to navigate visually than through a conversation. Canvases, now in preview, let you create interactive interfaces for working with your agent and its context, such as a task board for tracking a project. You can also choose from readily available canvases. The Markdown editor lets you edit a rendered plan or document directly and leave comments for your agent to act on, rather than describing every revision in chat.
Completing a task might mean working with a desktop application that doesn’t have an MCP server or another tool integration. Experimental computer use lets your agent interact with those applications on macOS and Windows by clicking controls and editing text. You control application access, and organizations can disable it through policy.
With models that support image generation, you can create visual assets for your project alongside the code, whether you’re exploring a design idea or building a prototype.
For a little fun, there’s Blobby, the VS Code pet who reacts as you work with agents, with achievements to unlock along the way.
Still your editor
We remain just as committed to the editor you rely on every day. Precision editing, code completion, navigation, refactoring, and debugging remain at the heart of VS Code. Next edit suggestions continue to improve with new models and are available to Copilot Free users.
The extension ecosystem remains central to making VS Code your own, from language support to AI extensions like Claude Code and Codex. And it has never been easier to build your own extension.
Last, but not least, our UI modernization work brings shared design choices to the editor and Agents window for a clearer, more consistent experience that preserves your customization and familiar workflows.
Feedback and ideas from the VS Code community have shaped how the product has evolved over the past year. Please keep sharing what is working and what could be better in VS Code GitHub issues!
Upwind, a San Francisco startup that uses AI to secure cloud infrastructure, has raised a $400 million Series C round at a $3.8 billion valuation led by Bessemer Venture Partners, with participation from existing backers including Greylock Partners and Craft Ventures.
The round comes nine months after Upwind closed its previous $250 million financing at a $1.5 billion valuation.
The fresh funding, which has been in the works for months, nearly fell apart after Datadog attempted to buy the company, according to a person familiar with Upwind. Datadog is a publicly traded company that sells tools for monitoring how software runs, known as observability. It didn’t offer a premium above the $3.8 billion valuation set by venture capital investors, the person said, so Upwind decided to stay independent.
Four-year-old Upwind has grown rapidly amid rising AI-driven cybersecurity threats. The startup has been adding $20 million to $30 million in annualized recurring revenue (ARR) each quarter and is projected to end the year at roughly $90 million, according to a person familiar with Upwind’s financials. That means that VCs and Datadog valued the startup at more than 40 times its forecast ARR, a common yardstick for pricing software companies. The high multiple is also well below the 80x ARR fetched by Cyera, another fast-growing cybersecurity startup, according to TechCrunch reporting from earlier this year.
Cybersecurity is poised to be the third big wave of AI software that companies will pay for after AI coding tools and customer support, Theory Ventures general partner Tomasz Tunguz recently wrote in his widely read blog.
By walking away from an acquisition offer, Upwind clearly believes that the company will ultimately be worth more than the $3.8 billion that Datadog was ready to pay for it. However, given how few cybersecurity companies have gone public in recent years, an eventual sale remains the most likely outcome for the startup.
Upwind continues to draw acquisition interest, according to a person familiar with the company.
The startup was founded by Amiram Shachar, who sold his previous company, the cloud spend management startup Spot.io, to NetApp for $450 million. Upwind calls its approach to thwarting threats “runtime” security, which means it alerts and remedies attacks and vulnerabilities in active services in real time.
TechCrunch has reached out to both Upwind and Datadog for comment.
When you purchase through links in our articles, we may earn a small commission. This doesn’t affect our editorial independence.
The agency will vote next month on relaxing its long-standing opposition to jammers.
Kevin Dietsch/Getty Images
The US Federal Communications Commission announced today that it will vote on a new rule that would allow state prisons and jails to use cellphone jammers. The goal of the change would be to block use of illegal cellphones by inmates, since having outside contact could allow them to continue engaging in criminal activity.
The planned vote during the agency’s open meeting on November 19 would consider allowing state and local incarceration facilities to opt in to using jammers; use of the tech would not be required. Any tech that interferes with communications signals is illegal for non-federal parties to use. In 2018, the Federal Bureau of Prisons began testing “micro-jamming” in federal prisons as a way to block unauthorized cellphone use by inmates. This move would potentially open up similar tools at the state and local levels, and provide a formal pathway for federal facilities to jam signals as well.
It’s a reversal from previous policies where the FCC has not allowed implementing jammers as a method of reducing illegal cellphone use in prisons. Previous concerns about jammers suggested the tech could interfere with emergency and public safety communications, as well as creating new security risks by putting more jamming tools into the wild where they could be exploited by bad actors. The bulletin today notes that if the new rules are adopted, correctional facilities would need to meet some standards, including proving “that the jamming solution does not cause harmful interference outside of the designated geographic areas.”
Today’s move isn’t the first time the FCC has changed its approach toward prisons under the current administration. In July 2025, the department said it would delay implementing a cap on the rates charged for prison phone calls.