Hopefully your week is off to a great start so far! In our house I’m happy we’re almost all over a round of everyone coming down with a cold now that school’s in full swing. Though I’m sure there will be plenty more where this one came from as winter approaches!
In particular, we are learning some of my favorite tips and tricks that will save you time and get you designing like a Pro in no time! Everything from hidden shortcuts, quick commands, general best practices and more, I’m sure you’ll learn at least a few new tricks to save some time.
While the software we’re using today is Solidworks new online/browser-based CAD platform, almost all of the tips I share also apply equally to practically every CAD software. Things like shortcodes, commands, and productivity best-practices are universal and something we can all improve on (myself included!).
That’s all for today, I hope you enjoyed this week’s video and I would love to hear what you think, have you tried SolidWorks Online Offerings?
Thank you to Solidworks for Supporting the Channel and Sponsoring today’s video!
I’ve really enjoyed how much they’ve packed into the apps and just how seamless it’s been to begin using the online design apps coming from the desktop!
As always, thank you so much for reading and watching, I am super excited for the rest of the year, growing the content, tutorials, and blog with you all.
Cheers and happy Drafting!
The following two tabs change content below.
Brandon is a Civil Designer, Aspiring Blogger/Creator, Husband, Father to two Amazing Kids and Tech Aficionado from a small town in Canada. He has been obsessed with design and technology since he can remember and working as a Civil Designer for nearly as long. Brandon’s blog and Youtube channel, CADIntentions.com has been his outlet and excuse for keeping up with new tech and trends in the CAD design world for the last 10 years growing to more than 60,000 subscribers and over 15,000,000 views, while also being the source of many great friendships and unique opportunities.
If you would like to Sponsor CAD Intentions or Work together in some way, Please visit my About Page and send me an email: http://cadintentions.com/about-me/
AutoCAD is often considered a 2D CAD software product, but it also has an extremely robust 3D environment. Accessing it is as easy as switching to one of the two 3D workspaces included by default. But, like moving into a new neighborhood or going to a new school, one of the first things you need to do is learn how to get around, and the 3D world of AutoCAD is no different.
You’ll be glad to know that zooming and panning in 3D work the same way as they do in 2D, so you’ve got a bit of a head start. You’ve probably already noticed some of the 3D viewing and navigation interface elements that bleed into the 2D world. They can be used there, but they’re really not very useful, so chances are you’ve ignored them. But, in 3D, they are useful, and they’re the subject of today’s post.
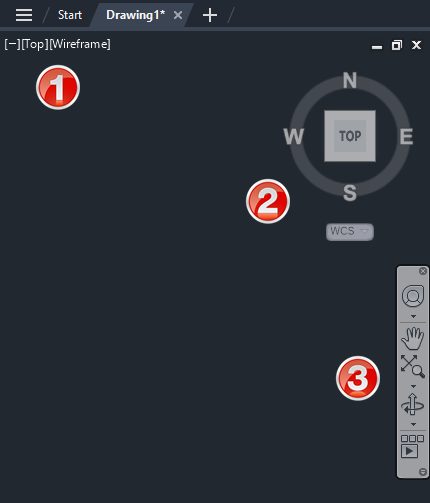
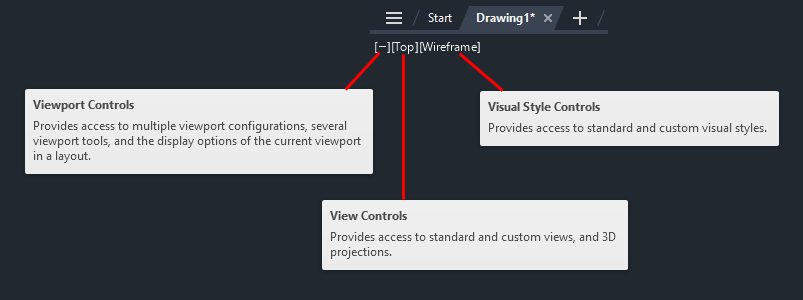
Please refer to the image below. The widgets in the upper left labeled as #1 are technically called Viewport Controls. The #2 item is the View Cube, and #3 is the Navigation Bar (or NavBar for short). There are some other places to find these and other tools, but today, we’re paring it down to these three, along with some keyboard and mouse methods.
Viewport Controls
Let’s start with the Viewport Control tools. There are three parts to it, and it’s an extremely efficient way to interact with your 3D model. The left widget brings up your Viewport Controls, the center one contains your View Controls, and the one on the right lets you quickly specify your Visual Style.
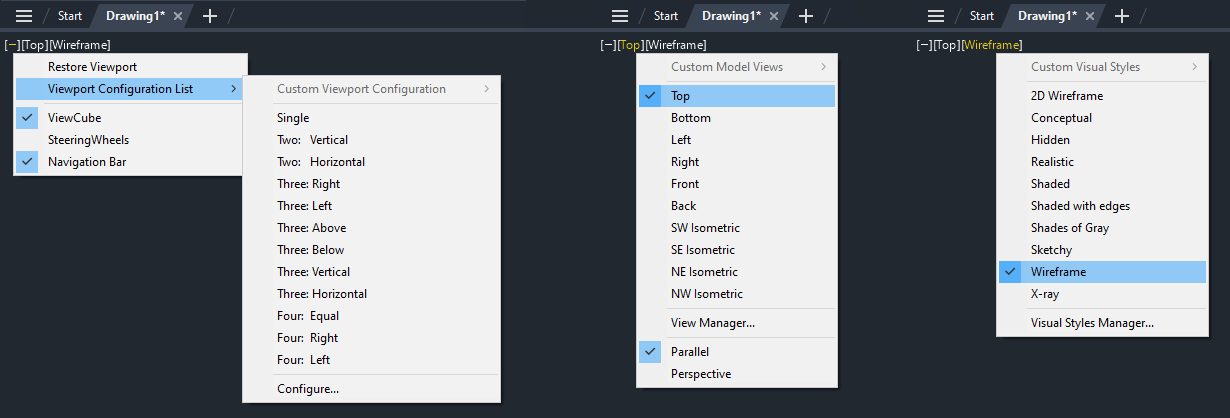
The following image shows the popup menu for each of the three widgets. As a 2D user, you probably equate viewport configuration to layouts. However, in the world of 3D modeling, setting up different views in Model Space can be pretty helpful. I wrote about it here on our blog as part of my Tuesday Tips series. In fact, I’m using the same model for this post as I did then (sometimes, the fine line between efficiency and laziness is a bit blurry with me.)
The View Controls (middle) is an extremely efficient way to quickly switch to a preset view of your model. Setting one takes just two mouse clicks. You can choose between all orthographic projections or from four isometric views.
The same can be said for setting a visual style. Depending on your model and workflow, you may want to change how it appears. Most of us modeling in 3D AutoCAD will have a favorite and just leave it that way. Experiment with each, and no doubt you’ll find a favorite also.
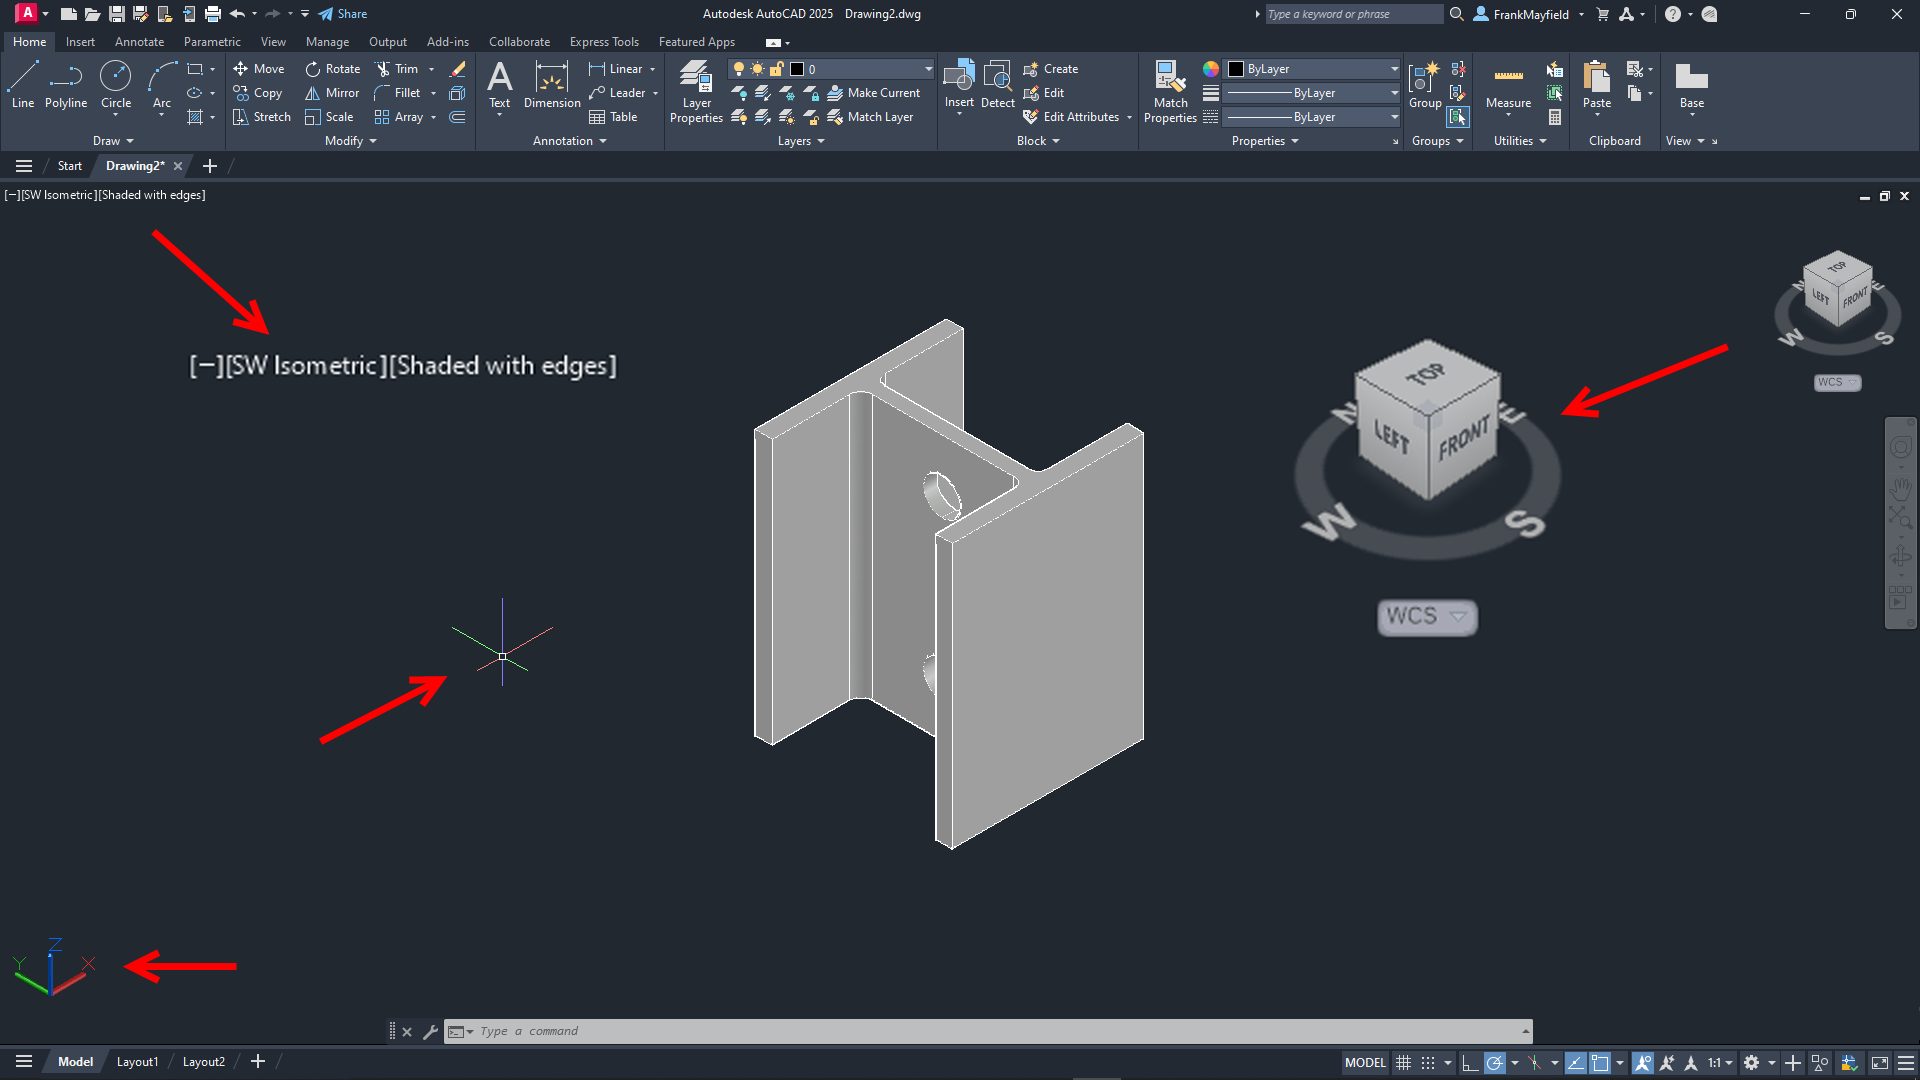
Let’s set the top view of our model to be shown in the SW Isometric view and its visual style to be Shaded with Edges. When you set the view, some of the interface elements will change. I’ve either enlarged them or pointed to them in the image below. The Viewport Controls widgets will change to reflect the current setting, the View Cube will rotate to show the current view, the cursor will change into its 3D style, and the UCS icon will change.
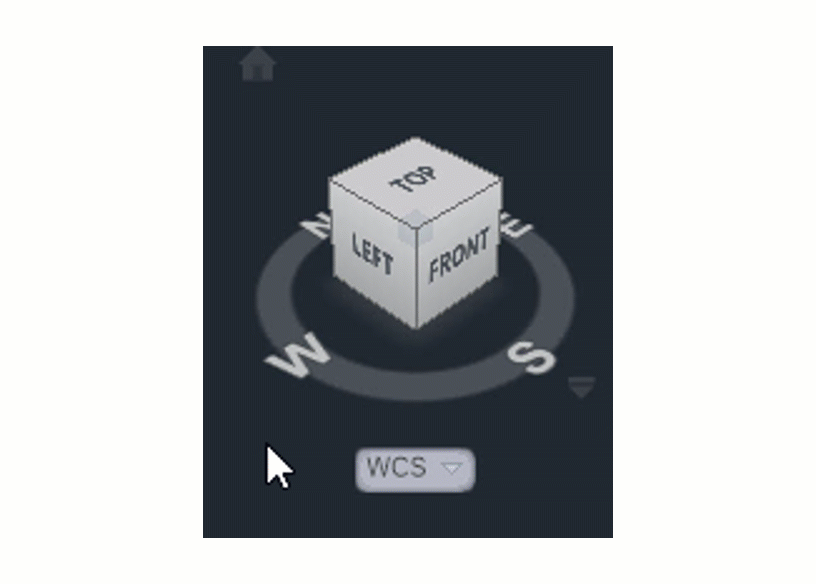
View Cube
Let’s now consider the View Cube. It is yet another very efficient way to change your view to a preset. Without delving too deeply into how it works (that might be a future Tuesday Tip), let’s just say that it’s a more visual, interactive way to change your viewing angle. The cube itself is made up of tiles on the faces, edges, and corners that you pick with your cursor to set that view.
You can also select one of the cardinal directions (N, S, E, W) or pick and drag your mouse along the circular compass below the cube. A home icon and a menu dropdown will also appear when you first hover over the View Cube. To change your “home view,” just right-click anywhere on the View Cube, and click “Set Current View as Home.”
Navigation Bar
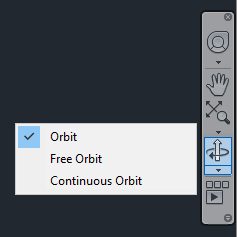
Finally, there’s the NavBar, which shows up on the right side of the drawing editor and below the View Cube. I’m only going to talk about one of the tools within it. But it consists of – from top to bottom – the steering wheel tools (yet another full blog post of its own), pan and zoom, the Orbit tools, and, at the bottom, the Show Motion tool. Let’s focus on Orbit.
Notice there’s a little drop-down arrow just below the icon. Clicking it will allow you to set your Orbiting to a constrained orbit, a free orbit, or a continuous orbit.
Again, you’re invited to try all three, and no doubt one style will become your favorite. To read about the differences between these, go to the help page on the subject.
Keyboard/Mouse Combos
With all that having been said about the interface tools, in reality, you’ll be like most users, and you’ll do all of your navigating with either just your mouse or with mouse/keyboard combos. You already probably pan and zoom with your mouse (and if you don’t… why not?).
When you’re in a 3D view, your depressed scroll wheel becomes the 3DORBIT command when used in conjunction with your Shift key. So, there’s no slowing yourself down by taking your eyes off your work to hunt down an icon. Your hands are already in place, so use them! Do you like to use Free Orbit? No problem, just add the Ctrl key, making it a Shift/Ctrl combo with the mouse wheel.
Get Going With 3D
Hey, it’s a 3D world out there, and if you’re still using AutoCAD as just a 2D tool, there’s probably a good chance you’ll be using a 3D workspace sometime soon. Now’s a good time to get familiar with your new neighborhood and to learn how to get around efficiently.
All the methods I’ve discussed today are great to know. Try them all out and find your favorite methods. When you do get the call to work in 3D, you’ll be ahead of the game from the beginning.
More Tuesday Tips
Check out our whole Tuesday Tips series for ideas on how to make AutoCAD work for you.
This week I’m excited to share a new tutorial video that was really fun to make. I have always enjoyed modeling objects and parts in my spare time and in particular, things that I use a lot in my day-to-day life.
It’s always been fun for me to try and improve on the design of everyday objects as a way to improve my design skills and problem-solving in general.
In today’s video I wanted to share some insights into my process as we follow along with recreating a Dirt Bike Level as a 3d Model in Solidworks Online, including my thought process and methods along the way including measuring with a caliper, reasoning for improvements, and tips throughout the design process!
That’s all for today, I hope you enjoyed this week’s video and I would love to hear what you think, have you tried SolidWorks Online Offerings?
Thank you to Solidworks for Supporting the Channel and Sponsoring today’s video!
I’ve really enjoyed how much they’ve packed into the apps and just how seamless it’s been to begin using the online design apps coming from the desktop!
As always, thank you so much for reading and watching, I am super excited for the rest of the year, growing the content, tutorials, and blog with you all.
Cheers and happy Drafting!
The following two tabs change content below.
Brandon is a Civil Designer, Aspiring Blogger/Creator, Husband, Father to two Amazing Kids and Tech Aficionado from a small town in Canada. He has been obsessed with design and technology since he can remember and working as a Civil Designer for nearly as long. Brandon’s blog and Youtube channel, CADIntentions.com has been his outlet and excuse for keeping up with new tech and trends in the CAD design world for the last 10 years growing to more than 60,000 subscribers and over 15,000,000 views, while also being the source of many great friendships and unique opportunities.
If you would like to Sponsor CAD Intentions or Work together in some way, Please visit my About Page and send me an email: http://cadintentions.com/about-me/
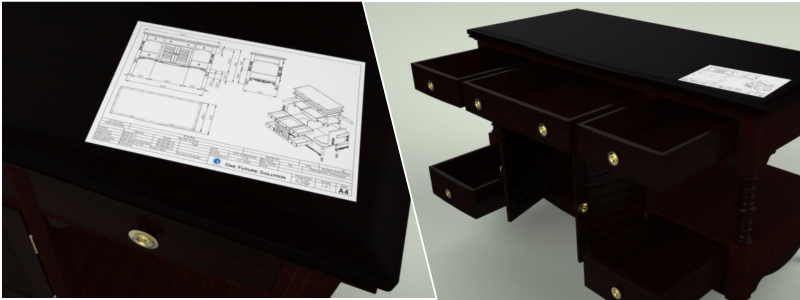
The millwork industry provides clients with quality personalized products, and they must innovate to keep the costs down as much as possible. Companies are now outsourcing millwork shop drawings to cater to this business challenge, which is a consistently winning formula. If you ask any veteran furniture marker, the secret to achieving top-quality millwork is clear communication during the project.
The best way to achieve this is to align millwork drawings with 3D furniture modeling and design using the right combination of technology and freelance millwork drafting and drawing services.
More and more businesses are now realizing that outsourcing millwork shop drawings is a great way to get top-of-the-line millwork drafting at the best costs possible. These service providers are flexible and experienced in handling projects regardless of complexity. It’s easy for them to scale down or scale up resources to make way for the valleys and peaks of a business.
Top millwork challenges in furniture making
Millwork furniture manufacturers often face some significant challenges, which include the following:
Compromised expertise and skills
Numerous challenges are associated with bringing on board and training people who can produce the most detailed millwork shop drawings for 3D furniture modeling and design. It leaves most manufacturers with no option but to settle for less. However, manufacturers have realized that if their goal is to continue engaging customers with personalized and brilliant furniture pieces at reasonable costs, they must explore joinery and millwork partnerships with expert firms.
Delayed schedules of projects
Acquiring millwork drafting and drawing skills is time-consuming and has a steep learning curve. In-house teams are found to be less flexible when it comes to extended working hours. Without a doubt, this can easily jeopardize a project’s deadlines.
Hiring a team of millwork drafters who are experts in operating numerous CAD platforms can significantly burden manufacturing budgets in terms of exorbitant salaries and training and head-hunting costs. Arranging technological infrastructure regarding software and hardware can further drain finances.
A recurring issue for millwork developers is the constant rework in the joinery drawings throughout the conceptualization and design phases. Flaws identified much later in the production phase can cause a delay in manufacturing deadlines, making project costs shoot to the sky and dragging the projects for weeks or even months.
How to use millwork shop drawings for 3D furniture modeling and design
Millwork shop drawings are not just a critical tool for furniture making but can also be very effective for developing furniture designs. These can help in the recreation of designers’ ideas in 2D graphics and getting the project approved to ensure a seamless and smooth production process.
Millwork shop drawings are not just great for technical manufacturing but can be a great help in communication between contractors and designers. Here are some ways companies can use millwork shop drawings for 3D furniture modeling and design.
Showcase precise dimensions
Millwork shop drawings, more than anything else, are considered the most precise demonstration of dimensions. These include the product’s general size measurements and the dimensions of every part. With the help of millwork shop drawings, designers can ensure that the dimensions meet their requirements and seamlessly fit into their projects.
This type of millwork drawing as a plan section and plan view allows designers to make all the essential home measurements and guarantee that the furniture piece will go well with the room. It is particularly applicable to plan views with furniture layout. 3D furniture modeling services use these drawings to determine the right furniture arrangement and envision how a particular 3D furniture model will look once it becomes part of the interior design.
Millwork shop drawings can also present a clear idea of the functions of the product from the engineering point of view. Thanks to them, millwork experts can prove the durability and usability of their products, which are as essential as the piece’s appearance. Interior designers can then ensure that every project element will function exactly as planned and perfectly suit their brief.
Freelance shop drawing services offer elevation drawings showing every functional possibility of a furniture model. For instance, if it is a locker, the draft will present how drawers come out. On the other hand, if it is a sofa, the client can view the right way of unfolding it. Detailed millwork shop drawings make it easier to examine the mechanisms and fastenings of product models and grasp how things work.
Enumerate the specific materials used
The materials used largely shape how a product looks, so correctly indicating them is vital in the presentation of furniture designs. Millwork shop drawings present all the details regarding the materials used during production. They show complete data for every resource, including the type, name, and the part of the item where it will be used.
These drawings also allow confirmation that every material chosen is in line with the requirements of the designer. They also allow room for making adjustments before the start of the manufacturing process. Once the millwork shop drawings have been approved, the interior designer will know the precise quantity of materials they need to buy to prevent excess or shortage.
Present structure quality
Millwork shop drawings are also the most reliable means of presenting the technical elements of furniture design. They help present the structure of the product while establishing its solidity. In particular, these drawings also showcase the overall view of the ordered piece and the quality of its inner parts.
The plan section of millwork shop drawings shows every part of the product’s structure in complete detail and from various views, including top, cut, horizontal, or vertical. The millwork plans also show interior designers how an item is developed and how it functions, allowing the assessment of the construction of the furniture piece in general and the separate parts of the product.
Show the design details
Millwork shop drawings also allow for studying the design details and exploring the furniture fixtures more completely. These drafts highlight not just the engineering specifications but also the design details and the product furnished. This is an effective means to agree on all parts and aspects of the project with the designer and receive their approval.
These detailed drawings are also perfect for the examination of even the tiniest aspects of the furniture. The drafts can show the object’s different parts at a bigger scale from various angles. These also include marks with the materials and dimensions, even for minute details such as nails and bolts that help prevent errors during the manufacturing process.
You can benefit from outsourcing millwork shop drawings for 3D furniture modeling and design. These include the following:
Cost-effective
When you work with a dedicated provider of CAD drafting services, you can have complete assurance that you’re working with someone who invests in employing and training a skilled workforce, infrastructure, and the correct CAD software for millwork drafting and design needs.
It lets you operate lean while enjoying significant savings on operating costs. Several of today’s most prominent manufacturing companies are already enjoying the perks of outsourcing millwork shop drawings in terms of lower project costs.
Scalability and flexibility
The initial millwork shop drawings usually change and require several reworks that can lead to additional costs, missed deadlines, and confusion on the shop floor. With its pool of experts, your outsourcing partner can quickly change the drafts within the expected timelines and follow quality benchmarks.
The best CAD partner can also provide resource scalability, which you can quickly ramp up once there is an increase in the workload. You can save costs once the demand returns to normal by dropping off the additional resources. This enables you to choose the projects you wish to take on with no need to worry about the availability of resources.
Millwork manufacturers care about one thing, and that is to offer top-of-the-line products to their customers. It means that they always look to create a hassle-free and effective process. The good news is that you can achieve this through outsourcing. Millwork shop drawings are a great way to present your furniture projects to the designers, gain their design approval, or make the necessary changes before they continue to the manufacturing phase.
Cad Crowd is a great resource where you can find experts in millwork shop drawings perfect for 3D furniture modeling and design.
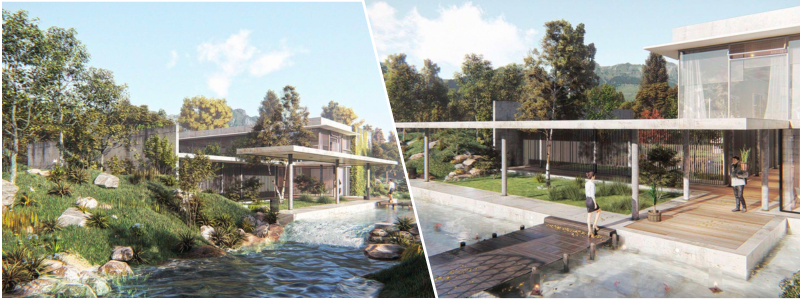
When someone mentions “metaverse,” the first thing to cross your mind is probably Facebook, which has now changed its name into Meta and expanded its business model from social media to virtual reality. An important distinction has to be made between Meta (the company) and Metaverse (the ecosystem) because they are different things. Meta is a platform where users and advertisers can utilize Metaverse to interact with each other. However, the Metaverse refers to the AR/VR ecosystem itself and is not a property of Meta. Think of the Metaverse as the Internet; everybody can use it, yet nobody owns it.
The Metaverse is a digital ecosystem with all the features necessary to allow individuals, businesses, organizations, and society to interact and communicate. One of the most common examples is how a user can build a virtual office or storefront to conduct day-to-day business operations within the Metaverse. It is a virtual world in every sense of the word, almost like the matrix.
While Metaverse has been around for about two decades, it remains in an early stage of development. Getting into the Metaverse is not that difficult; get yourself a VR headset, and you’re ready to go. But similar to the physical world, developments mean creating infrastructure inside the virtual atmosphere; otherwise, it is an empty space, and that’s where architectural designs come in.
Metaverse Architectural Design services
An architectural firm typically comprises an architect to design a building, engineers to calculate structural feasibility, builders to physically handle the construction, and administrative employees to handle paperwork. A metaverse architectural firm replaces the engineers and builders with 3D modeling design services and developers. The design services from both firms are pretty much the same, such as building construction, renovations, exterior designs, 3D interior design services, urban planning and design services, real estate developments, and design consultations. A big difference is that the metaverse type produces virtual buildings instead of physical ones.
The jobs of metaverse architects revolve around designing and constructing virtual structures and landscapes in a virtual environment. Unlike mere digital models, the infrastructures must be integrated into the metaverse ecosystem so users can navigate and interact with them. Designing such an infrastructure is like creating an immersive VR-based architectural walkthrough at a much larger scale. Therefore, a metaverse architect must know building design, engineering, computer science, and game creation.
Best examples
Metaverse is a transformational platform that may redefine the nature of collaboration between people and machines. Combining immersive visualization technology and cloud computing enables anybody to run and manage businesses outside the constraint of physical spaces without losing efficiency. Metaverse is also an effective simulation tool to test ideas, manufacturing processes, and products to gauge their technical viability before real-world implementation.
The best example (thus far) of architectural design services is the creation of a digital twin, where companies build a fully functional digital copy of their manufacturing facilities for production simulation. BMW is among the first to have a metaverse-based factory built in collaboration with Nvidia. The virtual factory comes equipped with everything its real-world counterpart has and is primarily utilized to measure its manufacturing robots’ abilities to perform complex tasks.
Process simulation is nothing new in product designs, such as computational fluid dynamics and wind tunnels. However, Metaverse architecture design services take it to another level thanks to real-time digital modeling and immersive experiences. It turns out that digital twin is not limited to the manufacturing and design industry. Singapore has begun a massive undertaking to build a digital twin of its urban landscape and topographical data. Shanghai and Las Vegas have embarked on the same venture, too. All those metaverse twins are used as digital simulation tools to test large-scale urban planning projects.
A digital twin is reverse engineering done for the virtual world. Metaverse architects build a virtual version of a building, structure, or even an entire city based on actual data from the physical objects. As far as project planning is concerned, the simulation eventually becomes a virtual prototyping process. It allows people to conduct experiments, recognize anomalies, and prevent safety issues.
Of course, creating a digital twin of a city or a factory is a massive project likely undertaken only by a select few. Most metaverse users will be interested in creating a much simpler virtual structure like houses, offices, stores, amusement parks, sheds, barns, garages, bridges, roadside attractions, or anything they usually encounter during daily activities in the real world.
When simulation is not in the equation, the metaverse architects can create just about any structure in a relatively short period. One of the main reasons is the lack of engineering problems. Since the primary concern is visuals, the architect spends less time (if at all) checking structural integrity, calculating and purchasing construction materials, obtaining permits, weatherproofing, wiring, and plumbing. Visualization is all that matters, whereas functionality and comfort come far behind.
Exterior design makes up for the bulk of the work. When someone wants to build a virtual house with a specific style, the architect spends most of the time designing the aesthetic aspect of it. Whether or not the construction meets the structural integrity requirement is not a pressing issue. It does not matter if the solar panel on the roof is connected to the electric installation. The most important thing is appearance. Real engineering input adds no practical value to the project because structural knowledge is irrelevant. The structure and materials are neither subject to deterioration nor exposed to the elements. Gravity is not a factor, let alone regulations.
The same thing applies to interior design. Metaverse architects will not lose sleep over an inefficient HVAC system, natural lighting, noise pollution, or heavy-maintenance fixtures. Everything can be set to perfect condition, fully functional, and comfortable every day. In the Metaverse, nothing is impossible.
Metaverse Architectural Design services cost
Thanks to the absence of restrictive regulations and laws of physics for a typical project, architectural design services from either freelancers or firms are more affordable in the Metaverse than in the real world.
Freelancers
There is no definitive range of pay for freelance metaverse architects. Experiences, portfolios, and skill levels are crucial factors in determining the amount of money the architect may request. A well-known metaverse architect, working as a freelancer, can ask for around $1,000 to $4,000 for the most straightforward build.
Alexander Vlerick, a well-known metaverse architect based in France, priced his services at $1,000 for a basic 100-square-meter virtual build when he began in 2020. Bear in mind that he boasts an impressive portfolio in game design. New freelancers with a less spectacular track record will not likely charge as much. Now, Vlerick can charge at least $5,000 for the same range of architectural services of a similar scope. It should take him no more than two days to complete the project.
Prices go up based on the number of details and estimated completion time. About 90% of the project time is spent on 3D modeling and coding to add design elements like door-opening sounds and button clicks. You may find it hard to believe that not all customers want to add virtual furniture to their metaverse build, which can reduce the cost somewhat.
Experience/Portfolio/ Skill Level
Pricing Range (for a basic build)
Services Included
Additional Factors
New Freelancer
$500 – $1,500
Basic architectural design, limited features, and simple 3D modeling.
Limited experience, smaller portfolio, and entry-level skills.
Intermediate Freelancer
$1,500 – $3,000
More intricate design, additional features, and moderate 3D modeling.
Some experience and a moderate portfolio.
Experienced Freelancer
$3,000 – $5,000
Advanced architectural design, detailed features, and complex 3D modeling.
Established skills and a portfolio demonstrating expertise.
Well-Known Freelancer
$5,000 and above
Customized and high-end design, extensive features, and sophisticated 3D modeling.
Renowned reputation, extensive portfolio, and high skills.
The data to show the average salary for full-time metaverse architects is scarce at best. Some sources say it is around $55,000 annually, while others suggest a higher number of up to $80,000 annually. It all depends on work experience and the company that hires them. If you are starting your career, your salary is likely lower than the suggested amount.
If, for some reason, you want to hire a metaverse architectural firm to work on your project, be prepared to spend anywhere from $10,000 to $300,000, depending on scale, features, and details. Construction project workflow in the Metaverse is similar to that of the real world. There will be initial discussions between the client and the firm before the latter offers a quote based on the former’s project requirements. The firm will produce building sketches and rough iterations for the client to review. Once everything is set, construction begins, but in this case, all the work is done by developers and 3D modelers.
Metaverse architectural project only has very few hurdles. In addition to the budget, you might be limited to the size of virtual land you have. You can buy parcels of land (with cryptocurrency) from Sandbox and Decentraland, currently the biggest metaverse platforms. Prices have gone up and won over the years; conservatively, it is between $1,000 and $5,000 for the most minor plot of land. If you don’t own a virtual land, a metaverse architectural firm can help you purchase it for an additional fee.
Type
Average Salary/Project Cost
Details and Considerations
Full-Time Metaverse Architect
$55,000 – $80,000 per year (approximate)
Salary varies based on work experience and the hiring company. Entry-level salaries may be lower.
Metaverse Architectural Firm
$10,000 – $300,000 (project cost)
Project cost depends on the scale, features, and details. Initial discussions precede a firm’s quote based on project requirements. Construction involves collaboration with developers and 3D modelers.
At this point, the concept of the metaverse architectural industry still appears to be a bit out of reach for the general population, primarily due to the limited promise of ROI. As with every new business and platform, big companies and well-funded organizations take the first step into the venture, and then it should be a gradual development before the public takes a more serious interest.
How Cad Crowd can help
Unlock the boundless potential of Metaverse architectural design with Cad Crowd. We connect leading companies and firms with skilled professionals who can harness their expertise to craft immersive digital spaces within the Metaverse. These visionary architects merge technology and creativity to bring captivating virtual environments to life, from futuristic cityscapes to awe-inspiring virtual landscapes.
Take your Metaverse architectural projects to new heights and redefine the future of digital spaces by requesting a free quote and contacting us today. Join the movement and ensure your architectural designs leave an indelible mark in the ever-evolving Metaverse landscape.
Building Information Modeling (BIM) is now an indispensable tool for more and more building projects in today’s quickly evolving architecture, engineering, and construction (AEC) industry. However, what does the future hold for this field? What trends should you watch out for?
BIM modeling services are changing the AEC industry in ways you may not know. From enhanced efficiency to improved collaboration, there’s no denying how beneficial BIM is. This article explores the emerging BIM modeling trends for companies.
BIM modeling adoption
What’s the effect of BIM modeling adoption on manufacturers? BIM is critical as more and more companies, governmental entities, and private clients recognize its value. Architects, engineers, and interior designers have started to adapt their practices to integrate BIM technology into their work.
The professionals turn to BIM objects that manufacturers, EPDs, and LCAs provide for accurately assessing their designs and environmental impact. BIM adoption is vital for manufacturers to stay competitive and adhere to the increasing demand for BIM objects in construction projects.
Artificial Intelligence (AI)
Integrating AI with all its promising benefits is starting to change the construction industry. Manufacturers are among the main stakeholders that this trend will affect sooner or later. With the help of AI algorithms, it will be easier for manufacturers to analyze all project data, acquire insights into their products’ performance, and reach data-driven decisions for their improvement.
When used in the construction industry, AI can help monitor performance and detect problems before they occur. This also improves quality control and can come in handy for analyzing vast quantities of data and determining patterns that will further optimize the design and construction process.
For example, artificial intelligence can be used to examine data that can help predict possible delays in the schedules of construction projects. Tools powered by AI, like chatbots, can also be a great help for customers as well as other stakeholders. These tools can answer questions that can improve the overall satisfaction of customers and reduce the workload on the part of the customer support teams. If you still find these lacking, AI is also great at analyzing data on building components and materials to pinpoint areas with room for sustainability, efficiency, and cost improvement.
Automation
Automation is also an emerging trend expected to transform the BIM world. Construction automation uses applications, robots, and digital processes to achieve and complete tasks with the least human input. Automation has numerous perks, including being more cost-effective and reducing safety hazards.
Automating the BIM model production process allows manufacturers to collaborate more effectively with engineers, architects, and other stakeholders involved in the construction process. The use of automation in BIM helps the manufacturing process as well. Automation technologies like sensors, AI, and robotics enable manufacturers to improve the quality of their products and streamline the production process. These can lead to better adaptability and flexibility in changing the requirements for production. It allows manufacturers to better cater to the demands of the construction professionals who use BIM.
It’s a big no-no for manufacturers to fail to adhere to BIM mandates now more than ever. BIM mandates are a requirement instead of a mere option in the construction industry because of their numerous benefits, including increased efficiency and better project outcomes. Technological advancements aren’t the only ones that drive the trend; even politicians strive to improve a country’s competitiveness, productivity, and environmental and social welfare.
Manufacturers can enjoy a strategic edge by adhering to BIM mandates and coming up with BIM content to enhance their product offers and better meet the needs of their customers. Manufacturers must keep up with the newest BIM requirements to stay competitive.
Cloud-based technology
Numerous benefits are associated with cloud-based BIM, such as real-time updates, accessibility, and improved collaboration. Information management is a vital benefit where BIM objects play a significant role. Thanks to this technology, building project stakeholders can update and access BIM models worldwide to collaborate on projects.
Manufacturers can make the most of this trend by ensuring their products are accessible on cloud-based BIM platforms. As a result, it will be easier for stakeholders to have their products integrated into BIM models. Real-time updates are also available on cloud-based BIM to help teams keep up with progress and project changes.
On the other hand, using onsite premises may require stakeholders to work with obsolete information or wait for updates, leading to errors and delays. With cloud-based BIM, stakeholders can access the most updated information about the project and engage in real-time collaboration. This trend will likely continue as cloud-based technology infiltrates other industries. As an increasing number of stakeholders welcome the idea of using cloud-based BIM, it’s expected that accessibility and collaboration will further improve, thus transforming the construction industry as a whole.
Prefabrication
Prefabrication is an up-and-coming trend that might already be familiar among manufacturers. Prefabrication and BIM are similar to two peas in a single pod. The prefabrication process involves the offsite creation of building components and assembling them on the site.
During prefabrication, BIM has a critical role to play as it lets manufacturers develop digital models of the components that allow easy integration into the building model. Manufacturers can enjoy numerous benefits from using BIM during prefabrication. These include accuracy, increased efficiency, and better collaboration with the rest of the stakeholders.
All of these allow quicker and more efficient onsite assembly of the components. Combining BIM with prefabrication will enable manufacturers to seamlessly develop components fitting into the building model.
Internet of Things (IoT)
Greener, faster, and better building processes are what BIM is all about. Stakeholders can take advantage of sensors and IoT to gain insight into the operation of their building projects. The construction industry can use IoT to control and monitor building systems and automate repair and maintenance tasks for improved safety at work.
Integrating IoT data with BIM software can give construction professionals more detailed and accurate information on the building systems’ performance, including lighting, product design, and other equipment. Manufacturing services can also use IoT to understand the needs of end-users and construction professionals to develop improved products that cater to their customers’ competitive needs.
Digital twins
As digital twins continue rising in popularity, the construction industry is also set to enter a new dimension of simulation and design. Digital twins can be likened to replicas of physical assets like machinery or buildings, which help stakeholders view and assess the performance of their structures in various scenarios. Digital twins can provide real-time data that optimize performance, improve decision-making, and anticipate maintenance needs before they happen.
Digital twins can accurately predict and simulate the behavior and operation of a product according to conditions in the real world. It allows manufacturers to come up with educated decisions regarding support and maintenance needs that optimize the performance of a product. This reduces rework and waste, hastens the design process, and enhances the product’s overall quality. The identification of possible bottlenecks before they happen is among its significant benefits.
The rise of augmented reality technologies significantly impacts BIM processes. These are starting to be further integrated into the construction industry to provide various means of interacting and visualizing BIM data. The technologies allow picturing and simulating construction projects so stakeholders can understand them before construction.
Virtual augmented reality is a technology that will enable easier and faster inspection of large-scale 3D models to offer stakeholders a clear and comprehensive image of the development and design process. The technology is also expected to improve the BIM modeling process in the future by providing a comprehensive look at the different stages of the design process.
It’s an impressive way of presenting designs and products to customers to give them a chance to understand better what they will get before deciding to buy. Virtual augmented reality also allows visualization of product designs and improved collaboration among project teams. This cuts down errors and enhances the overall quality of the project through the identification and resolution of problems before the start of construction.
How Cad Crowd can help
Possibilities are almost infinite as far as the future of BIM modeling for AEC companies is concerned. Cad Crowd operates as a platform where you can find BIM modeling & design services and architectural BIM modeling experts who can help your company keep up with the changes taking place in the industry.
There’s no question about the significant growth in popularity that BIM or Building Information Modeling has been getting these past few years. On the off chance that it’s your first time learning about BIM, it’s often described as a new way of going about the documentation and design of construction projects.
BIM comprises the virtual representations of actual pieces and parts used to construct a building. These BIM elements have the logical and physical characteristics of their counterparts in the real world. Simply put, BIM elements are digital prototypes of the physical elements of a building. With the help of BIM, you can build something virtually before you build it physically.
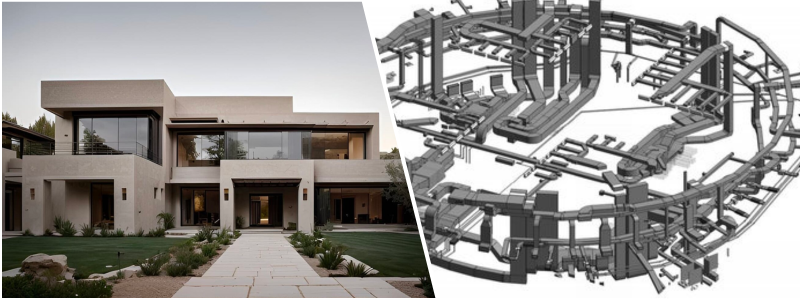
Users of BIM list several benefits it offers at different phases of the construction project, including estimation, scheduling, risk analysis, more effective management of facilities, and developing a more collaborative process among all stakeholders. However, BIM can offer more in other specific aspects and areas. One particular case is how it provides substantial advantages to contractors who work on mechanical, electrical, plumbing, and fire protection or MEP/FP design and construction. Using BIM in MEP/FP modeling streamlines projects improves collaboration, and reduces waste and risk.
BIM proves beneficial in MEP/FP through its application in 3D modeling design services, shop drawing services, fabrication drawing services, builder’s working drawings, comprehensive section reviews, collision detection, bill of materials, scheduling, and more. These benefits are equally applicable to both electrical and mechanical fields.
Benefits of integration of architectural BIM services in the MEP/FP design process
Complete BIM integration has been proven to be greatly beneficial. If you’re still unsure as to how architectural BIM services can complement the MEP/FP design process, here are a few points to convince you further:
The 3D advantage
The first is the most basic BIM modeling service benefit. However, 3D designs of ductwork and piping can help MEP/FP contractors save more effort and time. Thanks to these designs, they can better visualize and understand their clearances and know how to add equipment or make adjustments before its final implementation in the field.
They can also view the model from all possible angles, for example, which include the interface of the processes. It can also be used for redesigning the model and making further enhancements along the way.
Interference prevention
How often have you heard horror stories about electrical trays and plumbing being installed haphazardly? This clash, mainly when several players are involved in the project’s different facets, is typical in construction projects.
The bright side is that it is possible to detect these clashes with the help of BIM during the design stage to solve them immediately. Clash detection includes but is not limited to Hard Clash, Soft Clearance Clash, 4D/Workflow Clash, and the like. You can imagine how much money and time you can save if delays are prevented before they happen.
BIM software consists of tools for budget management and cost estimation. It simplifies estimating their work’s cost more simplified for MEP/FP engineers to ensure that they stick to their budget. With the help of BIM, MEP/FP engineers can also pinpoint areas where they can further lower costs and enhance their systems’ efficiency in general.
Improved visualization
BIM offers a building representation in 3D that allows MEP/FP engineers to visualize how the finished product will look. It makes it possible for MEP engineers to detect potential problems early on in the process and make the necessary adjustments before the start of construction. BIM also offers MEP/FP engineers an enhanced understanding of how their systems and the rest of the building will interact to improve the overall quality of their work.
Gain total control
MEP/FP contractors can also use BIM to get a bird’s eye view of different components, including ceiling elevations, the plumbing layout, the walls with electrical wires, and the rest. They only need to use a single platform to access these details.
The common platform also serves as the single version of truth for every stakeholder involved in the project. It gives them total control over the project’s scope of work and saves them from more agony since flaws can be detected early on. All of these mean that there will no longer be unwanted wastage of resources because of errors.
Enhanced collaboration
BIM modeling & design services allow MEP/FP engineers to work hand in hand in real-time with contractors, architects, and the rest of the stakeholders. It enhances their communication lines and ensures everyone stays on the same page from construction to completion. BIM also allows MEP engineers to corroborate their work with other trades and pinpoint possible conflicts early on to reduce the risk of delays and rework.
Better management of the project
BIM modeling & design offers a centralized single platform for managing each aspect of a building project, from design to construction. MEP/FP engineers can then use it to efficiently manage resources, track progress, and coordinate with the rest of the stakeholders.
Architectural BIM services can also help MEP/FP engineers meet their deadlines, project requirements, and budgets to improve their work’s overall efficiency.
Higher safety levels
BIM also comes in handy in simulating various construction scenarios, such as possible safety hazards. It lets MEP/FP engineers determine and address risks before the start of construction to improve worksite safety for all workers. MEP/FP engineers can also use architectural BIM modeling services to ensure the correct installation of their systems and compliance with all relevant standards for safety.
Augmented accuracy
BIM software allows MEP/FP engineers to develop accurate models and visualize their systems, including plumbing and electrical systems. It helps ensure the correct installation of the systems and lowers the risk of rework and errors. BIM also makes it easier for the MEP/FP engineers to confirm that their systems adhere to all relevant standards and codes to help improve their work and its overall quality.
Procurement and logistical planning
It’s no secret that MEP/FP work is rather complex. Several large and small components like pipes and wires occupy space, financial resources, and planning bandwidth. To prevent chaos, BIM can help streamline different activities, including material procurement and procurement planning. It helps ensure that elements made offsite will fit perfectly in their respective spots.
It also helps MEP/FP contractors order and deliver only the required materials on-site. It results in better estimates to help you save money by eliminating over-ordering. In addition, it also gets rid of the hassles of offsite or on-site bulk storage of materials.
Prototypes made faster
In the ever-evolving field of construction, integrating 3D printing services and rapid prototyping services is a game-changer. Since the first 3D-printed house milestone in 2017, MEP/FP contractors have been blending 3D printing with BIM for groundbreaking results. This fusion enables the creation of rapid prototypes, providing stakeholders with a tangible, detailed representation of complex designs and enhancing communication and project clarity. This innovative approach streamlines the construction process and offers cost-effective, efficient solutions, revolutionizing building and design.
Address challenges
There are instances when smaller components can become significant challenges for MEP/FP contractors. It’s easier for them to model the bigger components to their precise measurements instead of handling the smaller ones. BIM modeling can solve this challenge for contractors by allowing them to design, model, and eventually develop the smaller parts quickly in the most detailed way possible.
Streamlined processes for design and construction
Architectural BIM services allow MEP/FP engineers to create accurate and detailed models of their systems that reduce the need for site visits and manual calculations. MEP/FP engineers can also use BIM to harmonize their work with the rest of the trades and manage the construction process to cut down on the possibilities of rework and delays.
Sustainable benefits
MEP/FP contractors who wish to go green can also use BIM modeling services and make the most of their sustainable benefits. Since the BIM model offers a common platform where stakeholders can collaborate, they can easily use it to consider the energy properties and materials throughout the design stage. This is where the inputs of MEP/FP design can substantially impact. Better integrated BIM designs can help in the construction of more energy-efficient buildings.
Welcoming BIM innovations in the MEP/FP design process
BIM has a significant potential to become the most powerful partner for MEP/FP contractors. It offers a long list of benefits. However, the exciting technology’s improved collaboration and planning capacities can drive better control of resources, early detection and solving of problem areas, and more integrated efforts.
How Cad Crowd can help
Cad Crowd can link you with the best and top-of-the-line architectural BIM services to complement your company’s MEP/FP design process to generate better results.
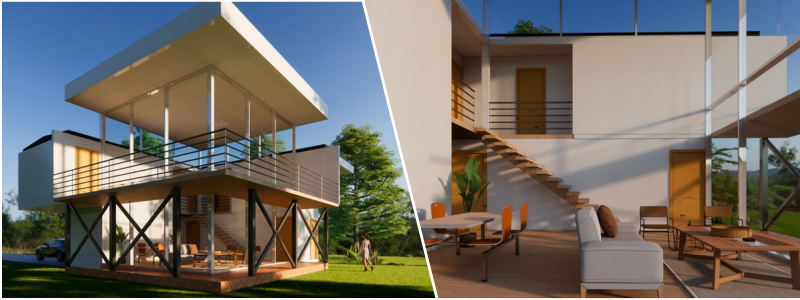
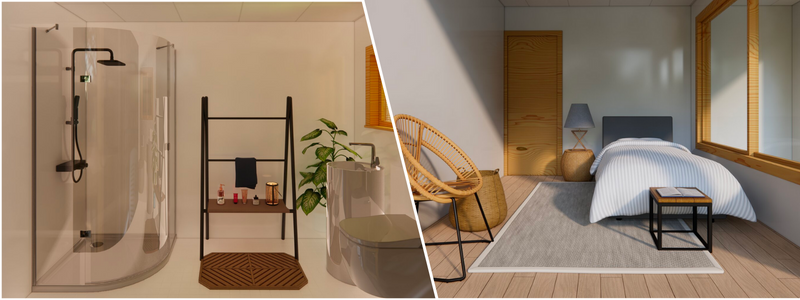
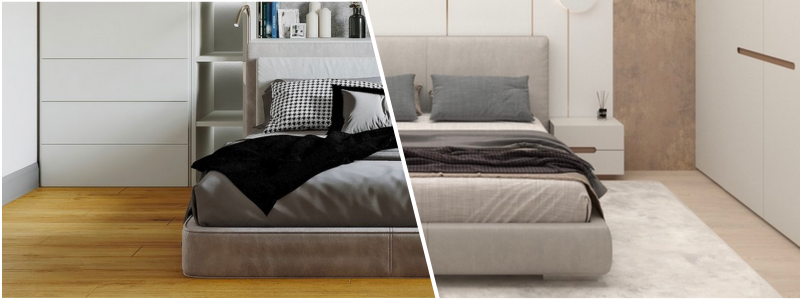
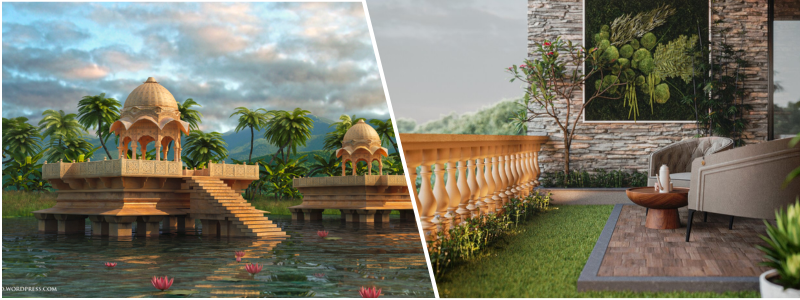
3D furniture modeling has become an indispensable tool for furniture companies that wish to stand out amid the cut-throat competition in the industry. But while 3D modeling technology is already revolutionary and advanced in its own right, specific errors may arise if you need more trade-specific expertise.
Continue reading to learn how to avoid 3D furniture modeling blunders with 3D furniture modeling services:
Choose the proper perspective and camera angles
The rules of the perspective serve as the basis for any room setup, whether in 3D or physical. The settings’ standard horizon line must be at eye level or right under it. Inexperienced 3D modeling designers need to figure out where to put cameras properly, which can result in 3D objects being rendered too low or too high relative to the viewer’s level. The result is that viewers cannot understand the proportions of the furniture and room because of the confusing angle.
An incorrect perspective will distort items, resulting in misconceptions about the product’s size. For instance, if you capture a photo from high above or below a piece of furniture, the cabinets will look like skyscrapers, while your couch will appear short and squat.
The good news is that 3D furniture modeling services have 3D modeling experts with years of experience who can decipher ideal angles for 3D rendering items. They also have lifelike and well-organized 3D lifestyles. With the help of their mastery of the art, CG artists can even take advantage of risky angles and use them as artistic tools to produce a more dramatic effect.
Provide optimal scaling of 3D objects
Whenever CG specialists render 3D objects, they should ensure the entire scene looks as realistic as possible. This is why every item should have the right proportions to express realism. Expert CG artists are extra careful when checking the scaling to prevent disproportion at all costs. Their renderings never represent colossal furniture items in cramped tiny rooms. Their room setups are always coherent and well-balanced. In addition, CG experts are well-versed in 3D modeling, which helps them avoid distorting the geometry every time they build a scene. Their 3D furniture models never look stretched out and disproportional.
Use 3D objects correctly
Given the context, 3D room setups and 3D furniture models should perfectly match. However, in real life, CG amateurs often pick strange locations for their products, such as putting a dining table in the study. The interior style and design for a room setup are also a big deal. This is why CG professionals should ensure that the room and 3D objects go well together.
3D modeling experts always choose a 3D scene that will match the item and never vice versa. To achieve just that, CG artists often take interior design courses. They are also well-versed in the different styles, from the trendiest to the most traditional ones. Aside from this, far-sighted 3D furniture modeling services also have 3D libraries where they keep all of their ready-to-use 3D scenes. From there, their clients pick the specific room setup they want.
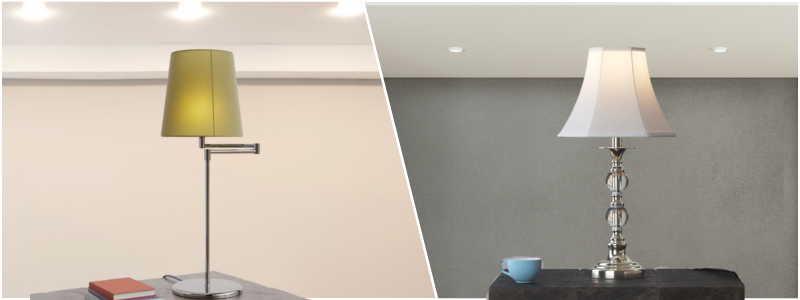
Provide high-quality textures for 3D furniture models
Bad textures are one of the most visible indications of unprofessional 3D furniture models. Distorted patterns, seams on textures, and blurry surfaces mean that the texture map needs the proper settings and is made of a poor-quality 2D sample.
3D furniture modeling services know how to apply textures to ensure smooth and seamless surfaces correctly. Professionals can even make textures for products from scratch if you need custom or rare materials for your 3D furniture models.
Don’t go overboard with post-production
Newbie CG artists usually produce low-quality renderings only to use intensive post-production to cover up errors. For instance, many use Photoshop to incorporate unnatural shadows, overdo images with color corrections, and add flashy glares without logic.
On the other hand, 3D furniture modeling services always give their best effort to produce the highest quality 3D furniture models. CG professionals know that meticulously rendering 3D objects will help minimize post-production work. They must adjust color contrast and balance and add minor finishing touches to achieve 100% photorealistic results.
Create roomsets that aren’t dark or too bright
Unrealistic lighting is undoubtedly one of the biggest 3D furniture modeling blunders. CG beginners typically need to fix the brightness or put the incorrect number of light sources. This results in either overexposed or excessively dark models.
Unlike neophytes, CG experts can create evening and daylighting schemes to produce a natural look. These 3D modeling professionals know how to adjust the 3D sun’s tonality and the lighting sources required for a night-time scene. Since they can render 3D furniture models with the correct lighting, they can produce 3D images that appear as realistic as the actual photos of the products.
Produce natural intersections
Before CG professionals can render 3D objects, they need accurate 3D modeling since the arrangement of 3D models is the secret to a more realistic image. However, beginners usually must be more focused and ignore item placement in the scene. Thus, tiny but significant details end up slipping their attention.
For instance, in their 3D furniture rendering services, the 3D furniture models may intersect in a way that doesn’t look real. Some furniture pieces may even seem like they are drowning or floating over the floor. The good news is that 3D modeling experts will avoid making this mistake, as these cases can easily damage the studio’s reputation. Trustworthy CG companies only hire professionals as part of their team.
How 3D furniture modeling services speed up the 3D furniture modeling process
The time required to create a perfect and virtually sound 3D furniture model often takes hours. But with the help of specialized and advanced tools, the entire process is faster than traditional photography methods.
Professional 3D furniture modeling services take specific steps to achieve the best results for your projects.
3D modeling design concept development
3D furniture modeling services will start with a clear perspective of the furniture to ensure that your 3D furniture model captures the response and interest of your target customers. They will then use the best 3D furniture modeling software and conduct thorough analysis and research on different marketing segments. It will help them optimize the furniture model based on your target audience and competition.
Understanding of technical details
Having a clear understanding of your product’s technical details will lengthen the completion time of your 3D furniture modeling project. The 3D furniture modeler needs a clear vision of the technical details related to your product, including its layout, material, dimensions, and others. This helps them execute geometrically accurate parameters in the software for furniture model development. It’s more straightforward to develop CAD models with no complexities added. This saves them from making significant corrections later in the furniture development process.
The development stage will begin once the 3D furniture models are ready. This is the stage when your furniture product’s 3D prototype is made. Prototype models function as experimental models that you can use to trace imperfections and errors before the product is submitted for the client’s approval. With the help of CAD modeling software, CG artists can validate the process immediately and make it two times faster than usual. The experimental model can be used later for visual prototyping or 3D printing services.
Visual prototyping is done using VR technology that helps reduce the overall manufacturing cost. On the other hand, rapid prototyping services will produce a larger quantity in the least amount of time possible.
Use references for lighting and decoration
Using references for decoration and lighting objects is also an equally helpful method, which is also a popular option among CGI experts. This is because the creation and conceptualization of furniture product details need time.
There is also no assurance that the results will be exciting. When the results end up otherwise, it will harm your project’s progress. This will lead to unsatisfied customers and extended deadlines. But you can enjoy faster turnaround time when the results are more relevant to modular furniture, like readymade models for décor, lighting, and scenes.
How Cad Crowd can help
If you want to avoid all the 3D furniture modeling blunders, Cad Crowd is the best place to look for the most reliable 3D furniture modeling services. Cad Crowd has expert 3D furniture modeling designers and 3D visualization services, ensuring stunning and realistic representations of your furniture designs.
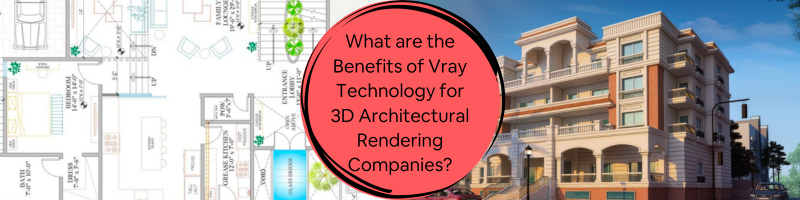
3D architectural rendering companies that hope to succeed and grow should note that clients think differently than they do. Instead, you need to amaze and blow them away right from the get-go. Architects should combine various tools to showcase their skills to ensure clients are blown away by their work. Architects, artists, and designers can effectively communicate and express their ideas if they work collaboratively.
The universal plugin Vray allows different types of 3D modeling software to produce excellent results from designs. Your 3D architectural rendering company will have a fun time working with Vray technology thanks to its wide range of benefits, which include the following:
Vray enables access to extensive resources and libraries
Vray’s vast material library makes it stand out from its competition. You should never consider a material that doesn’t render flawlessly with life-like precision and add it to your design. The Vray plugin revolutionizes interior design and 3D architectural rendering by taking them to a new level. With Vray, you can effortlessly manipulate finish combinations in real time, eliminating the need to spend endless hours explaining the look and feel of every finish on every surface. Instead, you can simply showcase your design vision through stunning 3D renderings, making it a game-changer for both 3D interior design services and 3D architectural rendering services.
Visually presenting information allows you to make faster decision-making, depart sooner, and let you do all the things you love and appreciate about architecture. Only a few 3D rendering products can keep up with the popularity of Vray. It’s packed with tons of courses, lessons, and tutorials to help you make the most out of its potential. Practice is required to make the most of a product, especially with steep learning. But you will become better at it faster if you practice under focus and guidance with the help of the available resources at your disposal.
The community of Vray 3D rendering software users is massive, with instructors, content creators, social media, forums, and more. You can ask for expert technical opinions on your newest renders and receive friendly feedback. There are also learning resources available for free that help beginners find their footing and guide well-versed artists who plan to implement new features. Designers and architects can search for 3D assets, tutorials, and docs to improve their 3D architectural rendering workflows.
Boundless options in Vray
Vray also has limitless options to adjust camera settings, depth of field, light source, material textures, bump maps, and more. It ultimately all boils down to flexibility if numerous options are available. It’s easy to get tempted to control all aspects of a design drawing, and Vray lets you do just that. All plugin products are also tailored to specifications to assure you that it’s yours and yours alone.
Material rendering
You last want your realistic 3D architectural visualization to look unrealistic. It will make your project look amateurish if your company is caught between finished and conceptual work. Ensure you nail realism if you want your work to be genuine, and this is where Vray comes in handy. Vray’s consistency and precision play a pivotal role in achieving the highest level of realism in your 3D architectural visualization services.
Big projects always entail large overheads. Even the most straightforward scenes involving international airports, towering hotels, and smart cities can already contain thousands of lights and objects. It’s easy to feel nervous with the mere thought of all the data involved in such projects.
The good news is that Chaos, the company behind Vray, has developed a rendering engine that can handle these massive scenes quickly and smoothly. Tools like Proxy Objects can also handle the most exhaustive models without any issues with memory consumption. Meanwhile, the VR scene format lets you share scenes, 3D architectural models, or entire 3D architectural rendering projects across various host platforms without conversion troubles.
Exceptional photorealistic quality
Vray has already bagged Emy and Academy Awards, and many animations and sequences in TV shows and movies have been crafted using the physically accurate materials and lighting of this proven and tested render engine for production. 92 out of the top 100 architectural companies in the world use Vray daily to visualize their most significant and essential designs. Of course, you can also tap into its unique power and develop stunning visuals.
Vray has you covered if your company wants to create a more hyper-realistic 3D architectural rendering. It allows you to build fly-throughs and stills that resemble natural photography. Vray also offers VR camera support. By exporting 6×1 Cube or 360 spherical images, Vray empowers you to deliver an immersive and intuitive experience of your designs to clients, making it ideal for both traditional and cutting-edge AR/VR architectural services.
The cleanest textures, the whitest whites, and the darkest blacks accurately represent real-life situations. You can use Vray to create spaces that will make your clients feel they live in them. Every design you make should be of top quality, whether presenting it to potential clients or submitting it to stakeholders.
Despite its subjective nature, quality is an easy-to-quantify and recognize measure.
You can catch the eye of more people and establish your reputation if your work stands out from the crowd. This is what 3D architectural rendering companies are all about.
Seamless integration with SketchUp, 3DS Max, and Rhino
Integrating with Google SketchUp is an indispensable feature for any 3D architectural rendering company. Sketchup can present ideas right away with the help of a simple set of tools. However, this modeling tool is technically not the most sophisticated.
But by using Vray, you can breathe life into your sketchy ideas at the fastest time possible. Client meetings that used to be held to address issues with conceptual programs can now be improved with real-life visualization, thanks to Vray.
Light and shadow
Shadow and light, and the way they are rendered in architectural visualizations, are just two of the most essential tools available at your disposal to understand realism unconsciously. Lighting that isn’t convincing can be off or distracting on a drawing. Vray is known to handle realistic shadow and light more realistically and accurately than other comparable renders.
Real-time validation of ideas
Vray provides two real-time solutions. First is Vray Vision, which is available in Rhino, Revit, and SketchUp. This raster engine lets you improve your design’s view in another window. Vray Vision allows you to export scenes to enable your clients to navigate them and evaluate and review design proposals. Another real-time ray-traced solution is Chaos Vintage with Live Link, which lets you navigate the scene and check your design with Vray’s realistic quality. You can also work interactively with IPR or Interactive Production Rendering to check the result while you design and speed up the lookdev process of lighting and materials. It allows you to reach decisions faster, thus enhancing your productivity significantly.
The past several years have witnessed the redesigning of Vray to start easily and quickly. It only takes several steps to create gorgeous 3D architectural rendering imagery, which is undoubtedly every Vray designer’s dream. Creativity is the most critical aspect of any design. You can enjoy more opportunities and options if you can use friendly tools that you can seamlessly incorporate into your creative exploration.
Thanks to the scene intelligence technology and default settings of Vray that work with different scenes, you can spend more time on creative solutions and less on technical aspects. Vray can also seamlessly work with top 3D platforms like SketchUp, Rhino, Cinema 4D, Revit, 3DS Max, and more. However, even though it’s easy to learn, you can expect that there is still a learning curve due to the extensive material library and more settings and options as you find your way through the entire process. The real value of Vray lies in its work. The good news is that architects need to learn the system, change it based on their preferences, and make the most out of its efficiency.
Fast 3D rendering made possible
Fast is often associated with machines, settings, and 3D rendering model size. However, Vray consistently outperforms its competitors. Vray offers architects a range of benefits, including faster 3D rendering services, architectural drafting services, and 3D architectural animation services. Using a 3D visualization tool that lets you quickly determine if something will work before you fully engage in longer, higher-quality rendering presentations works to your advantage.
This will allow you to see the lighting, materials, and colors to decide the frame and composition much faster. Vray also offers a faster rendering engine that no other rendering software can provide. Consider using Vray if you’re looking for something quick that will maintain quality, even on a tight schedule.
Cad Crowd is a platform where your 3D architectural rendering company can search for professionals who are well-versed in using Vray for architectural design services.
I hope you’re having a great start to the week so far!
It’s been busy around here, projects are kicking off, there have been a ton of new videos on the channel, and Kid’s soccer/swimming lessons are both in full swing, making for packed weeks for the foreseeable future!
I’m also excited to share a bunch of new videos in the coming months where we’re learning new software and tips/tricks as well!
Today we’re going to be taking a look at a new Cloud/Online Offering from SolidWorks. It’s a browser-based CAD offering that is bringing SolidWorks remote!
I’ve long been a proponent of cloud and browser-based design platforms.
With more and more teams working remotely and in hybrid arrangements every year. Being able to get away from expensive modeling hardware, servers, file organization, and Network licenses not only provides huge cost savings, it also helps streamline the shift to distributed teams while maintaining collaboration through a project’s lifecycle.
In today’s video, the first of a SolidWorks series, we’re taking a look at some of my favorite features, cool tricks, insights and much more as we dive in and learn about the Software.
In the coming videos, we’ll be walking through the process of designing a project using the SolidWorks Online Apps and sharing my tips/tricks and tutorials along the way!
That’s all for today, I hope you enjoyed this week’s video and I would love to hear what you think, have you tried SolidWorks Online Offerings?
I’ve really enjoyed how much they’ve packed into the apps and just how seamless it’s been to begin using the online design apps coming from the desktop!
As always, thank you so much for reading and watching, I am super excited for the rest of the year, growing the content, tutorials, and blog with you all.
Cheers and happy Drafting!
The following two tabs change content below.
Brandon is a Civil Designer, Aspiring Blogger/Creator, Husband, Father to two Amazing Kids and Tech Aficionado from a small town in Canada. He has been obsessed with design and technology since he can remember and working as a Civil Designer for nearly as long. Brandon’s blog and Youtube channel, CADIntentions.com has been his outlet and excuse for keeping up with new tech and trends in the CAD design world for the last 10 years growing to more than 60,000 subscribers and over 15,000,000 views, while also being the source of many great friendships and unique opportunities.
If you would like to Sponsor CAD Intentions or Work together in some way, Please visit my About Page and send me an email: http://cadintentions.com/about-me/