Control Your Large Layer List With Filters: Tuesday Tips With Frank | AutoCAD Blog


Layers. They’re a core feature any AutoCAD user learns about early on. After lines, arcs, and circles, along with how to modify said items, we learn about layers to help us better organize our drawings.

A well-designed layering standard is one of the key components of a design department’s efficiency. But what happens when that layer list becomes so large that it becomes unmanageable?

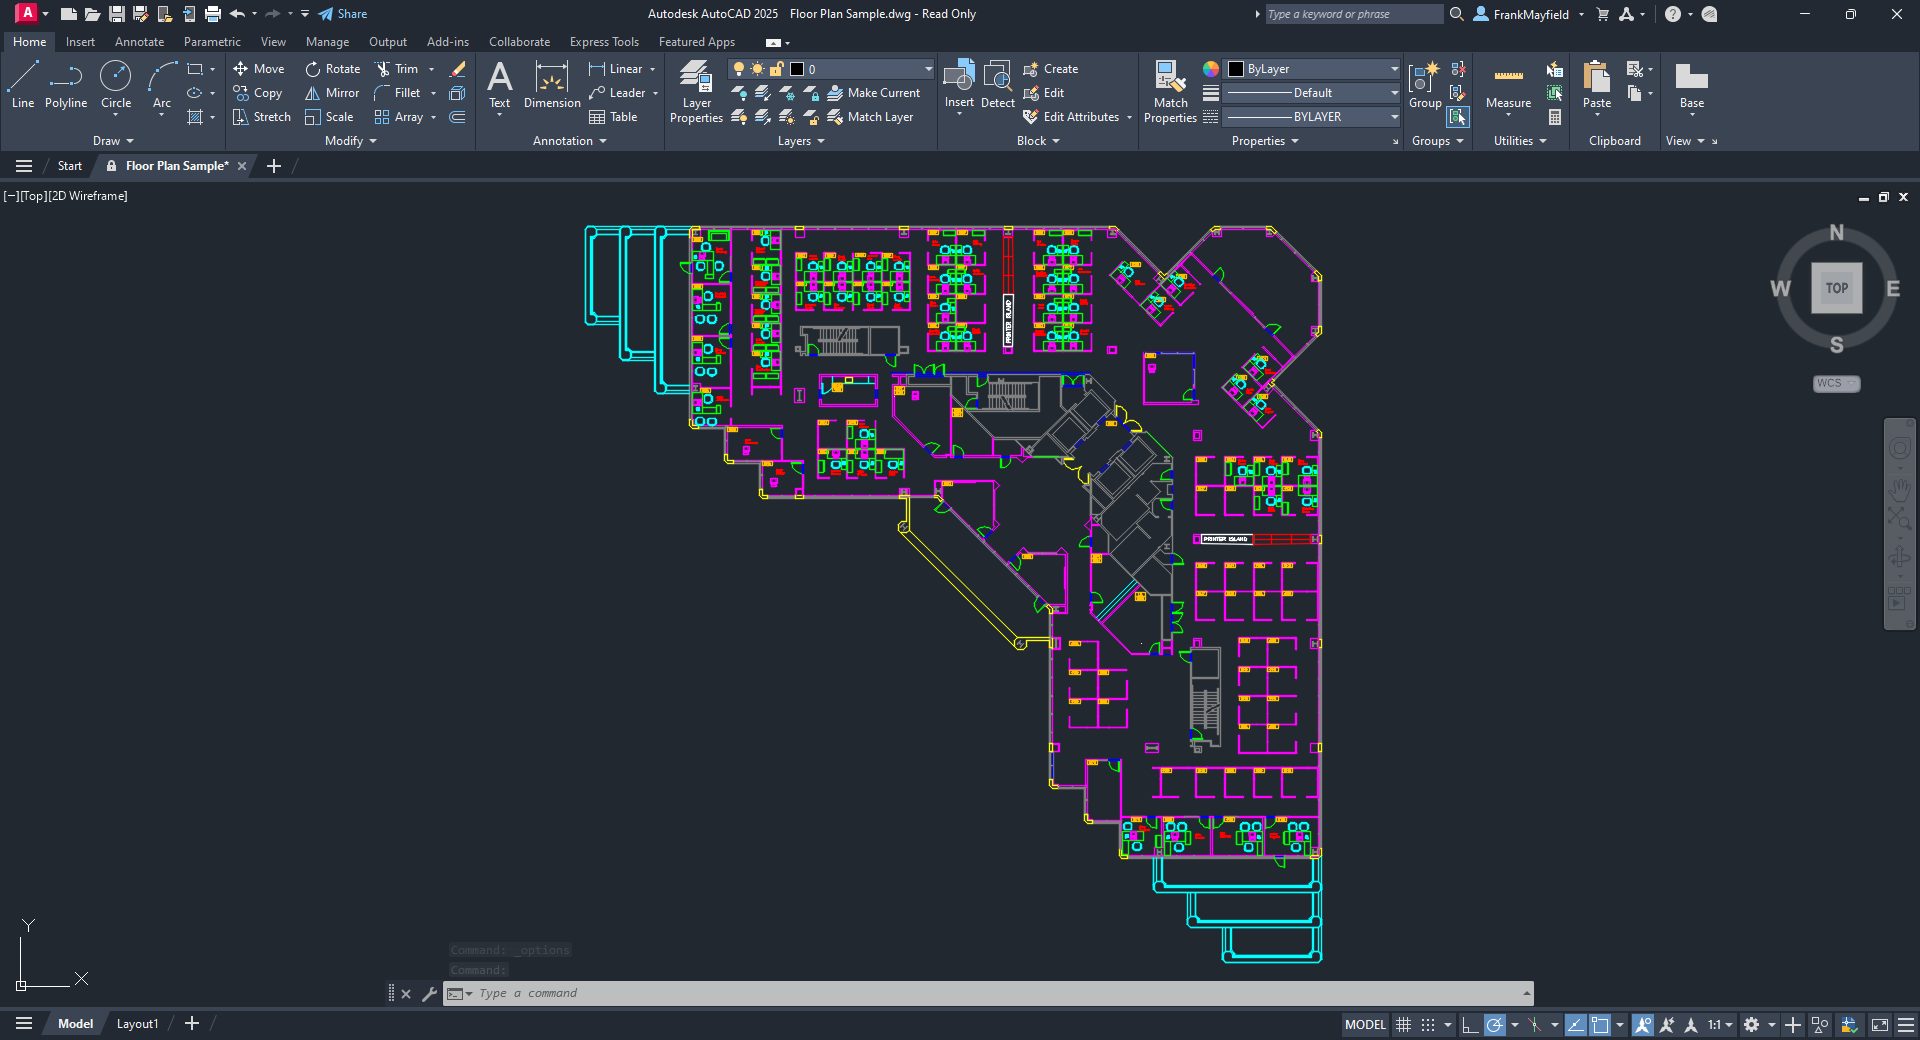
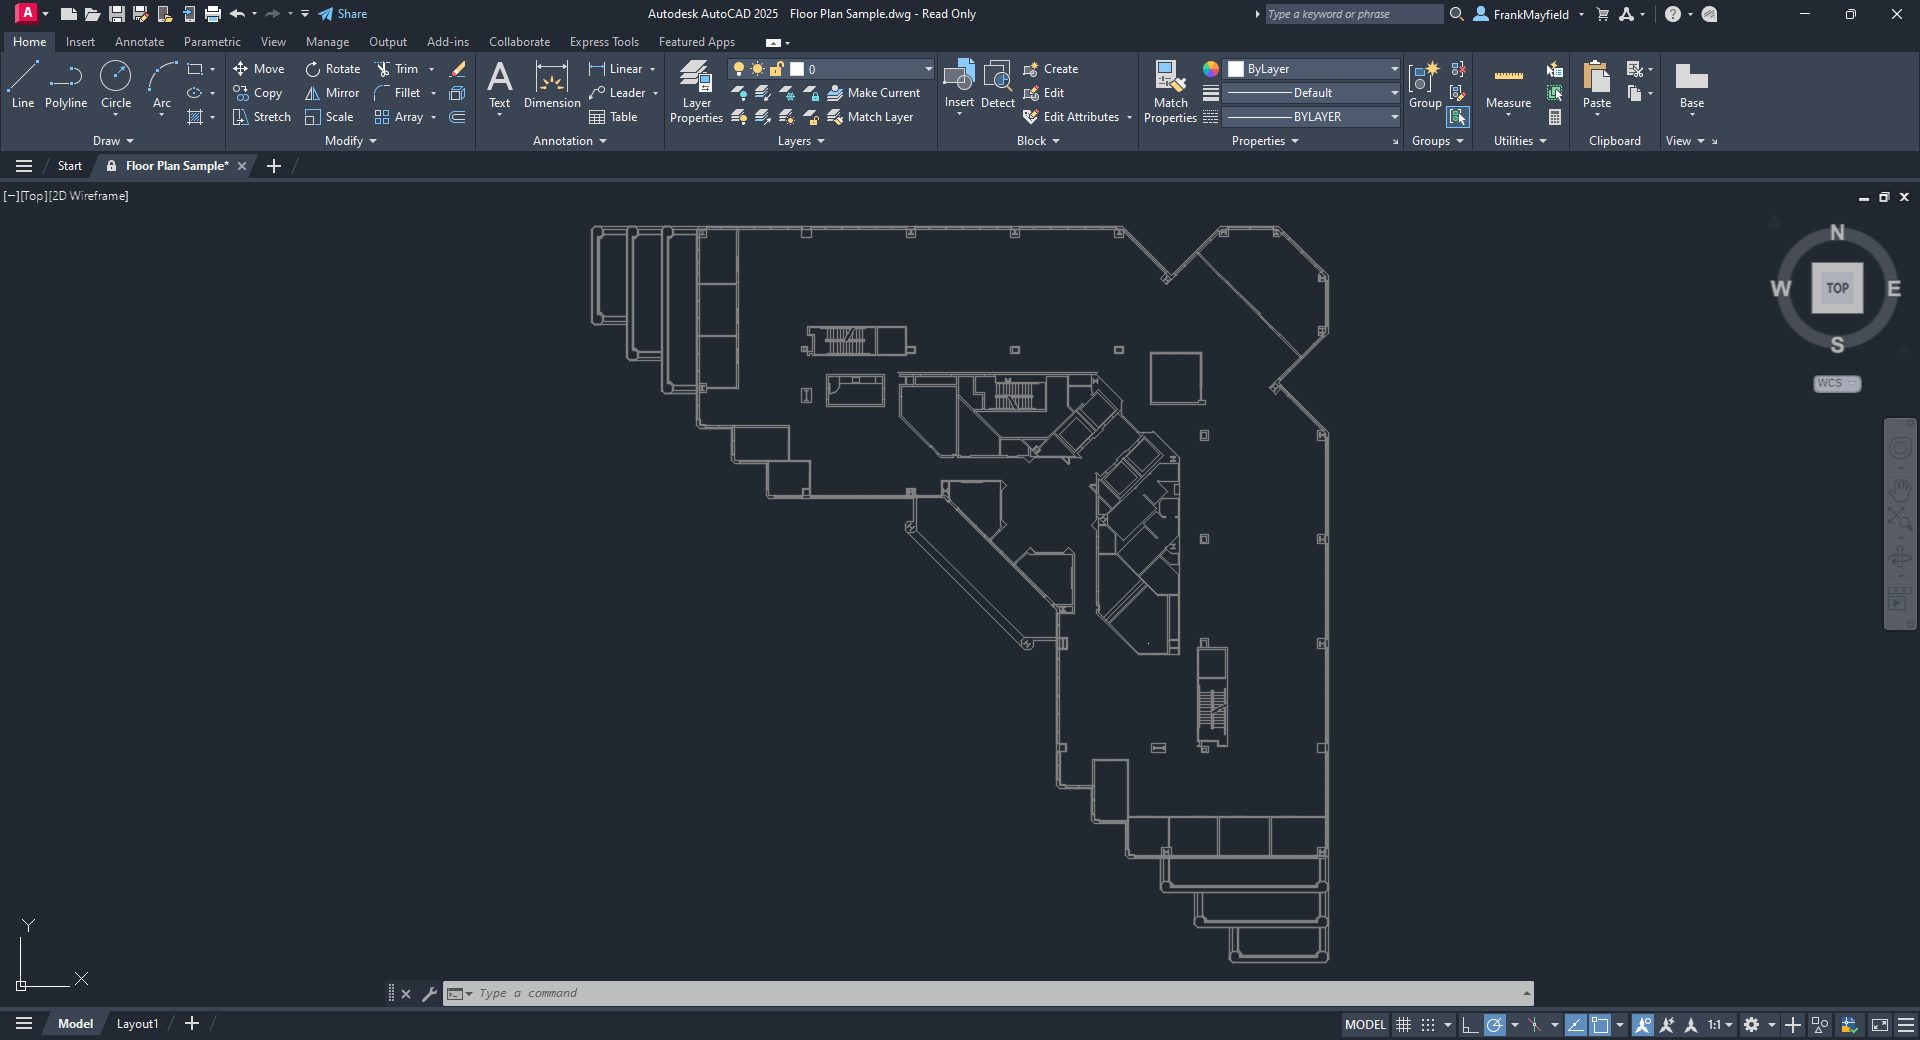
Imagine bringing a master plan together in an AEC office by bringing in all disciplines as Xrefs. You can suddenly have thousands of layers to manage. That’s where today’s topic comes in—it’s called Layer Filters.

Property Filters

You can create two types of named filters: property filters and group filters. One is more complicated than the other, but both can be very useful. Let’s look at property filters first.

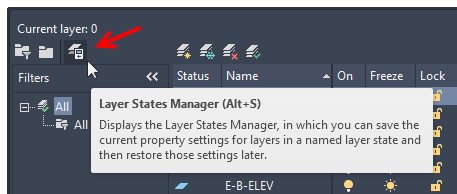
First things first… open the New Property Filter dialog from the icon in the upper left corner of the Layer palette. It’s the one that looks like a folder with a little funnel.

Screenshot of property filter in AutoCAD

Now, it’s time to build your filter. You can use any of a layer’s properties to filter your results. I’ll be building a filter that only gives me layers that have the string “A-Flor” at the beginning and are either red or cyan in color. You first want to give it a name, as you’ll see it listed in the filters panel of the palette when you’re done. I’ll name mine Arch Floor.

Now come the property filters. Since I’m interested in the layer’s name, I’ll click on the Name column in the first row. You’ll see it’s pre-populated with an asterisk. If you’re unfamiliar with wildcards in AutoCAD, you might want to refer to one of my very first Tuesday Tips, where I discuss them more in-depth. I’ll specify the string “A-Flor*.” As I do, you’ll see the layer list begin to change, showing only those layers that match the new criteria. Next, I’ll click in the first-row field of the Color column. A small glyph will display on the right side. Click it to bring up the Select Color dialog. Select the red swatch and click OK. You’ll see your filter preview list now only shows A-Flor layers that are red. Congratulations. You’ve just built a logical AND query. That’s an important thing to know about this dialog. The first row of filters (I could have added any red A-Flor layers that are Thawed) is always a logical AND – in other words, all filters must be true to display a layer name.

Screenshot of layer filter properties in AutoCAD

But we said we wanted all A-Flor names that were either red or cyan. That’s where your subsequent lines come into play. They are logical OR statements. You’ll want to keep the first row’s filters, so let’s duplicate that row. Right-click anywhere on it and select Duplicate Row.

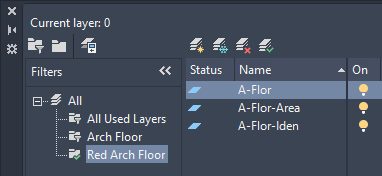
Now, I’ll change the red color to cyan. Just like that, I have what I was after. Click on OK to save your filter. It will immediately show up as the active filter in the layer palette.

Screenshot of active filter in layer palette in AutoCAD

Group Filters

Group filters are much easier to create. The icon is next to the properties filter – without the funnel.

Screenshot of creating new group filter in AutoCAD

This type of filter is just a name, drag, and drop operation. Let’s say we wanted a subset of our property filter containing just red A-Flor layers. Click the icon, and a new filter will appear in the palette, ready to be named. Since it’s now active, the layer panel will show no layers. It’s up to you to find what you want and populate it. I’ll return to my property filter, select only the red A-Flor layers, and drag them into the new group filter.

Yeah. It really is just that easy.

One Last Thing

There’s a very handy checkbox at the bottom of the filters panel in the palette. Check it to invert the results of the filter list. In the image below, instead of getting red A-Flor layers, you’d get those that are not red A-Flor layers.

Screenshot of checkbox at bottom of filter panel in AutoCAD

OK, two last things… remember earlier that I said you could have thousands of layers in our example scenario? If you ever do, you’ll notice that they probably won’t sort alphabetically. That’s controlled by a system variable called MAXSORT. Its default value is 1000. If you have 1001 layers, they won’t automatically sort. Set it higher to make it sort again. But not higher than 32767 – which is, of course, (nerd alert) the maximum value of a 16-bit signed integer.

So, don’t let a massive layer list overwhelm you. Take control of what you see by utilizing property and group filters.

More Tuesday Tips

Check out our whole Tuesday Tips series for ideas on how to make AutoCAD work for you. Do you have any favorite AutoCAD tips? Tell us in the comments!

Have You Tried: Count Blocks Quickly | AutoCAD Blog


Screenshot of AutoCAD

We’re excited to bring you this month’s Have You Tried topic. It’s all about counting blocks—but not just any old way. This updated Have You Tried delves into efficient and quick methods that could change the way you work with blocks.

If you’ve been hanging onto old habits, like using less efficient features or even manually counting blocks, you’re in for a treat. The introduction of Count (released in AutoCAD/LT 2022) and Quick Select features are about to leave those old methods in the past. After mastering these tools, you’ll think back and wonder why you didn’t use them sooner.

In this revised Have You Tried article, we’ll guide you on how to:

  • Count block instances (COUNT command)
  • View count details (COUNTLIST command)
  • Create a count table (COUNTTABLE command)
  • Insert a count field (COUNTFIELD command)
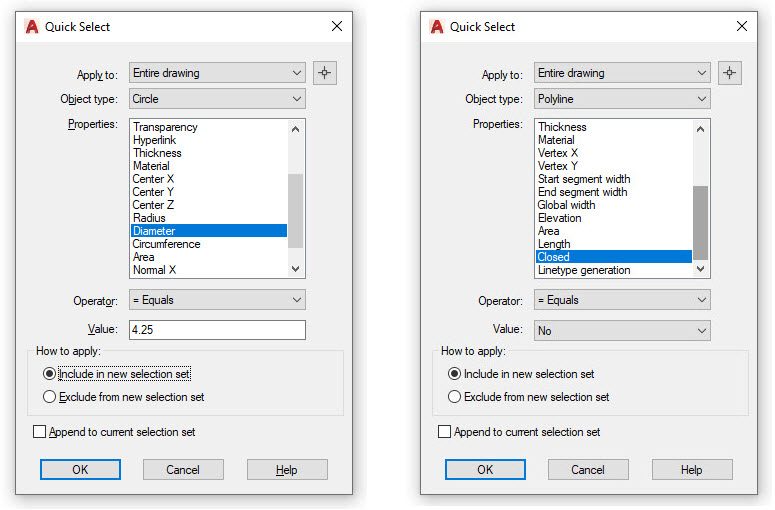
  • Filter and count blocks by their names, layers, and other properties (QSELECT command)

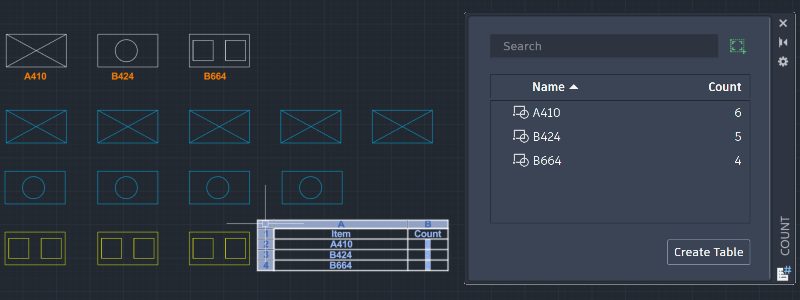
Learn how to count blocks quickly and accurately in a drawing using the Count and Quick Select features with step-by-step examples in our revised article.

Counting blocks screenshot in AutoCAD

Keep the Feedback Coming

Thanks for all the great feedback submitted so far. Because of the great feedback, we have been able to improve the topics in the AutoCAD Online Help system.

The best way to submit feedback is by using the “Was this helpful?” section located at the bottom of every Help topic. Let us know what you like or don’t like about a topic or provide suggestions for other subjects that you’d like to see covered in greater detail. The more specific your comments, the better.

AutoCAD Workspaces and Profiles: Tuesday Tips With Frank | AutoCAD Blog


Screenshot of AutoCAD

One of the things I liked about AutoCAD when I began using it way back when was that it was designed to be tailored to how you would use it. It wasn’t intended for only drawing floorplans, printed circuit boards, or machined parts, although it could do all those things. The idea was for you to customize it to fit your needs.

Fast forward to its modern incarnation, and that element hasn’t changed. Oh, there are all kinds of specialized offspring, but even the toolsets are meant to be tailored to how you use them. Whether it’s which palettes you have on (and where) or how you view tooltips (or not), these settings all make up your customization of AutoCAD and saved in a couple of places.

Most users are probably aware of these, which we call Workspaces and Profiles. But what are they exactly, and how do they differ? I find that’s often a confusing subject for new users. Today, we’ll look at what each one is, what it contains, and how to use them to your advantage.

AutoCAD Workspaces

Ask most AutoCAD users what customization means to them, and they’ll talk about the user interface. What palettes are displayed? Are they anchored or floating? Auto-hidden or not? Maybe it’s the display state of the Ribbon, or perhaps you like using the old menubar in conjunction with toolbars. All these UI elements can be saved in a workspace, and a workspace is saved within a CUIx file.

Notice I said, “can be.” It doesn’t happen on its own; it requires you to set it up. Let’s look at what that means. First, you can access the commands you need to manage your workspaces in three ways.

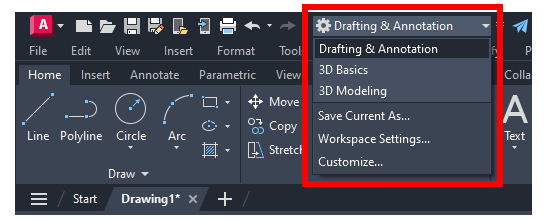
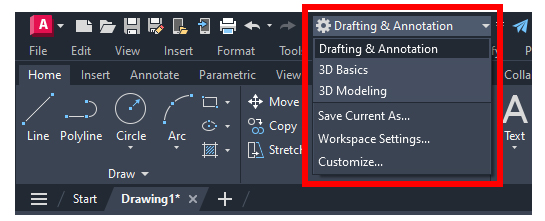
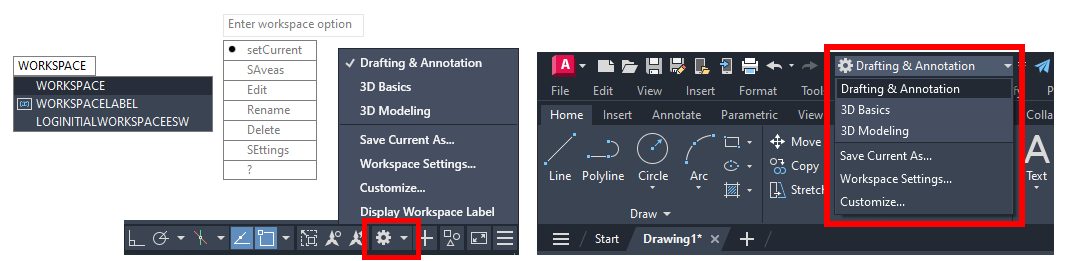
The most common place to find your tools is via the status bar. Just click on the gear icon. You can also add Workspace to your Quick Action Toolbar (QAT) and access it there. And, as always, you can also type it in.

Screenshot of drafting and annotation workspace in AutoCAD

I want to concentrate on two of the commands in the menus. The first is “Save Current As…” and the other is “Workspace Settings…”.

We’ll start with Save Current As. There are two schools of thought on creating a new workspace. Some people like to create a workspace (which also sets it as current), then set up the UI as they please, or they’re like me and set up the UI first, then save it as a new workspace—both ways work.

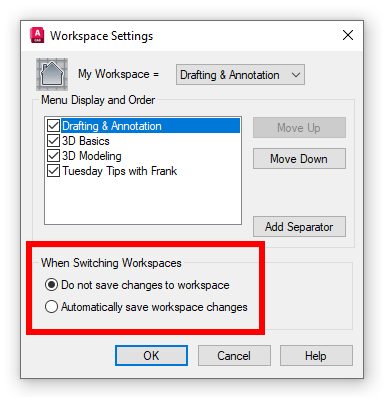
The other important tool to know about lies within the Workspace Settings dialog. Yes, you can choose the active one from here, change the display order, or even add a separator, but the radio buttons at the bottom are the key to managing your Workspaces.

You can either have AutoCAD automatically save any changes you make to the current workspace or not. Choose the latter, and it’s on you to save any changes yourself.

Screenshot of how to save changes in AutoCAD

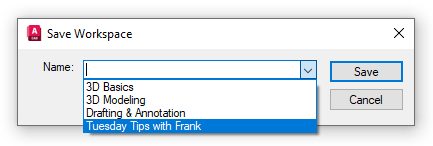
“But Frank,” you’re saying, “there’s no Save in the menu, just Save As.” I get it. But don’t worry. Use the Save Current As, and you’ll find that the Name field also has a pulldown menu. To save any changes, just select your workspace and save it. It’s kind of a two-in-one dialog!

Screenshot of how to select workspace to save in AutoCAD

AutoCAD Profiles

The second part of the customization puzzle is your profile. It contains things like the background color, command line font and color, cursor size, pickbox size. It’s pretty much anything that’s found in the Options dialog, including path information.

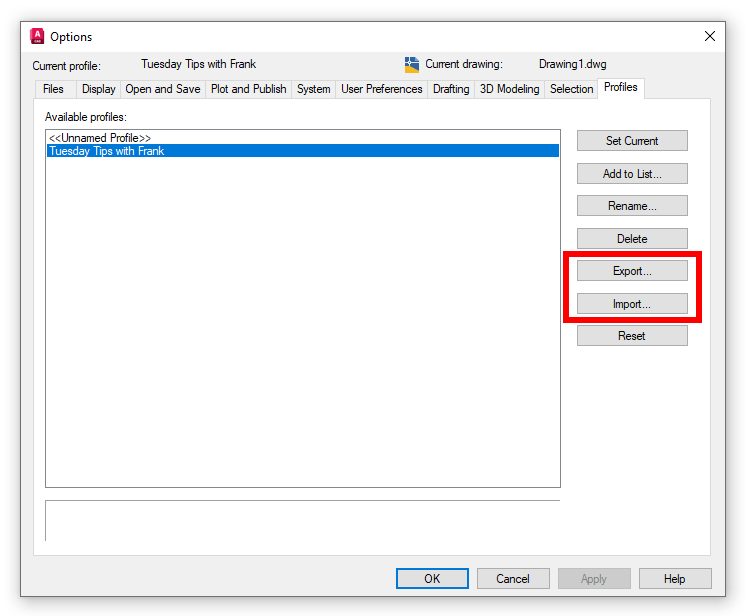
Your computer’s registry stores all this information. And, unlike a workspace, you can export all these settings to an external file (extension of ARG) to use as a backup or to import into another AutoCAD installation. In fact, if you were to open an ARG file, you’d see that it is just a lot of registry keys and values.

Unlike workspaces where you decide how changes get saved, a profile saves any changes automatically. But if you want that external file for a backup – you know, just in case – you have to remember to do it yourself. That is, unless you had me as your CAD Manager, as I put in some start-up AutoLISP code to export a new version every two weeks, because again… things happen. I always find it’s better to be the hero in those situations than to be a goat.

Screenshot of export and import buttons in AutoCAD profile options

Summary

So, there you have it. Pretty much every interface element is stored in a workspace or a profile. Now that you know which one contains what and you have a basic understanding of how to manage them, you’re on your way to having better control of your AutoCAD customizations.

More Tuesday Tips

Check out our whole Tuesday Tips series for ideas on how to make AutoCAD work for you. Do you have any favorite AutoCAD tips? Tell us in the comments!

AutoCAD Fields and Dynamic Data: Tuesday Tips With Frank | AutoCAD Blog


In my last post, we used AutoCAD fields and custom sheet set properties to automate title block information. Today, I’m going to demonstrate a way to automate a callout or label by using a little-used but very powerful feature of fields.  

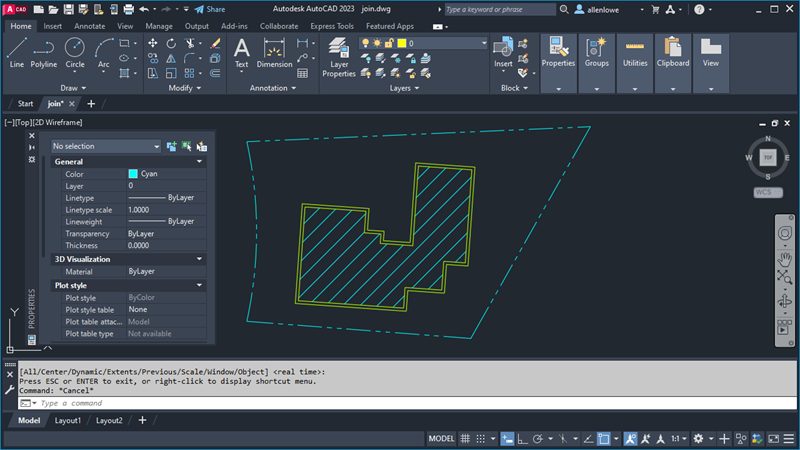
I’ll assume you have at least a working knowledge of using AutoCAD fields, so this won’t be a deep dive into them but instead focus on a particular feature. Let’s set up a simple scenario and let your imagination turn it into something you’re familiar with. You have a closed object of some kind in your drawing. Maybe it’s a pool, a pond, or a parking lot… and you have to label its total area in some way. That may be via a multileader, a label block with attributes, or it may be somewhere in a block of notes. Have I got you thinking yet? 

Now, here’s the kicker. During the design phase, that closed feature will change its shape, thus changing its total area. Or maybe it’s in a prototypical drawing and changes for every project it’s used in.  

If you’re using a static callout of that area, you’ll need to query the feature whenever it changes and subsequently edit the callout to reflect the new area. Trust me when I tell you that it won’t take very many times doing that to make it get old. This is where an AutoCAD field can come to your rescue. 

The Object Is Your Objective

By my count, there are 50 field names available from the Field dialog box, and they fall within seven categories. You can leave the category set to All and choose what you want from the entire list, but most people prefer to find and set their category first, thus paring down the list. Since the enclosed feature in our drawing is an AutoCAD object, choose the Objects category.

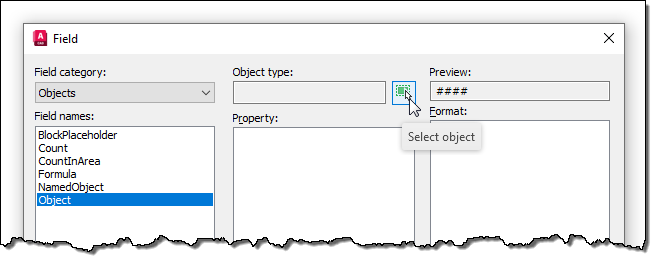
Screenshot of objects category for AutoCAD fields

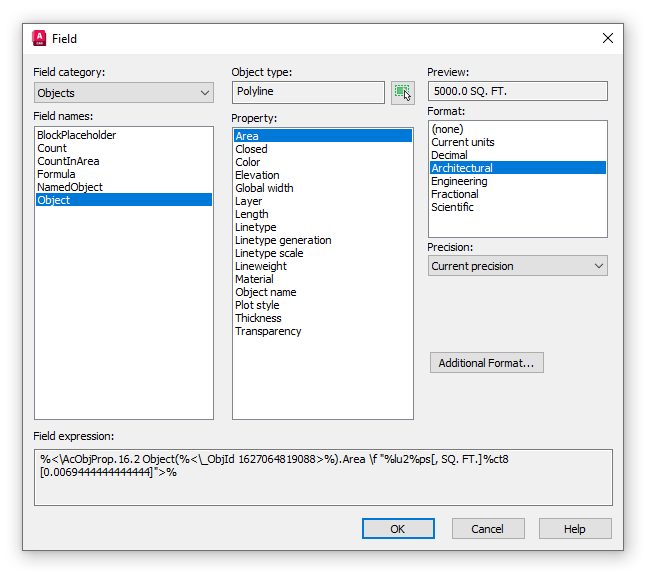
You should now see only the six field names in the category. All are useful in their own way, but we’re after the Object field for this exercise. When selected, the dialog will change to offer other options. Our next step will be to select the closed feature we’re working with, so select the small select icon next to the Object Type box and select the closed feature. The middle property panel will now be populated with all the properties of the polyline available to you.

Screenshot of Object Type Box with AutoCAD Fields

In this example, we’re labeling the total area of the object we’ve selected, and conveniently, Area is at the top of the list. Select it, and make sure the formatting is what you want from the Format box on the right.

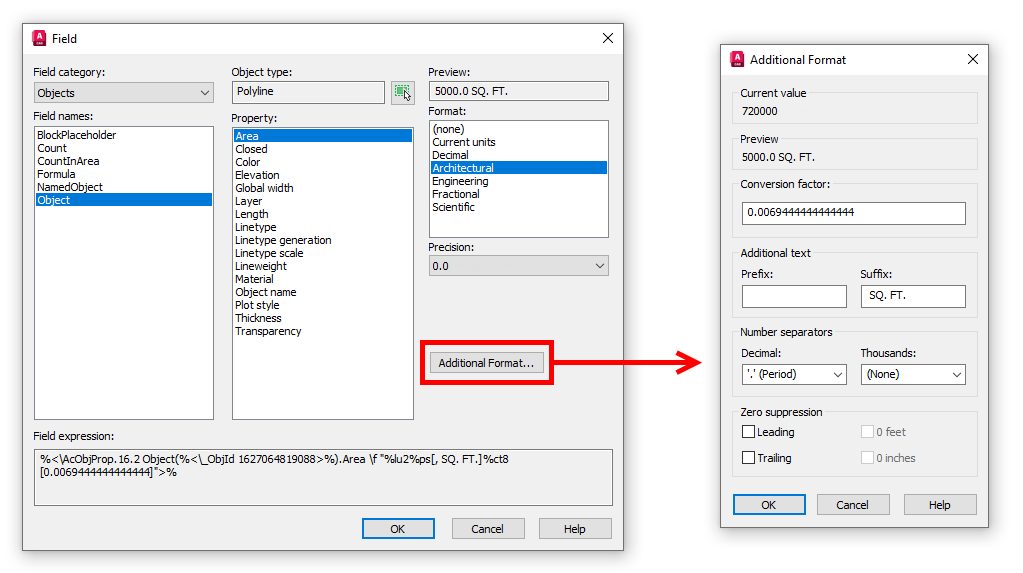
Pro Tip: Need some additional text like a prefix or suffix? Click the Additional Format button for these options and more!

Screenshot of Additional Format with AutoCAD field

Now, with the proper field applied to the callout of your closed feature, it will update whenever its shape is edited. (Just remember the rules on updating fields. I suggest a quick regen).

Not only does this method cut out the continual querying and editing steps, but it also removes the possibility of typing in the wrong value. We humans are quite prone to mistakes, you know – at least this one is.

My example used the area property of a polyline. It could have been the length of a path through a park or even the name of an Xref. The point is to keep this nugget in mind should you ever have to call out a property of an object. It might just save you a lot of work and keep those pesky typos out of your valuable drawings.

More Tuesday Tips

Check out our whole Tuesday Tips series for ideas on how to make AutoCAD work for you. Do you have any favorite AutoCAD tips? Tell us in the comments!
Have You Tried: Looking Back at a Year of Tips | AutoCAD Blog


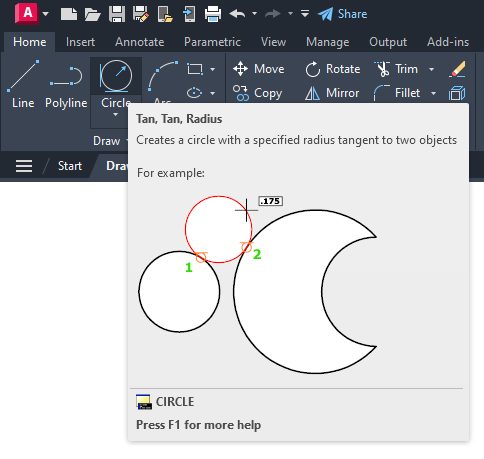
AutoCAD screenshot

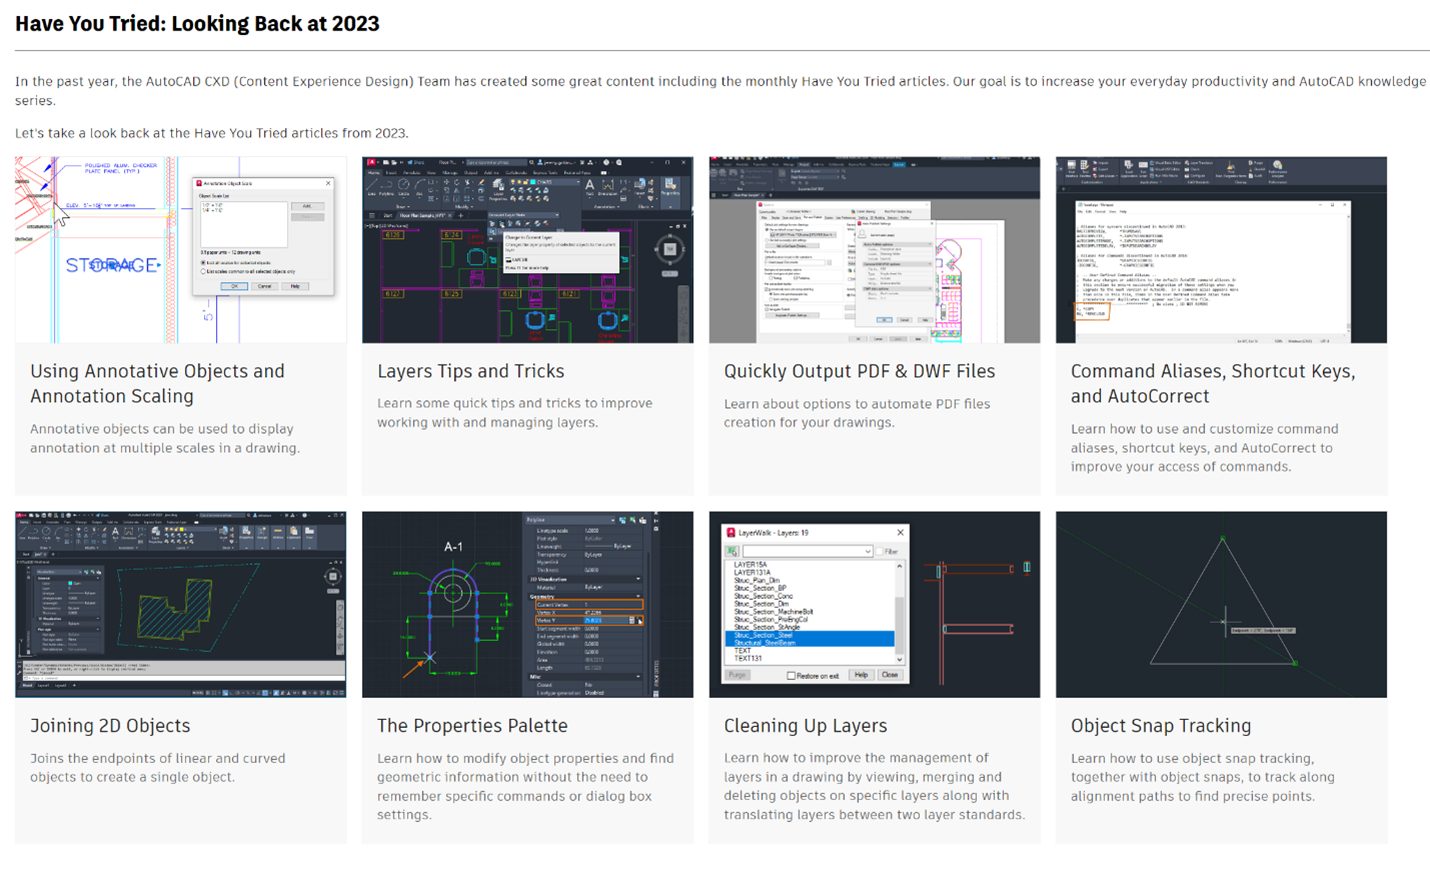
Last year, the AutoCAD CXD (Content Experience Design) team put together eight “Have You Tried” articles that focused on increasing the everyday productivity and knowledge of our users. We covered topics ranging from quickly outputting PDF and DWF files to cleaning up layers. 

Our first “Have You Tried” article this year is a look back at these articles. As you check out this collection from 2023, we hope you’ll not only remember the skills you’ve learned, but also be inspired to continue learning in 2024.

AutoCAD 2024 Help | Looking Back at 2023 | Autodesk

We’re looking forward to sharing more knowledge in our 2024 “Have You Tried” series. As always, thank you for reading and learning with us.

Keep the Feedback Coming

Your feedback helps us improve the topics in the AutoCAD Online Help system.

The best way to submit feedback is by using the “Was this helpful?” section located at the bottom of every Help topic. Let us know what you like or don’t like about a topic or provide suggestions for other subjects that you’d like to see covered in greater detail. The more specific your comments, the better.

Sheet Set Custom Properties in AutoCAD: Tuesday Tips With Frank | AutoCAD Blog


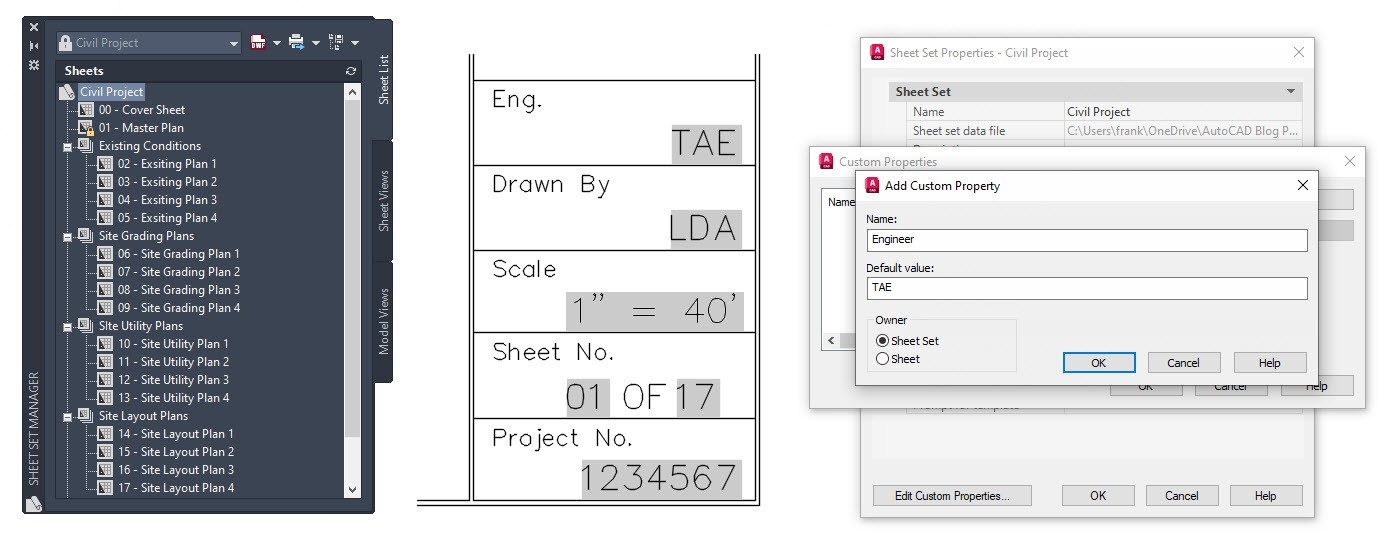
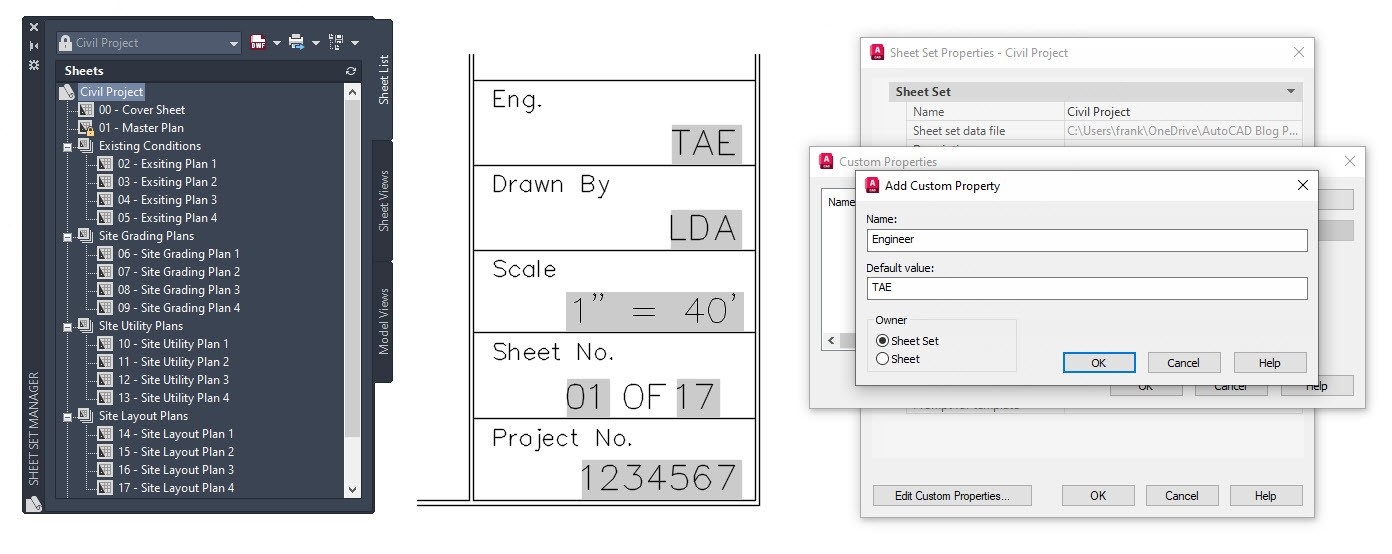
I often start these blogs with an anecdote, and today is no different. I imagine something similar has happened to most of you. Your project’s template file(s) have some pre-set information in the title block. The CAD manager sets the engineer’s initials as TAE, as he’s been there for twenty years and his initials are on every set that goes out. Besides, if left to individual users, you’d sometimes get TE, T.A.E., or Tae. You know it happens.

Midway through the project, old Thomas Alva Edison leaves for a new job. You get tasked with updating hundreds of drawings to reflect the new engineer’s initials. Let’s be honest: at this point, you wish you had scheduled that root canal for the day.

Wouldn’t it be great if this task was reduced to a couple of clicks? That’s where today’s topic comes in. With the proper custom properties created in your Sheet Set, that’s what you get: a fix in a couple of clicks.

Sheet Set Custom Properties

I wrote about the benefits of using the Sheet Set Manager awhile back. But I only touched on custom properties, and in all honesty, that’s one of its most powerful features.

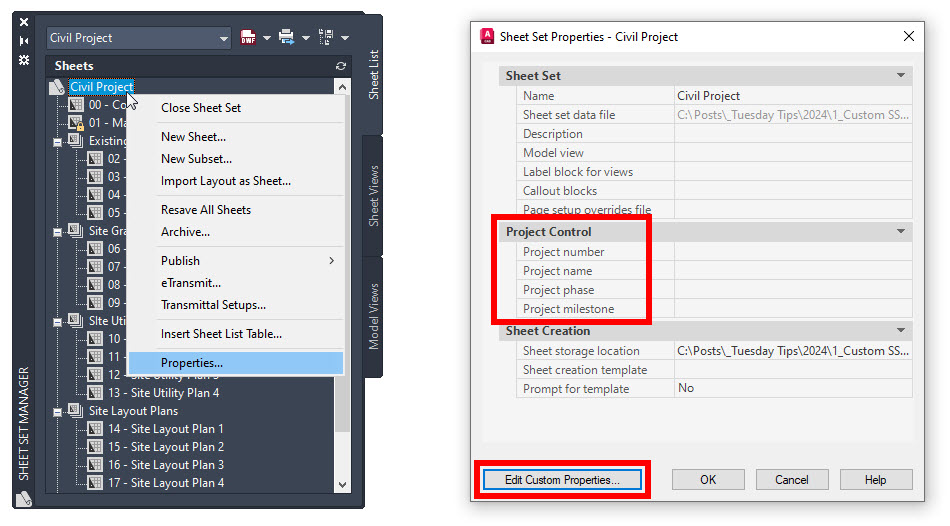
Like many things in AutoCAD, you can access the Sheet Set Properties dialog via the right-click contextual menu.

Right-clicking on anything listed in the Sheets panel will get you a Properties entry, but the only place to define custom properties is via the top-level sheet set node. When the Sheet Set Properties dialog is displayed, you’ll see the first type of property available – the four built-in Project Control properties.

OK, handy information, but somewhat limited. The real power comes from the Edit Custom Properties button at the bottom of the dialog.

Screenshot of Edit Custom Properties button for Sheet Sets in AutoCAD

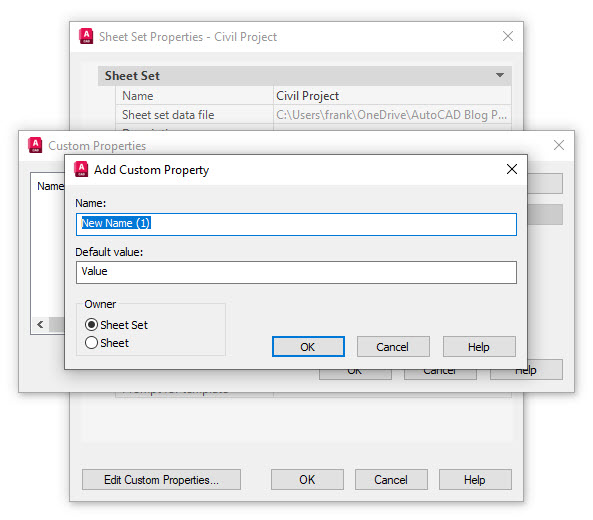
Click it to display the Custom Properties list dialog. We haven’t created any yet, so at this point, it’s empty. On the right are two buttons: Add and Delete. Choose the one that’s not disabled. You’ll finally get to the Add Custom Property dialog. It’s pretty simple; you’ll give your property a name and a default value.

But this is where you’ll also find the two other kinds of Sheet Set Properties. In the lower-left corner, you have two choices. Will this Custom Property be owned by the Sheet Set itself (a global property), or will individual sheets own it?

Screenshot of Add Custom Property button for Sheet Sets in AutoCAD

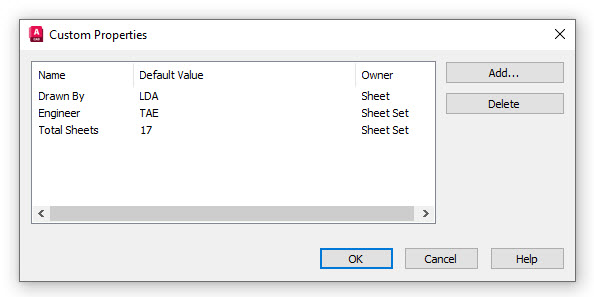
For our example, I’ll create a sheet-owned property of “Drawn By” – as that may differ from sheet to sheet. I’ll also make a couple of global sheet properties – the total number of sheets and our engineer, TAE. Since this is a tips blog, I have an insider tip for you. Notice there is no Edit button. If you’ve made a mistake, you must delete and recreate the custom property. When you’re done, keep clicking on OK to dismiss all the dialogs and save your settings.

Screenshot of Custom Property box for Sheet Sets in AutoCAD

The Next Step

OK, now you’ve got three types of properties in your Sheet Set… what’s next? Now, it’s time to map them to your title block. You’ll do this using AutoCAD’s fields. Since this isn’t a blog about fields, I’ll not spend much time deep diving into them, but if you’re curious, there are several past posts about them, including this one.

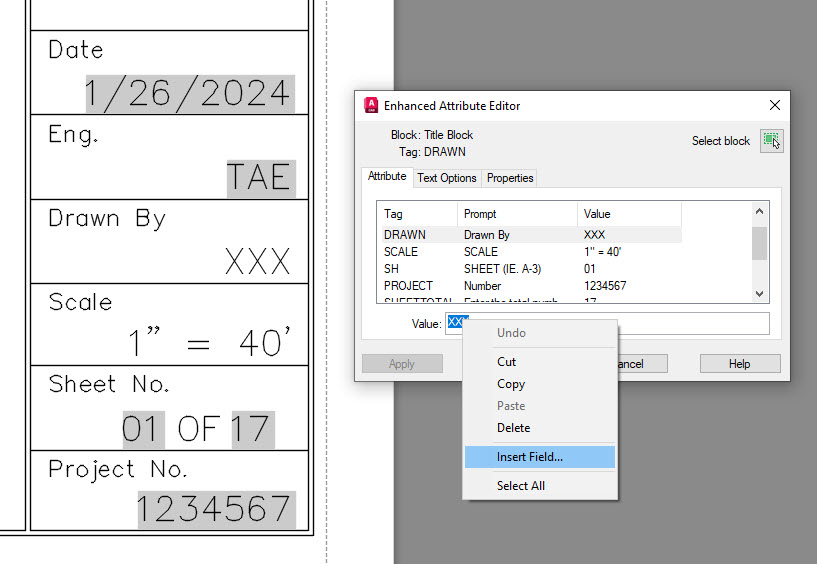
In the image below, I’ve applied the built-in project property of Project No., along with our normal engineer of TAE. Finally, the Custom Sheet Set property of Total Sheets has also been added. Let’s step through the important steps of applying our custom sheet property of Drawn By.

Screenshot of Enhanced Attribute Editor box for Sheet Sets in AutoCAD

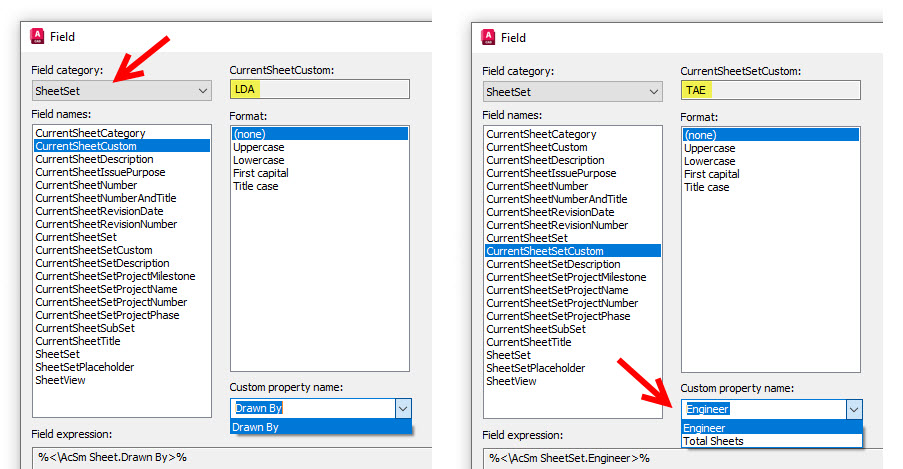
In this case, we’re dealing with block attributes, but fields can also be applied to Mtext. Again, highlight the value and right-click to display the Field dialog. The first thing you’ll want to do is select the correct field category. Expand the pulldown and select SheetSet. The panel on the left will populate with all the fields available to you from within a sheet set.

We want to add the drafter’s initials for this sheet, which we applied to a custom property owned by the sheet. Select CurrentSheetCustom (those owned by the sheet set are in CurrentSheetSetCustom); since there are possibly multiple properties, a custom name dropdown menu will appear beneath the Format panel. Choose wisely if you have more than one, note the value that appears in the upper right box, click OK, and you’re good to go.

Screenshot of choosing Custom Property in AutoCAD

Summary

Back to our engineer leaving the company scenario… by using Sheet Sets and custom properties, all you have to do is replace the old engineer initials with the new ones. How’s that for saving hours of work? Trust me, it beats the alternative.

Sheet Sets, their custom properties, and Fields are all underutilized, in my opinion. They offer so much functionality, and you don’t even need to use everything they offer to gain a lot of productivity. In fact, while writing this, I’ve decided to make an aspect of fields the topic of my next Tuesday Tip. So, until then, stay tuned!

More Tuesday Tips

Check out our whole Tuesday Tips series for ideas on how to make AutoCAD work for you. Do you have any favorite AutoCAD tips? Tell us in the comments!
AutoCAD File Types: Tuesday Tips With Frank | AutoCAD Blog


This week’s Tuesday Tips installment is an important topic involving various files. During an editing session, AutoCAD creates several files along with your DWG (or DWT or DWS – they’re all the same thing with a different extension). Some are temporary and go away when you exit the file; others do not. Here we’ll explore these different AutoCAD file types.

Easy Ones to Find

By default, this first group of files is saved in the same folder as your DWG file. When the drawing is open, AutoCAD creates lock files with DWL and DWL2 extensions alongside the DWG. You may not see them, as they are set to be hidden. You can turn on hidden files with the control shown below. They are used in conjunction with the WHOHAS command.

Screenshot of AutoCAD and how to find hidden items and file name extensions

This is also where you’ll find the BAK backup file if enabled. Each time you perform a SAVE, a QSAVE, or quit and save, an exact copy of the drawing file prior to that save is created with a BAK extension. The feature is on by default, and you can find it in the Open and Save tab of the Options dialog (it controls the ISAVEBAK system variable).

Screenshot of where to find BAK file in AutoCAD

Next comes the temporary files that are usually written to your temp file folder. This includes the Automatic Save File Location. Where is that, you ask? There are a couple of ways to find the folder. Again, expand the Automatic Save File Location entry from the Options dialog and Files tab. Highlight and copy the path to your clipboard, then paste it into the address bar of a file explorer window.

Screenshot of Automatic Save File Location in AutoCAD

Or, you can take the easy route and type %TEMP% into the address bar, which will take you right to it. If you don’t keep it cleaned out, you’ll probably see thousands of files there, mostly with all kinds of extensions, many of which are TMPs or some files or folders with no extensions. But somewhere in there, if the autosave feature has been invoked in your drawing session, there will be a file that consists of your drawing’s file name, followed by some seemingly random characters and an extension of SV$. That’s your autosave file.

It’s intended to be temporary, as it will be deleted if you exit your drawing properly. But, if you exit thanks to a crash of some kind, it will remain. Similar to the BAK file, it’s a copy of your file when the autosave was invoked. You could copy it somewhere and rename the extension to DWG, and you’d be good to go. Same with the BAK file. Like the backup creation, autosave is turned on by default and set to 10 minutes (the SAVETIME system variable). That control is in the same place as the BAK file creation control in the Options dialog.

Drawing Recovery Manager

OK, those are the important AutoCAD file types I wanted to cover today. They might just save you a lot of lost work someday, but who wants to remember secret codes, odd locations, name changes, or how to show extensions and hidden files in your file explorer? Back in my early days, when we worked mainly with ones and zeros, we had to know this stuff. But today, there’s an easier way. It’s called the Drawing Recovery Manager.

Screenshot of Drawing Recovery Manager in AutoCAD

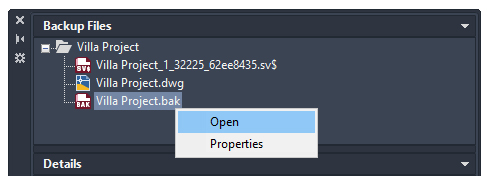
If AutoCAD detects that it had previously terminated improperly, you’ll be presented with the Drawing Recovery Manager palette upon restarting it. It will contain an expandable list of all the files that were open when the crash occurred, with each entry containing all the available file types.

You may get the drawing file itself, the BAK, the SV$, or if you got prompted to save before the exit, you’ll get a file with _RECOVER appended. These files will be listed in the order that they were last saved.

Screenshot of Drawing Recovery Manager palette in AutoCAD

The Details panel in the middle of the palette gives you the file’s location and the date and time stamp. Below that, you’ll get a thumbnail preview, if available. It is all handy for you to decide which save file is the one you want to use. And when you decide, now it’s just a matter of right-clicking and selecting Open.

Remember those hidden lock files? If you use the Drawing Recovery Manager, it will handle those for you, as they’ll be left over in case of a crash. If you decide to recover the files manually, you’ll have to delete those, or your file will want to open as read-only—another good reason to do things the modern way.

Summary

Yes, the modern way is preferred. But what if the crash left your system unable to access AutoCAD? These things always happen at the worst time, and if you could only recover your work, a co-worker could take over. What a great time to know how to do it manually. Knowing about these important AutoCAD file types and how to use them just might save the day for you sometime. Let’s hope that’s never the case, however.

More Tuesday Tips

Check out our whole Tuesday Tips series for ideas on how to make AutoCAD work for you. Do you have any favorite AutoCAD tips? Tell us in the comments!
FFXIV ocean fishing beginner’s tips and bait list


Ocean fishing is a fun and relaxing Final Fantasy 14 side activity, though it can be stressful if you don’t know what you’re doing. Getting on a boat with friends to reel in big catches is a unique experience, but you can only ocean fish during certain times of the day.
You do not need to own any expansions to ocean fish and you can participate even if you’re playing the free trial. Yippee!

Below, we explain how to unlock ocean fishing in FFXIV. We’ll also tell you the ocean fishing schedule, what bait to use while you ocean fish, and tips to score big and rake in rewards.


What is ocean fishing?

Ocean fishing is like an alliance raid, but for fishing. You’ll board a big boat that’ll take you through three different parts of the water and you’ll have to complete objectives for extra points.

You’ll be put into a full party, with two other parties on your boat. The goal is to catch fish to score big during the time limit.

It’s not all just catching big, rare fish, though. Catching special “spectral” fish has a chance to trigger a spectral current. These spectral currents allow you to catch even more fish with higher point values, so triggering one of these is nearly always the goal.

There are also a handful of objectives to try to complete during the expedition, like catching a lot of sharks or jellyfish.


How to unlock ocean fishing in FFXIV

In order to start your grand ocean fishing adventure, you’ll need to unlock the Fisher job, which you can do by heading to the Fisherman’s Guild in Limsa Lominsa. You’ll also need to complete the next Fisher quest, “My First Fishing Rod.” You can ocean fish even if your Fisher is at level 1. (In fact, ocean fishing is a really easy way to level Fisher up super fast.)

Once you have your Fisher ready to go, you’ll just need to complete the quest “All the Fish in the Sea” in Limsa Lominsa, which starts at the NPC Fhilsnoe below:

A map showing where to find Filsnoe in FFXIV to unlock ocean fishing

Graphic: Julia Lee/Polygon | Source images: Square Enix

Once you finish that quest, you can queue for ocean fishing via Dryskthota at the Limsa Lominsa Ferry Docks (west of the Arcanist’s Guild Aetheryte), as long as it’s time to ocean fish.

Note that you will not be able to take the Ruby route through the Stormblood locations until you beat the Stormblood expansion.


Ocean fishing schedule

Unfortunately, you can’t ocean fish whenever you want to. Ocean fishing abides by a schedule and you can only register for it for fifteen minutes from the top of the real world hour, every other hour. For example, if the registration period starts at 2 p.m., you have until 2:15 to queue for ocean fishing. If you miss this period, you’ll have to wait until 4 p.m.

While we would recommend looking out for the odd or even hours, the exact time changes depending on daylight savings and on your timezone, so we actually recommend Lulu’s Tools, which has a live ocean fishing schedule, even noting which objectives and routes the next few boats will take.


Which bait to use while ocean fishing

There are three main bait types used during ocean fishing: krill, ragworm, and plump worm. You can nab all three of these baits from the merchant on the docks where you queue for ocean fishing. You should stock up and buy a ton of each of the three.

In every ocean fishing experience we’ve had, there has always been somebody in the group who will use alliance chat (the orange chat) to say which bait to use or, alternatively, somebody who will tell you which bait to use if you ask. However, if you don’t want to rely on these genius fishing strangers every time you get on the boat, here are the best baits to trigger spectral currents by location:

  • Bloodbrine Sea: krill
  • The Ciedalaes: ragworm
  • Galadion Bay: plump worm
  • Rhotano Sea: plump worm
  • Rothlyt Sound: plump worm
  • Northern Strait of Merlthor: ragworm
  • Southern Strait of Merlthor: krill
  • Sirensong Sea: plump worm
  • Kugane Coast: ragworm
  • Ruby Sea: krill
  • One River: krill

In a very broad sense, these three baits will keep you covered. There are some specific catches that take a different bait from the three, but for the sake of simplicity and scoring points, using these three baits should lead you to success.


How to get a high score in ocean fishing

You can min-max in ocean fishing, and while scoring big also relies on luck, there are a few things you can do to help boost your score:

  • Empty your inventory to prepare for the fishing trip, as you’ll be hauling in lots of unique fish that take up a ton of inventory slots. Do not use the “release list” feature to automatically discard fish, as the animation that plays to discard the fish wastes your precious time on the boat.
  • Bring and use Cordials and Hi-Cordials to restore your GP. You should be using your fishing skills, whether you’re using Patience, Powerful and Precision Hookset, or other fishing skills. You should not just be using your basic Hook skill.
  • Don’t forget to use Thalaik’s Favor, a level 15 skill that gives you back 150 GP in exchange for three stacks of Angler’s Art (a buff you get for just catching big fish).
  • Use Chum between catches during spectral currents to get fish to bite faster.
  • Don’t stress too much about your point value while fishing, as there are a ton of bonuses at the end that’ll shoot your score up. You’ll be surprised about how many bonuses you may get at the end.

Just by following the above, we’ve been able to score above 10,000 points (which is all you need to get the mount and minions).


Ocean fishing rewards

Every time you finish ocean fishing, you’ll get a boatload of EXP, as well as gatherers’ scrips (if you’re high enough level to have them). Notably, there are a few exclusive rewards to ocean fishing that are locked behind specific achievements.

The following achievements give minions and mounts:

  • On a Boat IV: Earn a cumulative total of 1 million points while ocean fishing (Much-coveted Mora minion)
  • No More Fish in the Sea I: Score at least 5,000 points during a single ocean fishing voyage on the Indigo route (The Major-General minion)
  • No more Fish in the Sea II: Score at least 10,000 points during a single ocean fishing voyage on the Indigo route (Hybodus Horn for the mount)
  • Near, Far, Wherever Fish Are II: Score at least 10,000 points during a single ocean fishing voyage on the Ruby route (Mossasaurus minion)
  • Mine, Mine, Mine: Encounter 3 seagull flocks while ocean fishing (Gull minion)
  • Double-backwards Somersault: Encounter 3 dolphin pods while ocean fishing (Dolphin Calf minion)

You can claim these rewards from the achievements menu once you earn said achievement.

A Viera rides the Hybodus mount in FFXIV, which is like a shark with wings.

The Hybodus mount, Viera not included.
Image: Square Enix via Polygon

These achievements give you titles:

  • On a Boat V: Earn a cumulative total of 3 million points while ocean fishing, (World-class Troller title)
  • No More Fish in the Sea III: Score at least 16,000 points during a single ocean fishing voyage on the Indigo route (Ocean Fisher title)
  • No More Fish in the Sea IV: Score at least 20,000 points during a single ocean fishing voyage on the Indigo route (Master of the Sea title)
  • Near, Far, Wherever Fish Are III: Score at least 16,000 points during a single ocean fishing voyage on the Ruby route (Doom of the Deep title)
  • What Did Octopodes Do to You?: Earn the “Octopus Travelers” bonus during an ocean fishing voyage on the Indigo route (Octopus Traveler title)
  • What Did Sharks Do to You?: Earn the “Certifiable Shark Hunters” bonus during an ocean fishing voyage on the Indigo route (Shark Hunter title)
  • What Did Jellyfish Do to You?: Earn the “Jelled Together” bonus during an ocean fishing voyage on the Indigo route (Jellyfish Fanatic title)
  • What Did Seadragons Do to You?: Earn the “Maritime Dragonslayers” bonus during an ocean fishing voyage on the Indigo route (Sea Dragoon title)
  • What Did Balloons Do to You?: Earn the “Balloon Catchers” bonus during an ocean fishing voyage on the Indigo route (Balloon Catcher title)
  • What Did Crabs Do to You?: Earn the “Crab Boat Crew” bonus during an ocean fishing voyage on the Indigo route (Deadliest Catcher title)
  • What Did Mantas Do to You?: Earn the “Sticking it to the Manta” bonus during an ocean fishing voyage on the Indigo route (Manta Maniac title)
  • What Did Shellfish Do to You?: Earn the “Maximum Mussel ” bonus during an ocean fishing voyage on the Ruby route (Sea Comber title)
  • What Did Squid Do to You?: Earn the “Squid Squadron” bonus during an ocean fishing voyage on the Ruby route (Squidzure Dragoon title)
  • What Did Shrimp Do to You?: Earn the “Shrimp Smorgasbord” bonus during an ocean fishing voyage on the Rubyroute (Shrimp Mariner title)