On an iPhone: Tap and hold on the home screen until the icons wiggle, then drag them around to rearrange or tap the X to uninstall them.
Add Shortcuts for Useful Tasks or Apps
One of the best things you can do is place shortcuts on the home screen to make it easier for them to call or message their closest contacts with a single tap.
On an Android phone: Tap and hold on the home screen and select Widgets, choose the Browse tab, then scroll down to Contacts, choose Direct dial, and select a contact. You can place the shortcut anywhere on the home screen, and they can call that person simply by tapping it. You can add Direct message shortcuts in the same way.
On an iPhone: Use the Shortcuts app. If you create a folder for the home screen, you can potentially add multiple shortcuts. You can tap the plus (+) icon at the top right to add a new shortcut, search for or scroll down to Phone or FaceTime, tap on it again, then tap Contact and pick the contact you want to add. Tap at the top and choose Rename to give the shortcut a name, choose the icon, and Add to Home Screen. You can also tap and hold on the home screen until the icons wiggle and tap Edit at the top left, then Add Widget, and choose Contacts, then select the contact you want to add, but this will require an extra tap when they want to call.
Call contact shortcut on Android
Screenshots: Simon Hill
Consider a Simple Launcher (Android Only)
With Android phones, you can change the “launcher,” which determines the look of the whole interface, including things like app icons and font size.
Samsung phones have an alternative launcher called Easy Mode built in. To toggle it on, go to Settings, Display, and choose Easy Mode. There are loads of alternative Android launchers that you can install, and several simplify the phone experience with big icons. Simple Launcher, Big Launcher, or Senior Home are all worth a look.
On an Android phone: Go to Settings, Display and touch, and choose Display size and text, then drag the slider to adjust. You can also get there via Settings, Accessibility, then Display size and text.
Objects in a drawing share several general properties that determine their appearance. These include color, linetype, linetype scale, lineweight, and more. Properties, such as color and linetype, can be changed per individual object or across many objects with the use of layers.
In our next installment of the AutoCAD Foundation blog series, we have a quick tip on how to change AutoCAD object properties. For the full tutorial on changing object properties and using layers, you can check out the AutoCAD Foundations article.
How to Change AutoCAD Object Properties
All objects that you create have properties. Object properties control the appearance and geometric characteristics of an object. The general properties that are common to most objects are as follows:
Color
Linetype scale
Hyperlink
Layer
Plot style
Lineweight
Linetype
Thickness
All other properties are object type specific.
When objects are selected, you can use the Properties palette to verify and change property values. If you select an object in your drawing, here is what you might see in the Properties palette.
Notice that the current properties for the selected object are displayed in the Properties palette. You can change any of these properties by clicking it and changing the value. A property that is set to “ByLayer” inherits its value from its assigned layer. In the previous example, the line object’s color of magenta is inherited from its assigned layer of 20 ELECTRICAL.
If you select several objects, only their common properties are listed in the Properties palette. If you change one of these properties, all selected objects are changed in one operation.
When the Properties palette is displayed and no objects are selected, the current property values are of those to be assigned to newly created objects. Property values listed as ByLayer, indicate properties that inherit their values from the layer to which the object is assigned. For example, changing the Color property value from ByLayer to Red causes all subsequent objects to be assigned the Red color which overrides the value of the assigned layer.
The Properties palette takes up a lot of space. For quick access to the most common properties, you can use the Properties panel on the ribbon. As you can see in this example, the listed properties will all be determined by the current layer.
Today’s Tuesday Tip is really three tips in one, with all three sharing the same theme. They let you Get Back to where you… started (you thought I was going to say once belonged, didn’t you?) Sometimes our work doesn’t take us where we want, and we realize it’s best to start over, or as the Fab Four told us, it’s time to Get Back.
AutoCAD REVERT: Toss It and Start Over
The scenario: You have an existing drawing, and its design needs to be updated. There are various design options, and your job is to try them and decide on the best. You work for a while, try ideas, get stuck, get unstuck, work more, until you realize it’s just not going to work.
Yes, you could close the drawing, making sure that you don’t save it, then reopen it to start over. There are better options that will get you there quicker. The first is an Express Tool. It is called REVERT, and it does exactly what you might think. It tosses out all your edits and Gets Back to the state of the drawing when you opened it. It’s not in the Ribbon, so you’ll have to remember its name – unless you have the MENUBAR turned on.
I first wrote about the Express Tools found in the MENUBAR way back in 2018. There are more tools there than in the Ribbon. You can find REVERT there if you want.
There’s another way to revert your drawing back to its original state, and it works as a segue into my next topic. You can type in the full UNDO command, then B for Back, then accept the Y for Yes to accept the prompt to undo everything.
AutoCAD UNDO: Control Your Undo
Some of you may not be aware that UNDO is a full-fledged command with options. If you’re like most of us, you type U and pop the spacebar, or maybe use the Windows Ctrl-Z option or the little icon (and pulldown menu) in the QAT.
Let’s consider our design scenario again. This time, some of your initial design changes work perfectly, and you don’t want to lose them if you continue. In other words, a full REVERT or UNDO “Back” later on would remove things that you want to keep. But UNDO is still your friend here. Notice all the options available in the full command. I’ll be focusing here on one of them, but feel free to explore further in the help file.
You can use the “Mark” option to set a kind of bookmark of the current state of your drawing. You can set multiple, in fact. Later, when you do an UNDO “Back”, it will only go back until it finds the most recent Mark.
Once a Mark is encountered, it will be removed. If you have more than one Mark set, subsequent calls to UNDO “Back” will go to those. If you’re using the U <enter> method (which is actually UNDO <1>) and a Mark is encountered, you will be informed about it. Once all of your Marks are accessed and removed, running UNDO will Get Back to the beginning.
AutoCAD OOPS: Get Back the Erased
Back to our design scenario one more time. You work on an idea, get to the end, and decide against it, so you erase it all. You work on a different part of the design for a while, which is going to work great, but then you realize the stuff you deleted would now work in conjunction with your new design. You want to keep what you have, but also Get Back what you’ve deleted. Now what?
That’s where our last option comes in handy. It’s called OOPS. Yes, I’m serious here. As far as I know, it’s been in AutoCAD from the very beginning. It restores the last object, or set of objects, that were deleted by the last ERASE command. Just type it into the command line and press return, and your object or objects will return.
A word of warning, though, OOPS doesn’t work like UNDO does. It won’t keep going back in time restoring erasures. It’s a one-time deal. You can only Get Back the last object or objects that were erased.
And In the End…
I’ve got to hand it to myself. It was so tempting to fill this post with Beatles puns, but I was able to stick to the topic.
Using REVERT, UNDO, and OOPS, you can easily Get Back the last thing you erased, you can Get Back to a virtual bookmark in your design, or you can Get Back to where you started.
And now, I’ve Got a Feeling that I’m going to call my dog, Jo Jo over, we’ll Come Together, and I’ll drop all my pent-up puns on him. It will be just the… Two of Us.
More Tuesday Tips
Check out our whole Tuesday Tips series for ideas on how to make AutoCAD work for you.
If you’re sensitive to tech disasters, you might want to look away now: A recent Reddit thread tells the story of an unfortunate user who found 30 years of photos and work locked away and inaccessible in Microsoft OneDrive.
The individual made use of their cloud storage account to consolidate files from various hard drives, which had to be discarded due to a move. The plan was to then move the files back from OneDrive to new hard drives, but before the user was able to do this, their account was locked by Microsoft—without any reason given.
It’s still not clear why the account was locked or why Microsoft has so far ignored the user’s appeals to restore access, but it’s a warning to the rest of us—and a reminder to put a few basic protections and precautions in place.
Keep Multiple Backups
It used to be a truth universally acknowledged that data wasn’t properly backed up until it was backed up twice, in two separate locations. You can copy your important files to an external hard drive, but if it’s in the same room as your laptop, then theft, fire, or flood can wipe out both copies at the same time.
Today, having two backups of everything—so three copies in total—might seem excessive, as cloud storage services so rarely go down. We’ve all become used to the idea that the data we’ve logged with Microsoft, Google, Apple, or other providers is always going to be available, so we don’t need to worry about it.
Apps will often push you to delete local copies of your files.
All of us here at Tuesday Tips Headquarters love getting feedback from our readers. It may take the form of expanding on a tip or maybe explaining how they utilize it at their job. Of course, we get plenty of suggestions for tips (lots of great ideas have made their way into the blog.)
We also get a lot of readers looking for a solution to a particular problem they’re having. Much like Santa at the North Pole, we try to answer as many as we can, but there’s just not enough time. So, occasionally, we like to open up the old mailbag and pick out a few that deserve attention but may not warrant an entire blog post. We like to call it AutoCAD Potpourri because you never know just what you’ll get.
Murray from Minneapolis writes:
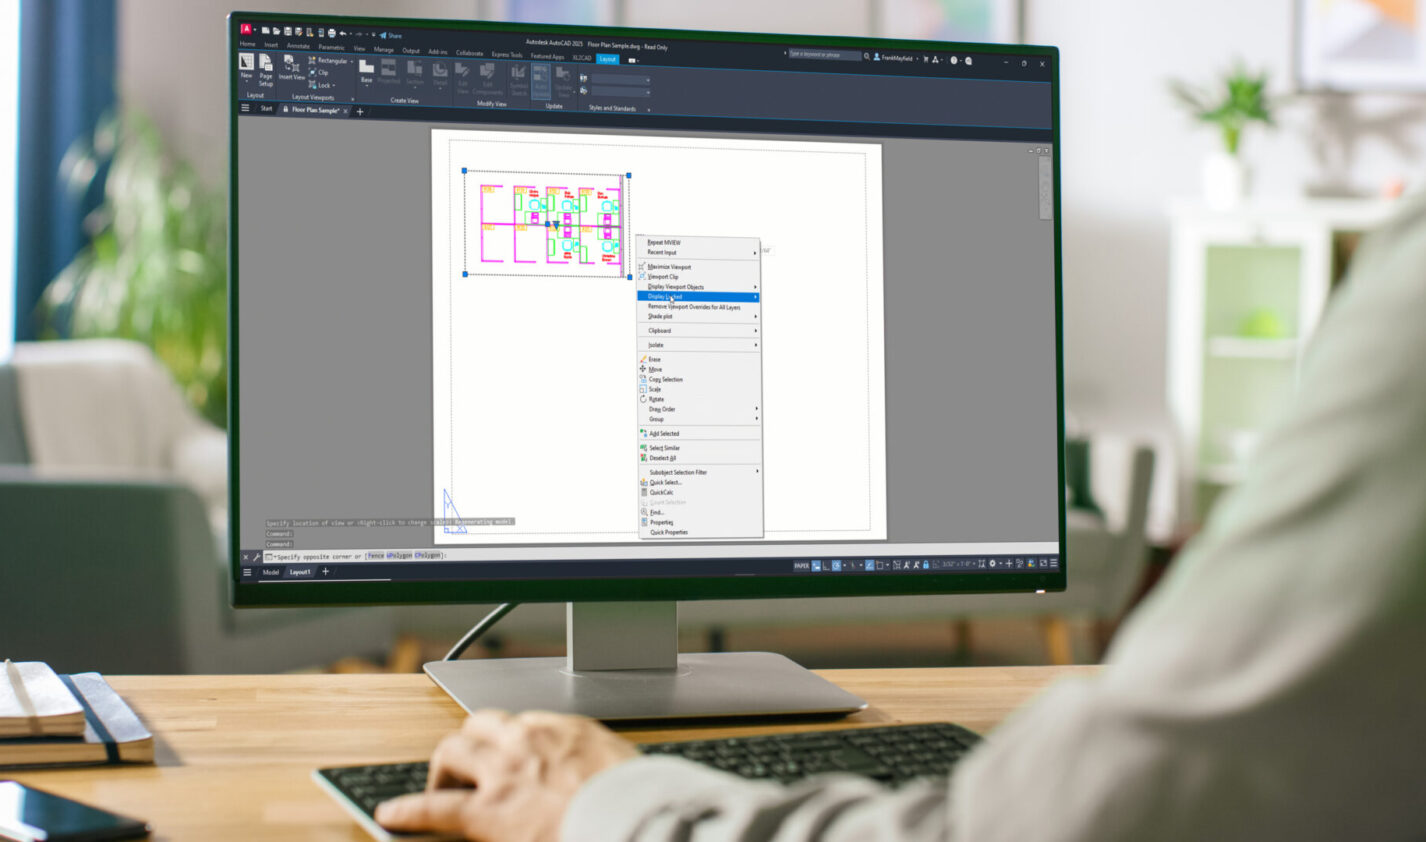
I have a co-worker who’s driving me crazy by forgetting to set their newly created Layout Viewports as being locked. Is there an automated lisp routine or something to help me with this? I don’t know how many times the zoom or scale has been messed up because of this.
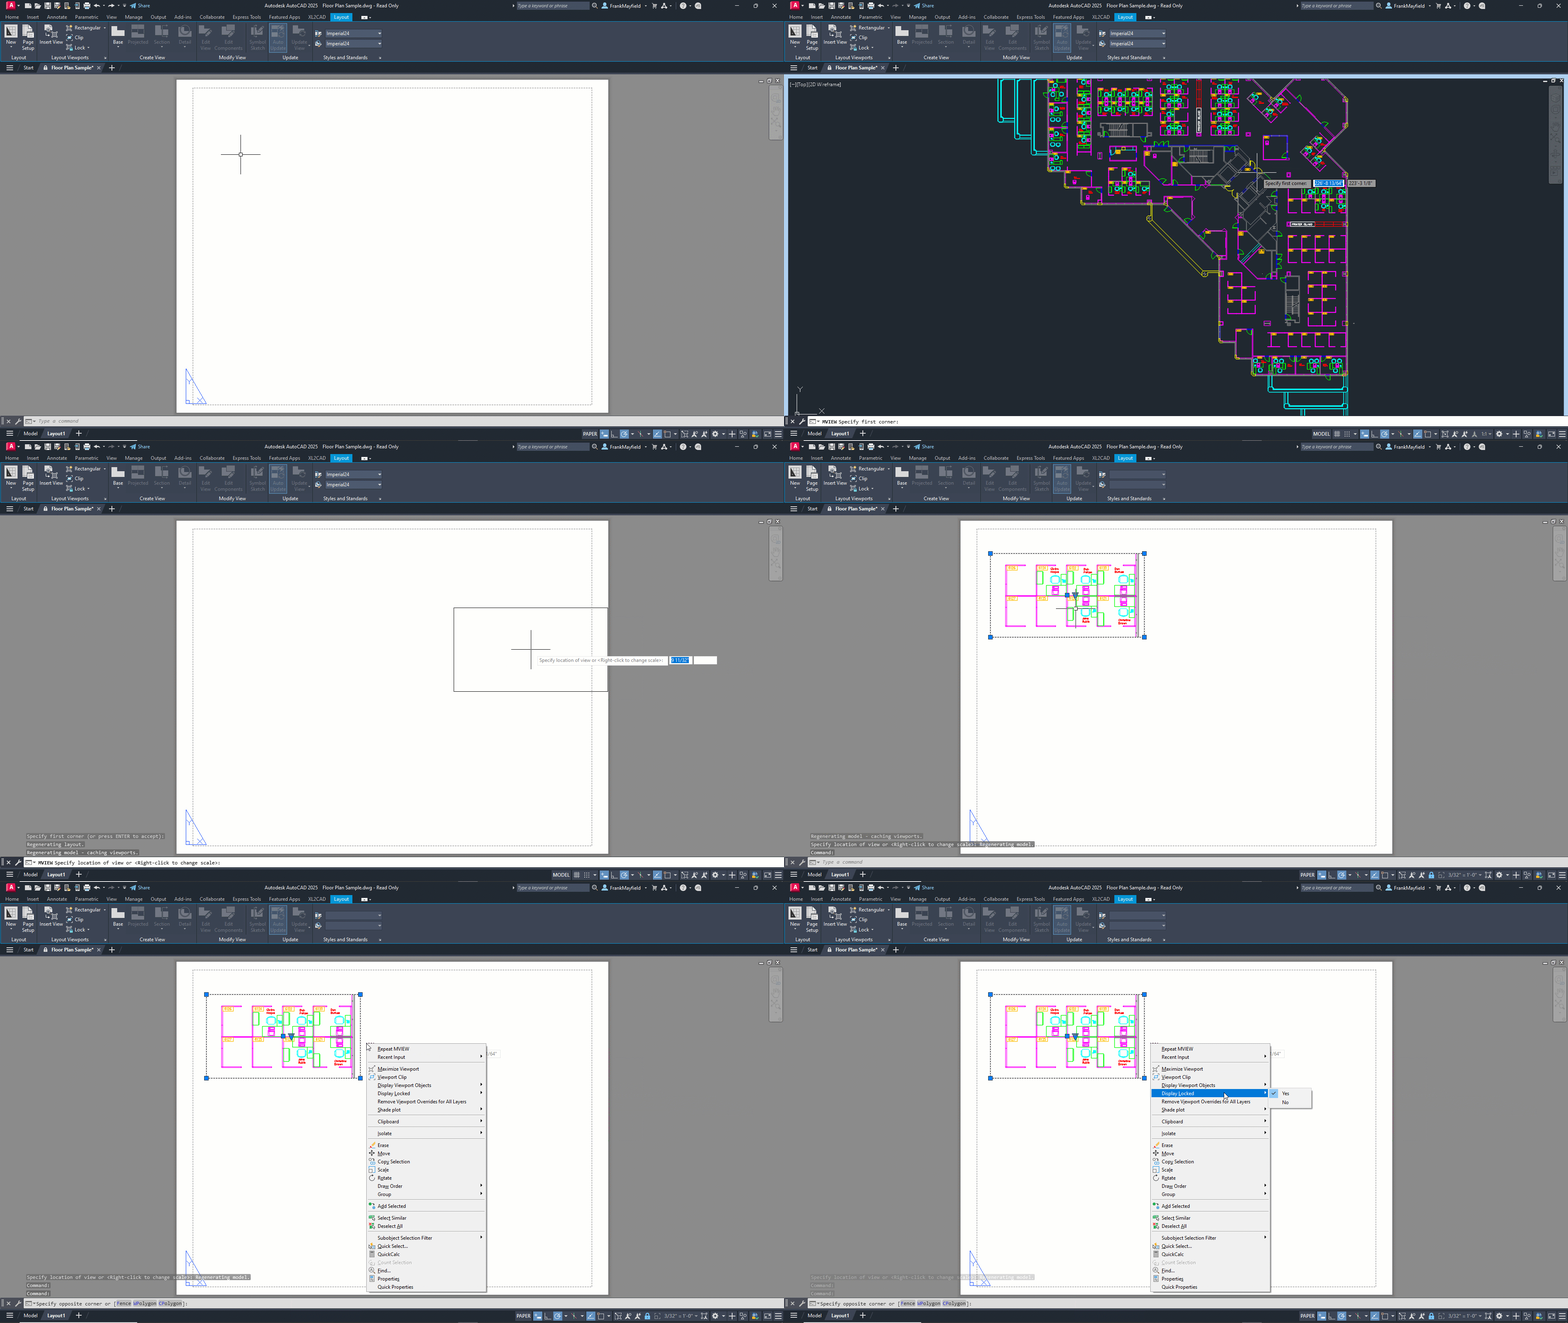
Hi Murray, instead of that, how about you just make an easy change in your workflow? From the blue contextual Layout ribbon tab, you’ll find an Insert View tool in the Layer Viewports panel. This will let you insert any named view as a viewport. You don’t even have to use named views to use it. If you don’t have any views, it will go directly into New View mode, where you can select an area of your model. When you’re satisfied with the selection, hit enter, and you’ll return to your layout, where you can now drop in the viewport.
AutoCAD will do its best to scale it correctly for you, but you can always change it. And, best of all, it will automatically be locked after you insert it using this method. Viola! Problem solved.
Utilize Activity Insights
Emily from Chicago asks us:
Is there an easy way to know who did what in our drawings? In particular, who was working on it, who saved it, and who managed the Xrefs in it?
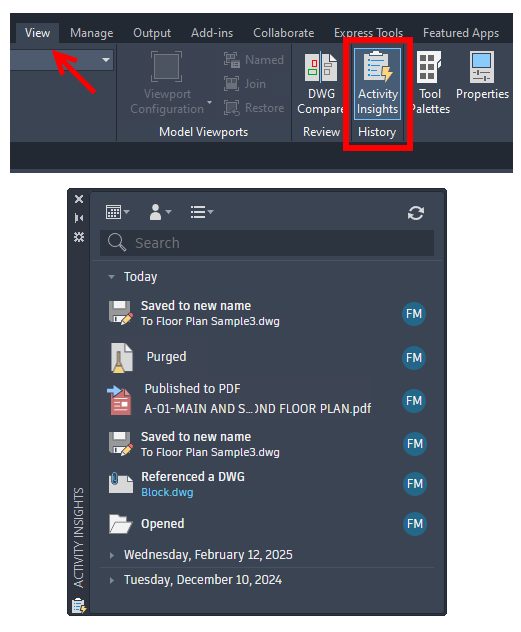
Emily – you didn’t mention what version of AutoCAD you are using, but if you’re on 2024.1 or higher, you sound like a perfect fit for the new Activity Insights palette. You’ll find it in the View tab of the ribbon. It’s the only icon in the History panel. Turn it on, and you’ll get a palette view of various activities, telling you who did what and when they did it. Click on any entry to get more info on it. Just follow this link to learn more about it.
Use Paste Special to Insert Image Files
Louie from New York wants to know:
We don’t use externally referenced drawing files in our work, but we do insert numerous images into our drawings. Of course, this references the image, which, in turn, creates problems for our users who aren’t used to working with the image paths. In other words, the path is often broken. Is there a way to attach an image so that it’s not externally referenced (thus pathed?)
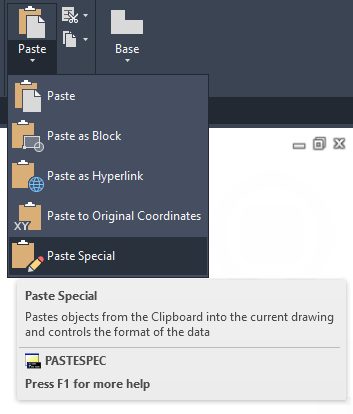
Louie, in a word, yes! It’s a simple three-step process. First, open the image file in MS Paint® or pretty much any graphic software. Next, select “all” and perform a clipboard copy. Finally, in AutoCAD, do a “paste special” (not a regular paste) to place the image directly into your drawing. Baddabing! No more lost image files.
Reset Overridden Dimension Strings
Bailey from Cincinnati asks:
Let me start by saying that I work with that co-worker. The lazy drafter who prefers to override dimension text instead of just doing it right to begin with. Of course, there’s no way to know if it’s been overridden or not (I wish they would get flagged similar to Anno Monitor). Do you have any suggestions for me?
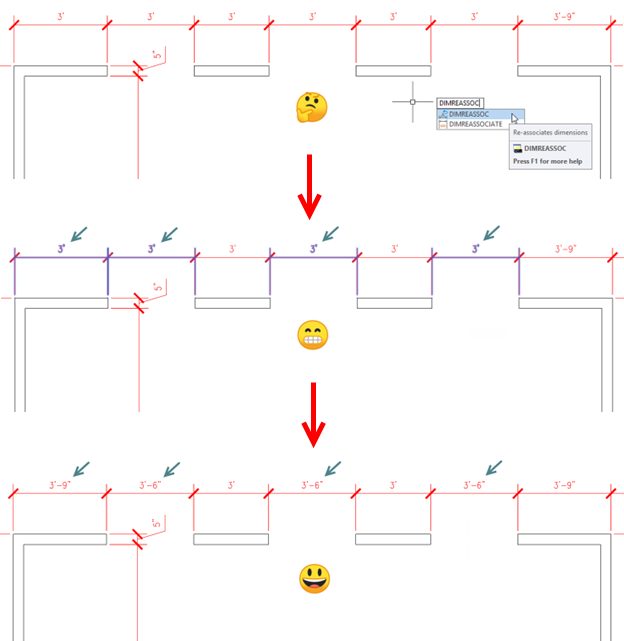
Yes, Bailey, I do! There’s an Express Tool called DIMREASSOC. You can type it into either the Dynamic Input Box or the Command Line. You can also find it as “Reset Text” in the Dimension panel of the Express Tools tab in the ribbon. To use it, select an area of dimensions or just type in ALL since the command filters out anything that’s not a dimension.
Any dimensions that have overridden text will immediately be highlighted for you. Just hit Enter to end object selection, and Boom! All the overridden dimensions now read accurately.
How’s that for an easy fix? I just wish we could do the same with your co-worker!
Coming Clean
If you were paying close attention, you may have noticed a pattern in our questions. They were all from fictional characters in classic TV sitcoms.
That’s right, there’s no actual mailbag full of letters that we pulled from. That’s shocking here in 2025, I know. But we do hear from a lot of you via emails or comments, so we also have plenty of shorter tips to share, so this is always a fun way to get them out there.
I hope to do another AutoCAD Potpourri post someday, so please make sure you keep those letters and questions coming!
Celebrity Guest Stars:
Murray Slaughter – The Mary Tyler Moore Show
Emily Hartley – The Bob Newhart Show
Louie De Palma – Taxi
Bailey Quarters – WKRP in Cincinnati
More Tuesday Tips
Check out our whole Tuesday Tips series for ideas on how to make AutoCAD work for you.
South of Midnight launches on April 8, or play now with the Premium Edition.
The game arrives for Xbox Series X|S, Xbox app for Windows PC, Steam, cloud, and will be available day one with Game Pass. And with Xbox Play Anywhere, play on Xbox consoles, Windows PC, and cloud with full cross-entitlements and cross-saves.
To celebrate release, we’ve put together 6 tips to help you in both exploration and combat.
South of Midnight invites you into a dark, fantastical world drawn from tales of the American South – and while this might look like a fairytale, both the stories it tells and the challenges it poses are far from simplistic.
Telling the tale of Hazel, who gains the magical power of Weaving after her mother is swept away by a supernatural flood, you’ll need to cross a warped take on the South in your hunt to find her mother, and answers to what exactly is going on. Along the way, you’ll battle Haints – corrupted enemies borne from the sorrow of the world – and cure the wounds of Mythical Creatures, the subjects of real-life folktales brought to life by developer Compulsion Games.
Premium Edition owners can play from today (ahead of an April 8 release date for all players), and to celebrate we’ve put together some tips that cover both exploration and combat, which will help you prepare for this very unexpected journey:
Look Everywhere
Navigating each of South of Midnight’s chapters could be as simple as following your Guiding Strand – a feature that sees magical threads guide you to your next goal. But that’s far from all there is to discover. Each location is stuffed with hidden areas – some require platforming to reach, others need you to use your spells, while others will lead you into battles you might never have otherwise had. All of them will require a keen eye to find.
Your rewards for doing this usually come in the form of Floofs – the game’s upgrade currency – and we hugely recommend you take the time to look for them. With just a bit of concerted exploration, you can add upgrades to your skill tree (more on those later) much faster than by simply running from one objective to the next.
Even better, you may also find Life Filaments as you go. Most chapters contain one of these – usually in its most hidden side area – and collecting three offers a permanent upgrade to your health bar.
Expand These Stories
South of Midnight is all about stories – from the tale of Hazel’s search to find her mother, to the tragic backstories of the Mythical Creatures you’ll find along the way. But if you want to dig really deep, make sure to search each chapter for items, notes, and more. You’ll see these marked by small circles as you approach, often in out-of-the-way locations.
Far from your regular world-building, each chapter’s hidden notes add even more detail to the characters and stories you’re learning about along the core questline. You may discover hidden motivations for why characters are the way they are, simply because you took the time to read about their lives. It’s an enriching way to add to the wider tale.
Upgrade Early and Often
As mentioned above, you can speed through the upgrade tree with a bit of exploration – and when you start hitting harder combat sequences, you’ll thank yourself for doing it. Even on its regular difficulty level, South of Midnight’s combat packs a punch, with even the most basic Haint enemies removing whole chunks of your health bar after a single hit – never mind when you come up against a Mythical Creature. Upgrades are your means of turning the tables.
Upgrades tend to focus more on offering you added perks, rather than simply buffing an ability’s existing stats. When you Unravel a downed enemy to claw back some health, for example, you can add an area of-effect blast to stagger any nearby Haints before you get back into the fray. Adding a quick double-dodge to your repertoire, meanwhile, will come in very handy when you start meeting enemies that can quick-fire multiple projectiles. Take the time to explore the skill tree, and prioritize upgrades that look like they’ll solve problems.
Use Dodges as Attack and Defence
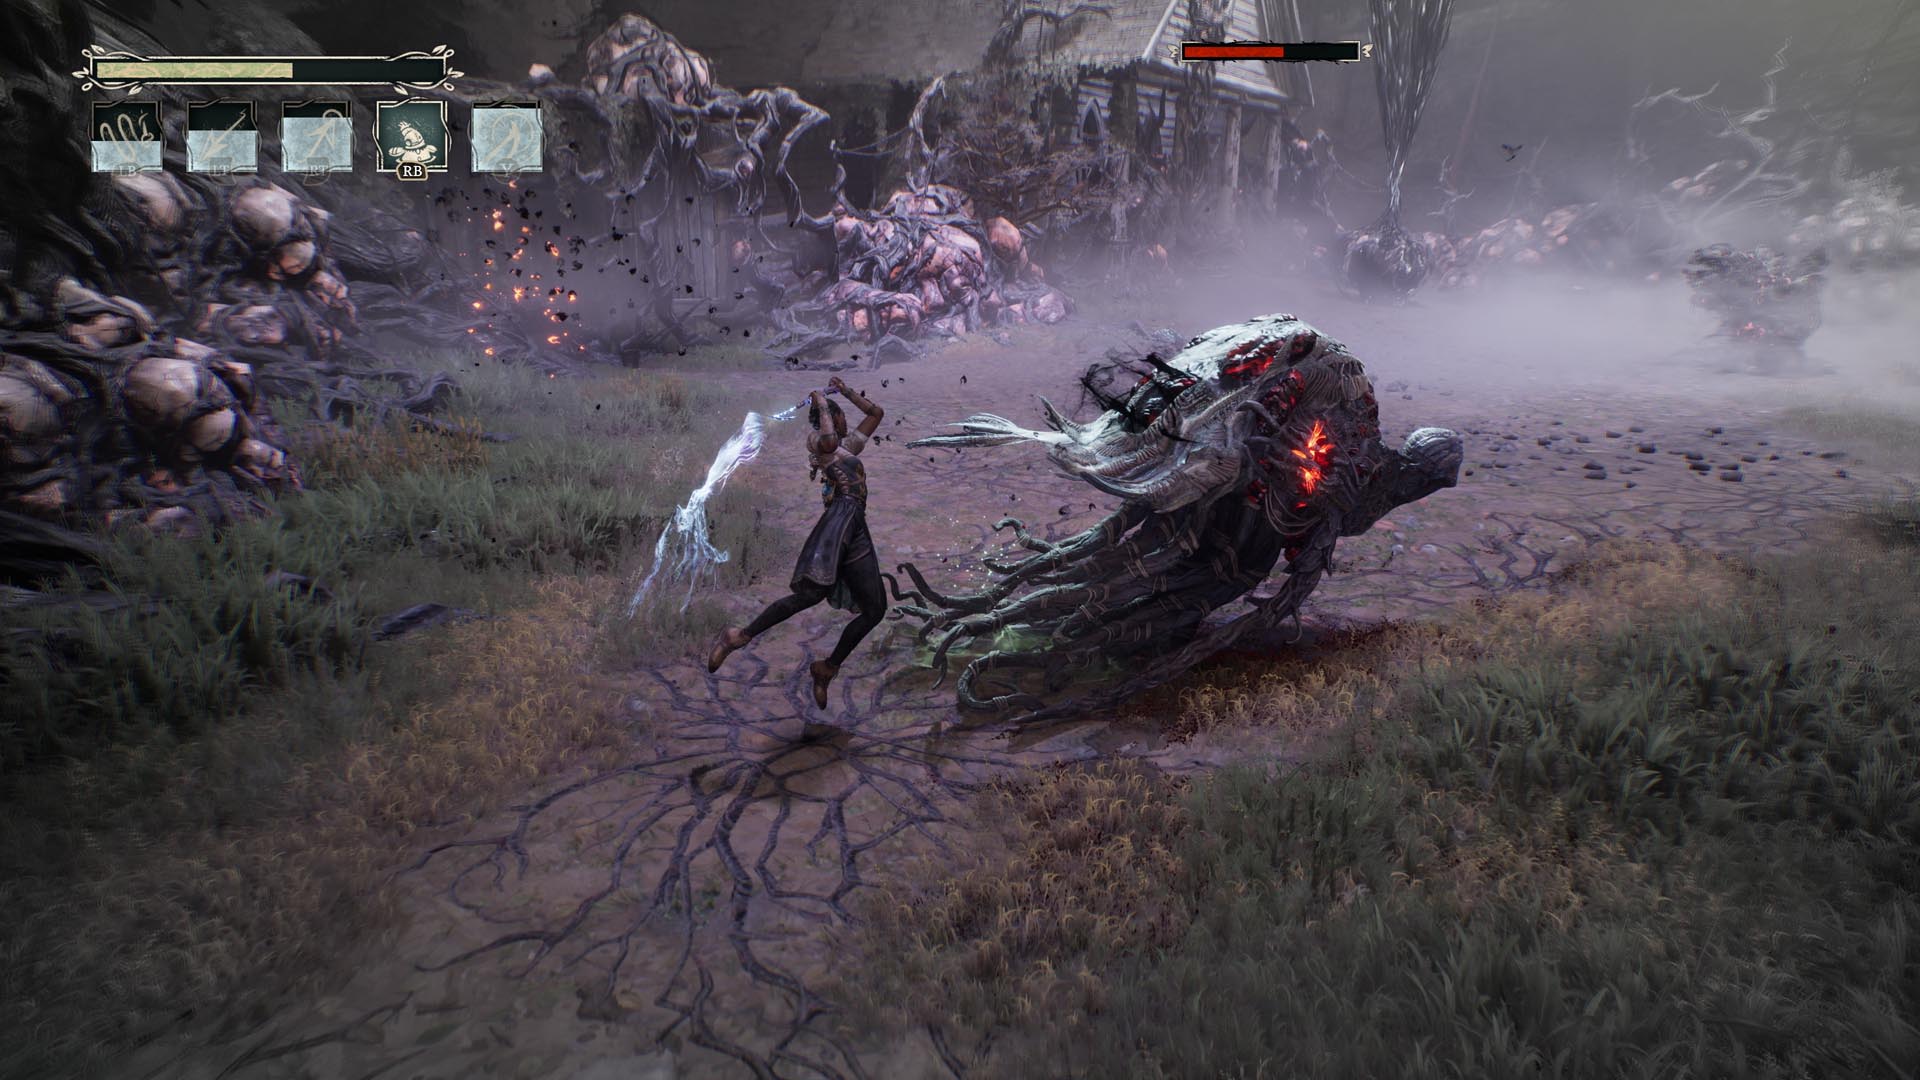
Hazel doesn’t have the ability to block attacks – but she more than makes up for that with a powerful bonus to her dodge. Hitting the dodge button will help you escape in any direction (with some invulnerability frames thrown in) – but hitting a perfectly timed dodge, just before you’re hit, comes with a nasty surprise for whoever was trying to hurt you.
Perfect Dodges send out a blast of energy, staggering any enemy around you and doing some nice damage, too. It’s worth paying attention to not just what attacks enemies can do, but the time it takes to pull them off – pretty soon, you can be doing almost as much damage by not attacking.
Use Spells as Interrupts
As we mentioned, getting hit in South of Midnight can get very nasty, very quickly – and while Hazel has that handy dodge, it can sometimes be easier simply to stop an attack in the first place. Against most enemies, throwing out a spell – whether that’s a Pull, a Push, or a Weave (which incapacitates most Haints) – will break them out of an attack completely.
While it’s tempting to spam your spells as soon as they’ve cooled down, we’d recommend keeping one in reserve as an emergency interrupt – if you see an enemy winding up during your combo, simply hit them with a spell and keep thwacking.
Chain Your Spells
If you really want to keep an enemy locked down, you can use your full spell repertoire to keep attacks going without interruption. This is particularly useful once you have a few upgrades under your belt.
For example, you could Pull an enemy towards you, with an added Weave effect (which you can also upgrade to have them take more damage while tied up). As soon as they break free, Weave them again with that core spell – and when they break free again, use Push to deal some damage and keep your distance, before charging up your ranged attack to deal the killer blow.
With a bit of practice, enemies that felt like they took an age of dodging and poking to beat in the early game can begin to go down in a single combo – it’s extremely satisfying.
South of Midnight will be available on April 8, 2025, on Xbox Series X|S, Xbox App for Windows PC, Steam and cloud, and arrives on day one with Game Pass. Play from today by purchasing the Premium Edition, and get access to digital extras.
South of Midnight Premium Edition
Xbox Game Studios
☆☆☆☆☆ 12
★★★★★
$49.99
Immerse yourself into the macabre and fantastical world of South of Midnight with the Premium Edition, which includes the full game, up to 5 days early access, and digital access (in English) to:
• South of Midnight Artbook
• Original Soundtrack composed by Olivier Deriviere
• The Boo-Hag Comic book by Rob Guillory
• Music Video: Songs & Tales of South of Midnight
• Documentary: Weaving Hazel’s Journey, Director’s Cut
UNRAVEL THE PAST
From the creators of Contrast and We Happy Few, South of Midnight is a spellbinding third person action-adventure game set in the American Deep South.
As Hazel, you will explore the mythos and encounter creatures of Southern folklore in a macabre and fantastical world. When disaster strikes her hometown, Hazel is called to become a Weaver: a magical mender of broken bonds and spirits. Imbued with these new abilities, Hazel will confront and subdue dangerous creatures, untangle the webs of her own family’s shared past and – if she’s lucky – find her way to a place that feels like home.
A DARK MODERN FOLKTALE
When a hurricane rips through Prospero, Hazel is pulled into a Southern Gothic world of memory made real and must embark on a journey to rescue her mother and safeguard her hometown. In this folktale for modern times, Hazel will need to reconcile the weight of family, history, and legacy against her own identity.
CONFRONT MYTHICAL CREATURES
Wield an ancient power to restore creatures and uncover the traumas that consume them. Cast weaving magic to fight destructive Haints, explore the diverse regions of the South, and reweave the tears in the Grand Tapestry.
HAUNTING BEAUTY OF THE GOTHIC SOUTH
Discover the lush, decayed county of Prospero and its locals. Experience a crafted visual style, touching storytelling, and immersive music inspired by the complex and rich history of the South.
South of Midnight
Xbox Game Studios
☆☆☆☆☆
★★★★★
$39.99
From the creators of Contrast and We Happy Few, South of Midnight is a spellbinding third person action-adventure game set in the American Deep South.
As Hazel, you will explore the mythos and encounter creatures of Southern folklore in a macabre and fantastical world. When disaster strikes her hometown, Hazel is called to become a Weaver: a magical mender of broken bonds and spirits. Imbued with these new abilities, Hazel will confront and subdue dangerous creatures, untangle the webs of her own family’s shared past and – if she’s lucky – find her way to a place that feels like home.
A DARK MODERN FOLKTALE
When a hurricane rips through Prospero, Hazel is pulled into a Southern Gothic world of memory made real and must embark on a journey to rescue her mother and safeguard her hometown. In this folktale for modern times, Hazel will need to reconcile the weight of family, history, and legacy against her own identity.
CONFRONT MYTHICAL CREATURES
Wield an ancient power to restore creatures and uncover the traumas that consume them. Cast weaving magic to fight destructive Haints, explore the diverse regions of the South, and reweave the tears in the Grand Tapestry.
HAUNTING BEAUTY OF THE GOTHIC SOUTH
Discover the lush, decayed county of Prospero and its locals. Experience a crafted visual style, touching storytelling, and immersive music inspired by the complex and rich history of the South.
In my last Tuesday Tip, I introduced you to some handy tools for turning your 2D shapes into 3D solids. Today, I’m going to take you just a little further with AutoCAD 3D editing and show you how easy it is to turn your extruded (or press/pulled) objects into more complex structures.
To illustrate these tools better, I will use the same simple geometry I created last time: a box and a cylinder (extruded from a 2D rectangle and a circle). However, for today’s post, I’ve moved the cylinder to the center of the box and made it a little taller.
The subjects today are the 3D editing tools, Union, Subtract, and Intersect. They can be found in either the 3D Modeling workspace or the 3D Basics workspace. I’ll be demonstrating these tools via the 3D Basics workspace, as it’s a bit cleaner and easier to see the icons.
Union
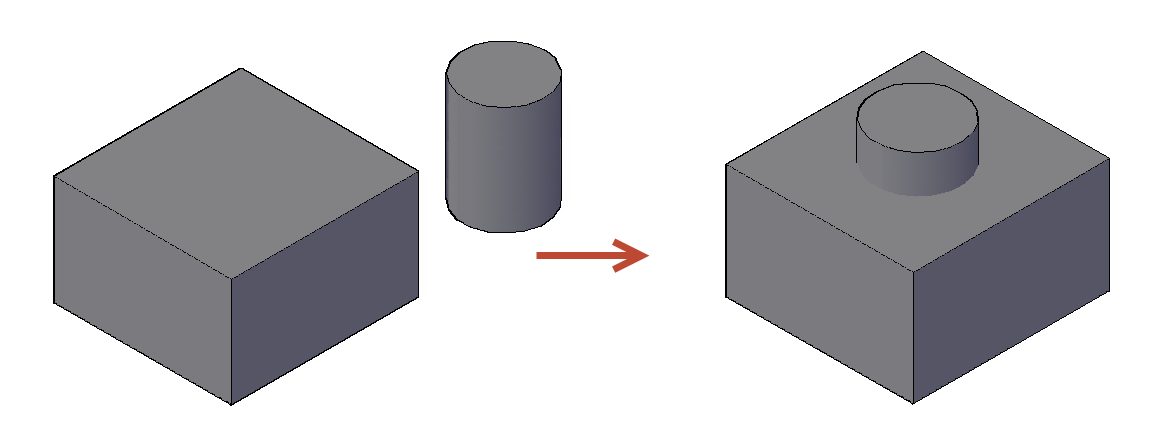
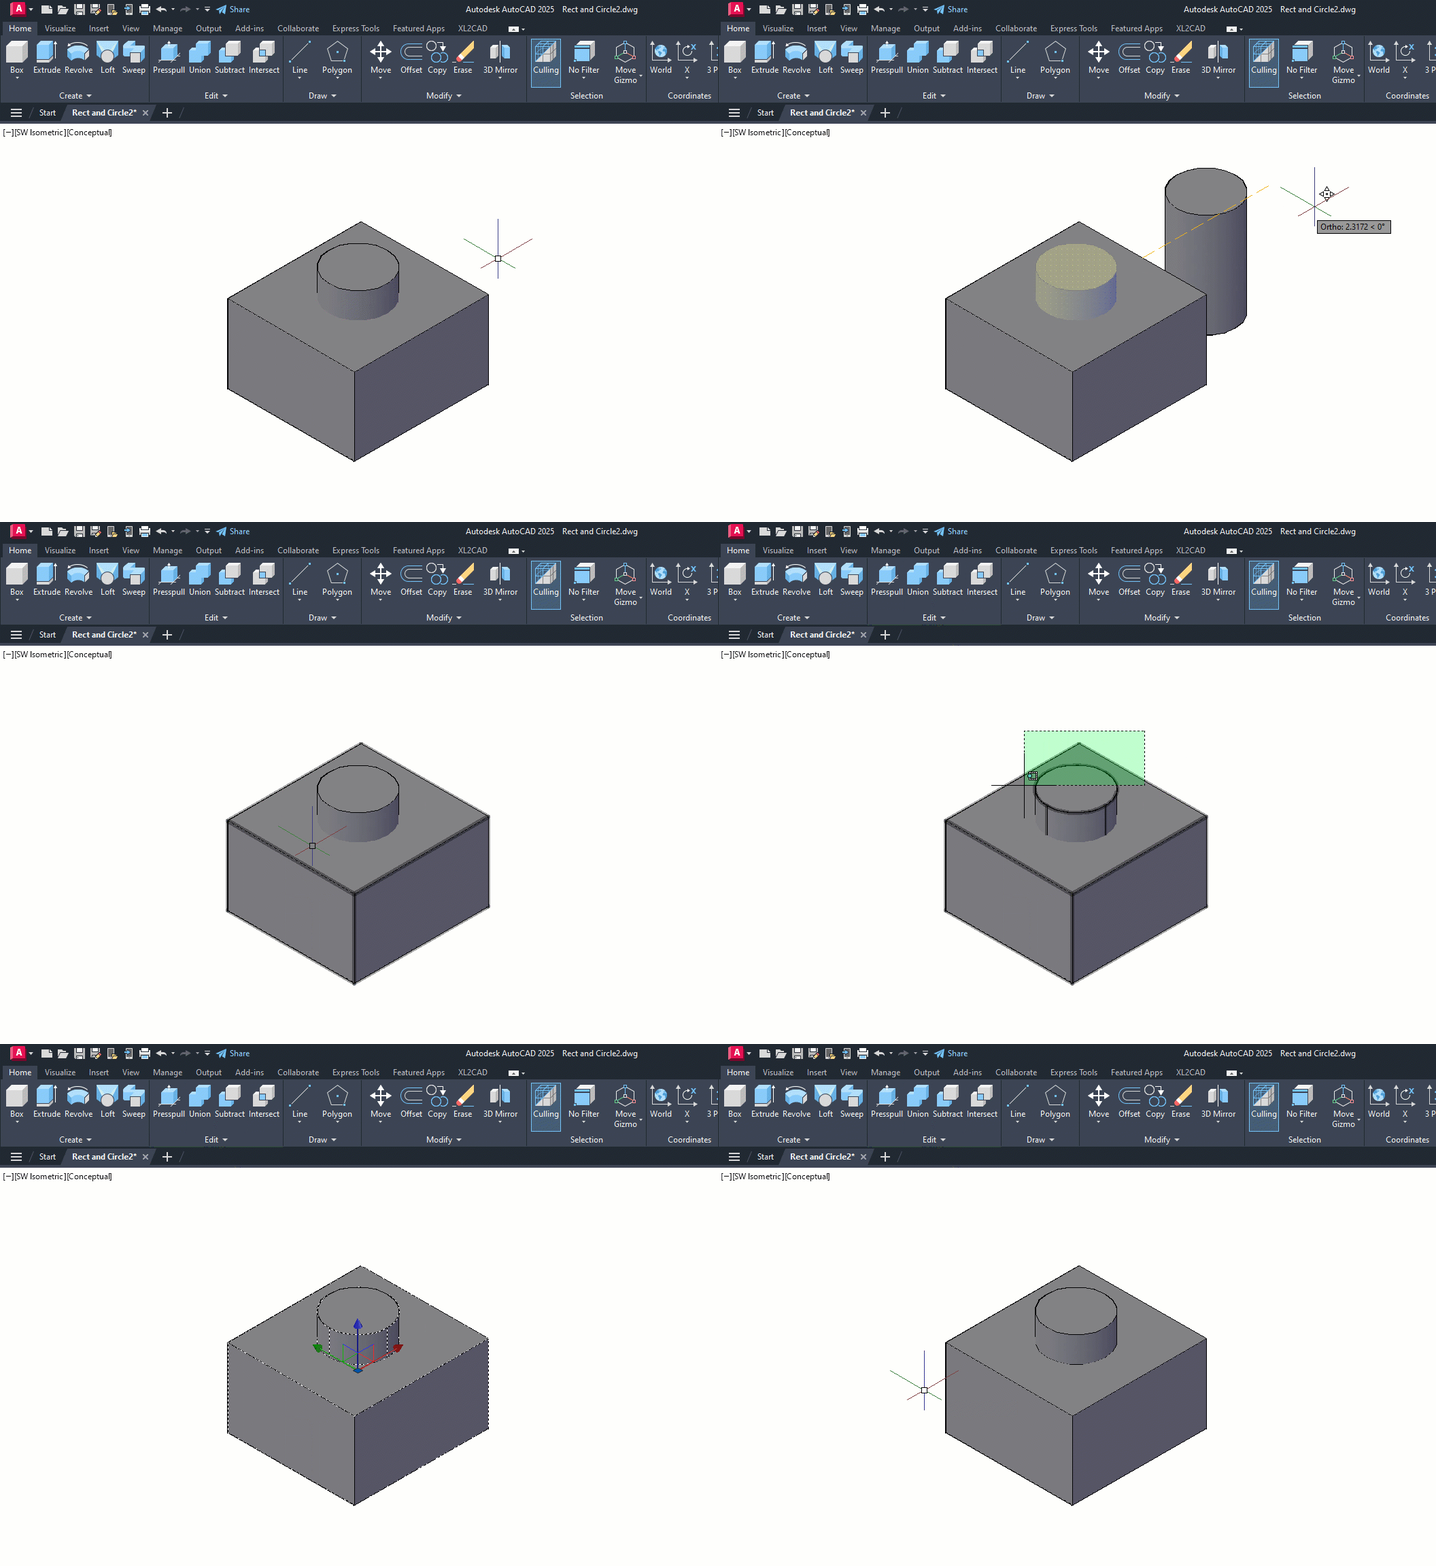
The first tool out of the box is Union. With this command, you don’t have to worry about what order you select things (more about that with the next tool). As you’ll see in the animation below, I take advantage of this by using a crossing window selection box. Quite simply, the UNION command will combine all the selected 3D solids into a single solid object. So, I no longer have a box and a cylinder, but now I have a box with some kind of a boss on top.
Please keep in mind that my examples are simply for visualization purposes and do not depict anything useful.
Subtract
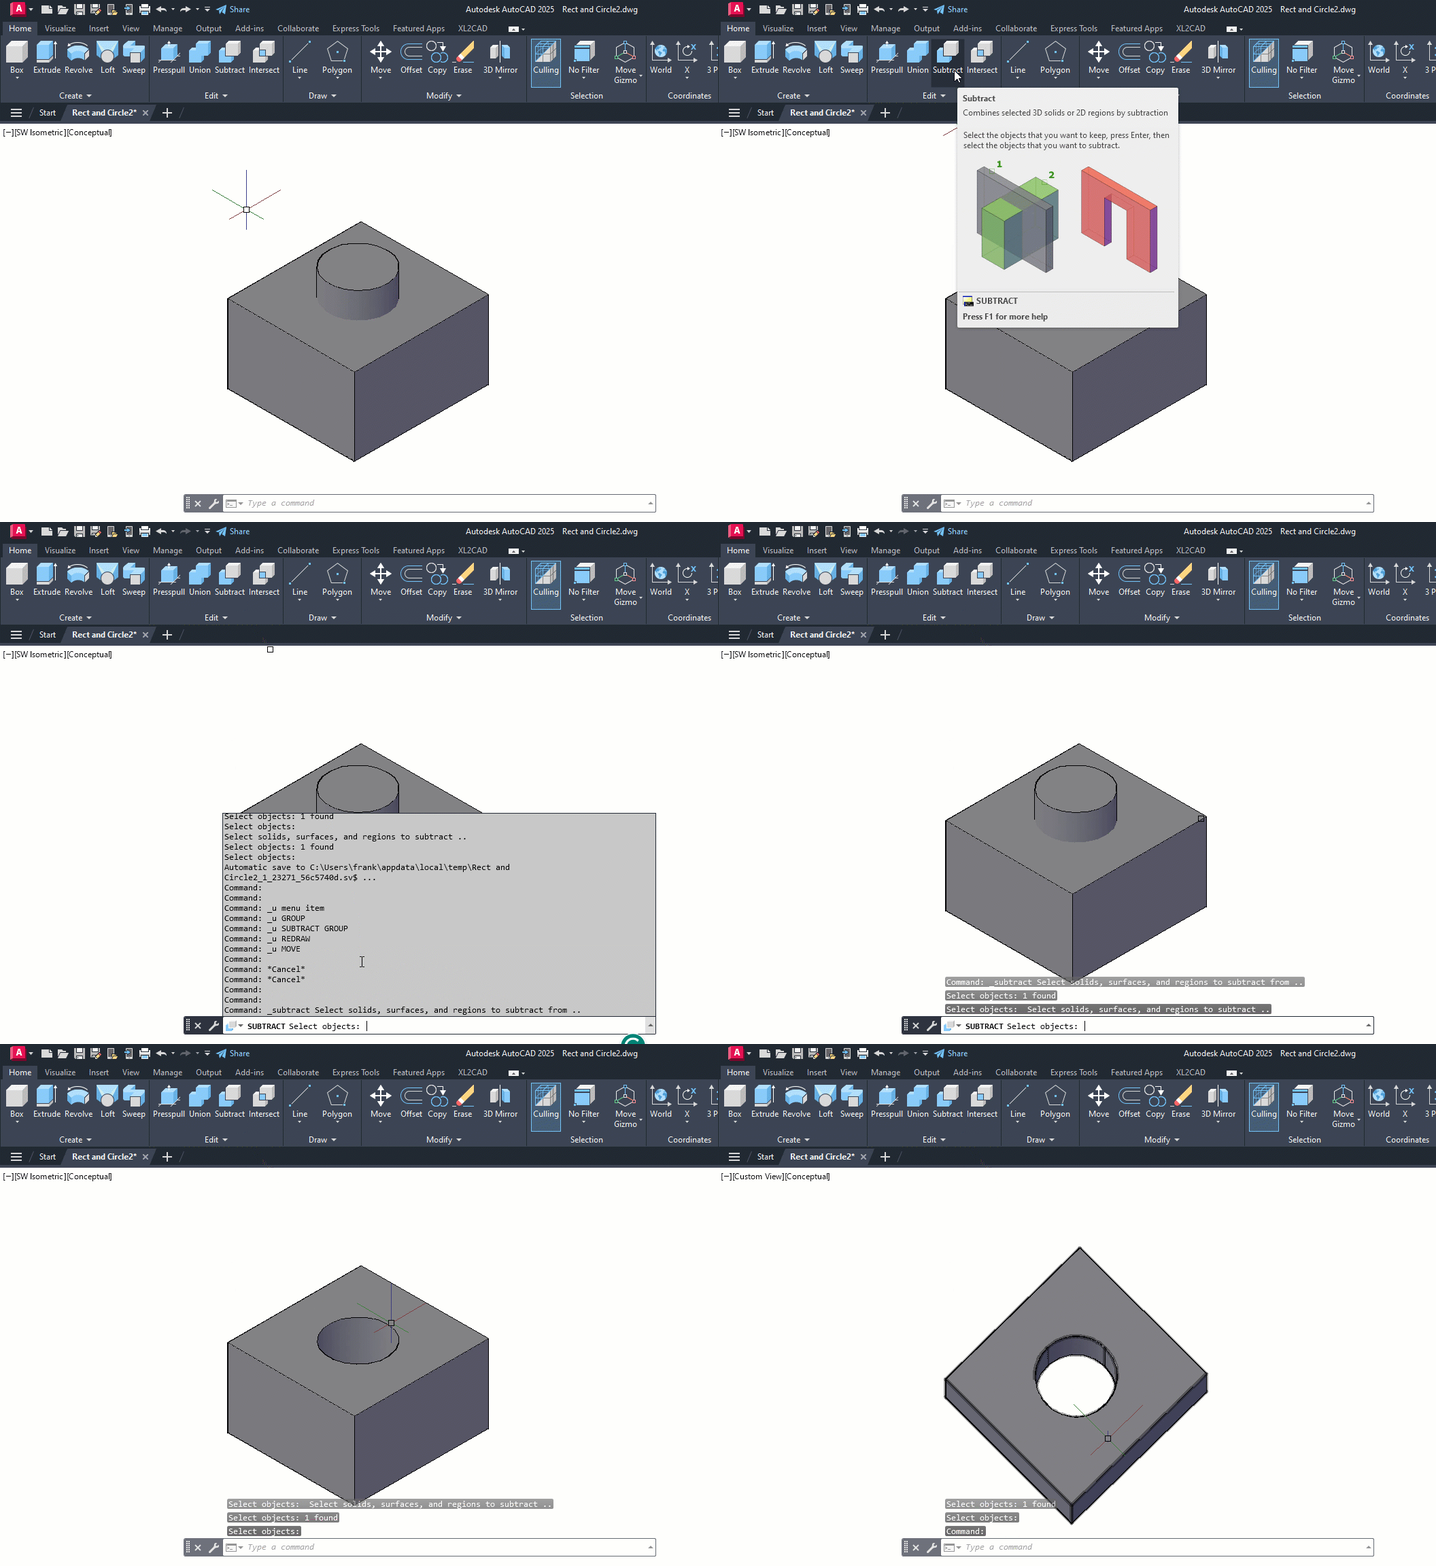
On to the second tool — the Subtract command. In this animation, you’ll notice I pause for the extended tooltip when selecting the subtract icon. This is a reminder to use these, especially in the 3D workspaces, as they give you a detailed (and sometimes animated) illustration of how the tool works.
You’ll see that its workflow is to select the object(s) you want to keep, hit enter, and then select the object(s) to subtract. In this case, I’m keeping the box and using the cylinder to subtract, thus creating a hole in the box. You may also notice that I’ve moved the Command Line into frame and used F2 to expand it into the text window. I did so because, for some reason, the prompts for what to select (the kept object vs the subtraction object) are not very clear—just something for you to keep in mind.
Bonus Tip: I’m using the Orbit command at the end to show the hole better. Just hold down your Shift key, press down the scroll wheel on your mouse, and just move the mouse around! It’s a fast way to visualize your 3D work.
Intersect
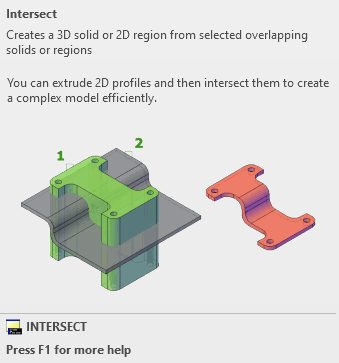
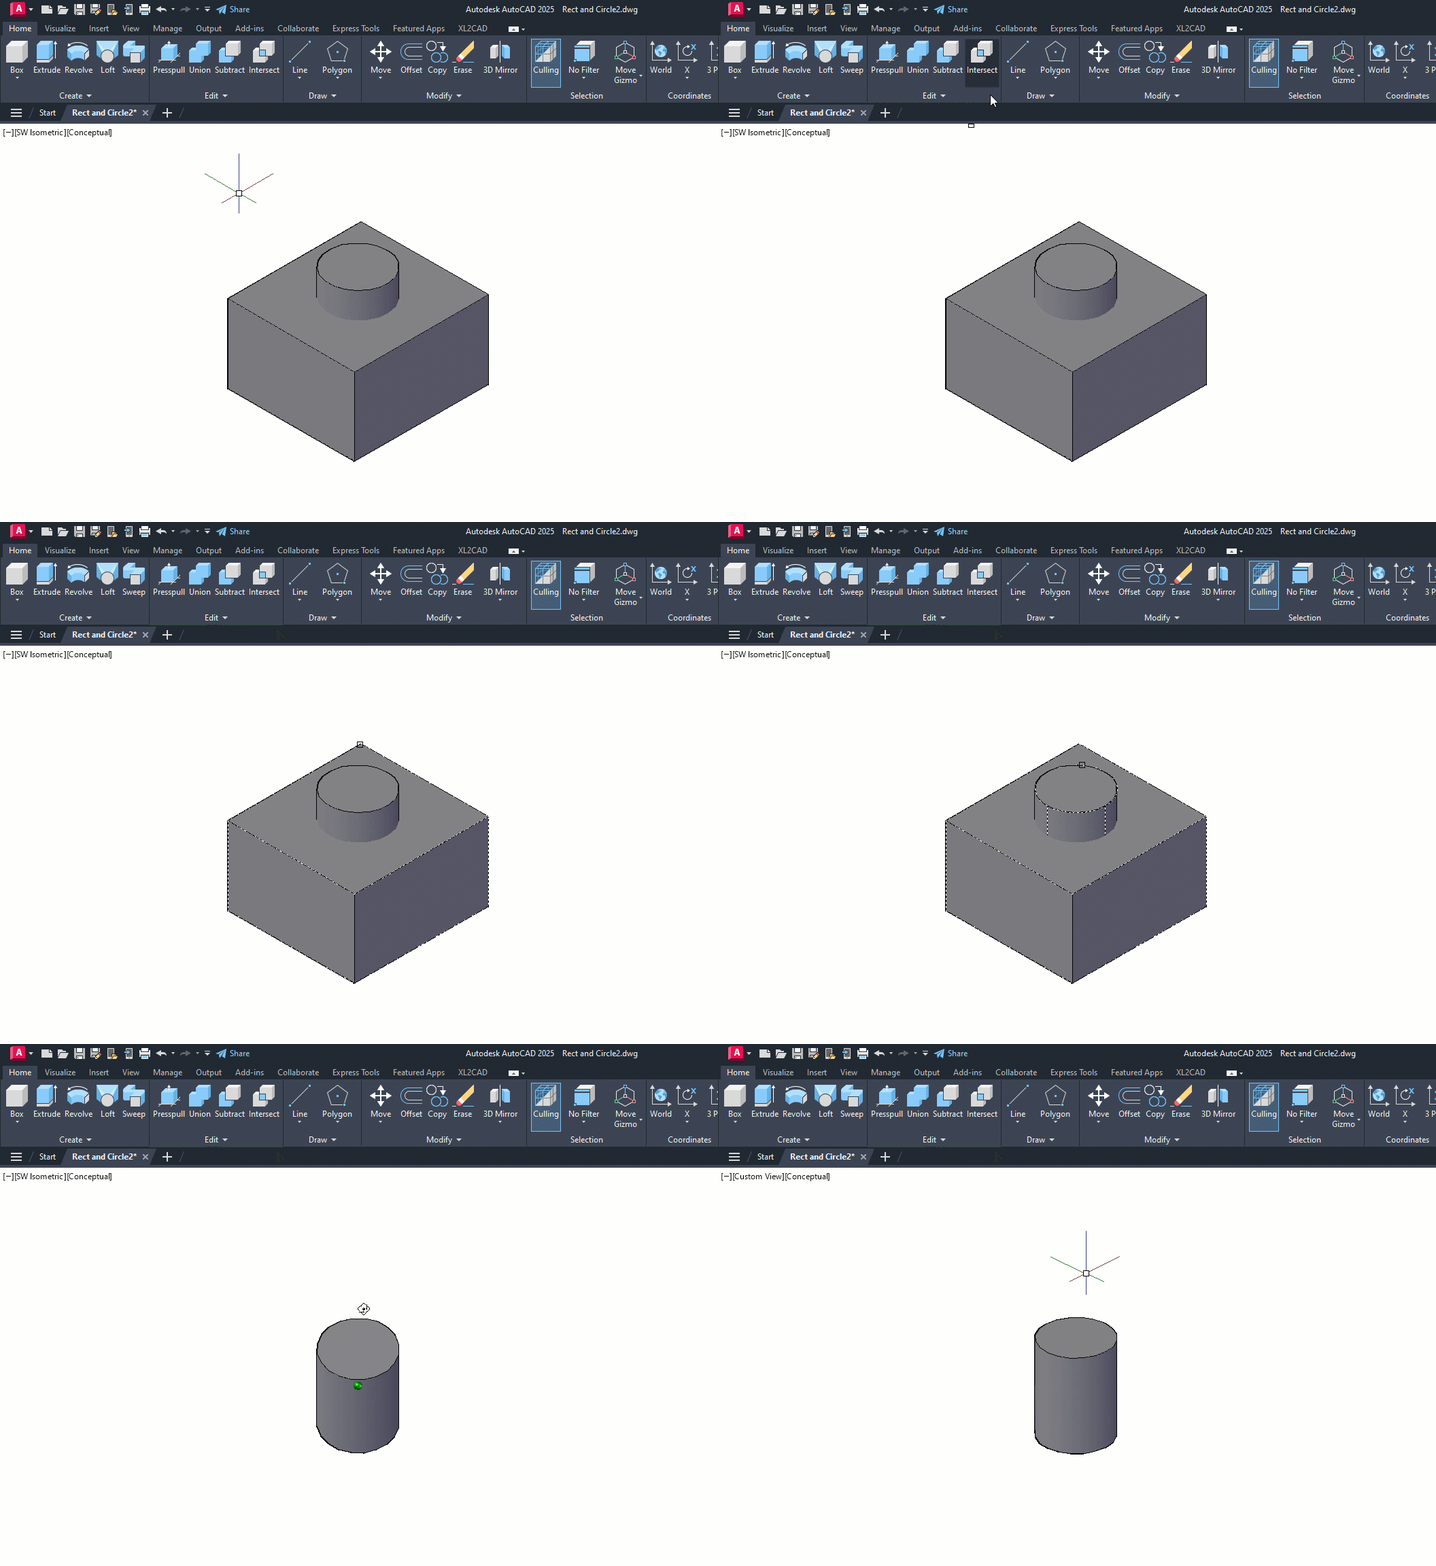
The third and final tool for the day is the Intersect command. I stayed with my box and cylinder solids, but using intersect on them doesn’t do Intersect justice. It just creates a smaller cylinder. However, the extended tooltip has a terrific visual example, as shown below.
Both shapes began as 2D objects that were extruded into 3D solids. Intersect operates just as you would expect. It takes the overlapping regions of multiple 3D solids and turns the overlap into a new solid.
Much like the Union command, you don’t have to worry about the order of your object selection. In my example animation below, I selected the box and cylinder individually, but I could have also used a crossing window as I did with Union.
Summing Up
As you can see, these tools are not too terribly difficult to use, but they’re extremely powerful, especially when used together. Hopefully, even with my incredibly simple examples, you’ve been inspired to visualize how they can bring your seemingly complex project to fruition.
Hey, there’s nothing wrong with keeping one foot in your familiar 2D world, but don’t be afraid to put the other into 3D. Poke around some while you’re there. Expand the Ribbon Panel and see what other tools are available in the Additional Tools area. Explore both 3D workspaces. You’ll find familiar tools (3D versions of Chamfer and Fillet) and some new ones as well.
And by all means, don’t forget to hover over them to see their Extended Tooltip. It’s a terrific method for getting a feel for how a tool works before you find a need to use it.
More Tuesday Tips
Check out our whole Tuesday Tips series for ideas on how to make AutoCAD work for you.
Having used AutoCAD almost my entire professional live and working alongside those who use it as well, I find it amazing how, with so much in common, we’re so different in our approaches. Let’s look at two camps. One camp is the people like me. I love customizing AutoCAD and extending its capabilities, mainly by programming in AutoLISP. Another camp wants none of that; they want to be designers, not programmers.
I think they’re missing out on the ability to automate repetitive tasks (something any AutoCAD camper has in common). There’s good news for you if you’re not a programmer and don’t want to be.
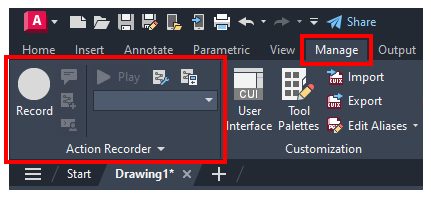
AutoCAD has a tool that can record your actions (repetitive tasks!) and put them into a named macro that you can play back at any time. Accordingly, it’s called Action Recorder, which you can find in its own panel in the Manage tab of the Ribbon.
Today’s post is intended to provide a general overview of Action Recorder. It’s easy to use, and plenty of instructional guides, including the Help file, are available.
Getting Started With Action Recorder
Let’s start with all those icons in the ribbon panel. Of course, there’s the big Record button on the left. If you press it, it turns into a Stop button. That makes sense. There are three icons vertically next to it (in the image, they’re grayed out since no macro is selected). The top icon lets you insert a message into the current macro. Think user prompts… “Select Object:” “Enter Distance:” and things like that.
The middle icon pauses the macro to insert a base point used by the proceeding coordinate entry/value. The bottom icon allows the user to insert a pause for user input during the macro’s playback.
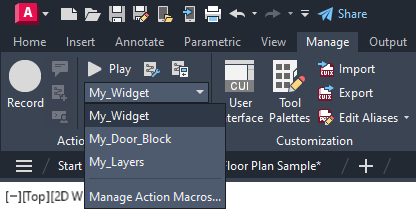
Now for the right side of the panel. There’s a pulldown that contains all your available action macros. Above that is the play button. It’s pretty easy so far. Pick a macro and play it.
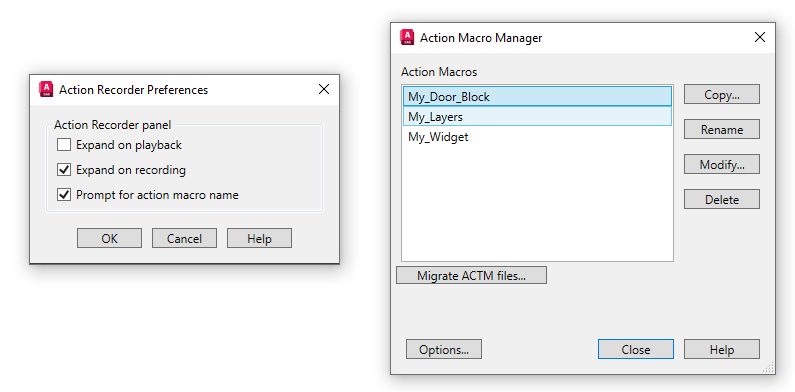
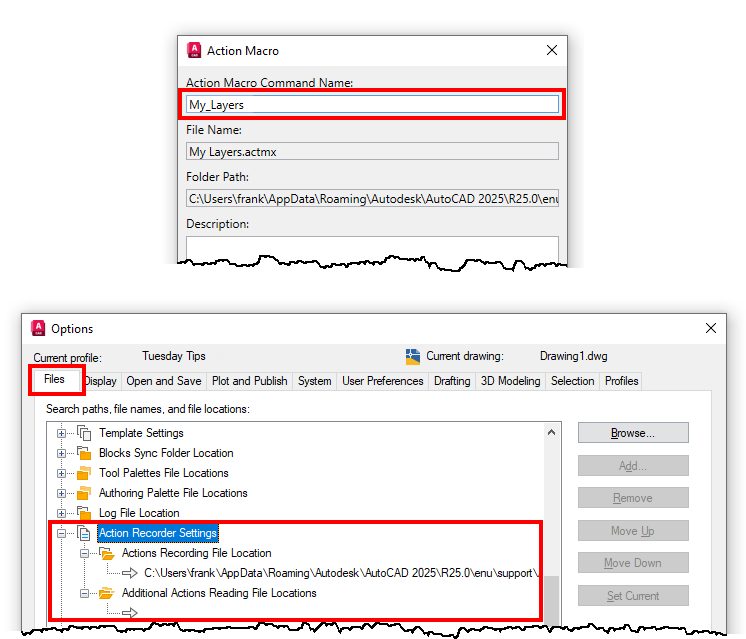
To the immediate right of Play is the Preferences icon, which displays a dialog where you can control some of the panel’s display options. Finally, the icon on the right will display the Action Macro Manager. These last two dialogs are shown below:
Recording Your Action Macro
Let’s quickly explore what happens when you decide to record a macro. First, a couple of “gotchas.” Avoid dialog boxes and use the command line version if possible. For instance, the “My_Layers” macro shown in my list uses the -LAYER command. Most commands that use dialog boxes have a similar command line version.
Another thing to avoid are grips. The My_Door_Block macro inserts a dynamic block and changes its default Visibility State and vertical Flip. Typically, you’d do this using the block’s multifunctional grips, but the recorder won’t pick that up. Instead, I used the Properties Palette to make those changes.
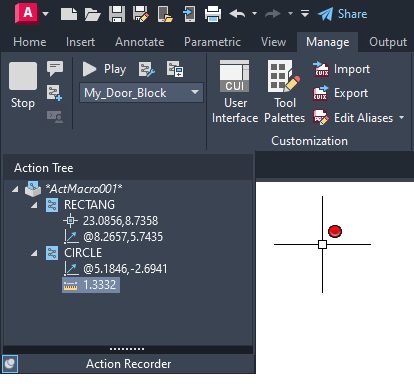
Back to recording. You’ll only notice that the round Record button transforms into a square Stop button, a circular red badge will appear next to your cursor, and the additional tools menu will expand and pin itself in place to display the Action Tree. More on that in a moment.
When done, click the stop button. You’ll get a dialog prompting you to name your new Action Macro (did you click Stop because you made a mistake? Just use Cancel here to delete it). Please be aware here that the name must not have any spaces. I like to use underscores in their place. You do you, please.
Also, notice that there is a folder path. This is where your action macro file is stored. For years, these files used an extension of ACTM. It is now an ACTMX file. It’s just something to be aware of. The really cool thing is that your macros can be shared. You can send one to a colleague, and they can put it into the default file location, a custom location, or better yet, you can define a path to a shared location so the entire team can access this new tool.
So, now you’ve created time-saving customizations. You’re still not a programmer, but you are now the office hero. It doesn’t get much better than that.
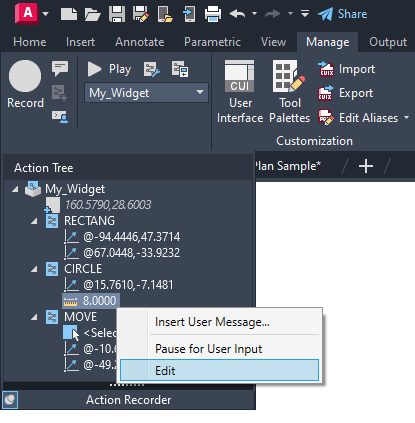
Back to the Action Tree shown in the Additional Tools menu. This is a list of the actions you used to create your macro. By right-clicking on an entry, you can access a few tools. You can insert a message or pause for input (same as the icons we saw in the panel), or if you select something editable, you can do so here. In the example below, we might need to change the circle’s radius to something other than 8.000.
Wrapping It Up
Action Recorder can be just the tool you need to get your tedious task down to a single pick-and-click. And, as you’ve seen, sharing it with your team is easy, too.
So, you can quickly create powerful macros to improve your efficiency, all without having to learn a programming language, which should turn you into a happy AutoCAD camper!
More Tuesday Tips
Check out our whole Tuesday Tips series for ideas on how to make AutoCAD work for you.
AU 2024: The Design & Make Conference was held for the first time in sunny San Diego. This year the General Sessions and Industry Keynotes delved even deeper into the future of AEC, design and manufacturing, and media and entertainment. And, of course, there were hundreds of incredible sessions and classes that are the hallmark of the AU experience.
Even if you attended AU 2024, there were probably some AutoCAD classes you couldn’t pack in. And, if you weren’t there, we still want to bring all the great insights and content directly to everyone for free. Catch up on all the AU 2024 AutoCAD classes, sessions, and tips from the comfort of your own home or office. Here’s just a sampling of what you’ll find.
Curious about the road ahead for AutoCAD software? AutoCAD product managers and leaders shared new features and functionality supporting the capabilities and workflows you need to drive more efficient and more collaborative projects. Discover how Autodesk is incorporating Autodesk AI into AutoCAD to elevate your design and drafting capabilities. Learn about the strategic insights and decisions driving development directions and peer into the future of the product you use every day.
Shaun Bryant helps you discover workflows and methodologies you never knew would enhance your AutoCAD skill set. He also shares some of the cool, new stuff in AutoCAD 2025 software and demonstrates how the new 2025 features can boost your productivity, especially when meeting those ever-important deadlines.
During the seventh installment of this multi-award-winning session, you’ll learn new efficiencies with Donnie “The CAD Geek” Gladfelter as he delivers today’s top tips and tricks. This session dives deeply into today’s most-efficient AutoCAD workflows.
AutoCAD users spend most of their time drafting based on markups and incorporating revision changes. Volker Cocco shows you how to automate workflows and decrease the time spent on design changes using Trace, Markup Import, and Markup Assist in AutoCAD. Whether design changes are made in the field, at the office, or remotely, these tools will increase your efficiency and improve collaboration on markups and revisions.
AutoCAD software unlocks intelligent and connected design collaboration across people, devices, and platforms that will improve design efficiency and ease management of design projects. In this session led by Audrey Boguchwal, Can Anbarlilar, and Kerry Ko, learn how you can unlock this experience for you and your team by connecting the best of Autodesk Docs—the cloud-based document management and common data environment—with AutoCAD.
AutoCAD web and mobile apps redefine the design experience by providing an integrated, connected ecosystem for design and collaboration. In this session, Tedman Martinez, Wenqian Yan, and Sachin Singh demonstrate how AutoCAD web and mobile apps can revolutionize the way we work on DWG files, making the process more efficient and collaborative. Explore the collaborative features of AutoCAD web and mobile apps with real-world workflows.
Typically, in this space, I’ll write about some tips, features, or workflow within the software that will (hopefully) make your AutoCAD work easier or more efficient. In fact, there have only been a couple of other times that my Tuesday Tip didn’t include AutoCAD itself. If you’re keeping score at home, I previously wrote about using Core Console to automate your scripts.
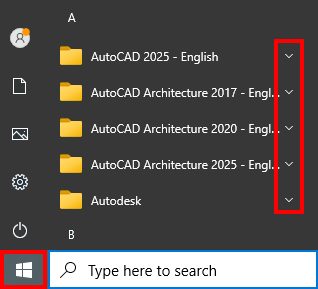
Today, our adventures again take us outside of the interface and into the Windows® Start Menu. The menu can be accessed by clicking on the icon below, just to the side of the search box, or by simply clicking the Windows button on your keyboard. Since you have your scorecards out, the Tuesday Tip about startup switches (hilariously entitled “Start Me Up” and referencing the addition of the Start Menu back in Windows 95, and the Rolling Stones for good measure) also didn’t involve the interface.
The menu contains program groups sorted alphabetically. The Autodesk groups are shown below. Your list may differ from mine depending on what you have installed. Notice they all use a folder as an icon. As such, they each have an expandable menu that can be accessed with the down arrow.
Autodesk Folder Group
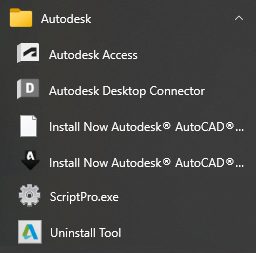
We’ll focus on two of the groups in my list. First up is the Autodesk group. Here, you’ll find a link to the Autodesk Access program – which can come in handy if you find it difficult to tell one tiny icon from another from the taskbar’s hidden icons menu.
Again, depending on what you have installed, you’ll find things like you see in the image below. There are a couple of old installation shortcuts, the ScriptPro executable that I used in the aforementioned Start Me Up blog post, and the old Uninstall Tool that came with the 2017 ACA I have installed.
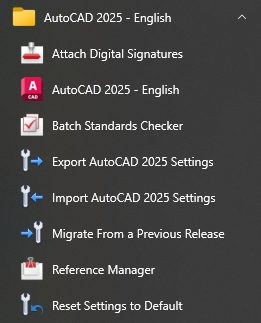
Expanding the AutoCAD 2025 folder group will yield several very handy tools, and in general, are the intended subject of this post. Have you ever needed to attach a digital signature to your drawings? Did you even know you could? If you have a digital ID or certificate on your computer, this is where you go to add them.
Next is the AutoCAD program file. Why would you ever need to access it from here? Let’s say you’ve accidentally deleted your desktop icon to AutoCAD, and need to recreate it. Right-click the program icon, expand the More menu, and select Open File Location. An Explorer window will open with the executable highlight. Right-click on that, expand the Send To menu, and select Desktop (create shortcut). Badda bing, your shortcut is back on your desktop.
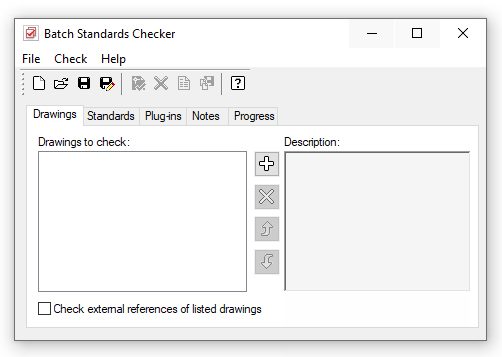
Next up is the Batch Standards Checker. Are you one of those who have tried implementing the standards-checking tools only to have your users revolt because of the constant popups and interruptions? Well, you can still apply your DWS file(s) to your templates and use the batch checker here to run a report without alienating your users.
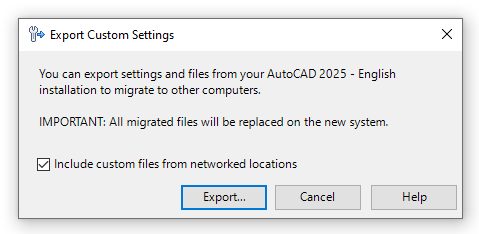
The next two icons allow you to export and import settings and files from the version’s group you’re in (in this case, 2025). You can use the generated zip file to migrate to another computer’s installation as long as they’re the same version. Before you rely on these tools, I suggest you click on the Help button and make a note of what files are included and what files aren’t. You may thank me someday for that hint.
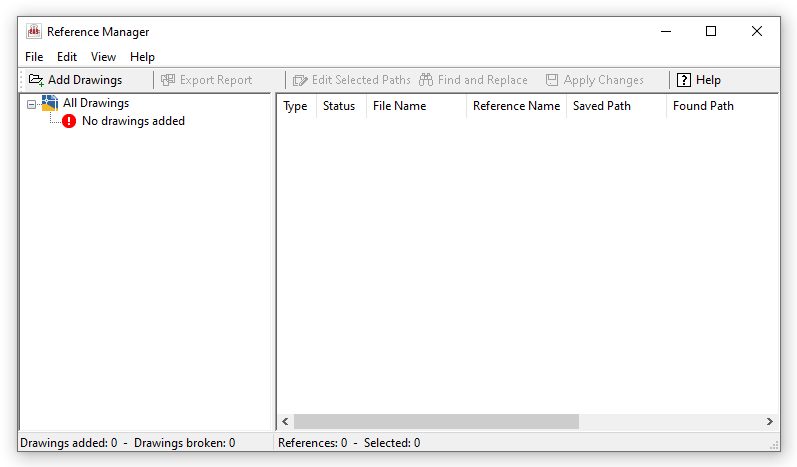
Next is one of my favorites, the Reference Manager. AutoCAD’s pathing management for reference files has improved dramatically in the last few releases. But, as with most things relating to CAD management, the solution usually has to be applied to multiple files at the same time. Enter the Reference Manager. If you’ve ever had to do this, you’re probably already familiar with this powerful tool.
If you decide to try this tool, let me first offer you this caveat: Make a copy of a smaller portion of your project to tinker with. It is extremely powerful, and you can do more harm than good if you don’t know what you’re doing. Again, future-you may thank me someday.
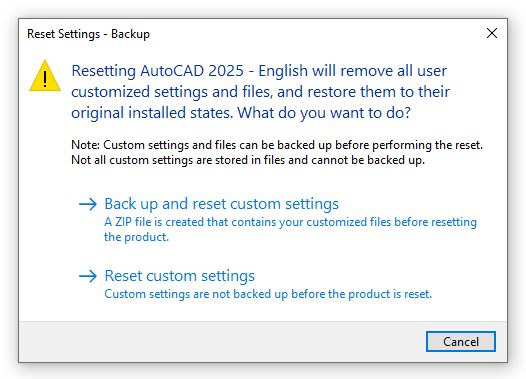
The final tool in this program group can also be quite useful. And guess what? It, too, is very powerful and potentially dangerous. As such, I’d suggest choosing the backup and reset option. It will restore your AutoCAD back to its original, out-of-the-box configuration, so beware.
Wrapping Up
How’s that for a lot of tools that you may not have even known about? Yes, some are dangerously powerful, but as long as you’re careful and you know what you’re doing, that power can help you tremendously.
And now that we’re done, you can change that scorecard to three tips that don’t involve AutoCAD itself.
More Tuesday Tips
Check out our whole Tuesday Tips series for ideas on how to make AutoCAD work for you.