Keep an eye on your furry, feathered or scaly friends when you leave the car.
Rivian
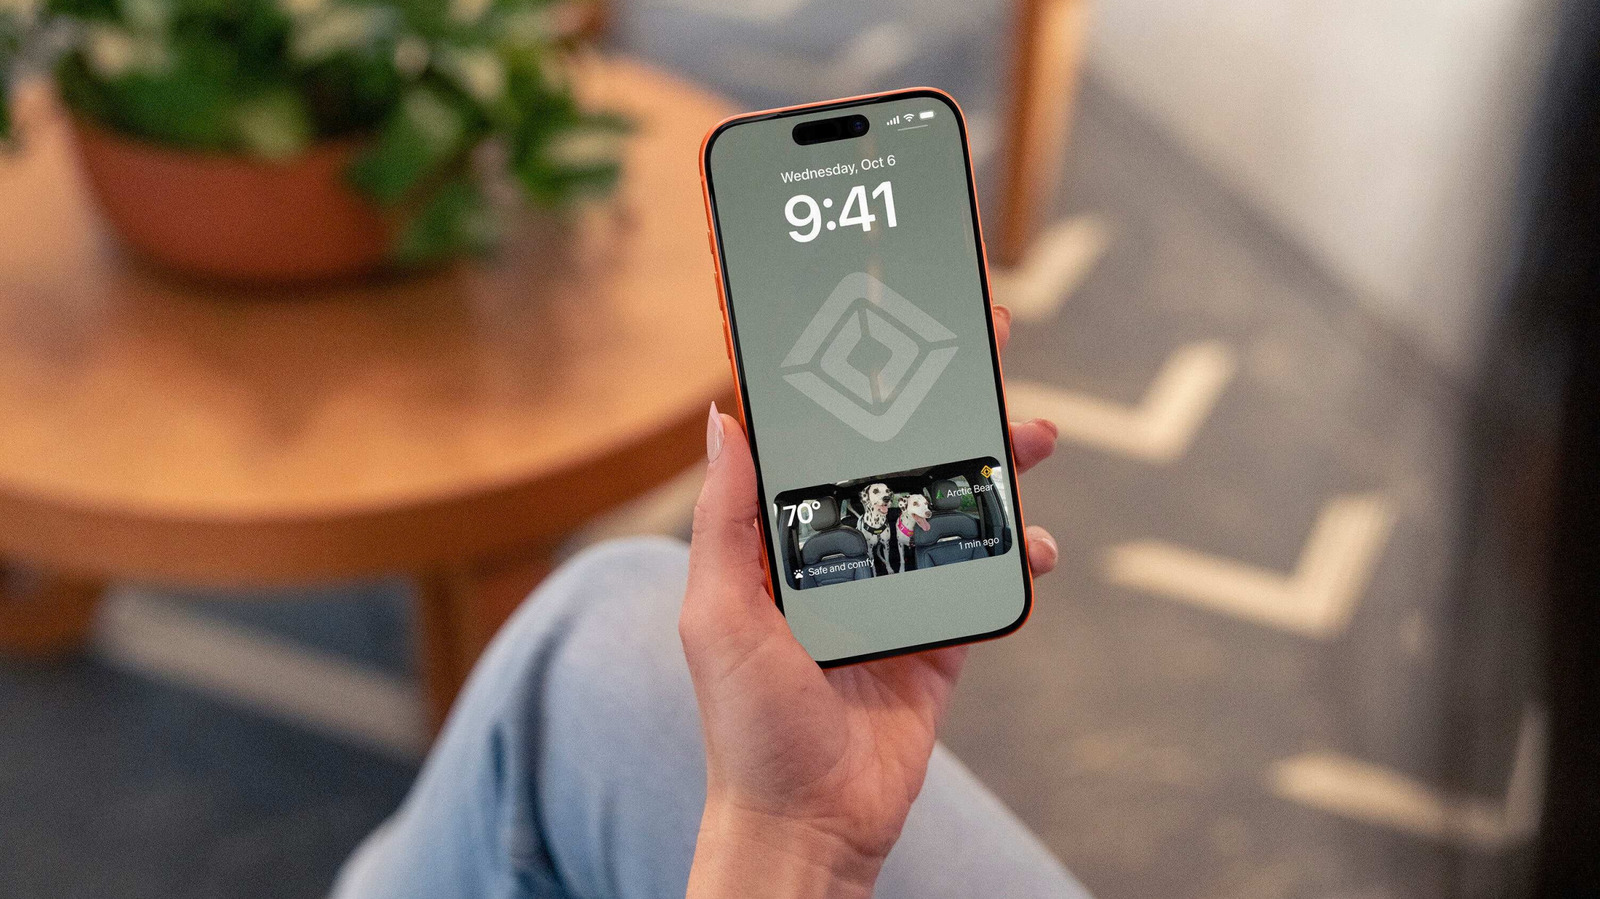
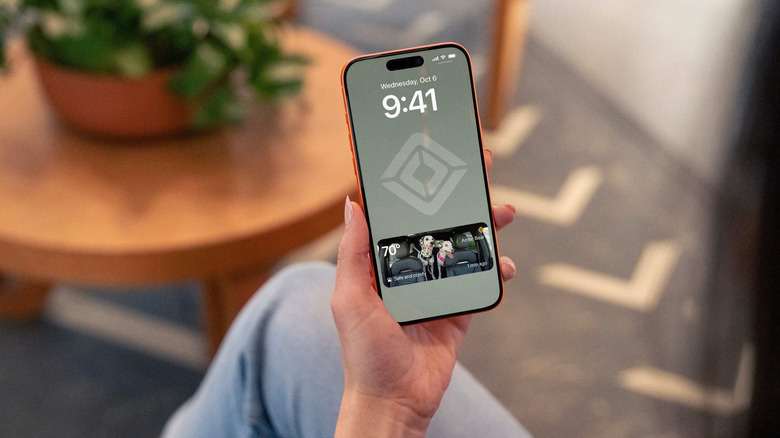
Rivian’s latest software update is one many pet parents will be very pleased to see. Following the latest 2026.36 update, R2 vehicle models will have the option to put a Pet Cam on your phone’s lock screen in case you need to step away from the car while your critter is still inside. This feature leverages the high-definition interior camera in R2 models to show the vehicle’s interior in the Rivian app. You’ll be able to see a full livestream if you don’t want to miss a minute of whatever your pet gets up to, or just see a regularly refreshed snapshot in the app dashboard or on your lock screen for a quick check. The Pet Cam can be stopped with a tap on the vehicle’s main display.
The next software update also has further improvements coming to the Pet Mode that Rivian already made available for animal-friendly climate control when you’re not on board. Now you can enable Pet Mode from the Rivian app, in case you forget to turn it on before leaving the vehicle. There will also be a confirmation prompt when toggling Pet Mode on or off from the app to avoid accidental changes that could put your canine companion, feline friend or awesome avian at risk. These controls will be available in all models from the company.
In non-pet news, R2 vehicles will also be seeing the debut of Rivian Assistant. The AI voice assistant is already available in R1 models, and it can be directed to handle simple tasks around navigation, entertainment and climate in the vehicle.
🔥 The Dark Arisen expansion releases on October 8 or 9 depending on your timezone.
🔥 There is no preload currently available.
🔥 The DLC size is about 25GB.
The Dark Arisen expansion for Dragon’s Dogma 2 releases this week, over two years on from when the base game launched back in 2024.
The DLC arrives on October 8 in the US, but October 9 for the UK, Europe, and the rest of the world. Here’s exactly when you can play:
West Coast US: 5 pm PDT (October 8)
East Coast US: 8 pm EDT (October 8)
UK: 1 am BST (October 9)
Europe: 2 am CEST (October 9)
Australia: 11 am AEST (October 9)
New Zealand: 1 pm NZDT (October 9)
You can see the rest of the release times in the image above. If you’re looking for PlayStation instead, then the game releases at midnight local time on October 9 everywhere except PST, where it releases at 9 pm on October 8. The size of the DLC is 25 GB and you can view its current requirements on the Steam page.
Latest Videos FromPC Gamer
Keep up to date with the most important stories and the best deals, as picked by the PC Gamer team.
Product Packaging design services undergoes a thorough process other than just creating to make it visually appealing. It taps different factors to protect it, improve shipping, and supports customer satisfaction. A good packaging design needs the right materials, accurate and detailed structures, and testing to ensure it works properly. From the developing CAD dielines stage to building detailed prototypes, every step significantly contributes to creating packaging that is not just beautiful, but also strong, practical, and ready for the market.
In this article, we’ll walk you through the complete structural packaging design process, starting from planning, selection of materials, CAD development, testing, and production preparation. We’ll also highlight how packaging engineers and designers, especially the experienced professionals available through Cad Crowd, help businesses in creating effective and market-ready packaging.
Structural packaging is important simply because it serves as the main determinant of how well a certain product is protected, transported, and presented. While graphics mainly focus on the product’s visual appeal, packaging structure takes more into account the influence on product storage efficiency, packaging durability, strength, and manufacturing process. A well-designed package helps in reducing product damage, control material costs, and supports efficiency and manufacturing.
What are the key steps in the structural packaging design workflow?
The structural packaging design process involves multiple stages, which guide a product from the very start until its final production. Each stage plays an essential role in making sure that every packaging delivered is efficient, protective, and suitable for its intended use.
Requirements Planning
Establishes the foundation for packaging decisions based on product needs and shipping conditions.
Format Selection
Determines the most suitable packaging structure for protection, usability, and presentation.
Structural CAD Design
Creates accurate digital packaging designs needed for prototyping and manufacturing.
Material Selection
Ensures the package has the right balance of strength, cost, and performance.
Prototyping and 3D mockups
Allows designers to evaluate fit, function, and appearance before production.
Testing and validation
Confirms that packaging can withstand handling, transportation, and environmental conditions.
Print production handoff
Prepares final files and specifications for efficient manufacturing.
What needs to be considered before designing structural packaging?
Before developing a packaging structure, designers must first keep in mind the importance of careful requirement planning, understand handling conditions, and distribution needs. Planning early helps determine the right level of protection, structural approach, and material needed for the specific package. Factors like size, weight, fragility, and shipping method affect how packaging will be designed and tested.
This stage defines the foundation of the overall process of packaging design. This is where designers start to evaluate the product’s dimension, fragility, mass, and how it will move through the supply chain before finalizing the packaging solution.
Key considerations include:
Product mass and dimension. Products that are larger or heavier require stronger structures and materials that are more durable in order to prevent any potential damage during carrying and transport.
Product fragility. Items that are soft and delicate require additional protection for internal support, cushioning, or reinforced packaging structures.
Retail vs. DTC shipping path. Retail packaging should consider shelf presentation, customer interaction, and stacking. Direct-to-consumer packaging, on the other hand, should handle shipping and delivery conditions.
By identifying these important requirements early, designers can make packaging that meets the standards and balances cost efficiency, protection, and Manufacturing design services practicality before finally moving into the next stage, which is format selection.
How do designers choose the right packaging format?
Choosing the right packaging format is an essential step in the process of structural packaging since different products require different materials and levels of protection, functionality, and presentation. Designers must consider several factors like weight, type, durability, shipping requirements, and customer experience when selecting the most appropriate structure for the product. By applying the right format, designers can ensure that the package performs effectively while also meeting the standard manufacturing and market needs.
Stage 2. Format selection
Format selection stage mainly determines what type of packaging suitable for the specific product and its requirements. Designers evaluate options according to its cost, appearance, protection, and production feasibility.
Common packaging formats:
Folding cartons- It is commonly used for retail products like food, cosmetics, and consumer goods since it is made with lightweight paperboard.
Corrugated packaging- It’s appropriate for heavier products and shipping applications since it provides stronger protection, especially for e-commerce and transportation.
Rigid boxes- It offers quality presentation and durability, which is mostly appropriate for high-value items and luxury products.
Blister packaging- It’s a packaging that uses a transparent plastic cavity with a backing material, which displays and protect small products.
Pouches- It is often used for products that require portability, lightweight, or resealable designs since it is flexible.
Choosing the right packaging format helps in ensuring that the delivery of final design balances its visual appeal, product protection, and cost efficiency.
How are structural CAD and dielines used in packaging design?
After choosing the most suitable packaging format for a specific product, designers then create the structural design services that best defines how the package will be presented and produced. This stage converts concepts into a detailed and precise digital model that manufacturers can use for folding, cutting, and production. It is best to create accurate structural design since it significantly affects the entirety of the package, and we ensure that it fits the product properly and functions accordingly.
Stage 3. Structural CAD design
Structural CAD is used to create accurate packaging layouts, which is also known as dielines, that define the package shape and construction. The digital drawings specifically include flaps, folds, panels, and cutlines that are needed to manufacture the final product package.
Key elements of a packaging dieline include:
Panels. It is the main surface that forms the exterior part of the package.
Flaps. Extensions that are used for securing, closing, or assembling the package.
Cut lines. They indicate where the material will specifically be cut during production.
Crease or fold lines. It marks where the packaging material will be folded and shaped accordingly.
Industry standard software like ArtiosCAD is mostly used for professional packaging structure development. Freelance packaging designers that are experienced in the field are allowed to create production-ready dielines that significantly meet its required manufacturing standards. This way, businesses can smoothly move from concept to production.
How do materials influence structural packaging performance?
Material selection is a very crucial stage in the process of packaging design since the material must be suitable to the product as it affects its protection, strength, appearance, cost, and sustainability. Designers are encouraged to select materials that support product during transportation, shipping, and manufacturing, and satisfy customers’ expectations. With the help of the right material, packaging stays durable and performs effectively throughout the life cycle.
Stage 4. Material selection
In this stage, designers evaluate several materials according to the product’s fragility, weight, usage, and distribution standard requirements. Most of the packaging materials are chosen to properly provide the balance between flexibility, visual quality, and durability.
Common material considerations include:
Paperboard. It is usually measured by GSM or grams per square meter, with higher GSM generally provides greater thickness and strength for retail packaging and folding cartons.
Corrugated board. It uses various flute types like E, V, and BC flutes, which provides different levels of stacking strength, cushioning, and protection.
Coatings and finishes. Different options like gloss, matte, and protective coatings significantly improve packaging’s appearance, durability, and resistance to moisture.
It’s really a must to appropriately select a material design services that’s best for a specific product so it can guarantee quality protection, support manufacturing needs, and deliver customer satisfaction appropriately.
Examples of packaging materials and specifications:
Used for selecting paperboard thickness and strength
Corrugated flute
E-flute
Small retail boxes, electronics, display packaging
Corrugated flute
B-flute
Shipping boxes, retail packaging
Corrugated flute
C-flute
Heavy products, protective shipping cartons
Coating
Matte finish
Luxury packaging, cosmetics, specialty products
Coating
Gloss ifnish
Retail boxes, promotional packaging
Coating
Aqueous coating
Food cartons, product packaging
Coating
Soft touch finish
Premium cosmetics, electronics packaging
Need help in designing production-ready packaging?
Worry no more as Cad Crowd packaging designers can help you in creating detailed die lines, optimized packaging structures, and designs that are equipped for production. Creating effective packaging requires not just structural design knowledge, but also proper CAD expertise and manufacturing understanding, where you can find at Cad Crowd. Through professional CAD services, Cad Crowd teams can guarantee in transforming packaging concepts into a real functional digital model that don’t just meet your standards, but also market requirements.
Why are prototypes and 3D mockups important before production?
Before a package proceeds into the production, designers create accurate prototypes and 3D mock-ups so they can evaluate how the design performs in real-world applications. This stage is very helpful in a way that it verifies if the design is fit and functional, and identifies possible issues that can be corrected before manufacturing. Early validation is very important since it helps reducing costly revisions and improves overall confidence in the production of final design.
These two allow designers, stakeholders, and manufacturers to review the final packaging before mass production. Both virtual and physical models help in confirming that the specific structure meets the standard design and production requirements accordingly.
Common uses of prototypes and 3D mock-ups:
Checking product fit. It ensures that the package is secured enough to hold product with the correct clearances.
Evaluating assembly. It verifies that the package locks, folds, and assembles appropriately.
Reviewing appearance. This allows teams to assess the package’s proportions, structure, and entire presentation.
Gathering feedback. It supports design reviews with manufacturers, clients, and other stakeholders before launching.
Through proper validation, teams can have better time allowance to improve any issues before investing in tooling and large-scale manufacturing design services. In this way, they can save both time and energy while ensuring it fits best to the appropriate product standards and requirements.
To ensure a package can significantly protect a product, it must be tested throughout the process since it needs to handle transportation, storage, and carrying. Validation testing mainly helps in identifying structural weaknesses before leading to production, reducing the potential risk of product damage, costly redesigns, and returns. Industry testing standards are also helpful in verifying that a package meets its standard performance requirements.
Stage 6. Testing and validation
Engineers and designers perform several tests in evaluating how a package will perform in the real-world application despite unpredictable conditions. These tests simulate the stresses a particular package may deal and experience throughout the supply chain.
Common packaging validation tests:
Drop testing. It evaluates how a specific package will protect a product from potential drops and impacts.
Vibration testing. It simulates movement during product transportation to identify possible damage from continued vibrations.
Compression testing. It measures how a specific product packaging will hold against heavy stacking loads during shipping and storage.
Climate cycling. It tests packaging under the unstable temperature and humidity conditions to secure its long-term performance.
A lot of companies follow a recognized testing standards like ASTM D4169 and ISTA in validating packaging for distribution and transportation. By completing these tests, proper packaging is ensured to be reliable, durable, and ready for production.
How does packaging move from design to production?
The final stage of the process of product packaging is a very crucial part as it prepares the overall complete design for manufacturing. After significant testing and validation, designers finalize everything, the packaging structure, specification, and production files, making sure that the package is ready to be manufactured and delivered consistently and accurately. A prepared handoff helps in preventing major errors during cutting, printing, and assembly.
Stage 7. Print production handoff
In this final stage, designers provide manufacturers with all the necessary files and specifications required in producing the final packaging. In this stage, CAD design experts connects with the large-scale manufacturing.
Key elements of the production handoff:
Final dielines. It provides the detailed folding, cutting, and assembly instructions that serve as a reference for the manufacturers.
Artwork files. It includes all the branding elements, graphics, and print-ready designs.
Material specifications. It defines the selected kind of paperboard, coatings, corrugated type, and finishes to avoid mistakes in attaching everything together.
Production guidelines. It provides the entire details about the printing methods, quality expectations, and assembly requirements.
Providing detailed and complete production handoff ensures that the packaging design can be manufactured efficiently while also maintaining its intended structure, performance, and appearance.
What common packaging design mistakes should be avoided?
Loose panel fit
Weak structure and poor assembly
Weak crease geometry
Folding issues and reduced strength
Complicated locking
Difficult production and usability
Oversized boxes
Higher material and shipping costs
Dimensional weight shipping
Increased transportation expenses
Poor material selection
Reduced protection and durability
Loose panel fit: why is structural accuracy important?
Loose panel fit usually happens when packaging components do not properly align because of dimension inaccuracy or poor planning of packaging structure. These can possibly result in gaps, unstable package, and weak connections that negatively affects both the appearance and the protection of the product.
One effective thing to do to avoid this is by using accurate CAD design process and creating detailed prototypes before production, since it ensures that every panel fit correctly and the final product package would perform properly as intended.
Weak crease geometry: how folding design affects packaging strength?
Weak crease geometry mostly happens when fold lines are not appropriately designed based on the thickness of the material and packaging structure. Incorrect placement of crease or excessive stress on folding points can lead to uneven folds, cracking, or weakened areas that mainly affects the package’s appearance and durability.
One thing designers must do is analyze folding behavior during the CAD stage and testing prototypes before finalizing into production. Suitable materials, manufacturing-friendly designs, and proper crease placement help best in creating clean folds while also maintaining its structural strength.
Complicated locking: why should packaging closures be simple?
Complicated locking on product packaging mostly happens when its design prioritizes security without taking into consideration the user’s experience. Overly complicated closures really increase production time, make the assembly more difficult, and create confusion for customers when opening the package.
What’s best to do is to develop locking systems that are not just secure but also simple to manufacture and use. Designers should evaluate several closure methods of prototypes in finding a balance between efficiency, protection, and ease of use.
Oversized boxes: why can excess packaging be a problem?
Over-packaging happens when the package design is significantly larger than the product it is designed to hold. This kind of mistake leads to wasted materials, inefficient storage, and increased shipping costs. Through this excess space, the product may also shift during handling, which increases the risk of damage.
What designers do to avoid this kind of mistake is develop packaging that relatively matches the product’s size and shape. Using structural design services and proper cushioning, they can invent a more efficient package that balances sustainability, protection, and cost-effectiveness.
Dimensional weight issues: why does package size affect shipping costs?
Dimensional weight issues mostly happen when a certain package takes up more shipping space than it requires. A lot of carriers calculate shipping fees based on its package volume, which means oversized designs may result in higher transportation costs even when it’s a lightweight product.
To help reduce these costs, designers must consider shipping requirements during the early packaging process by optimizing package dimensions, ensuring no unnecessary space, and choosing efficient structures, which helps improve shipping performance and lower their transportation expenses.
Poor material selection: why is choosing the right material important?
Poor material choice occurs when packaging materials do not appropriately match the product’s fragility, environment, weight, or shipping conditions. When the materials being used are too weak, it can possibly lead to product damage, while overly strong materials can also increase their costs and waste.
The most effective solution for this kind of problem is to properly evaluate material performance before proceeding to the product development services, and consider its cost, durability, strength, and sustainability. Selecting the right corrugated board, paper board, coatings, or other materials ensures the reliability of the packaging as it meets standard business requirements.
Are you now ready to turn your packaging ideas into reality?
Successful packaging goes beyond creativity; it requires a significant combination of expertise and a thorough process of planning. Here at Cad Crowd, we connect you with experienced packaging designers who are experts inrealistic 3D rendering design services, accurate dielines, and structural CAD.
Don’t waste your time; bring your packaging vision to life with the help of the right expert design support.
Frequently asked questions
What is a packaging dieline?
It is a technical layout showing cut lines, crease lines, and folding areas, which are significantly needed in product manufacturing.
What is the difference between graphic and structural packaging design?
It differs in a way that graphic design is more focused on designing visual elements like branding and artwork, while structural design, on the other hand, focuses on the package’s construction, functionality, and strength.
How does structural packaging reduce product damage?
By using proper materials, dimensions, and protective features to ensure products handle handling, transportation, and storage conditions.
Can structural packaging design help reduce costs?
Yes, it can. Designing packaging structures can reduce material waste, optimize shipping space, and improve manufacturing processes, helping lower overall costs.
Product packaging design is not just about creating a container for a specific product. It involves careful planning, engineering, and testing to successfully develop solutions that both protect and support the product. With the help of structural CAD, designers can create accurate and detailed packaging models, and selecting appropriate materials ensures its durability, strength, and cost efficiency. Through testing, package performance is guaranteed before production, leading to fewer risks during handling and shipping. With the support of experienced and professional packaging designers, businesses can deliver functional and market-ready packaging solutions. That is why it is very important to partner with the right CAD professionals like Cad Crowd, who help in transforming packaging ideas into realistic and reliable designs that are thoroughly created for real-world manufacturing.
How Cad Crowd can help
Cad Crowd connects businesses with experienced packaging designers and CAD professionals who specialize in structural packaging, production-ready dielines, material selection, prototyping, and manufacturing support. Our experts help create durable, cost-effective packaging that is optimized for production, shipping, and real-world performance. Contact Cad Crowd today for a free quote and bring your packaging design to market with confidence.
MacKenzie Brown is the founder and CEO of Cad Crowd. With over 18 years of experience in launching and scaling platforms specializing in CAD services, product design, manufacturing, hardware, and software development, MacKenzie is a recognized authority in the engineering industry. Under his leadership, Cad Crowd serves esteemed clients like NASA, JPL, the U.S. Navy, and Fortune 500 companies, empowering innovators with access to high-quality design and engineering talent.
It took a while for controllers to work as well as they do today without cables.
Thank You For Your Assistant/Getty Images
If you’ve been a gamer for a while, you might know that wireless controllers have been used as far back as the 1980s. Those who grew up in the PS2/Xbox/GameCube era likely have a different gamepad in mind when they think of early wireless controllers. While wireless pads were tried in various iterations over the decades, they were only perfected within the last few console generations.
The history of non-wired controllers is fascinating. Here’s the story of how your current console has unleashed you from the couch.
When did controllers first become wireless?
Mikkelwilliam/Getty Images
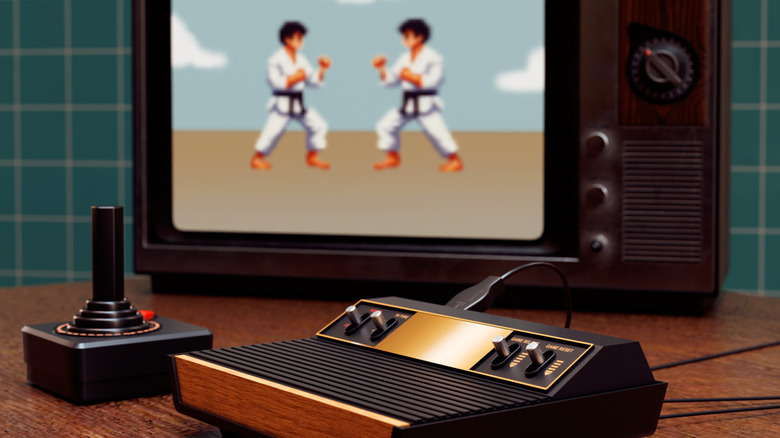
As a 41-year-old, I’m slightly relieved that the first wireless gaming controller is older than me: enter the Cynex Game Mate 2. Released around 1982, this is an Atari 2600 peripheral widely regarded as the first wireless console-compatible gamepad. It was the debut of an evolving, genre-defying tech, albeit one that wouldn’t be fully realized for some time to come.
The Game Mate 2 used radio frequencies. By embracing RF technology, this pioneering pad gave gamers more freedom than lesser IR alternatives that would launch later in the decade. Unlike the Acclaim Remote Controller that launched for the NES in 1989, you didn’t need to point the Game Mate 2 directly at your Atari 2600 for its signal to be recognized.
Whereas early infrared pads could easily lose signal if any objects came between their sensors and the receiver on the console (much like IR TV remotes), the more flexible Game Mate wasn’t bound by these restrictions. Indeed, that early RF tech worked well enough that it reportedly boasted a range of up to 20 feet.
While these were ahead of their time, they weren’t perfect. They were weighty and clunky, being essentially a standard 2600 controller on top of a heavy base. They also drained the required 9V battery quickly. Once Atari took over distribution a year after this peripheral launched, it was rebranded as the CX42 Remote Control Wireless Joystick. Catchy, right?
What was the first mainstream wireless controller?
Lightspruch/Shutterstock
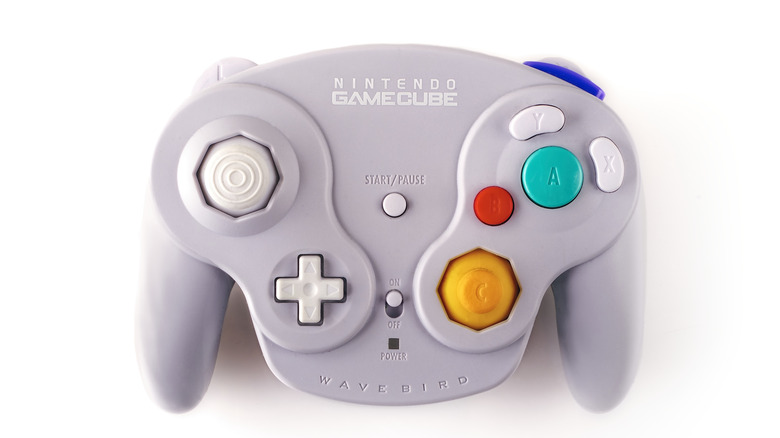
The GameCube’s mini discs weren’t the only notable part of the console’s legacy. The WaveBird wireless controller arrived in 2002 and was the first mainstream wireless pad that wasn’t weighed down by tons of compromises. I have vivid memories of waiting in line on a semi-balmy May evening in my native Edinburgh back in 2002 to pick up the Big N’s wondrous purple box, then buying the little console’s wireless controller around Christmas that same year.
And what a bulky but beloved brute it was; the WaveBird was anything but subtle. Adding serious girth to the GameCube’s standard controller, it came with an equally chunky receiver to plug into the sixth-gen console and required you to match a channel with sliders on each. If you have any affection for the best of the GameCube’s library, there’s a good chance you played some titles with a WaveBird.
Using radio 2.4G frequency tech for the first time in a controller, the WaveBird had a range of around 20 feet at minimum. It’s hard to explain what a big deal it was to have a gamepad that untethered you from a console. No longer did you have to precariously perch within six feet of your beloved gaming box. Instead, you could lean back or even move around the room, which was great for multiplayer sessions so everyone didn’t have to crowd onto the same couch.
To maximize battery life, the WaveBird didn’t have rumble support, but it ran for up to 100 hours on a pair of AA batteries. The freedom it gave you in controlling games paved the way for future gamepads, leading to all the fabulous wireless controllers from Sony, Microsoft and others that have launched over the last quarter-century.
Which PlayStation had the first wireless controller?
Dion Chandra/Shutterstock
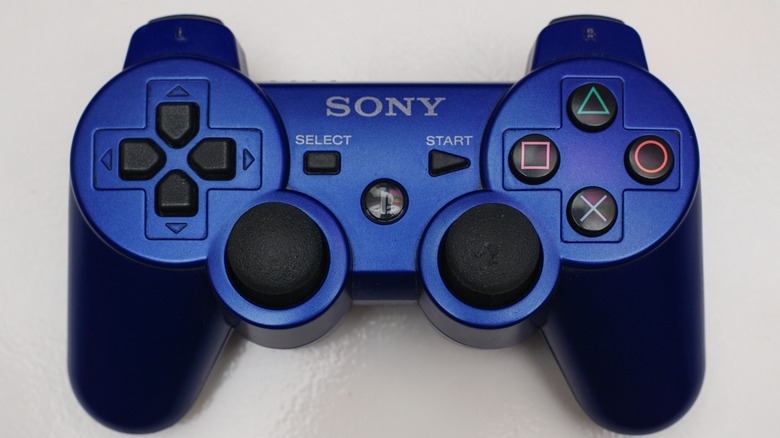
Before learning this history, you might have thought that the first wireless gaming controller was a PlayStation product. That’s understandable, since Sony has (mostly) dominated the console market since the PS1 arrived stateside back in 1995. As it turns out, Sony’s debut wireless peripheral wasn’t introduced until the PS3 era. With the benefit of hindsight, we can say it was a bit of a stinker.
The Sixaxis is perhaps the most infamous Sony controller of all time, minus the banana-shaped “Boomerang” prototype PS3 gamepad that never saw the light of day. As the initial controller model for the PS3, the Sixaxis dropped rumble for half-baked, early, never-fully-realized motion controls.
Not long after the Sixaxis debuted in 2006, Phil Harrison said Sony didn’t incorporate rumble into Sixaxis not because of a lawsuit over patent rights, but because it was a “last-generation feature.” That was a pretty bold (fairly craven) statement, considering Phil was the President of Sony Computer Entertainment Worldwide Studios at the time.
Although PS3 launch title Resistance: Fall of Man was among the first games to support Sixaxis features, it was really the dragon-riding Lair that came to define the controller. It was widely panned for its semi-botched motion controls, and folks made it clear that the lack of rumble was unacceptable. Sony quickly saw sense, and soon enough, titles like 2007’s Ratchet & Clank Future: Tools of Destruction would embrace the palm-shaking possibilities of the DualShock 3 after its 2008 release.
Google has started rolling out a new update for the Pixel Buds that brings several new features, and at the same time, the company has slashed $60 off the Pixel Buds Pro 2’s price.
Last month, Google started rolling out a feature for Pixel Buds that lets users control their earbuds’ settings just by asking Gemini. While you could already ask Gemini to do things like change the volume, the new integration goes much deeper, letting you adjust the EQ, enable or disable ANC, and change other Pixel Buds settings using your voice.
Alongside that, Google has now started rolling out another sizable update for the Pixel Buds Pro, Pixel Buds Pro 2, and Pixel Buds 2a. One of the biggest additions for the Pixel Buds Pro 2 is Dynamic Active Noise Cancellation.
Google previously explained that Dynamic ANC automatically adjusts the noise cancellation based on the seal of the earbuds in your ears. So, if the Pixel Buds move slightly and the seal changes, the earbuds can automatically compensate and adjust the ANC accordingly. That feature is now starting to become available on the Pixel Buds Pro 2.
✅ Recommended if: You use a Pixel phone, want strong ANC and Gemini integration, like Google’s latest Pixel Buds features, or want premium wireless earbuds for under $200.
❌ Skip this deal if: You don’t use Android, want the absolute best battery life, or don’t care about Pixel-exclusive features and ecosystem integration.
Google has also added a new tap-to-mute and unmute gesture for calls. So, if you’re in an online meeting or taking a phone call, you can simply tap the surface of your Pixel Buds to quickly mute or unmute your microphone.
The Pixel Buds can now automatically pause media playback when you fall asleep as well. This feature requires a paired Pixel Watch to detect when you’ve fallen asleep, after which your earbuds can pause playback, disable touch gestures, and silence notifications.
(Image credit: Andrew Myrick / Android Central)
Enhanced Live Translate is also starting to roll out. You can now leave your phone in your pocket and start translating using a gesture on the earbuds. Google says the Pixel Buds now work more seamlessly with the Google Translate app to make on-the-go translations easier.
To get these features, make sure you’re running the latest version of the Pixel Buds app and look for firmware version release_6.144. You can also manually check for the update by heading to More Settings > Firmware > Check for updates.
And if you’ve been thinking about buying the Pixel Buds Pro 2, this might be a particularly good time. Thanks to the ongoing Amazon sale, the Pixel Buds Pro 2 are currently $60 off, dropping from their usual $230 price to just $170.
So, not only are you getting them for considerably less right now, but Google has also made the Pixel Buds Pro 2 noticeably more capable with the latest software update.
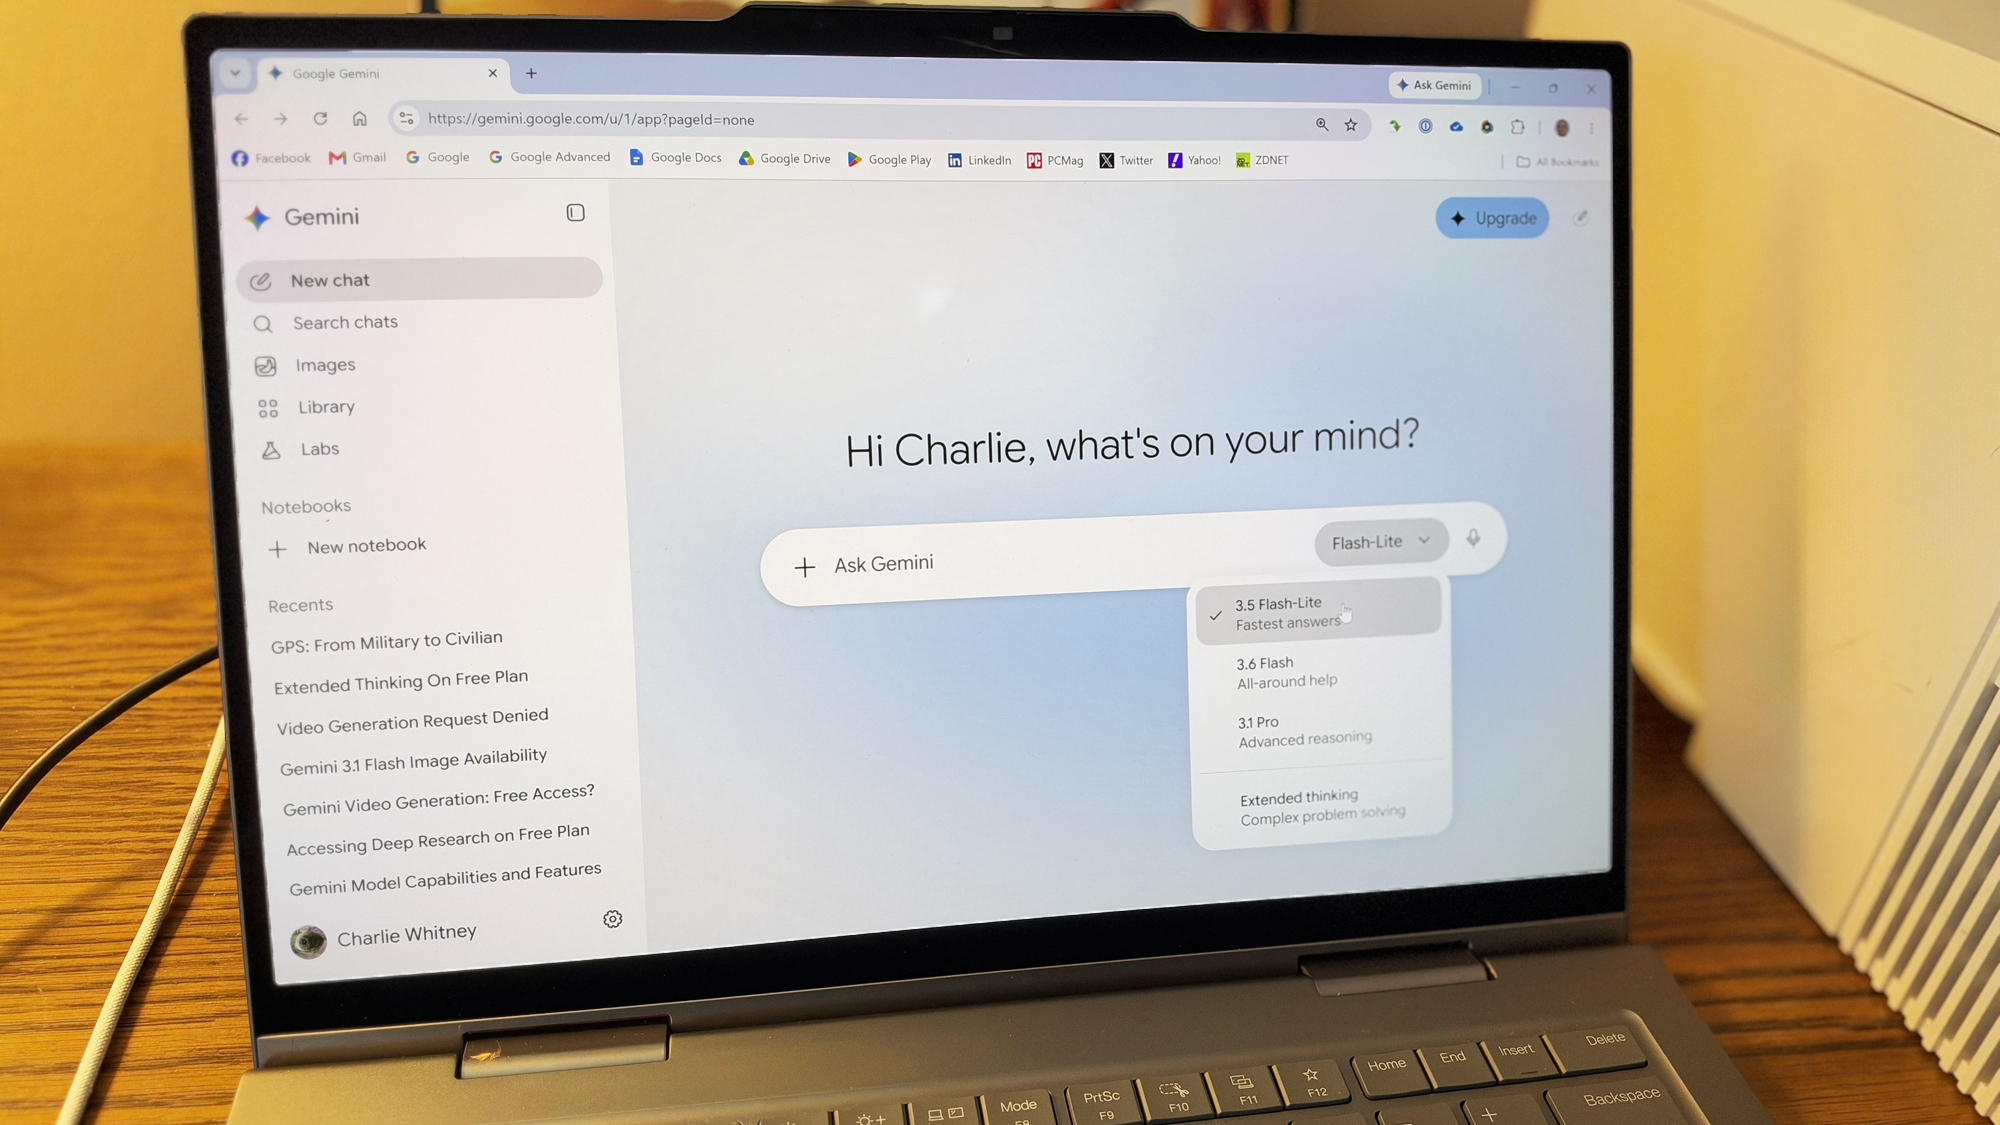
Google is limiting the AI models that free users can access.
Only the Flash-Lite model will be accessible to free users.
AI Plus subscribers will also lose the Pro model.
Those of you who use Google’s Gemini app or website for free will soon be able to use only one AI model for your queries and conversations. And it’s the weakest of the bunch.
In a new support document, Google revealed that free users will lose access to the Flash and Pro models starting Friday, Oct. 9. Anyone without a paid Google AI plan will be stuck with only the lowest-tier and least robust Flash-Lite model.
And there’s more bad news. People who subscribe to the cheapest Google AI paid plan, namely the $5-per-month AI Plus option, will lose access to the Pro model on the same date, leaving them with only the Flash and Flash-Lite variants.
The one bright spot here is reserved for users of the $20-per-month AI Pro plan. If you subscribe to this one, you’ll gain access to the Deep Think reasoning mode, which is currently reserved only for AI Ultra users who shell out $100 or $200 a month for the privilege.
In a nutshell, a free user who needs Flash would have to pay for an AI Plus subscription. An AI Plus user who needs the Pro model will have to jump to a Pro plan.
How these changes affect your AI use
Why is all of this important, and how does it affect your use of Google AI in the real world? The answer depends not only on how frequently you use the Gemini app and website but for what purposes.
You can use Gemini via four, or actually five, different plans or methods, each with greater access and more features. First up, you’re able to use it for free without any type of paid subscription. Next, the AI Plus plan is a budget-friendly paid option. The AI Pro subscription is a beefier plan for people with more demanding requirements. And the two AI Ultra plans are the cream of the crop.
Flash is designed as a generalist, capable of handling most common AI tasks, such as providing information, summarizing files, generating and analyzing images, and chatting.
Flash-Lite is a faster but slightly less capable version, able to handle repetitive tasks but not adept at deeper knowledge and reasoning.
Pro is the most analytical of the three, solving more difficult and challenging problems, especially those focused on such areas as math, logic, and coding.
With the least expensive paid plans, Flash is typically the default and go-to model. When I use Gemini with my AI Pro account, Flash is the model that’s automatically chosen. For me, that’s perfectly fine for 90% of the tasks I run.
Free users typically see Flash-Lite as the default since their access to the other two models is limited. The Lite flavor should suffice for most general tasks but not for any type of deep reasoning or complex problem solving, potentially putting many free users in a bind.
To make things just a bit more complicated, Google says each model will now allow you to choose an error level among low, medium, and high. The higher the level, the greater the model’s ability to complete tasks and provide more thorough responses to your questions. However, higher levels will also chew up more of your limits.
Speaking of limits, Google does restrict how — and how much — you can use Gemini. But instead of doling out access based on a specific number of requests or conversations, the company uses a compute-based limit that will now refresh every five hours until you reach your weekly quota. This means that your limits are based on the complexity of your prompt, the features you use, and the length of your chat.
Paid users naturally have higher limits than those without a subscription. Plus, premium models and tasks eat into your limits more and may cause you to hit your quota faster. Asking Gemini to generate an image or video, use Deep Research or Deep Think, and tap into the Pro model will use up your limits more quickly than everyday chats and requests.
If you’re confused and frustrated by all these changes and conditions, you’re not alone. The more we demand of AI, the more that companies like Google curb or control our access, thus adding more complexity to the whole process.
The main bright spot here is that Google AI subscriptions are doled out on a monthly basis. So you can stick with free access or one of the paid plans and switch month-by-month if you find yourself too limited by your current level.
Lance Whitney is a technology journalist with an IT background. He’s written for TechRepublic, PCMag, Macworld, and Time, among others, He also teaches classes in AI, cybersecurity, and social media.
See full bio
Whether you’re revving your Lancer for the very first time or returning to the battlefield after years away, the Gears of War timeline can get a bit chaotic. Between mainline entries, tactical spin-offs, and prequel campaigns, keeping track of the COG, the Locust Horde, and the Swarm isn’t easy.
With the launch of Gears of War: E-Day taking us back to where the nightmare began, there has never been a better time to experience Sera’s tragic history in true chronological order.
Here is your ultimate canonical story guide to playing every Gears of War game from E-Day to the modern era.
The Complete Chronological Game Lineup
1. Gears of War: E-Day
Timeline Setting: Year 0 (Emergence Day)
Main Protagonists: Marcus Fenix & Dominic Santiago
The canonical starting point for the entire saga. Set 14 years before the original 2006 title, E-Day follows young Marcus Fenix and Dominic Santiago as the monstrous Locust Horde erupts from underground to destroy humanity. It delivers a darker, horror-driven look at first contact.
2. Gears of War: Judgment
Timeline Setting: 6 Weeks Post-E-Day
Main Protagonist: Damon Baird
Set in the immediate, chaotic aftermath of Emergence Day. Damon Baird and Augustus “Cole Train” Cole lead Kilo Squad through Halvo Bay in a military court-martial trial, fighting off the early Locust invasion without orders.
3. Gears Tactics
Timeline Setting: 2 Years Post-E-Day
Main Protagonist: Gabe Diaz
A turn-based tactical strategy game following Gabe Diaz (father of Gears 5 protagonist Kait Diaz). Set 12 years before Gears 1, Gabe hunts down Ukkon, the mad Locust scientist responsible for creating bio-weapons like the Brumak.
4. Gears of War (or Ultimate Edition/Reloaded)
Timeline Setting: 14 Years Post-E-Day
Main Protagonist: Marcus Fenix
The original legend. Marcus Fenix is busted out of the Jacinto Maximum Security Prison by Dom Santiago. Delta Squad forms to deploy the Lightmass Bomb deep into the subterranean Locust Hollows.
5. Gears of War 2
Timeline Setting: 15 Years Post-E-Day
Main Protagonist: Marcus Fenix
Humanity makes its last stand at Jacinto. Delta Squad takes the fight directly underground into the Hollow. This entry introduces the Lambent menace, the tragic fate of Maria Santiago, and the sinking of Jacinto.
6. Gears of War 3
Timeline Setting: 17 Years Post-E-Day
Main Protagonist: Marcus Fenix
The epic conclusion to the original Marcus Fenix trilogy. With the COG disbanded and humanity living as “Stranded,” Delta Squad makes one final push to destroy both the Locust and the mutated Lambent once and for all.
7. Gears of War 4
Timeline Setting: 42 Years Post-E-Day
Main Protagonist: JD Fenix
Set 25 years after the end of Gears 3. The focus shifts to Marcus’s son, JD Fenix, alongside Kait Diaz and Del Walker. A new bio-technological threat called the Swarm emerges from the ashes of the old war.
8. Gears 5
Timeline Setting: 43 Years Post-E-Day
Main Protagonist: Kait Diaz
Kait Diaz takes center stage as she uncovers her mysterious connection to the Swarm and the dark origins of the Locust Horde itself. Features expansive open-world zones and high-stakes campaign choices.
Story Breakdown: The Three Eras of Sera
The Locust War Begins (E-Day, Judgment, Tactics)
The war didn’t start with military tactics; it started with utter terror. Gears of War: E-Day sets the stage by showing humanity completely unawares as subterranean horrors burst through the soil. Following E-Day, Judgment shows the Coalition of Ordered Governments (COG) desperately trying to organize a military response, while Gears Tactics pulls back to show the intelligence side of humanity’s fight for survival against Locust geneticists.
The Original Trilogy (Gears 1, Gears 2, Gears 3)
This is the core Marcus Fenix saga. Over three games, Delta Squad goes from desperate survival ops (Lightmass Bomb in Gears 1), to a suicidal counter-offensive underground (Gears 2), to a bitter last stand on a dying world (Gears 3). It is a story of brotherhood, grief, and brutal sacrifice.
The Swarm Era (Gears 4, Gears 5)
Two decades of peace come crashing down when the dead bodies of the Locust evolve into the Swarm. Passing the torch to a new generation, these chapters explore the lingering secrets of the COG state and the true ancestry of the Locust Queen.
PC players hoping to find a way to play GTA 6 when it launches on consoles next month must be feeling pretty disappointed, as Microsoft has clarified that Grand Theft Auto 6 will not be available to stream to PC via Xbox Cloud Gaming. The news comes after an earlier report claimed Xbox had secured exclusive streaming rights to Rockstar’s highly anticipated game.
The clarification came from Xbox chief strategy officer Matthew Ball, who addressed The Verge‘s report. Ball said the excitement surrounding GTA 6 and Xbox had resulted in some inaccurate reporting.
His full statement read, “While the excitement for GTAVI and XBOX is great to see, it has also led to some misreporting. We are looking forward to launching GTAVI on Xbox November 19, though the game will not be streaming exclusively or to PC.”
That means, sadly for PC players, that you shouldn’t expect to fire up Xbox Cloud Gaming on November 19 and find yourself wandering around Vice City without a console.
While the excitement for GTAVI and XBOX is great to see, it has also led to some misreporting. We are looking forward to launching GTAVI on XBOX November 19, though the game will not be streaming exclusively or to PC.
The original report from The Verge claimed that Microsoft had secured exclusive game-streaming rights for GTA 6, citing sources familiar with the company’s plans. The report followed comments from Xbox CEO Asha Sharma, who apparently told employees that Microsoft was preparing to do something with GTA 6 that “no other platform holder is doing.”
The report suggested the arrangement could have been significant for PC players, who as of yet, don’t know when they’ll be able to get their hands on the game.
Rockstar has yet to announce a PC version of GTA 6, with the game officially confirmed for PlayStation 5 and Xbox Series X|S. A streaming arrangement could have offered PC players a way to play the game at launch without waiting for the GTA 6 PC release date.
The confusion arrives at a pretty interesting time for Xbox Cloud Gaming. Microsoft is making significant changes to the service in November, including introducing a pay-as-you-go option and changing the amount of cloud gaming time available across Game Pass tiers.
Since 2023, Apple’s newer iPhones have had an 80 percent charge limit for those who want to extend battery lifespan. Charging to 80 percent instead of 100 percent is supposed to put less stress on the battery, improving longevity.
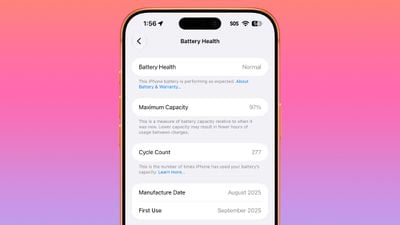
After 12 months at an 80 percent maximum charge, my iPhone 17 Pro Max is at 97 percent maximum capacity with a cycle count of 277.
Last year, my iPhone 16 Pro Max was at 94 percent capacity after 12 months, and in 2024, my iPhone 15 Pro Max was also at 94 percent capacity.
During the year I tested the iPhone 16 Pro Max, I tried not to let the battery dip below 20 percent. This year, I did the same thing, but I also tried to do more charging over USB-C than Qi2 or MagSafe. I’m not sure if that helped, but 97 percent capacity is the best result I’ve had yet with the charge limit turned on.
I don’t know how my battery result compares to others, but if you’ve kept yours at 100 percent, you can compare your capacity to mine to see if there’s any real difference.
Apple transitioned to aluminum and added vapor chamber cooling with the iPhone 17 Pro Max, and I did think my iPhone spent less time uncomfortably warm than the iPhone 16 Pro Max. It may be that the vapor chamber cooling made the biggest difference and limiting wireless charging didn’t matter.
I don’t use the iPhone 15 Pro Max or the iPhone 16 Pro Max as my main iPhones anymore, but I do use them daily as test devices. They still have the 80 percent limit turned on, so I can share some longer-term battery results.
iPhone 15 Pro Max (36 months) – 88%, 369 cycles
iPhone 16 Pro Max (24 months) – 93%, 343 cycles
iPhone 17 Pro Max (12 months) – 97%, 277 cycles
Last year, my iPhone 16 Pro Max hit 299 cycles by September 24. This year, I’m only at 277 cycles. It’s nearly two weeks later than I usually report results too, so the larger battery meant less charging.
The iPhone 17 Pro Max has a bigger battery and faster charging than the iPhone 16 Pro Max, so an 80 percent charge limit wasn’t as difficult to live with as it was in the past. I rarely ran out of battery, though I did still bring a battery pack with me most places. My favorite battery packs right now are the ones with built-in USB-C cables, especially those that can attach to my iPhone magnetically but charge it over USB-C. It’s faster charging that’s still convenient. I also continue to be a fan of the super-slim battery packs that add little bulk and weight to an iPhone.
For the iPhone 15 Pro Max and iPhone 16 Pro Max, I didn’t think sacrificing a fifth of my battery was worth the capacity I ended up with, and that’s still mostly the case. I’m guessing my 97 percent capacity isn’t too far off from the battery health readings on iPhones that didn’t have the charge limit turned on.
As for older devices, my two-year-old iPhone 16 Pro Max only lost 1 percent capacity from 2025 to 2026, and my iPhone 15 Pro Max didn’t lose any capacity at all during the year. Both phones had fewer battery cycles (44 and 17, respectively), but they’re holding capacity even after sitting dead for short periods of time throughout the year.
The most hands-off way to manage battery health is to use Optimized Battery Charging, since it minimizes time spent at 100 percent battery while still charging to full. Setting an 80 percent limit and then turning it off on days you need 100 percent is also a good compromise that could save you battery capacity over time. Apple has 90 and 95 percent options too, which might be a better choice.
My iPhone 18 Pro Max is already set to 80 percent, so I’ll check in again in September 2027. I’m going to stick with USB-C charging when I can, and I’m curious how the even bigger battery will affect longevity and what the 80 percent limit is like day to day.
What’s your iPhone battery capacity and cycle count? Share it in the comments below and weigh in on whether you think battery charge limits are worthwhile.