Before You Use AI, Run This Cost-Saving Audit For Your Franchise


There is a lot of talk right now about AI.

Every franchisor, multi-location brand, and business owner is hearing some version of the same thing:

“You should be using AI.”

But that is not the real question.

The real question is:

Where should AI start?

Because AI can help in a lot of places. It can help with reporting, marketing, customer support, operations, finance, admin work, and many other parts of the business.

But if you start in the wrong place, it becomes just another tool, another experiment, or another project that does not really move the business forward.

That is why I like starting with a simple audit.

Not a technical audit.

Not a complicated AI strategy session.

Just a practical business audit that helps you see where manual work, slow reporting, repeated tasks, and inconsistent execution are costing you time and money.

I call this the AI Cost-Saving Audit.

It is built for franchisors, multi-location brands, and location-based businesses.

The goal is simple:

Find the first few areas where AI can actually help reduce cost, save time, and improve execution across locations.

How the Audit Works

The audit looks at five business areas:

  1. Reporting & Visibility
  2. Marketing & Local Execution
  3. Operations & Admin
  4. Finance & Control
  5. Cross-Location Consistency

Each area has five questions.

how it works

For each question, you score your business from 0 to 2.

0 means this is not an issue.

1 means this is sometimes an issue.

2 means this is a clear issue.

Each section gives you a score out of 10.

The scoring guide is simple:

0 to 3 means it is probably not urgent.

4 to 6 means it is worth reviewing.

7 to 10 means there may be a strong AI opportunity.

The important part is to answer honestly.

Do not answer based on how you want your business to work.

Answer based on how your business works today.

If reporting is still manual, mark it.

If your team is chasing locations for updates, mark it.

If your marketing team is still manually adapting everything for each location, mark it.

This audit only works if you are honest about where the friction is.

Area 1: Reporting & Visibility

The first area is reporting and visibility.

For many franchise and multi-location businesses, this is one of the biggest hidden problems.

On paper, the business may have systems.

There may be a POS system, CRM, marketing tools, spreadsheets, review platforms, finance reports, and dashboards.

But when HQ needs a clear view across all locations, someone still has to pull data from different places and stitch it together.

Reporting & Visibility

So ask yourself:

Are managers or HQ still pulling reports manually from multiple systems?

Does it take more than one day to get a usable roll-up view across locations?

Are location issues usually spotted only after the damage is already visible in the results?

Do different teams use different versions of the same numbers?

Is benchmarking locations still more manual than it should be?

This is where AI can be very useful.

For example, if your team is spending hours every week pulling reports, cleaning spreadsheets, and summarizing what happened across locations, there may be an AI opportunity.

AI could help create reporting summaries, flag exceptions, show which locations need attention, or help leadership get a faster view of what is happening.

The goal is not always to replace your dashboard.

Sometimes the opportunity is simply helping your team understand the dashboard faster.

Area 2: Marketing & Local Execution

The second area is marketing and local execution.

This is a big one for franchise and multi-location brands because marketing is not just one campaign.

You may have a national campaign, but every location has its own local market, local reviews, local SEO, local offers, local events, and local customer behavior.

Marketing & Local Execution

So ask yourself:

Is local marketing inconsistent across locations?

Does your team spend too much time adapting content for each location?

Is marketing spend hard to connect to location-level outcomes?

Are reviews, local SEO, or local campaign responses too slow or too manual?

Does the brand team become a bottleneck when supporting many locations?

A simple example:

Your brand team creates one campaign.

Now that campaign needs to be adapted for 20, 50, or 100 locations.

The copy may need to change.

The offer may need to change.

The city name may need to change.

The local angle may need to change.

That type of work can become very manual very quickly.

AI can help here if the process is repeated and the brand guidelines are clear.

It can help create first drafts, local variations, review responses, campaign summaries, or local SEO updates.

The key is that a human still reviews and approves. AI does the first pass. Your team keeps control.

Area 3: Operations & Admin

The third area is operations and admin.

This is where a lot of hidden cost sits.

Most businesses do not lose time only on big strategic work.

They lose time on repeated small things.

The same questions.

The same follow-ups.

The same checklists.

The same weekly admin tasks.

The same “where do I find this?” messages from locations.

Operations & Admin

So ask yourself:

Do store or location teams repeat the same admin tasks every week?

Do support questions from locations consume too much HQ time?

Are SOPs, checklists, or internal answers hard to find quickly?

Do routine workflows depend too much on one experienced person?

Are delays caused more by follow-up and coordination than by the actual work?

This is one of the most practical areas for AI.

For example, maybe your location teams keep asking HQ the same questions:

Where is the SOP for this?

How do we handle this customer issue?

What is the process for this request?

Which checklist do we follow?

Who approves this?

If the answers already exist somewhere, AI can help make those answers easier to find.

That could become an internal support assistant trained on your SOPs, checklists, policies, and internal documents.

Again, the point is not to remove people from the process.

The point is to reduce repeated manual support so your HQ team can focus on higher-value work.

Area 4: Finance & Control

The fourth area is finance and control.

In a franchise or multi-location business, small finance issues can add up quickly.

One missed item may not seem like a big deal.

But if similar issues happen across many locations, it becomes real money.

Finance & Control

So ask yourself:

Are finance follow-ups, audits, or checks still heavily manual?

Is it difficult to compare profitability cleanly across locations?

Do leaders find out about margin issues too late?

Are exceptions, anomalies, or missed items hard to catch early?

Do recurring finance tasks require too much spreadsheet work?

This is not about handing your finance function over to AI.

That is not the point.

The better starting point is exception spotting.

For example:

Which location has unusual numbers?

Which report is missing something?

Which cost looks higher than expected?

Which sales number does not match the usual pattern?

Which item needs a human to review?

AI can help with the first pass.

It can summarize, compare, flag, and prepare.

Then the finance team reviews what matters.

That can save time and help the business catch issues earlier.

Area 5: Cross-Location Consistency

The fifth area is cross-location consistency.

This is one of the core challenges in franchise and multi-location businesses.

You may have the same brand, same playbook, same SOPs, and same process.

But in reality, locations may execute things differently.

Some locations follow the process well.

Some locations do their own thing.

Some are strong.

Some need help.

Some communicate clearly.

Some need repeated follow-up.

Cross-Location Consistency

So ask yourself:

Do locations execute the same process in different ways?

Is brand consistency difficult to maintain across the network?

Does HQ struggle to know which locations need attention first?

Do strong and weak locations look too different operationally?

Is communication from HQ to locations slower or less clear than it should be?

This is where AI can help HQ see patterns faster.

For example, AI could help compare location performance, summarize issues, identify which locations need support, or help monitor whether the same process is being followed across the network.

The value here is not just automation.

The value is visibility.

HQ cannot manually inspect everything across every location all the time.

AI can help bring the right things to the surface.

total score audit

Turning Scores Into Action

Once you score all five areas, you will have a score out of 10 for each one.

Now look at the highest scores.

Those are probably the areas where the pain is highest.

But this is important:

A high score does not automatically mean it should be your first AI project.

A high score only tells you there is business pain.

The next step is to turn that pain into a specific opportunity.

Pick your top three areas.

For each one, write down:

The priority area.

The business pain.

The possible cost saving or impact.

Turning Scores Into Action

For example:

Priority area: Operations & Admin

Business pain: Location teams keep asking the same questions, and HQ spends too much time answering them manually.

Cost saving: Reduce repeated HQ support time and give locations faster answers.

Or:

Priority area: Marketing & Local Execution

Business pain: The brand team spends too much time adapting campaigns for each location.

Cost saving: Reduce manual content work and help the team support more locations.

Or:

Priority area: Reporting & Visibility

Business pain: HQ spends too much time pulling weekly reports from multiple systems.

Cost saving: Reduce manual reporting time and catch location issues faster.

This step matters because “use AI for marketing” is too broad.

“Use AI to create first drafts of location-specific campaign content” is much better.

That is a real workflow.

And real workflows are where AI starts becoming useful.

Can AI Solve This Now?

After you identify your top three opportunity areas, the next question is:

Can AI actually solve this now?

Because not every painful problem is a good AI problem.

Some problems are painful, but the process is messy.

Some problems are painful, but the data is not available.

Some problems are painful, but every output is fully custom.

Can AI Solve This Now?

So for each of your top three areas, ask five questions:

Does the process repeat often?

Does the input already exist somewhere?

Is the output predictable enough to standardize?

Would faster response or better visibility create real business value?

Can a human review exceptions instead of doing everything manually?

If an area gets three or more Yes answers, it is usually a good candidate for an AI pilot.

Let’s say Operations & Admin gets four Yes answers.

The process repeats often.

The questions already exist.

The SOPs already exist.

The output is predictable.

And a human can review anything that needs judgment.

That could be a strong first AI pilot.

Now compare that with a problem where everything is custom, no data exists, no one owns the process, and the output is different every time.

That may still be an important problem.

But it may not be the first AI project.

And that is okay.

The point of this audit is not to force AI into every area.

The point is to find the first area where AI can realistically help.

What Makes a Good First AI Pilot?

A good first AI pilot is usually not the biggest idea.

It is usually the clearest repeated workflow.

Good first pilots usually look like:

Repeated weekly or daily work.

Slow roll-up reporting.

Repeated admin or support questions.

Location-by-location content adaptation.

Review responses.

Exception spotting.

Summaries and follow-up workflows.

The areas that are usually not the best first pilots are:

One-off strategic work.

Messy processes with no clear owner.

Tasks with no usable data source.

Work where every output is fully custom.

High-risk work with no human review step.

The best first AI pilot should be practical.

It should be narrow.

It should have clear inputs.

It should have a clear output.

And it should keep a human in control.

That is how AI becomes useful inside the business.

Not as a random tool.

Not as a chatbot experiment.

But as a way to reduce manual work, improve visibility, and help HQ support locations better.

Final Thought

The question should not be:

“How can we use AI?”

That question is too broad.

A better question is:

“Which repeated workflow is costing us time or margin, and is that workflow ready for AI?”

That is what this audit helps you answer.

good first ai pilots

By the end, you should know three things:

Your highest pain areas.

Your top three cost-saving opportunities.

Your best first AI pilot candidate.

That gives you a much better starting point.

And once you have that, AI becomes much more practical.

It is not about chasing the newest tool.

It is about finding the places where manual work is adding up across locations, and then building AI into those workflows in a way that actually helps the business.


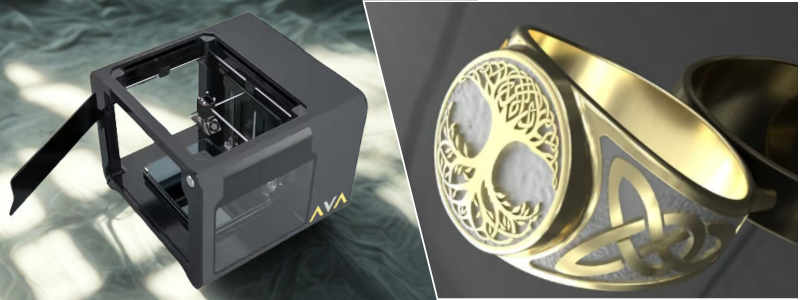
CNC Machining vs. 3D Printing Costs for Precision Prototype Development Insights


You’ve got the breakthrough product that could change everything. Maybe it’s a revolutionary gear housing that solves an industry-wide problem. Maybe it’s a sleek, modern bottle opener that reinvents a timeless tool. Whatever your innovation, you’re ready to move from concept to prototype, and you need it done right, done fast, and done within budget.

Now comes the critical decision that could make or break your project’s success. CNC machining and 3D printing both promise to transform your digital design into a physical reality, but they couldn’t be more different in their approach, costs, and capabilities. One offers unmatched precision and durability, while the other delivers speed and design flexibility. The choice you make here will determine not just your prototype quality and timeline, but your entire project’s trajectory. Because getting it wrong doesn’t just drain your budget, but it kills momentum, erodes stakeholder confidence, and can derail even the most promising innovations before they ever reach the market.

If you want to know more, for your project or firm, the leading agency Cad Crowd, is the best choice for you. They have 94,000 experts and professionals you can choose from at a very reasonable price with excellent service.


🚀 Table of contents


Difference between CNC vs. 3D printing

Let’s count costs, but before that, let’s make one thing clear: CNC machining design and 3D printing design aren’t two iterations of the same animal. They’re two distinct monsters in the realm of manufacturing, each with their own flair, positives, and attitude.

CNC machining? That’s the classic heavyweight titleholder. It’s a subtractive process, which means you start with a solid block of material, generally metal or plastic, then scrape away everything else that doesn’t fit. As a mission-focused sculptor, CNC machines are experts at precision cutting. Got something that requires heat, stress, or merely the tough demands of being out in industry? CNC’s your guy. And when tolerances must be tighter than last December’s holiday tight jeans, CNC is where it’s at.

3D printing is an additive manufacturing process, where rather than cutting things out, it adds your part piece by piece from the ground up, layer by layer. Whether spooled filament, liquid resin, or microscopic metal powder, 3D printers are masters of complexity. Want a prototype quickly? Need crazy-curved shapes and internal voids? 3D printing has that for breakfast. It’s perfect for rapid iterations, innovative designs, and tasks where speed and flexibility are more valuable than raw power.

RELATED: How 3D Printing for Rapid Manufacturing Is Pushing Boundaries at Product Design Services Firms 

Both CNC and 3D printing are revolutionary. CNC provides muscle and accuracy; 3D printing provides imagination and quickness. Which one is correct? That’s entirely dependent on what you’re producing, how quickly you need it, and how much abuse your part will endure. Understand the difference, and you’re already halfway to making the intelligent (and budget-friendly) decision.

The cost breakdown: it’s not always what you think

Let’s speak in numbers, because when you’re dealing with prototyping or small-batch production, what you believe an item will cost and what it really costs can be two completely disparate tales. CNC machining, for example, will make your wallet quiver at first sight. That is because CNC takes a lot of setup before the first part itself is cut. You have CAM (Computer-Aided Manufacturing) programming, tooling, and fixturing services to keep you awake. It’s an entire production just to clamp down on your raw material. So, if you are placing a single aluminum prototype order, don’t be surprised to pay anywhere between $75 and $300. Ouch, isn’t it?

RELATED: Benefits of Outsourcing CNC Machining Services for Your Company’s Prototype Design

Enter 3D printing as a cost-effective hero now. There’s almost no setup fee. You’ve got your electronic file, you choose your material, and you’re racing off. Need simple thermoplastic component services? You could have it done for as little as $20 to $60, and less if it’s a small or hollow design.

But here’s the twist: CNC machining begins to excel with volume. The more you increase the products from 50 or 100 pieces, the setup fees are amortized. That $300 in tooling is now just a few dollars per piece, and CNC’s unit cost falls dramatically. With 3D printing, however, how many pieces you’re printing is irrelevant. The unit cost remains roughly the same, so it’s not very good for scaling.

So what’s the real takeaway? If you’re prototyping or making just a few units, 3D printing often wins on price. But for higher-volume production runs, CNC can sneak up and steal the cost-efficiency crown. It all depends on your goals and your quantities.

Manufacturing Service Hourly Rate Per Project
3D Printing $2–$15 $20–$150 per item
CNC Machining $40–$150 $75–$500 per item

RELATED: The Advantages and Disadvantages of CNC Machining for Prototype Design

Speed and flexibility: the hidden costs

In the early stages, your concept is rarely perfect right out of the gate. You’ll tweak it. Then tweak it again and again. This is where 3D printing services become the MVP of prototyping without fanfare. Why? Because altering a design is as easy as revising a digital file. No production overhaul required. You send it to “print” before you head out for the day, and by the time you return to the office with your coffee cup in hand, the new prototype is ready to test. You can make another alteration before lunch and keep that creative momentum going.

Now compare that to CNC machining. Each design tweak usually means retooling, literally. You’ll have to reprogram the toolpaths, adjust the fixtures, and sometimes even swap out materials or cutting tools. It’s precise, yes, but every change adds time. And in this game, time is money.

But here’s the thing: whereas 3D printing excels at speed and adaptability, it may not always take home the endurance competition. If your working prototype has to endure high stress, support heavy loads, or survive heat, those plastic prints may not cut it. That’s when CNC machining takes the lead. It might take longer to change direction, but when performance is paramount, CNC still reigns supreme.

RELATED: How to Design 3D Models for 3D Printing & New Prototypes

So what’s the lesson? In today’s world of prototyping, 3D printing allows you to go fast and repeat frequently. But when the piece has to be as durable as possible, CNC’s your ticket. Finding the right time to use each is the key to staying within budget and on deadline.

From CAD file to physical prototype overnight

Product development services follow a strategic prototyping journey that matches the right technology to each stage. In early development, when you need quick visual prototypes for investor presentations or stakeholder buy-in, 3D printing delivers overnight results from your CAD files. It handles complex geometries effortlessly and provides affordable proof-of-concept models that demonstrate form and fit without significant upfront investment.

CNC-machining-prototype-precision-workshop-manufacturingpng

As your design matures and performance testing becomes critical, CNC machining takes over the prototyping process. Working with actual production materials like aluminum, stainless steel, or engineered plastics, CNC creates prototypes that can withstand real-world stress testing, temperature variations, and mechanical loads. This stage validates not just appearance but actual functionality, providing the performance data needed before moving to production. For small batch manufacturing and beta testing, CNC offers excellent per-unit economics with professional finish quality and tight tolerances.

The key to successful prototyping lies in understanding when each technology excels. When designs feature complex internal channels, organic shapes, or intricate geometries that challenge traditional machining, 3D printing returns as the optimal solution. It builds the most complex forms layer by layer without special tooling, setup costs, or geometry limitations. Rather than competing technologies, 3D printing and CNC machining work as complementary partners throughout the product lifecycle, ensuring faster time to market, reduced development costs, and more robust final products.

RELATED: 3D Printing Technologies for Modeling and Prototyping

The materials game

Let’s discuss materials, because when it comes to prototyping or production, your project’s success can depend on what it’s made of. Selecting the proper material isn’t just a checkbox, it can make or break your entire design.

CNC machining is the clear winner in terms of diversity. Imagine a buffet of metal and plastic: aluminum, brass, stainless steel, titanium; name it. You can even opt for carbon fiber-reinforced nylon if you want to get fancy. And the best part? You’re working with real-world materials, so you can test your design in the real world. Will it bend? Will it break? CNC provides you with real answers, not approximations.

On the other side of the ring, we’ve got 3D printing. And yes, it’s come a long way. Entry-level FDM printers work with familiar thermoplastics like PLA, ABS, PETG, and nylon. SLA printers offer amazing surface finishes, though their resins tend to be more fragile. Step up to industrial 3D printing like SLS (Selective Laser Sintering) or MJF (Multi Jet Fusion), and you’ll get stronger, more usable parts. Metal 3D printing design is also a thing, and it’s jaw-droppingly cool but be warned: it’ll burn through your budget fast.

3d-printing-rapid-prototype-additive-manufacturing processpng

Here’s the bottom line: if you’re building a complex internal structure that would make a machinist cry, metal 3D printing might be worth it. But if your goal is to create a strong, functional metal bracket or housing? CNC is still the smarter, faster, and more cost-effective option.

In the game of materials, it’s not only what you can do, it’s also about what you can afford. Pick wisely.

Post-processing and finishing

Now let’s discuss a cost that enjoys catching you off guard: post-processing and finishing. It’s not the most glamorous aspect of production, but if you neglect it, it will creepily eat into your wallet. Let’s say you’ve just 3D printed a prototype. Awesome, right? Wait, before you can put it to any kind of useful work, you’re not really finished. That raw part could require support structure removal, sanding, curing, or coating for strength or cosmetic purposes. And if you’re getting ready to shoot some product photos or make an investor presentation, you’ll likely want it to be showroom material. That kind of polish isn’t quick work, nor easy work, and often requires other materials or tools. Translation: more money.

And what about CNC-machined parts services? They tend to look much cleaner coming off the machine than their 3D-printed equivalents. But even so, there are usually deburred edges, surface finish, or anodizing to factor in, if the part is going to be handled by a client, at least. That smooth, professional finish you’re expecting? It doesn’t magically occur. Incorporate it into your budget upfront, even if you’re only prototyping. The time you invest in polishing and refining could very well be the difference between something that “works” and something that really blows away. Precision Matters- So Does Purpose!

Let’s cut to the chase, if your design depends on sheer precision, CNC machining remains the champion. This is no marketing rhetoric. We’re speaking of tolerances as tight as ±0.001 inches or tighter. That’s the accuracy you require when parts need to fit each other exactly, as in mechanical assemblies, sliding parts, or press-fit components that cannot risk shifting.

Yes, 3D printing is catching up and some high-end printers are surprisingly precise, but your typical print will fall somewhere in the range of ±0.005 to 0.01 inches. That’s fine for a rapid concept model or a snap-fit plastic enclosure. But if you’re making a part for a jet engine or a medical device, “good enough” won’t do.

RELATED: 3D Printing Technologies for Modeling and Prototyping

So, how do you decide? It all depends on your purpose. If you are at the early stage of prototyping design and only require something tangible to hold in your hand or present to the team, 3D printing is quick, adaptable, and affordable. You can experiment rapidly and check form and fit without burning through your budget.

But when you’re beyond the napkin sketch and require actual, testable, engineering-grade parts? CNC is your best bet. You’ll have the accuracy, ruggedness, and material selection that high-performance components require. Long story short, each tool has its application. The key is recognizing which phase you’re at and what your design really requires. Because in product development, precision is important. But so is purpose.

The freelancer factor: getting help on Cad Crowd

Now here’s the good news, you don’t have to do it all alone. If you’re not sure whether your prototype would be better suited to be 3D printed or CNC machined, Cad Crowd’s got you covered. Seriously. You’ve got choices, and more importantly, you’ve got specialists who know just how to assist.

RELATED: How to Improve Product Development For Your Company with Engineering Firms & Design Consultants

Need CAD files design perfectly optimized for CNC machining? No sweat. Need a designer familiar with the nitty-gritty of SLS printing and how to modify your model in response? No big deal. Need someone to do the actual printing or machining so you can work on the grand scheme? Done and done.

Cad Crowd makes it ridiculously simple to reach out to seasoned designers and engineers who’ve done it all and who can assist you with striking the right balance of quality, budget, and tight deadlines without sweating a drop. If you’re still brainstorming or you already have a prototype that only requires a little tweaking, Cad Crowd has someone who can take your concept and get it moving in the right direction. It’s like having your own dream product development team, waiting to pounce when you need them most. So smart build, don’t hard build.

Final takeaway: use the right tool for the right job

The choice between CNC machining and 3D printing isn’t about finding a winner, it’s about selecting the right tool for your specific stage of development. 3D printing excels in early prototyping with its speed, flexibility, and low setup costs, making it perfect for rapid iterations and complex geometries. CNC machining dominates when precision, durability, and real-world materials are critical for functional testing and production-ready parts. Smart product developers leverage both technologies strategically throughout their development cycle, using 3D printing for concept validation and CNC for performance testing. The true cost of precision lies not just in dollars, but in making informed decisions that accelerate your path to market success.

RELATED: How CAD Modernizes Product Concept Design at Industrial Design Services Companies

Ready to build your perfect prototype: Cad Crowd can help

Stop second-guessing your manufacturing choices and start building with confidence. Whether you need rapid 3D printing for early concepts or precision CNC machining for functional testing, expert help is just a click away. Connect with experienced professionals who understand exactly when and how to use each technology for maximum impact. Contact Cad Crowd today for your free quote and transform your ideas into reality; smartly and efficiently.

author avatar

MacKenzie Brown is the founder and CEO of Cad Crowd. With over 18 years of experience in launching and scaling platforms specializing in CAD services, product design, manufacturing, hardware, and software development, MacKenzie is a recognized authority in the engineering industry. Under his leadership, Cad Crowd serves esteemed clients like NASA, JPL, the U.S. Navy, and Fortune 500 companies, empowering innovators with access to high-quality design and engineering talent.

Connect with me: LinkedInXCad Crowd

Forza’s Horizon Festival Is Hell On Earth


When a game world doesn’t make sense, you could simply dismiss it as being “just a game.” Or, through the power of imagination, you could attempt to truly visualize it and then discuss at length how absolutely absurd it truly is. With that in mind, it’s time I say it: Forza Horizon 6 and the previous entries in the series do not make sense, and the longer we think about it, the weirder it gets.

If you’re unfamiliar, each game in the Forza Horizon series is set at the Horizon Festival, a car show-meets-music-festival that spans a large portion of the country the festival is set in. There are racing events, all manner of records to break, and you’re encouraged to explore every road on the map to find things like abandoned cars and collectibles, which you collect by driving through them.

In many ways, it’s kind of like the Olympics: Each festival is set in a different region, such as Australia, the United Kingdom, Mexico, or, most recently, Japan. Space is dedicated to these races; markers are put down, new dirt roads are made, and semi-permanent structures are erected to house the thousands of incoming cars. But while countries fight for the privilege of hosting the Olympics, who would ask to host the Horizon Festival? 

When the Horizon Festival descends on a region, countless drivers appear and begin to wreak havoc on the city and countryside. These drivers are destroying forests, private property, and municipal infrastructure; they slam into civilian cars at hundreds of miles per hour. They take “abandoned” cars out of old barns. Maybe someone left that car there for a reason? Surely, there should be some consequences, right? But you won’t find anything resembling law enforcement appearing, no matter what you do. That sounds impossible. 

There’s only one answer that makes this all make sense: billionaires.

Oh yeah, it’s all coming together. The Horizon Festival is orchestrated by billionaires for their own entertainment. They pick a peaceful-seeming place–the locations chosen for the festival are all premium vacation spots–they’ve decided they want to see destroyed. The region is blanketed in the emissions of some of the least fuel-efficient vehicles on the planet, and people are afraid to leave their houses.

The best way to celebrate Japan’s beauty? Tearing up its countryside with fuel-guzzling vehicles, apparently.

As you explore the region, you can win points doing just about anything. You’re encouraged not to just win races, but also to actively engage in destruction and dangerous activities. It calls to mind the government-sponsored Transcontinental Road Race in the film Death Race 2000, in which participating drivers are encouraged to win by any means necessary and to hit pedestrians for bonus points. In that film, the government covers up activity by a resistance group because the race is so popular with the general population, making sure everything is treated as fun and exciting for the viewership. The police in the region have been paid off, too, which is why they aren’t showing up to crashes or putting up roadblocks to catch drivers. Sure, you can’t hit civilians at the Forza Horizon Festival, but that doesn’t stop you from causing plenty of destruction.

As you race around the festival region, radio DJs report on your actions, telling everyone how great it is that you just set a new speed record on a public road, or won a race through the middle of a populated city. You might think it’s simply a game acknowledging your accomplishments, but it’s actually propaganda to make you sound like a hero not just to viewers and listeners, but to yourself. If you started to worry about the consequences of your actions, you wouldn’t want to participate in this grisly affair.

Billionaire sponsorship explains another aspect, too. Even if you end up somewhere like Southern Europe, the setting for Forza Horizon 2, there’s no way to explain the sudden preponderance of expensive cars. You don’t see the thousands of shipping containers full of hypercars and rally cars being shipped in, alongside the monopoly the event puts on all new and used cars in the region, but they’re there, out of view. 

These billionaires reward the dangerous actions drivers take with “credits” instead of any kind of real currency, and these credits are also assigned to the prices of the cars themselves. The billionaires sponsoring this have already purchased all of these cars, so you can’t buy them with real money. You have to engage in the events the festival sponsors want you to to advance, and it’s almost inevitable that even the cleanest driver will create some damage.

A race car tears past a vacated residential area. Its citizens are clearly to scared to leave their homes.

As you race, though, you’ll see people cheering you on and cars on the roads.The standard, inexpensive cars on the road are civilians just trying to live their lives while the “drivers” zoom around them. They stay inside when they can, but the festival goes on for months, and people have to go out for food and to go to work. The people you see cheering you on, though–these are people who attend for fun and clout. Rich people, influencers, and people like that.

There are other ways we could explore this. For example, maybe it’s a Westworld situation for people who really like cars, and that’s why all the DJs talk directly to you and why you have two cool friends who you know nothing about.

The longer I think about what’s happening in Forza Horizon, the darker it gets. Yeah, I know: It’s just a game and I’m way overthinking it. Framing this bright, happy game full of pop music, flashy events, and bright colors as a dark manifestation of class oppression is hilarious.

Use your own language model key in VS Code


June 18, 2026 by Kayla Cinnamon

At Microsoft Build this year, I had the opportunity to present in the opening keynote. One thing I showed was using local models inside VS Code on the new Surface RTX Spark Dev Box. My model was periodically analyzing my log files and giving me summaries, so I could easily diagnose issues without having to look through the logs myself. Check out the recording at 12:18.

Using local models gives you even greater flexibility when working with agents. Sometimes you want the built-in models available through GitHub Copilot. Sometimes you want to try a new model from a provider your team already uses. Sometimes you want to experiment locally. VS Code allows you to do all of these workflows with bring your own language model key (BYOK) and bring your own local model.

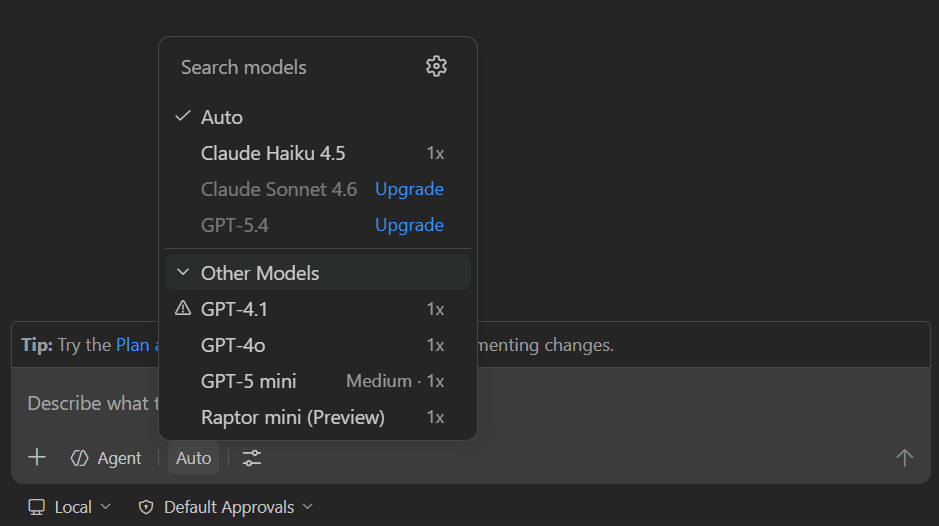
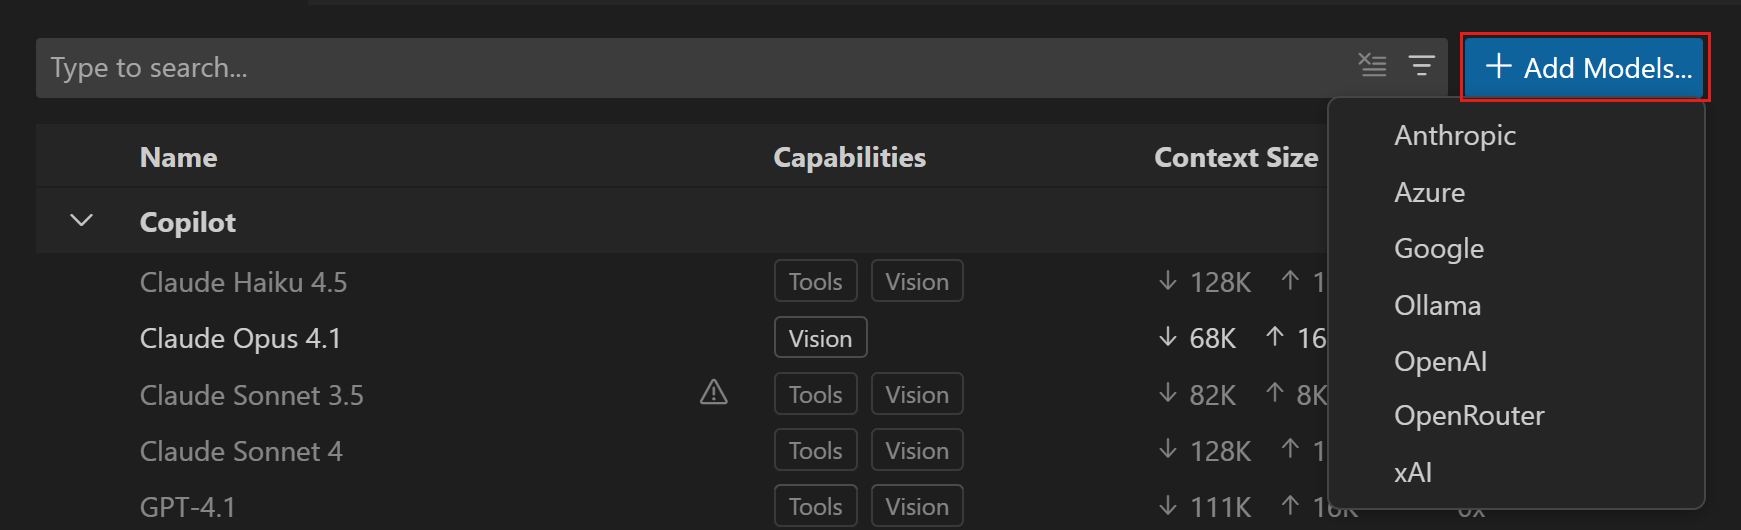
With BYOK in VS Code, you can add models from providers like Azure, Anthropic, Huggingface, Gemini, OpenAI, OpenRouter, or you can run a model locally with Ollama, Foundry Local, and more, then use them directly from the Chat model picker.

Screenshot of the VS Code Chat model picker showing available language models.

What is BYOK?

BYOK lets you use a language model from a supported provider by adding your own API key or endpoint configuration in VS Code. Once configured, those models appear in the same Chat model picker you already use for Copilot. Support is built in for several providers and VS Code is extensible, so any model provider can enable support through an extension.

This gives you more choice for chat and agent workflows. For example, you can:

  • Try models that are not built into VS Code.
  • Use a provider your organization already has billing or governance set up for.
  • Connect to local models through providers such as Ollama or Foundry Local.
  • Pick different models for different tasks, such as quick Q&A, planning, or multi-step agent work.

The goal is to allow you to choose the right model and keep working.

What BYOK works with

BYOK models are available for VS Code chat experiences, including agent workflows when the selected model supports the required capabilities.

There are a few important details to keep in mind:

  • BYOK models work without signing into a GitHub account and without a Copilot plan. You can add and use models entirely with your own API keys, including fully offline scenarios with local models.
  • BYOK applies to chat and utility tasks, not standard code completions.
  • Some AI features, such as semantic search, inline suggestions, and features that rely on embeddings, still require a GitHub account or Copilot support.
  • Usage for provider-backed BYOK models is billed directly by that provider and does not count against GitHub Copilot request quotas.
  • For Copilot Business and Enterprise, organization administrators can control BYOK availability through Copilot policy settings.

In other words, BYOK expands model choice in VS Code Chat, but it does not replace every Copilot-powered feature in the editor.

Getting started with BYOK

The easiest way to get started is through the Language Models editor.

You can open it from the Chat model picker by selecting the Manage Language Models gear icon, or you can run Chat: Manage Language Models from the Command Palette.

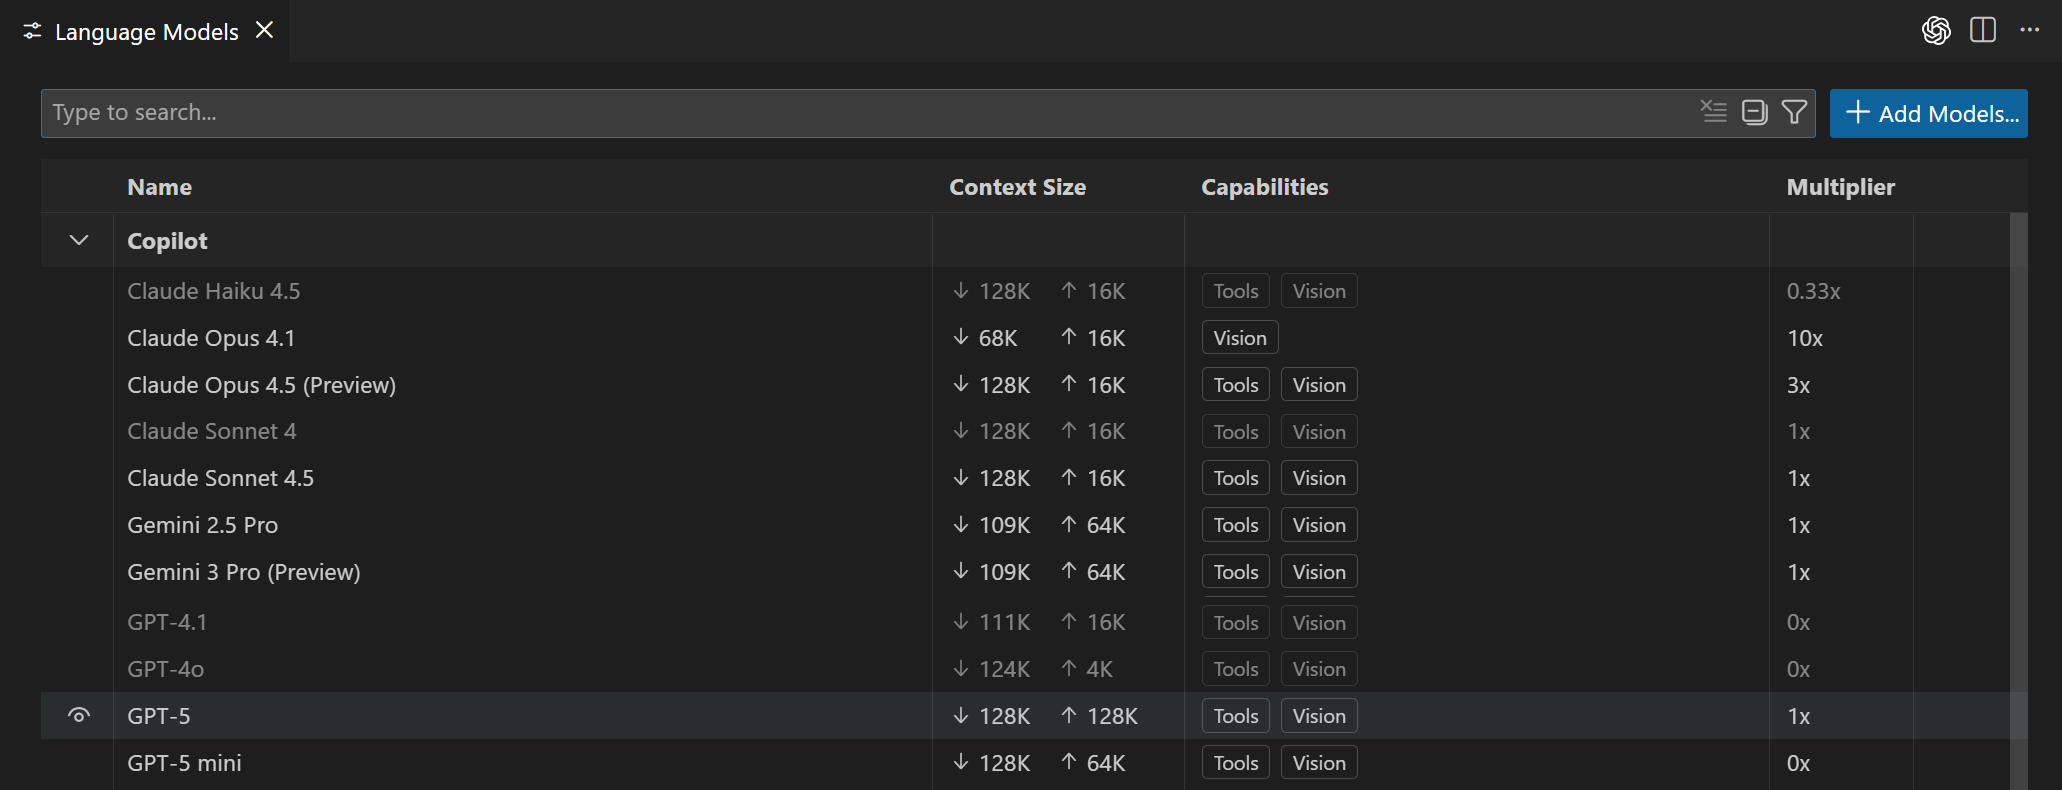
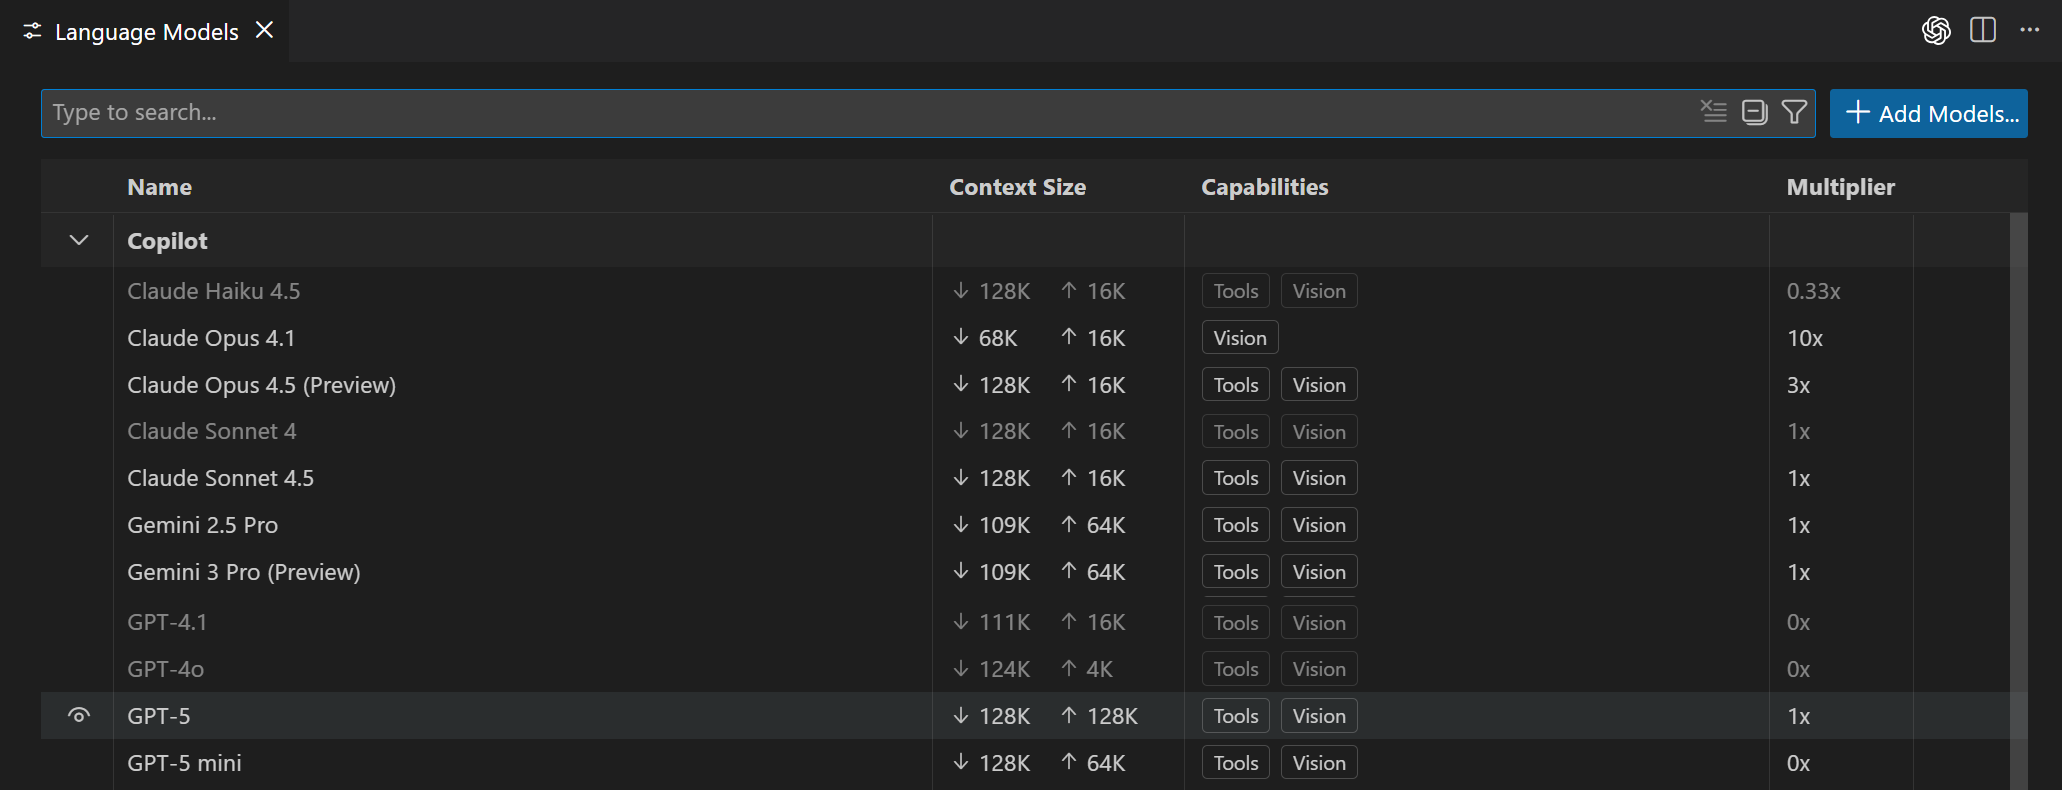
Screenshot of the Language Models editor in VS Code.

The Language Models editor shows the models available to you, grouped by provider. It also shows useful details like model capabilities, context size, billing information, and whether a model is visible in the picker.

This is also where you can keep the model picker focused. If you are testing several providers, you can hide models you do not use often and keep your day-to-day models easy to find.

Adding models from a built-in provider

If the provider you want is built into VS Code, setup is a few clicks.

  1. Open Chat: Manage Language Models.
  2. Select Add Models.
  3. Choose a provider.
  4. Enter a group name for the models. This is the label shown in the model picker and Language Models editor.
  5. Enter the provider details, such as an API key, endpoint, deployment name, or other required configuration.
  6. Select the model from the Chat model picker.

Screenshot of the model provider picker in VS Code.

Depending on the provider, VS Code might open a chatLanguageModels.json file so you can finish configuring model details.

For example, a Mistral configuration specifies the endpoint URL, API type, and model capabilities:

[
  {
    "name": "Mistral",
    "vendor": "customendpoint",
    "apiKey": "<your-mistral-api-key>",
    "apiType": "chat-completions",
    "models": [
      {
        "id": "mistral-medium-latest",
        "name": "mistral medium",
        "url": "https://api.mistral.ai/v1/chat/completions",
        "toolCalling": true,
        "vision": true,
        "maxInputTokens": 256000,
        "maxOutputTokens": 16000
      }
    ]
  }
]

The exact fields depend on the provider and model. The important part is that after the provider is configured, the model becomes available from the same picker you use for the rest of Chat. For more information, check out the Language Model docs.

Adding models from extensions

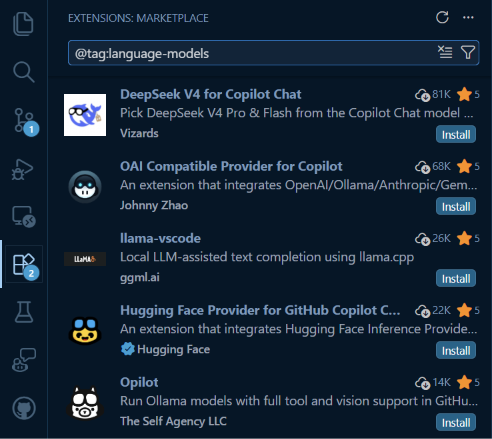
VS Code also supports language model provider extensions. These extensions can contribute models directly into the Language Models editor and Chat model picker.

To find provider extensions:

  1. Open the Extensions view.
  2. Search for @tag:language-models.
  3. Install the provider extension you want to use.
  4. Follow the extension’s setup instructions.
  5. Select the model from the Chat model picker.

Screenshot of the Extensions view listing extensions that provide language models.

This extensibility is a big part of the BYOK story. Instead of every provider needing to be hard-coded into VS Code, extensions can bring new model providers into the editor as the ecosystem evolves.

Leveraging utility models

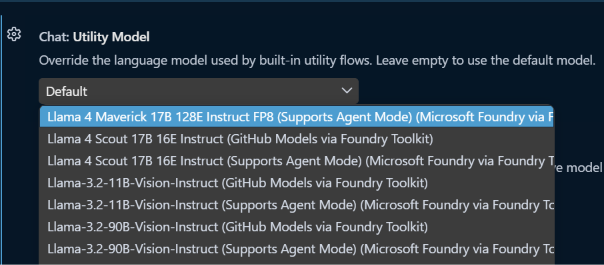
VS Code also uses lightweight models in the background for small tasks like generating chat titles, commit messages, and rename suggestions. These default to built-in Copilot models and most users won’t need to touch them. But if you’re using BYOK without signing into a GitHub account, those defaults aren’t available. VS Code will show a notification in the Chat view prompting you to configure them. Set


chat.utilityModel

and


chat.utilitySmallModel

to one of your BYOK models to keep those features working. A fast, inexpensive model works well here.

Screenshot of the setting for configuring the Chat Utility Model.

Choosing the right model

One of the best parts of BYOK is that you do not have to use one model for everything.

For everyday work, you might choose:

  • A fast model for quick questions, summaries, and small edits.
  • A reasoning model for planning, debugging, or complex refactors.
  • A local model when you want to experiment offline.
  • A provider-specific model when your team already has workflows around that provider.

Simply choose which model you want to use in the model picker below the Chat box.

Screenshot of the VS Code Chat model picker showing available language models.

Try it out

BYOK gives you more flexibility in VS Code without adding more tools to your workflow. You can keep using the built-in Copilot models, add models from providers you already use, experiment with local models, and choose the right model for each task from one place.

To learn more, check out the VS Code docs on AI language models, the VS Code blog post on Expanding Model Choice in VS Code with Bring Your Own Key, and the GitHub changelog entry for BYOK availability in VS Code.

We also have a video for how to Bring Your Own AI… No Sign-In Required!.

We are continuing to improve model choice in VS Code, and your feedback helps shape what comes next. Try BYOK with your workflow and let us know what you think in the VS Code repository.

Happy coding! 💙

Can You Get Banned for Valorant Boosting? Risks Explained


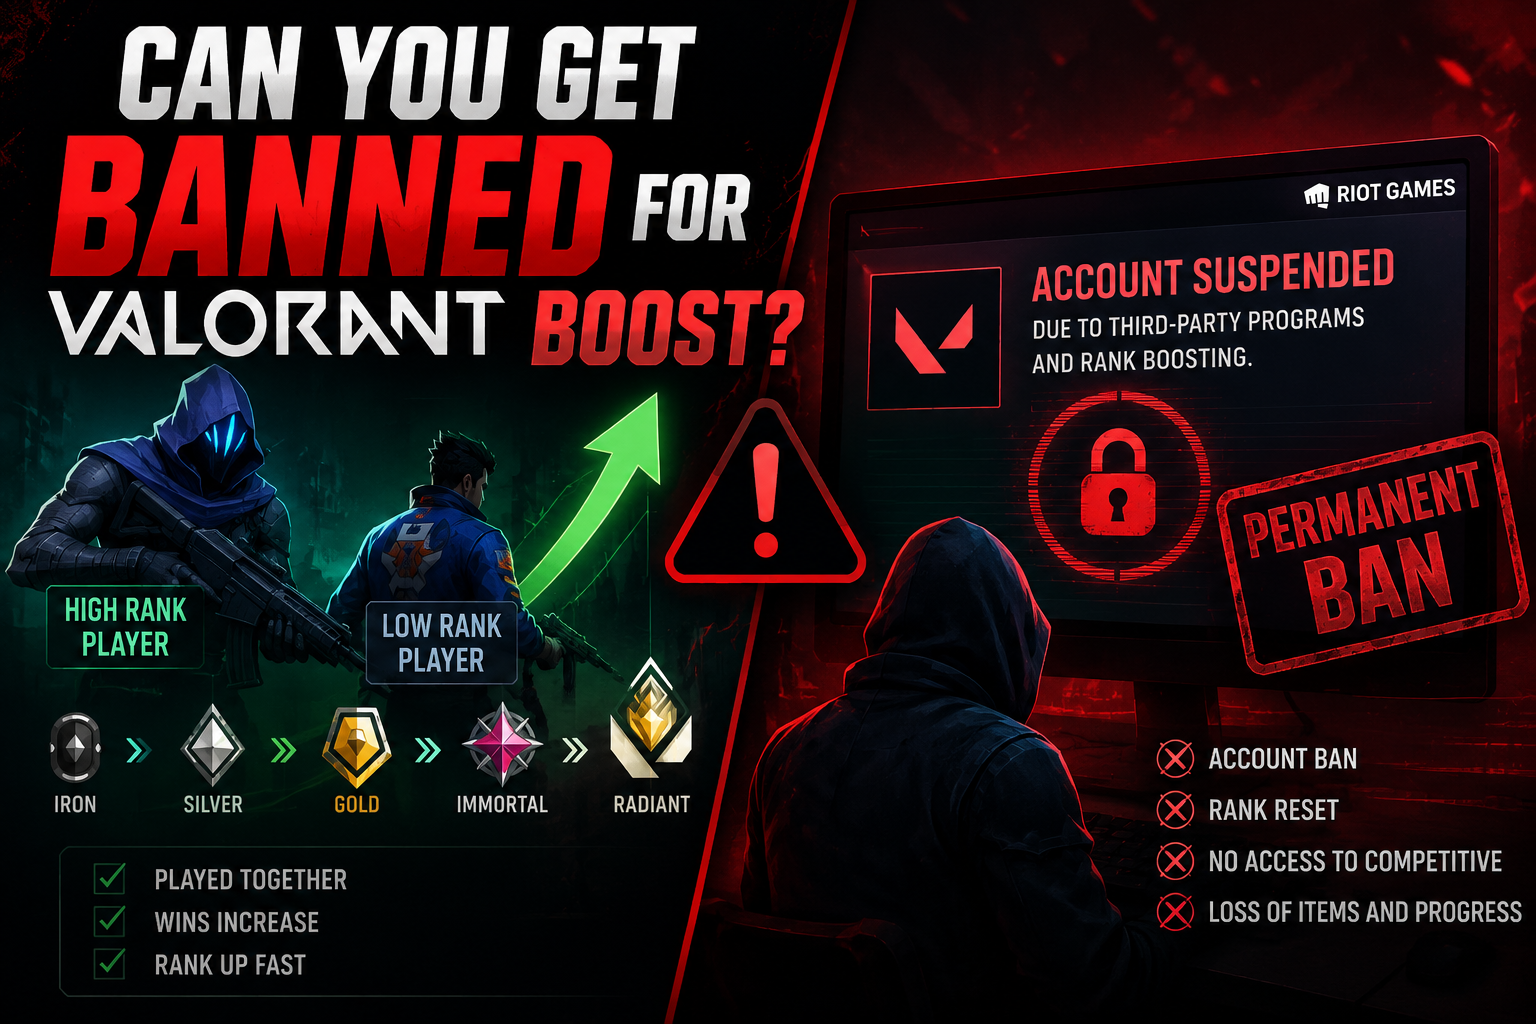
Illustration of Valorant rank boosting versus account bans, showing rank progression on one side and a suspended gaming account warning on the other.

If you’re searching can you get banned for valorant boost, you’re really asking two things: how Riot treats boosting in practice, and what usually gets accounts flagged.


In plain language, Valorant elo boost refers to a scenario where a high-ranking player facilitates you to rank up faster than you would if you were to do that solo, either by playing alongside you or using your account. For instance, when talking about Valorant boosting from Eloboss, it refers to the situation where a Radiant-ranked boosters assists in your ranking process through duo queue, training, and account share boosting, among other things.


The purpose of this guide is to remain neutral and factual by highlighting aspects such as considerations prior to ordering, detection, consequences, and minimizing risks.

Things to Consider Before Ordering a Boost


Start by deciding which method you’re actually comfortable with, because the risk profile changes a lot depending on how the boost is delivered.


Account-share (sometimes called piloted boosting) means someone else logs into your Riot account and plays ranked for you. It’s usually the most convenient, but it also creates the cleanest “paper trail” in account security terms: new device, new IP patterns, and activity that doesn’t match your normal routine.


Duo queue boosting (also called self-play carry) means you stay on your own account and queue with a higher-skill player on their account. You keep control of your login, which removes a major security variable.


“Duo queue boosting remains popular because players can participate in every match while working toward their rank goal,” says Eloboss, a Valorant boosting and coaching service.


Before paying for anything, it helps to pressure-test the provider like you would any online service that touches your account or money:


  • What is the process exactly, duo queue, coaching or account-share?
  • In which regions and on which servers is the account supported?
  • How does the support work if you feel something wrong during the order?
  • What is the refund policy, and in particular what about unfinished orders?
  • Does the provider make absolute guarantees, such as zero risk? (Absolute guarantees are usually a good indicator that the page is selling, not informing you).


Common features that players often look for include progress tracking, privacy options, region support, account-protection measures, and multiple service formats such as duo queue, coaching, or account-share boosting.

Standard Techniques of Boosting Detection

Although Riot has not provided an official list of criteria for “boosting detection,” there are some standard techniques used in most competitive video games.

Login and location inconsistencies

A sudden shift in where the account is accessed from can stand out, especially if it looks like a rapid jump between regions or repeated logins from known VPN endpoints.


Even if you travel, most people don’t teleport across continents in the span of a few hours, then immediately start grinding ranked with a very different performance profile.

Artificially high performance peaks

Sudden jumps may catch the eye, for example:


  • Win streaks way beyond what you have shown before historically
  • An abrupt rise in KDA ratio, headshot percentage, or impact metrics over multiple games
  • A fast climb in ranks within a short span


While none of them is by themselves conclusive evidence of boosting, they are all factors in building a case.

Discrepancies between behavior and play style

Users exhibit certain behaviors through accounts – their preferred agents, buy styles, speed, and timing of decision making. If these features suddenly undergo an overnight change, it would appear that someone else was using the account.


Practical example: After spending months controlling maps using keyboard, you realize that your account fights in duels aggressively and gets into the map in seconds.

Reports, chat, and avoidable receipts

Allegations made by players do not point at any guilt, yet their aggregation brings up concerns. In addition, even the chats might be proven useful for providing evidence if players talk freely about paid boosting and use of their accounts.


If keeping things discreet is important to you, keep everything you say in chat such that you wouldn’t mind it being screen-captured and sent around.

Potential Penalties for Boosting Violations


However, punishments differ depending on what Riot considers to be the case and what they can prove. Consider this to be more like a spectrum of possibilities.


Some of the most frequent punishments people discuss include:


  • Temporarily suspending an account
  • Limiting access to ranked matches/queues for that period
  • Extending suspensions due to account sharing issues
  • Permanent bans in extreme cases where the violations involve another infraction (such as cheating on the shared account)


There’s one fact most tutorials forget to mention: If the account you’ve boosted isn’t being permanently banned, the disruption of having your account suspended for a week at a crucial time during the season, being ineligible for ranked play, or having a locked account might be a worse “price” than getting the boost.

How Riot Handles Boosting and Account Sharing

According to Riot Games’ general policies, boosting and the sharing of accounts in their competition titles is prohibited. However, as far as how this policy is enforced, it is a combination of both automatic triggers and manual reviews.


It’s also worth separating two ideas that often get mixed together:


  • Account security: whether someone else accessing your account looks like unauthorized access
  • Competitive enforcement: whether the ranked results look like manipulation of matchmaking integrity


Duo queue boosting tends to avoid the first category because you aren’t handing over credentials. Account-share boosting tends to collide with it by default, even if the booster uses precautions.


Based on internal order patterns from Eloboss, placement matches and rank progression services tend to be the most requested options, especially at the start of a new ranked season.

Risk-Reduction Tips for Valorant Boost Users


None of this removes the risk, but here are the measures that help reduce exposure the most.

Choose approaches that allow you to play from your own account

If your goal is to minimize account-security risk, duo queue or coaching is the cleaner route because your login stays with you.


Coaching is also the most “future-proof” option in the sense that your improvement carries over after the sessions, and there’s no second player touching your account.

Keep your account activity consistent

Accounts that appear “normal” receive less scrutiny than those that make drastic changes overnight. If you want to avoid being too suspicious:


  • Avoid cramming an enormous change in ranking in a very small period of time
  • Maintain your agent pool relatively similarly to how you typically play
  • Avoid dramatic changes in your schedule such as only playing during the day to only ranked games at night

Be careful with offline status tools and third-party apps

Some mention being “offline”. If the technique involves other software that may be employed, think carefully before proceeding. In the case where the purpose is privacy, introducing other software opens up another layer of vulnerability.

Reduce social friction and report incentives

Most “detection” occurs from the intuition of the players who sense something wrong and report it. You can minimize the chance of triggering this chain reaction by maintaining a calm demeanor and keeping your communication quiet.


Another issue when there’s someone playing using your account is making sure they don’t even chat. Not because chatting is necessarily bad, but because it leaves behind a paper trail.

Secure your account like it matters

This isn’t about Riot; this is about you not losing your account.


  • Always use a strong password that isn’t easy to guess.
  • Use two-factor authentication if possible for both your email and Riot accounts.
  • When sharing your account with others, immediately change your passwords after.

Conclusion

Of course, there is the possibility of getting banned due to valorant boost since this kind of behavior might go against the regulations of the company, but the actual possibility depends a lot on the specific technique used. For instance, account-share boosting is likely to give off more security warnings than duo queuing and coaching.


When it comes to using any kind of boost-related assistance, think of it as a compromise decision where you have to choose one of two things wisely.


iPhone Ultra leak reveals Apple’s Samsung-inspired foldable design


iPhone Ultra in two colors

TL;DR

  • Apple’s rumored iPhone Ultra could debut in September with a wider foldable design that aims to feel like an iPhone when closed and an iPad when opened.
  • The foldable is tipped to feature a nearly crease-free display, an advanced hinge, and a 4.5mm unfolded profile — just 0.3mm thicker than Samsung’s Galaxy Z Fold 7.
  • With a rumored price above $2,000, the iPhone Ultra would enter a foldable market already dominated by Samsung’s Galaxy Z Fold 7 and upcoming Fold 8 series.

Fresh off WWDC 2026 and Apple’s cozy relationship with Gemini-powered Siri features, the rumor mill has already moved on to Apple’s next big swing: its first foldable iPhone. According to a new video and renders shared by Jon Prosser, the so-called iPhone Ultra could finally make its debut alongside the iPhone 18 Pro lineup this September.

If the renders are anywhere close to reality, Apple doesn’t appear interested in copying the narrow foldables of the past. Instead, the iPhone Ultra is said to embrace a much wider design philosophy. The idea is that when folded shut, it should feel like a regular iPhone in your pocket. Open it up, and it transforms into something much closer to a compact iPad.

iPhone Ultra when unfolded

The design philosophy also feels strikingly familiar. After years of criticism over the narrow cover screens on earlier Fold models, Samsung finally embraced a wider, more phone-like display with the Galaxy Z Fold 7. That change made the Fold feel much more like a regular smartphone when closed. Based on these latest renders, Apple appears to be borrowing that exact roadmap.

Prosser also claims Apple is preparing a remarkably thin foldable with a nearly invisible crease and a hinge mechanism reportedly imbued with Apple’s trademark obsession with over-engineering. Whether that translates into a meaningful real-world advantage remains to be seen, but Apple has rarely entered a new hardware category without first addressing the industry’s most obvious complaints.

The rumored dimensions are particularly ambitious. When unfolded, the iPhone Ultra could reportedly measure just 4.5mm thick, making it thinner than even Apple’s ultra-slim iPhone Air. That’s undeniably impressive, though it would still be around 0.3mm thicker than Samsung’s Galaxy Z Fold 7, which currently sits at an astonishing 4.2mm when unfolded. Even so, for Apple’s first foldable attempt, matching Samsung this closely on thickness would be a notable achievement.

iPhone Ultra camera island

Of course, that kind of engineering won’t come cheap. Early whispers point to a price tag north of $2,000, putting it firmly in luxury-device territory. Then again, premium pricing has never stopped Apple fans before.

What’s particularly interesting is the timing; Samsung isn’t standing still. By the time Apple enters the foldable race, Samsung will have the Galaxy Z Fold 7 firmly established and will launch the next chapter with the Galaxy Z Fold 8 and the rumored Fold 8 Wide. If those devices continue Samsung’s push toward wider displays and thinner bodies, Apple won’t be entering an empty field — it’ll be stepping into a category that’s already rapidly maturing.

For years, foldables have largely been Samsung’s playground. The iPhone Ultra could change that overnight. Whether Apple ends up leading the category or simply joining it fashionably late is the question we’ll be asking for the rest of 2026.

Thank you for being part of our community. Read our Comment Policy before posting.

This Is What B2B Marketers Need to Know About the Future of Work


The 2026 State of AI for Business Report surveyed more than 2,100 professionals, 84% of whom work at B2B organizations and about a third of whom are marketers. This makes this one of the most relevant datasets for B2B professionals trying to understand where AI is taking their profession.
Continue reading “This Is What B2B Marketers Need to Know About the Future of Work”

All shard of life locations in The Adventures of Elliot


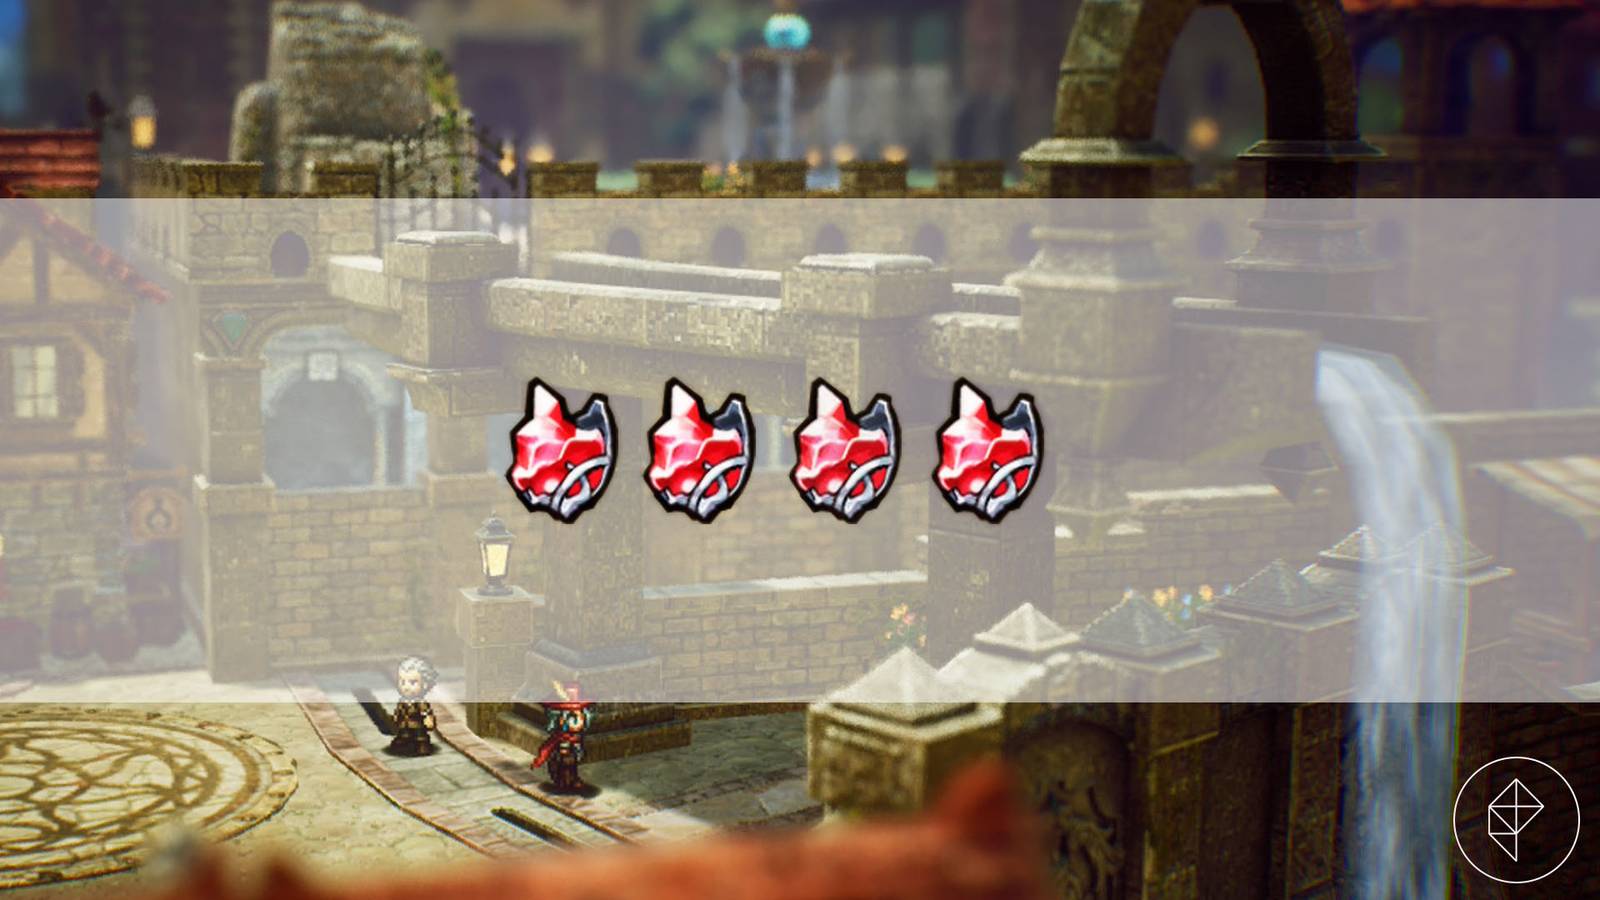
Collecting Shards of Life in The Adventures of Elliot: The Millennium Tales is as important as saving the world. These small red gem pieces can make you stronger, but only if you find enough of them.

Every time you collect four shards, they combine into one tear, which represents Elliot’s health — similar to Link’s hearts in Zelda games. The tear cap is 20, and obtaining all of them requires collecting 60 shards of life.

If you’re ready to explore every corner of this game looking for shards, then we can help you. Below, you find all shard of life locations in The Adventures of Elliot, split by ages.

[Ed. note: If you’re viewing this guide on a mobile device, you may need to swipe left and right to see the full tables listed below.]


All Age of Safekeeping Shard of Life locations in The Adventures of Elliot

There are 16 Shards of Life in the Age of Safekeeping, but obtaining some of them becomes easier after you have progressed in the campaign and unlocked more skills.

Map

Location

Description

A montage of two The Adventures of Elliot screenshots showing the location of a shard of life in the Age of Safekeeping

Eastern Fields of Flon

On the southwestern side of the Eastern Fields of Flon, you will find the Shrine of Life 1.

A montage of two The Adventures of Elliot screenshots showing the location of a shard of life in the Age of Safekeeping

Western Fields of Flon

Follow the path to the southwest through the remains of an old house, then follow the upper path that passes in front of a locked door until you find a blue chest behind a tree. Open it to obtain a shard of life.

A montage of two The Adventures of Elliot screenshots showing the location of a shard of life in the Age of Safekeeping

Eddartrayl

Use the Southern Caves — Desert Exit and head west to enter a small area with a guidepost and a chest to the northern side. Open it to find the shard.

A montage of two The Adventures of Elliot screenshots showing the location of a shard of life in the Age of Safekeeping

Mist Ruins – Neverwither

You find the chest containing this shard of life in a room on the eastern side of sublevel two.

A montage of two The Adventures of Elliot screenshots showing the location of a shard of life in the Age of Safekeeping

Western Fields of Flon

You must go through the Secret Shortcut 1 to reach the chest containing this shard. To unlock its entrance, located southwest of the chest, you must have unlocked the bombs in the Age of Reconstruction.

A montage of two The Adventures of Elliot screenshots showing the location of a shard of life in the Age of Safekeeping

Forest Ruins – Neverwither

The Forest Ruins are located on the western side of Neverwither. After entering the place, go to the second level. Use the moving platforms to cross to the south side and jump on the plant trampolines to reach the upper floor where there’s a blue chest.

A montage of two The Adventures of Elliot screenshots showing the location of a shard of life in the Age of Safekeeping

Westerea

You find the Shrine of Life 9 southwest of the Rainbow Lotus dungeon.

A montage of two The Adventures of Elliot screenshots showing the location of a shard of life in the Age of Safekeeping (editado)segunda-feira, 15 de junho de 2026 18:09 :heart: Clique para reagir :upside_down: Clique para reagir :smiling_face_with_tear: Clique para reagir Adicionar reação Editar Encaminhar Mais

Westerea

Head north of the Rainbow Lotus dungeon using the ladder on the west side, and enter Monster Trail 3. Next, use Secret Shortcut 6 to reach the blue chest.

A montage of two The Adventures of Elliot screenshots showing the location of a shard of life in the Age of Safekeeping

Westerea

To reach the Shrine of Life 10, you must use Monster Trail 2. Its entrance is hidden among poisonous vegetation northeast of the Raindow Lotus dungeon.

A montage of two images from the Adventure of Elliot showing the location of a shard of life

Geared Ruins

Reach the second level then head to the east side. Jump over the gears that form a bridge to reach the chest.

A montage of two The Adventures of Elliot screenshots showing the location of a shard of life in the Age of Safekeeping

Garretbelt

Go to the northern part of Garretbelt and reach the Mount Phoenix – Approach guidepost. From there, head south and drop off the edge to reach the Shrine of Life 18.

A montage of two The Adventures of Elliot screenshots showing the location of a shard of life in the Age of Safekeeping

Westerea

Go east of the Northern Westera guidepost to find the chest with this shard.

A montage of two The Adventures of Elliot screenshots showing the location of a shard of life in the Age of Safekeeping

Whiterea

Use Secret Shortcut 3 in Whiterea to reach the area, near the river, where you can find this shard.

A montage of two The Adventures of Elliot screenshots showing the location of a shard of life in the Age of Safekeeping

Whiterea

You find the Shrine of Life 5 north of Whiterea, and you must use Secret Shortcut 3 to reach the place.

A montage of two The Adventures of Elliot screenshots showing the location of a shard of life in the Age of Safekeeping

Neverwither

The Shrine of Life 16 is located in the southeastern part of Neverwither.

A montage of two The Adventures of Elliot screenshots showing the location of a shard of life in the Age of Safekeeping

Westerea

This shard is located in the Falls Caves, south of the Northern Tower. Use the Northern Westerea guidepost, head to the river on the left side and swim your way north to find the caves.

Table images: Graphic: Paulo Kawanishi/Polygon | Source images: Square Enix and Claytechworks/Square Enix via Polygon


All Age of Reconstruction Shard of Life locations in The Adventures of Elliot

You can find 18 Shards of Life in the Age of Reconstruction. While most of them you can obtain without too much trouble, you will need to learn the dive ability to collect a few shards.

Map

Location

Description

A montage of two The Adventures of Elliot screenshots showing the location of a shard of life in the Age of Reconstruction

Neverwither

To reach the Shrine of Life 3, you must use Secret Shortcut 2 southeast of Neverwither. You must have unlocked the bomb to open the entrance.

A montage of two The Adventures of Elliot screenshots showing the location of a shard of life in the Age of Reconstruction

Neverwither

Go west of the Littlehope Village – Northern Entrance guidepost to find some boulders blocking a ladder. Use a bomb to destroy them and get to the chest.

A montage of two The Adventures of Elliot screenshots showing the location of a shard of life in the Age of Reconstruction

Whiterea

You must use Secret Shortcut 3’s northwest entrance to make your way to where the Shrine of Life 4 is located.

A montage of two The Adventures of Elliot screenshots showing the location of a shard of life in the Age of Reconstruction

Whiterea

This chest is located inside the Northern Caverns and you find its entrance on the northwestern side of Whiterea. Inside, on the east side of the cave, there’s a blue chest. To reach it, use the spear to break the vases and jump to where it’s located.

A montage of two The Adventures of Elliot screenshots showing the location of a shard of life in the Age of Reconstruction

North of Western Fields of Flon

You will find this chest on a small island north of the Western Fields of Flon.

A montage of two The Adventures of Elliot screenshots showing the location of a shard of life in the Age of Reconstruction

Western Fields of Flon

The Shrine of Life 2 is located north of the Western Fields of Flon.

 A montage of two The Adventures of Elliot screenshots showing the location of a shard of life in the Age of Reconstruction

Northern Tower – Westerea

East of the sublevel one, enter a room with two pillars. Align them to bridge your way to the platform with a blue chest that contains the shard.

A montage of two The Adventures of Elliot screenshots showing the location of a shard of life in the Age of Reconstruction

Westerea

Find this chest to the right of the Southern Westerea guidepost.

A montage of two The Adventures of Elliot screenshots showing the location of a shard of life in the Age of Reconstruction

Eddartrayl

From the Geared Ruins, head southwest and follow the path that takes you upwards to find this chest.

A montage of two The Adventures of Elliot screenshots showing the location of a shard of life in the Age of Reconstruction

Eddartrayl

The Shrine of Life 8 is located northwest of Eddartrayl, but to reach it you must use a bomb to open the entrance to Secret Shortcut 4 on the southwestern side of Eddartrayl.

A montage of two The Adventures of Elliot screenshots showing the location of a shard of life in the Age of Reconstruction

Southern Caves (Desert exit) – Eddartrayl

You pass through the Southern Caves during the campaign to reach the Shrine of Mystic – Ignite. The chest is behind a path, and you must have unlocked the hammer to open the way for the platforms that take you to the chest containing this shard.

A montage of two The Adventures of Elliot screenshots showing the location of a shard of life in the Age of Reconstruction

Neverwither

This Shard of Life is inside a chest on the southeast side of Neverwither. Go south from the guidepost outside the Eastern Cave, take the route to the east and swim to the other side of the small lake to find it.

A montage of two The Adventures of Elliot screenshots showing the location of a shard of life in the Age of Reconstruction

Grandtree – Neverwither

The chest containing is located on the northern side of the first level in the Grandtree. To reach the place, you must drop from the southwest area on the second level.

A montage of two The Adventures of Elliot screenshots showing the location of a shard of life in the Age of Reconstruction

Doorway Ruins – Neverwither

On the west side of sublevel two, there’s a room with two moveable mirrors and on the south side of it, you will find the chest on a platform.

A montage of two The Adventures of Elliot screenshots showing the location of a shard of life in the Age of Reconstruction

Garretbelt

Shrine of Life 7 is located on the western side of Garretbelt. You can reach the area by using the Western Caves.

A montage of two The Adventures of Elliot screenshots showing the location of a shard of life in the Age of Reconstruction

Westerea

Southwest of the Water Ruins, there are two elevated platforms. You can access the one on the left using a ladder, then jump on the one to the east to find a blue chest containing the shard. You can only access this area after having unlocked the ability to dive.

A montage of two The Adventures of Elliot screenshots showing the location of a shard of life in the Age of Reconstruction

Water Ruins surroundings

Shrine of Life 6 is located to the right of the Water Ruins.

  A montage of two The Adventures of Elliot screenshots showing the location of a shard of life in the Age of Reconstruction

Dragonpillar – Whiterea

Use the stairs to reach sublevel three. As soon as you’re on the level, you will see the chest containing this shard.

Table images: Graphic: Paulo Kawanishi/Polygon | Source images: Square Enix and Claytechworks/Square Enix via Polygon


All Age of Magic Shard of Life locations in The Adventures of Elliot

Among the 13 Shards of Life in the Age of Magic, you will only need to have unlocked specific abilities to collect a couple of them.

Map

Location

Description

A montage of two The Adventures of Elliot screenshots showing the location of a shard of life in the Age of Magic

Eastern Fields of Flon

On the northeastern side of the Eastern Fields of Flon, to the right of the Secret Shortcut 1 entrance.

A montage of two The Adventures of Elliot screenshots showing the location of a shard of life in the Age of Magic

Eastern Fields of Flon

The Shrine of Life 11 is located on the north side of the Eastern Fields of Flon.

A montage of two The Adventures of Elliot screenshots showing the location of a shard of life in the Age of Magic

Eddartrayl

You find the Shrine of Life 13 on the southeastern side of Eddartrayl.

A montage of two The Adventures of Elliot screenshots showing the location of a shard of life in the Age of Magic

Westerea

Head northeast of the Rainbow Lotus dungeon to find the Shrine of Life 12.

A montage of two The Adventures of Elliot screenshots showing the location of a shard of life in the Age of Magic

Garretbelt

This chest is north of Garretbelt. You must go through Monster Trail 5 to reach the place after having obtained the key to the Western Caves.

A montage of two The Adventures of Elliot screenshots showing the location of a shard of life in the Age of Magic

Garretbelt

The Shrine of Life 17 is on the southern side of Garretbelt, near the Doorway Ruins.

A montage of two The Adventures of Elliot screenshots showing the location of a shard of life in the Age of Magic

Fire Ruins – Garretbelt

You find this chest inside the Fire Ruins, on the northwest side of the first level, coming from the sublevel one.

A montage of two The Adventures of Elliot screenshots showing the location of a shard of life in the Age of Magic

Eddartrayl

To reach the Shrine of Life 14, use Secret Shortcut 3 to reach the upper part of the snowfield in Whiterea, where you will find a chest containing this shard.

A montage of two The Adventures of Elliot screenshots showing the location of a shard of life in the Age of Magic

Whiterea

Use Secret Shortcut 3 to reach the upper part of the snowfield in Whiterea, where you will find a chest containing this shard.

A montage of two The Adventures of Elliot screenshots showing the location of a shard of life in the Age of Magic

Ice Ruins – Whiterea

After unlocking Faie’s Vacuum spell, go to the west wing of the Ice Ruins. Use her ability to open the door and head northeast to find this chest.

A montage of two The Adventures of Elliot screenshots showing the location of a shard of life in the Age of Magic

Whiterea

The Shrine of Life 15 is located on the west shore of Whiterea.

To access this shrine, you must unlock the dive ability and enter Monster Trail 4 east of the Ice Ruins in Whiterea. From there, the only exit available will take you to the shrine.

A montage of two The Adventures of Elliot screenshots showing the location of a shard of life in the Age of Magic

Water Ruins – North of Western Fields of Flon

Use the stairs to reach sublevel two, then activate the orbs on the east side to raise the water level. Swim to the south side of the map then head right to find the chest.

A montage of two The Adventures of Elliot screenshots showing the location of a shard of life in the Age of Magic

Rainbow Lotus – Westerea

The chest is on the first level, but you must go to the sublevel one to find the stairs that will lead up to the area from where you can reach the chest.

Table images: Graphic: Paulo Kawanishi/Polygon | Source images: Square Enix and Claytechworks/Square Enix via Polygon


All Age of Budding Shard of Life locations in The Adventures of Elliot

By the time you reach the Age of Budding, you might have already unlocked most abilities and spells you will need to collect all 13 Shards of Life in this age.

Map

Location

Description

A montage of two The Adventures of Elliot screenshots showing the location of a shard of life in the Age of Budding

North of Western Fields of Flon

Head to the north Western Fields of Flon and use a bomb to break the wall and enter the lake. Swim to the west and dive to reach the beach that gives you access to the ladder to climb the small island.

A montage of two The Adventures of Elliot screenshots showing the location of a shard of life in the Age of Budding

Western Fields of Flon

The Shrine of Life 19 is located on the northern side of the Western Fields of Flon, but you must go around it to reach the ladder that gives you access to the shrine.

A montage of two The Adventures of Elliot screenshots showing the location of a shard of life in the Age of Budding

Desert Caves – Eddartrayl

Reach sublevel two by dropping off the hole in the first level, then taking the stairs to the northwest side of sublevel one. Then, open the chest to get this shard.

A montage of two The Adventures of Elliot screenshots showing the location of a shard of life in the Age of Budding

Eddartrayl

Shrine of Life 20 is on the southwest side of Eddartrayl. Take the Southern Caves – Desert Exit and head southwest to reach the area where the shrine is located.

A montage of two The Adventures of Elliot screenshots showing the location of a shard of life in the Age of Budding

Western Fields of Flon

Enter the Southern Caves – Desert Exit on the southwest side of Eddartrayl and head north to reach the area where you will find the chest containing this shard.

A montage of two The Adventures of Elliot screenshots showing the location of a shard of life in the Age of Budding

Neverwither

The Shrine of Life 23 is near the Grandtree in Neverwither. The only path to its location is along Monster Trail 6. The trail’s entrance is on the river located southeast of the shrine.

A montage of two The Adventures of Elliot screenshots showing the location of a shard of life in the Age of Budding

Dragonpillar – Whiterea

Head to sublevel three and, on the west side, use the Warp magic to reach the chest.

A montage of two The Adventures of Elliot screenshots showing the location of a shard of life in the Age of Budding

Whiterea

This shard of life is located on the northwest side of Whiterea, near the Northern Whiterea guidepost.

A montage of two The Adventures of Elliot screenshots showing the location of a shard of life in the Age of Budding

Mount Phoenix – Garretbelt

On the first level, on the west side of the map, you can open this chest after having raised the bridge by lighting a pillar near the area.

A montage of two The Adventures of Elliot screenshots showing the location of a shard of life in the Age of Budding

Garretbelt

You find the Shrine of Life 24 on the northern side of Garretbelt. Go through the monster trail 5 to reach the place.

A montage of two The Adventures of Elliot screenshots showing the location of a shard of life in the Age of Budding

Westerea

Shrine of Life 22 is located northwest of Westerea. To reach the location, you must use Monster Trail 3.

A montage of two The Adventures of Elliot screenshots showing the location of a shard of life in the Age of Budding

Water Ruins surroundings

This chest is located on the largest island southeast of the Water Ruins. You can reach it by heading to the northern side of the Western Fields of Flon.

A montage of two The Adventures of Elliot screenshots showing the location of a shard of life in the Age of Budding

Garretbelt

Use the Secret Shortcut 7 passage, southwest of Mount Phoenix to reach this chest.

Table images: Graphic: Paulo Kawanishi/Polygon | Source images: Square Enix and Claytechworks/Square Enix via Polygon

Google’s extensive June security update fixes tons of lingering Pixel problems


What you need to know

  • Google detailed its June security patch for Pixel phones shortly after Android 17 and its Pixel Drop went live.
  • The company is still focused on fixing lingering display problems, as well as battery charging issues that weren’t quite solved in May.
  • Android 17 brings a few new features for Pixels, but it also bolsters security and threat detection.

Google’s busy week continues as a new security patch is rolling out for its Pixels, carrying a series of fixes for the latest software.

Android 17 launched this week, and Pixels are receiving a June Drop loaded with features. Now, a June security patch has been detailed with a substantial number of fixes for Pixel phones. The update is rolling out for Pixel 6 and newer devices, marked as vCP2A.260605.012 for global units. Google’s extensive patch notes clue us into several “Display & Graphics” issue fixes that have plagued Pixel phones for the past few months.

How to turn off AI in your Google Docs


It happened to me: I opened a Google Doc to write an article, and I was immediately confronted with a text box inviting me to “write with Gemini.” I looked for some button to swipe away the garish AI display, but I could not find it. It made me mad.

Now, instead of writing the article I’m supposed to be working on, I am writing about how to get the AI pop-ups off of your Google Docs screen, since it took me some time to figure out. You’re welcome.

What is this monstrosity? Why won’t it just go away?Image Credits:Screenshot from Google Docs

The first fix is pretty straightforward:

  • Click “Gemini” on the top menu bar above your document.
  • On the drop-down menu, select “bottom bar preferences.”
  • You can choose to turn off that bottom bar, which will get rid of that AI box at the bottom of your screen.
Image Credits:Screenshot from Google Docs

Full disclosure: I was so enraged when I set out to find “bottom bar preferences” that I initially missed it entirely. Instead, I clicked “Ask something else” and asked Gemini to help me remove itself from my life. AI may not be human, but Gemini seemed to have some sort of survival instinct, because it told me to click the “X” icon. That does not remove Gemini. It simply closed the conversation, the one in which I was asking it how to turn itself off. Suspicious!

Image Credits:Screenshot from Google Docs

Other aggrieved Google Docs users have reported features that I have yet to encounter, like a “help me write” feature that hovers over your cursor while you work. This seems like something that would upset me, so it’s probably worth nipping that in the bud before it’s too late. Benjamin Franklin once said, “An ounce of prevention is worth a pound of cure.” (He was talking about fire safety. I am talking about product design.)

Instead of turning off each individual AI feature like a game of whac-o-mole, we can disable “smart features” across our Google workspace via Gmail.

  • First, navigate to your Gmail inbox.
  • From there, find the gear icon for Settings and click it.
  • Then, at the top of the menu, click “See all settings.” (But while you’re here, you should pick out a fun theme for your inbox. Would a little bit of whimsy kill you?)
  • After clicking “See all settings,” scroll about half way down the page to find “Google Workspace smart features,” then click “Manage Workspace smart feature settings.”
Image Credits:Screenshot from Gmail
  • Here, you’re presented with two options: one that lets you toggle off smart features in Google Workspace (like those annoying Gemini pop-ups in Google Docs), and one that applies to other smart features (which I personally find less annoying). I only toggled off the first option, but if for some reason you hate when Gmail automatically makes calendar events for your flights, this is where you can fix that.

You should now be safe from annoying Gemini pop-ups that disrupt your writing process in Google Docs. You can rest easy.

When you purchase through links in our articles, we may earn a small commission. This doesn’t affect our editorial independence.