Spotify, it’s fair to say, has made some weird user-experience choices.
There are a number of panels in the app, and the layout is confusing. The service constantly tracks your activity. The app also seems to have an odd hostility to playing actual albums. This all works to create a general feeling that Spotify’s designers are trying to push you into using the service in a particular way.
It’s understandable, then, that some people are annoyed with the way music videos have been added to the platform. For the most part, they would start to play by default, in the background, whenever an artist had uploaded a video for the song. Some music videos have very different audio from the original tracks, particularly if they include sketches or sound effects, which can prove distracting if you prefer the album version of the song. And even if you enjoy music videos (which I do), the decision to have videos play by default—using up bandwidth and battery power—upset a lot of people.
There are a few other quirks. On Spotify’s desktop app, the videos are barely visible; they stay contained in the tiny album art panel until you manage to find the hidden, extremely small Now playing button that enlarges them. Also, the selection of videos that are on the platform, and the ones that are mysteriously absent, seems totally random. Because of this, I check YouTube first when I really want to watch a music video.
The most annoying thing, though, had been a lack of any obvious way to disable all videos. That changed recently—there’s now a toggle in the settings to disable music videos in Spotify entirely, alongside controls that disable the Canvas feature (animated album art) and video podcasts.
On mobile you can do this by tapping your user profile icon in the top-left to bring up the side panel. Then tap Settings and privacy, followed by Content and display.
Photograph: Justin Pot
In the Videos and Canvas section you will see three toggles: one for music videos, one for Canvas, and one for all other videos. This last toggle disables video podcasts, meaning you’ll get the audio-only version of podcasts instead. Turn all these off, and Spotify will use a lot less bandwidth.
On the desktop app, it’s a little different. Click your user profile icon in the top-right corner, then click Settings. Scroll down to the Videos and Canvas section to find the options to disable music videos and Canvas.
I tested this and it worked. The music video icon in playlists and albums disappeared, as did the collection of music videos on Artist pages. The only remnant of the disabled feature is a Switch to video button in the Now Playing sidebar, which appears below the album art. Click it and you’ll be told the video can’t play unless you turn videos back on in the settings. Odd, for sure, but for the most part turning this off means you don’t have to think about music videos in Spotify anymore.
I sincerely wish that Spotify would roll out music videos with more care. Sometimes I really do want to see a video—just not every time I play a track. Playlists of music videos might be welcome if they ran separately from the audio-only playlists. I just don’t want to get a music video when I’m looking for the album version of a song, and I don’t think I’m alone in that. I can only hope that Spotify’s future interface design choices will keep things more clearly separated.
Experience an epic action-adventure story set in feudal Japan! Become a lethal shinobi assassin and powerful legendary samurai as you explore a beautiful open world in a time of chaos.
MASTER THE DEEPEST STEALTH MECHANISMS OF THE SERIES & FIGHT IN VISCERAL COMBAT
“Shadows is some of the most fun I’ve had with a stealth game in a decade” —PC Gamer
Play as Naoe, a quick-witted shinobi, and use light, sound, and shadows to evade detection. Infiltrate enemy strongholds with many parkour options including the new grappling hook, distract guards with shuriken or smoke bombs, and assassinate your targets with your Hidden Blade. As the samurai Yasuke, use silent bow takedowns or unleash devastating melee combos with your katana or naginata.
DEEP-DIVE INTO THE CAPTIVATING WORLD OF ASSASSIN’S CREED SHADOWS
“Assassin’s Creed Shadows creates one of the best versions of the open-world style.” —IGN Way of the Hunter 2
Step into feudal Japan like never before! From majestic castle towns to serene shrines and sweeping countryside, Assassin’s Creed Shadows offers a breathtaking open world where dynamic seasons, shifting weather, and environmental destruction affect your tactical approach.
DISCOVER THE MOST TECHNICALLY ADVANCED ASSASSIN’S CREED GAME YET
“It leads to one of the most dynamic, fun, and best-looking open-world games I’ve played this generation.” —Kotaku
Experience a true next-gen leap with Assassin’s Creed Shadows, powered by the updated Anvil engine. Explore a world brought to life with ray-traced Global Illumination, real-time reflections, virtualized geometry, and dynamic wind and environmental particles.
A GLOBAL HIT Whether you are a veteran Assassin’s Creed player or new to the franchise, feudal Japan awaits you! Join a community of millions of players and discover a title GameSpot describes as “an absolute blast to play,” Eurogamer.es as “the best Assassin’s Creed of the modern era” and GamingTrend as “the new benchmark for the series.”
Screenshots
SystemRequirements
Minimum Requires a 64-bit processor and operating system
OS: Windows 10/11
Processor: INTEL® Core TM i7 8700K AMD RYZEN 5 3600
Memory: 16 GB RAM
Graphics: NVIDIA® GEFORCE GTX 1650 4GB / AMD RX-5500 XT 8GB / INTEL® ARC TM A380 6GB (REBAR ON)”
DirectX: Version 12
Storage: 115 GB available space
Support the game developers by purchasing the game on Steam
InstallationGuide
TurnOff Your Antivirus Before Installing Any Game
1 :: Download Game 2 :: Extract Game 3 :: Launch The Game 4 :: Have Fun 🙂
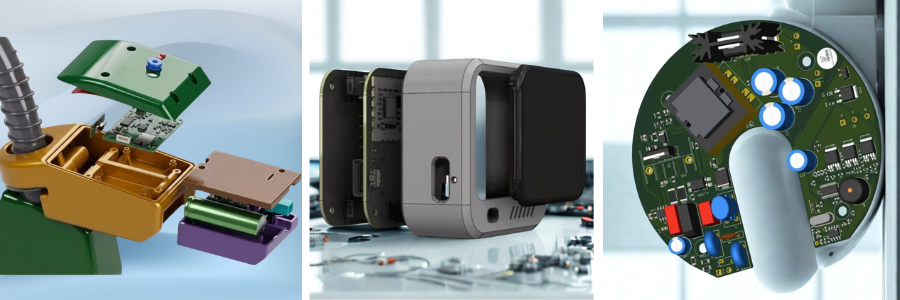
When people take apart devices like smartwatches, fitness trackers, or smart thermostats, they usually notice two main components inside. The first is the PCB, which controls the electronic functions and processing of the device. The second is the enclosure that holds and protects those internal parts. Companies help businesses develop custom electronics enclosures that are designed specifically for their PCB layouts, product requirements, and manufacturing goals.
A well-designed enclosure does much more than simply cover the electronics. It helps protect sensitive components from dust, moisture, impact, and overheating. It also improves usability and plays a major role in how the final product looks and feels to customers. Through its network of experienced CAD designers and engineers, supports startups, manufacturers, and technology companies with custom enclosure design services for a wide range of PCB-based products. Cad Crowd connects startups, manufacturers, inventors, and technology companies with specialized enclosure design experts who create custom housing solutions for a wide range of PCB-based products, from consumer electronics to industrial equipment.
For many electronics products, enclosure design becomes one of the most important stages of development. The housing needs to match the PCB layout accurately while also supporting airflow, durability, manufacturing requirements, and overall product design. Even small issues with spacing, materials, or thermal management can create problems later during testing or production.
Designing a PCB can take weeks or even months of development, testing, and refinement. Every component, circuit trace, and connection is carefully planned to support the performance of the final product. However, one important part of product development that is often overlooked is the enclosure that will house those electronics.
While off-the-shelf enclosures may seem convenient during the early stages of development, they are rarely designed to fit a specific PCB layout or product requirement. Companies often encounter issues such as misaligned ports, restricted airflow, poor cable management, weak durability, or limited internal space. In some cases, generic electronics enclosures can interfere with antennas, trap excess heat, or make the final product appear less polished.
This is where custom enclosure design becomes valuable. A custom electronics enclosure is designed specifically around the PCB and the intended function of the device. Whether the product is a wearable device, industrial sensor, medical instrument, or IoT system, the enclosure should support both performance and long-term reliability. A properly designed enclosure does more than protect electronics.
It can improve airflow and thermal management, simplify assembly and maintenance, support waterproofing requirements, and reduce stress on internal components. Custom enclosure design also allows products to be optimized for different manufacturing processes, including 3D printing, CNC machining, sheet metal fabrication, and injection molding process.
In addition to functionality, enclosure design also affects the appearance and usability of electronics product. The shape, materials, surface finish, and overall construction all influence how users interact with the device and how the product is perceived in the market. Investing in a custom enclosure helps companies create electronics products that are more reliable, easier to manufacture, and better suited for real-world use.
Cad Crowd: your custom enclosure design dream team
Custom enclosure design is one of those things people often think is simple until they actually need to do it. If you are not a mechanical engineer, or your team is already busy with other tasks, turning an idea into a proper manufacturable enclosure can get overwhelming pretty quickly.
That is where Cad Crowd comes in. It is not just a freelance platform. It works more like a curated network that connects you with experienced CAD professionals who actually focus on custom enclosure design instead of general 3D modeling. Whether you are a startup building your first prototype or a company refining a product for production, Cad Crowd helps you find designers who understand what a real enclosure needs. This includes PCB housing, electronics casing, and full industrial product design.
What makes it useful is that you are not just hiring someone to draw a basic shape. You are working with designers who think about real engineering details like heat management, durability, waterproofing, internal spacing, and how the product will be manufactured later on. If your enclosure needs injection molding, CNC machining, 3D printing, or materials like aluminum, plastic, or sheet metal, you can find someone who already has experience with that. If your product is customer facing, they also know how to balance functionality with a clean and professional look.
Another helpful part is how guided the process feels. You do not have to figure everything out alone. You get support in defining the project, choosing the right designer, and making sure the design is ready for manufacturing from the start. This helps reduce mistakes and saves time later on.
At the end of the day, custom enclosure design is not just about creating a shell for components. It is about making sure your product works properly, can be manufactured efficiently, and still looks good. With Cad Crowd, you are working with specialists who understand that balance and can help bring your idea from concept to production in a smoother way.
Custom enclosures: engineering meets storytelling
A product enclosure often gets treated like it is just a simple shell. Something that holds the electronics and keeps everything safe. But in reality, it plays a much bigger role than that. In a market where people form opinions in seconds, the enclosure can actually shape how a product is perceived before it is even turned on.
Think about the first time you hold something like an Apple device. You notice the smooth finish, the clean edges, the way everything feels intentional. Nothing feels random. That is not accidental at all. Those small details quietly signal quality and care, even before you use the device. That is what thoughtful enclosure design does. It communicates something without saying a word.
Not every company has that kind of design budget, but the idea still applies. A good enclosure can make a product feel more trustworthy, more refined, and more complete. It sets the tone for the entire experience.
This is why custom enclosure design is not just a technical step in development. It is more of a collaboration between engineering and design. Professional electrical engineers, industrial designers, and enclosure specialists working together to make sure the product does not just function properly, but also feels right in the hand and fits the brand it represents.
When it is done well, the enclosure stops being just a cover. It becomes part of the product’s identity. Something users notice even if they cannot always explain why. So instead of thinking of the enclosure as the final step, it helps to treat it as part of the first impression. Because for most users, it literally is the first real interaction they will have with your product.
The real-world benefits of custom enclosures
When people talk about bringing an electronics product to market, the focus usually goes to processors, sensors, or PCB design, while the enclosure is often treated as just the outer shell. In reality, custom enclosures do much more than “house” electronics. They directly affect how a product performs, how well it holds up in real-world conditions, and how professional it feels when someone actually uses it.
A well-designed enclosure protects sensitive components from dust, moisture, heat, and impact, while also helping everything fit and function properly inside the device. It can also make manufacturing smoother by simplifying assembly and reducing issues when scaling from prototype to production. This is why companies often work with specialists, and platforms like Cad Crowd are trusted to connect businesses with experienced enclosure design professionals who understand both engineering and real-world product development.
Keeping electronics safe in the harshest environments
Whether it is a rugged IoT device deployed in a dusty warehouse, a medical scanner handled daily by gloved technicians, or a sensor box mounted on a windy construction site, electronics go through a lot in real-world conditions. Printed circuit boards (PCBs) are sensitive by nature, and without a properly designed enclosure, they are exposed to moisture, dust, impact, and everyday wear.
This is where custom enclosures really prove their value. Designers can add features like shock-absorbing ribs, watertight gasket grooves, and reinforced mounting points, all based on how the product will actually be used. It is not a one-size-fits-all solution. It is targeted protection built for durability and long-term reliability.
Heat management that keeps products performing
High-performance electronics all have one thing in common, they generate heat. If that heat is not managed properly, it can lead to reduced performance, sudden shutdowns, or even permanent damage. In many cases, enclosure design becomes one of the most important factors in keeping things stable.
Engineers design enclosures that support airflow, integrate heat sinks, or use thermally conductive materials and pads. Some designs even help move heat away from sensitive components through the enclosure walls themselves. A well-designed enclosure can be the difference between a product that performs reliably and one that fails under pressure.
In a highly connected world, electromagnetic interference (EMI) is more than just a minor issue. It can disrupt performance or even cause devices to fail compliance testing. Poor shielding or grounding can turn a device into an unintended source of interference.
Smart enclosure designers account for this from the start. Shielding layers, conductive coatings, and properly designed grounding paths are built into the structure of the enclosure itself. The result is a product that behaves consistently and passes important regulatory tests without surprises.
Supporting certification and compliance goals
Custom enclosures are also essential when it comes to meeting certification requirements. Standards like FCC, CE, UL, and IP ratings are often mandatory before a product can be released commercially.
Material selection, wall thickness, sealing methods, and even finishing details can all affect whether a product passes these tests. Off-the-shelf enclosures usually fall short here. A purpose-built custom enclosure is what helps a product meet regulatory requirements with confidence.
Streamlining the manufacturing process
One thing people often overlook is that the enclosure is usually one of the most complex physical parts of a device to manufacture. Whether it is injection molding, 3D printing, or CNC machining, every method requires careful design decisions. Good enclosure design includes details like draft angles for clean mold release, internal ribs for strength without extra weight, and properly placed bosses for screws and PCB mounting. These details may seem small, but they make manufacturing smoother and more cost-effective at scale.
All of this requires more than basic CAD skills. It takes designers who understand thermal behavior, compliance standards, and real-world product use. That is where Cad Crowd comes in. Their global network includes experienced enclosure design professionals who are matched to your specific project, whether you are prototyping a wearable device or scaling an industrial controller for production. They focus not just on how a product looks, but on how it performs, passes certification, and succeeds in manufacturing.
In the end, a custom enclosure is more than just a protective shell. It acts as a thermal manager, a compliance enabler, and a manufacturing tool all in one. With Cad Crowd, you are not just enclosing electronics, you are setting them up for real-world success.
How the custom enclosure design process works
Designing a custom enclosure is not just about placing electronics inside a plastic case. There is a structured process behind every well-fitting, functional, and production-ready design. If you have never worked with a custom enclosure design company before, the process is actually more detailed and collaborative than most people expect.
Here is how it typically unfolds, and how a platform like Cad Crowd helps make it more efficient from start to finish.
Phase 1: diving deep into your electronics
Everything starts with the electronics themselves. Before any modeling begins, the designer studies your PCB layout, component placement, and overall system requirements. This includes ports, buttons, vents, mounting points, and display cutouts.
This stage is highly collaborative. The enclosure designer works closely with electrical engineers to make sure everything fits correctly and functions properly. Even small details like connector positions orLED placement matter. If this step is rushed, the final enclosure may not fit or could cause performance issues.
Once the technical details are clear, the enclosure starts to take shape in 3D CAD. This is where the idea becomes a real design.
At this stage, both function and form are considered. Designers think about internal spacing, ergonomics, branding, and overall product feel. They also decide on materials like ABS plastic or aluminum, along with wall thickness, fastening methods, and assembly approach. It is a mix of engineering logic and industrial design thinking, and it is a very important stage in the process.
Phase 3: bringing the design to life
After the CAD model is ready, it is time to test it in the real world. Prototypes are created using 3D printing orCNC machining.
This step is not just about appearance. It is about function. Does everything fit properly? Can it be assembled easily? Do buttons feel right? Are tolerances accurate enough for manufacturing? These tests often reveal improvements that are made before moving forward.
The CAD model is adjusted to match the chosen production method, whether that is injection molding, die casting, machining, or low-volume additive manufacturing. Features like draft angles, wall thickness, and structural supports are optimized to make production smooth and reliable.
Even after the design is finalized, many enclosure designers continue supporting the production phase. This can include helping with manufacturers, preparing technical drawings, or working with mold tool designers.
With Cad Crowd, you gain access to vetted enclosure design professionals who guide you through every stage. From early sketches to production-ready files, the process stays flexible and focused on getting your product to market without unnecessary delays or overhead. So when you are building your next electronic product, the enclosure is not just a final step. It is a critical part of the entire journey.
Startups and big players: who is actually using custom enclosure designers?
Custom enclosure design is not limited to large corporations. In fact, many startups get some of the most value out of it because they need to move fast and make every design decision count. At Cad Crowd, clients range from solo inventors working on early prototypes to large companies refining mass-market electronics. Startups often use custom enclosure design for rapid prototyping and fast iteration, especially when working with3D printingand early product testing.
Mid-sized companies usually rely on Cad Crowd as an extension of their engineering teams. When deadlines are tight or specialized expertise is needed, external designers help keep projects moving without slowing down internal workflows. Larger companies often bring in enclosure specialists for more advanced challenges, such as thermal optimization, waterproofing, or redesigning enclosures for new internal hardware. What connects all of these groups is flexibility. There are no long hiring processes or long-term commitments. Just access to experienced designers who can support projects from idea to production.
Not every enclosure is plastic, and the material chosen has big implications for durability, aesthetics, cost, and manufacturing.
Some of the most common choices include:
ABS/Polycarbonate Plastics – Great for consumer electronics, easy to mold, also impact-resistant.
Aluminum – Ideal for heat dissipation and rugged devices; often CNC machined or die cast.
Sheet Metal – Cost-effective for industrial enclosures, especially in low to mid volumes.
3D-Printed Resins or Nylons – Perfect for prototyping or low-volume runs.
Silicone or Rubber Overmolds – Used for grips, buttons, or waterproofing features.
A skilled enclosure designer doesn’t just make the part fit, they understand what materials are best suited to the form and function of your product. With Cad Crowd, you can specify your material needs upfront and be matched with someone experienced in that medium.
Custom enclosure design costs can vary quite a bit depending on the product, materials, and manufacturing requirements. A simple enclosure for an early prototype may only cost a few thousand dollars to design, while a production-ready enclosure often requires additional work such as CAD modeling, thermal analysis, prototyping, and manufacturing preparation. The table below provides a general idea of what companies can expect to invest when developing custom electronics enclosures for PCB-based products.
Mounting features, port alignment, internal clearances
Thermal analysis
$1,500 – $10,000
Airflow studies and heat management optimization
Waterproof design
$2,000 – $15,000
Gaskets, seals, and IP-rated enclosure development
Manufacturing documentation
$500 – $5,000
Technical drawings, assembly details, production files
Full enclosure development
$5,000 – $50,000+
Complete design process from concept to production
Rapid prototyping: when speed matters
Let’s be honest, time-to-market can make or break a product. Whether you are trying to stay ahead of competitors or preparing for a big demo at CES, moving fast without sacrificing quality really matters. Custom enclosure designers working through Cad Crowd are used to this kind of pace. They work with rapid prototyping workflows and can prepare files optimized for SLA, SLS, FDM, or CNC manufacturing. In some cases, you can get physical prototypes in just a few days.
These prototypes are not just for show. They let you hold the design, test it in real conditions, share it with investors, and make improvements early. Because many Cad Crowd designers come from real product development backgrounds, they also think ahead about manufacturability, not just how the model looks on screen.
The bonus: IP protection and confidentiality
One thing that often holds companies back from outsourcing design work is intellectual property protection. That concern is valid, especially when you are working on something new.
Cad Crowd addresses this by requiring freelancers to sign non-disclosure agreements and offering options for fully confidential projects. This means your ideas, product details, and branding stay protected throughout the process, just as they would with an in-house team.
Future-proofing your product with modularity
Another growing trend in custom enclosure design is modularity. Instead of building a fixed, one-time-use design, more products are being created with flexibility in mind.
Custom enclosure designers can integrate features such as swappable backplates for sensors or batteries, snap-fit systems for easier servicing, and modular compartments for future upgrades or accessories. This kind of design thinking helps extend the lifespan of a product and makes it easier to evolve over time.
It can be tempting to design an enclosure in-house using basic CAD tools or off-the-shelf templates, especially in the early stages. For simple mockups, that approach can work fine. But when you are building a real product that needs to perform well, look professional, and be ready for manufacturing, templates are usually not enough. You need someone who understands how to translate a PCB layout and product vision into a proper enclosure that works in the real world.
That is where Cad Crowd helps. It connects you with experienced enclosure design professionals who already understand the challenges of turning concepts into production-ready products, helping reduce guesswork and avoid costly redesigns later on.
Wrapping it all up: from circuit to shelf
At the end of the day, custom enclosure design is not just packaging. It is the part that quietly turns an idea into something real. You can have a great circuit board, great components, great everything, but until it has a proper enclosure, it does not really feel like a product yet. That final shell is what people actually touch, hold, and judge first.
And honestly, this is where things can either go really well or fall apart. When enclosure design is done right, everything just feels solid. The product fits together properly, it looks intentional, and it works in real conditions without constant issues. With Cad Crowd, you are working with designers who have done this kind of thing before, so you are not starting from scratch or guessing your way through it.
A good product should not feel like it was rushed into whatever box was available. It should feel like someone actually thought about how it would be used in real life. A proper custom enclosure helps with that in a big way. It protects the electronics, improves usability, and honestly just makes the whole thing feel finished. That is really the point of Cad Crowd. Helping turn early ideas into something that feels real, works properly, and is ready to go out into the world without feeling half done. Contact us now for a free quote!
MacKenzie Brown is the founder and CEO of Cad Crowd. With over 18 years of experience in launching and scaling platforms specializing in CAD services, product design, manufacturing, hardware, and software development, MacKenzie is a recognized authority in the engineering industry. Under his leadership, Cad Crowd serves esteemed clients like NASA, JPL, the U.S. Navy, and Fortune 500 companies, empowering innovators with access to high-quality design and engineering talent.
Google’s best Pixel is getting an upgrade in 2026. The Pixel 11 Pro XL is said to feature a faster, much more power-efficient processor, a cool LED ring around the back camera island, better gaming support, and plenty of surprises when it debuts on August 12.
Pros
New Pixel Glow feature
Updated Vulkan support should mean better gaming performance
Battery life should be notably improved
Pixelsnap MagSafe magnet support
Potential camera upgrades
Should have the same great accessory support
Cons
Likely still underperforms vs Qualcomm chipsets
Low PWM rate
Pixels have a history of being buggy
Last year’s best Pixel
The Pixel 10 Pro XL looks a whole lot like the Pixel 11 Pro XL, and that’s a particularly great thing in a year when smartphones are getting more expensive. Buying a year-old phone is always a great budget option, and this may be the best year yet for that tactic.
Pros
Pixelsnap Qi2 implementation is brilliant
A host of unique Google Pixel apps and services
Many AI features are processed on-device
Excellent accessory ecosystem (first and third party)
Notably improved gaming performance vs Pixel 6-9
Cons
eSIM-only in the U.S.
Forced battery throttling at 200 cycles
Doesn’t support the latest version of Vulkan
Performance is less than half of Qualcomm’s at times
PWM rate is still bad
The Google Pixel 11 family is right around the corner, and that means now is a great time to start considering whether you’re going to upgrade to this year’s phone, or save money and grab last year’s best with a solid deal (or a second-hand offer).
In a year with rapidly rising technology prices, 2026 might be the best year ever to consider buying last year’s phone, especially with the rumor that Google isn’t giving the Pixel 11 Pro XL a massive overhaul. If you’re choosing between the Pixel 11 Pro XL and Pixel 10 Pro XL, or are considering upgrading year-over-year, here’s everything you need to know!
Google Pixel 11 Pro XL vs. Pixel 10 Pro XL: Design and display
(Image credit: Google Store)
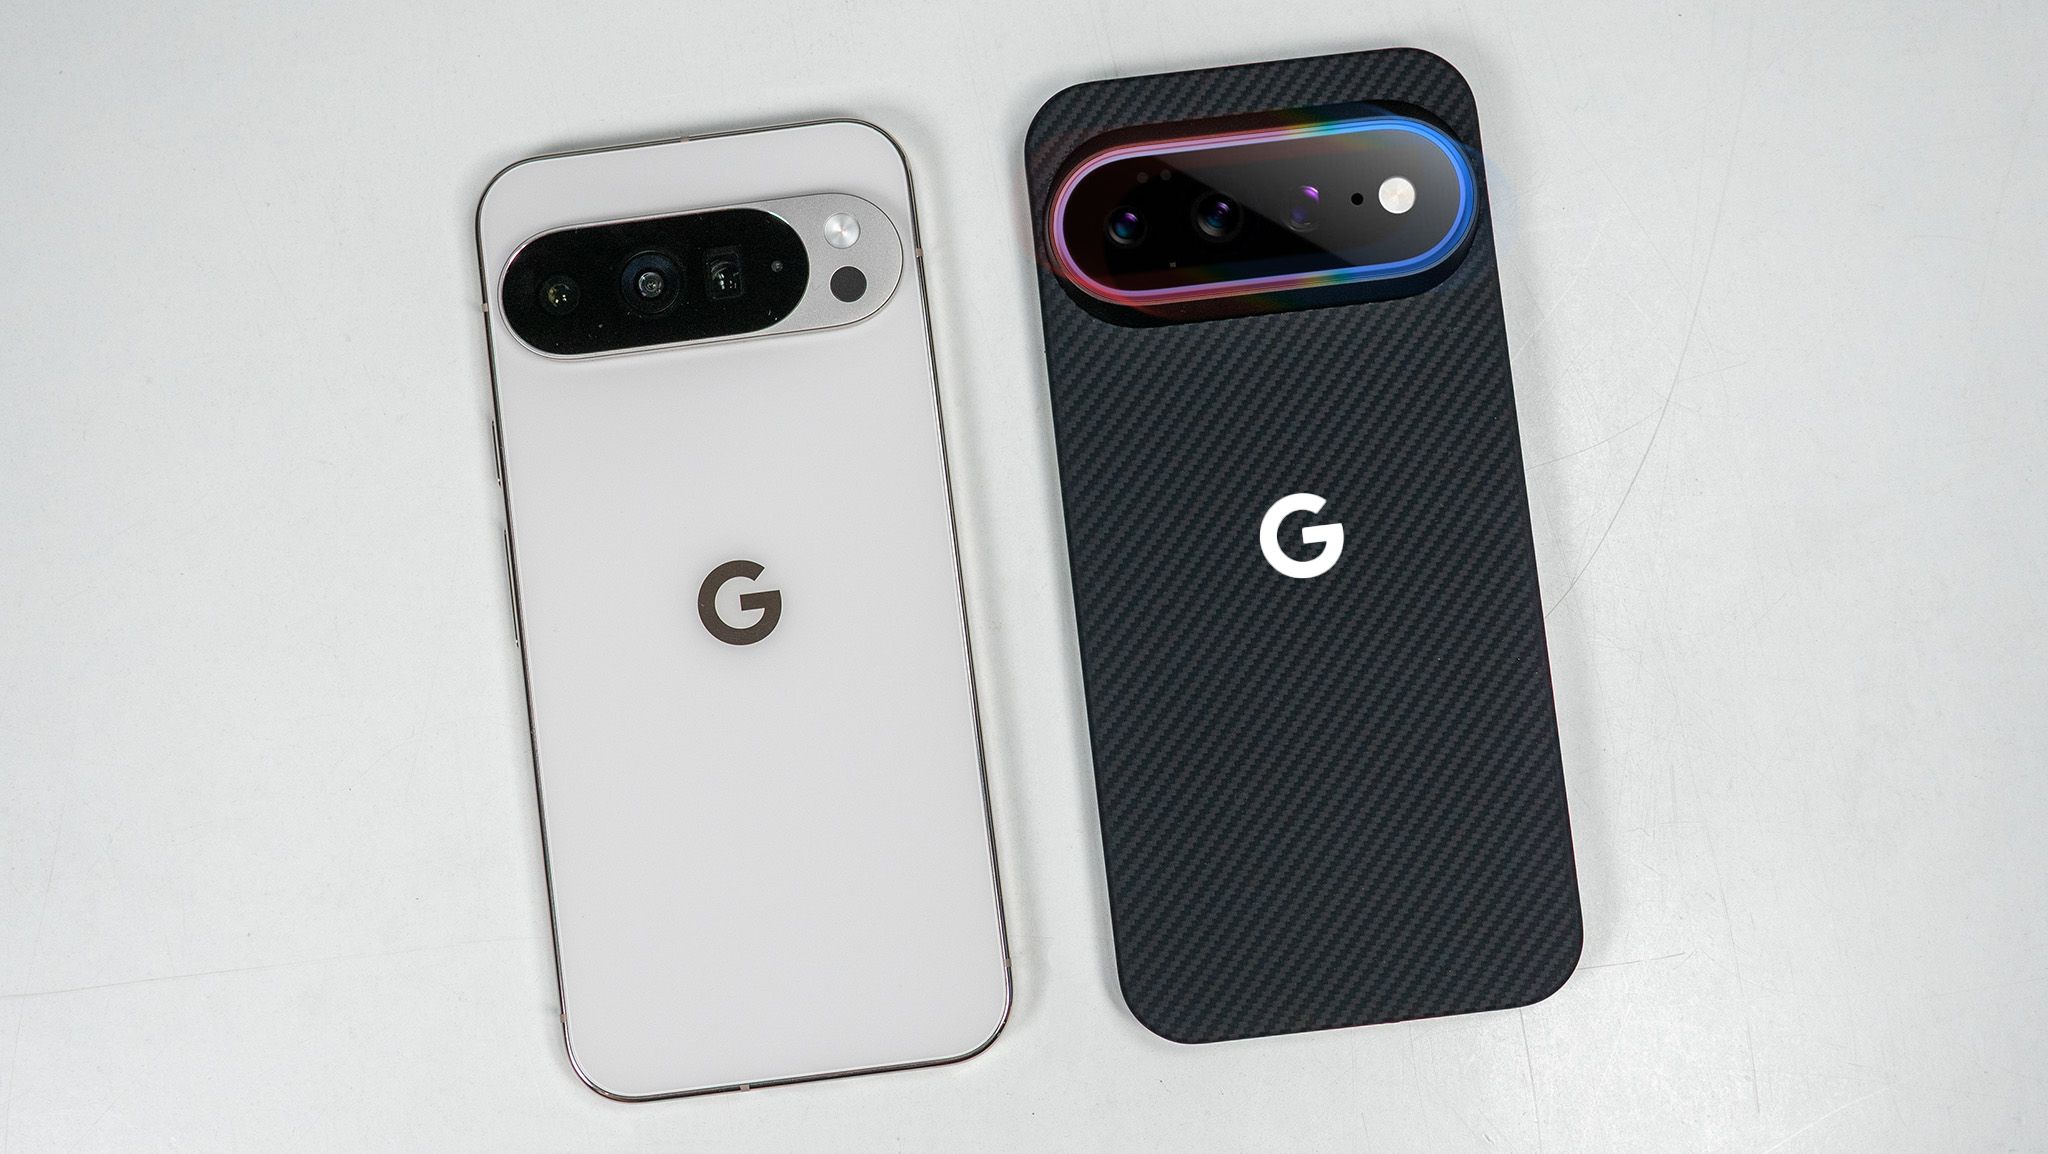
The Pixel 10 Pro XL and Pixel 11 Pro XL will likely look identical at a glance, but at least one key change will catch your eye and make you at least a tiny bit jealous. I’m talking about Pixel Glow, a new type of LED that appears on the Pixel 11’s camera bar, seemingly as part of the camera flash unit.
Latest Videos From
Google may be taking a page from Nothing with this new initiative, likely offering ways to light up the camera bar whenever you receive notifications, talk to Gemini, or interact with specific apps or features on your Pixel 11.
Image 1 of 4
(Image credit: Nicholas Sutrich / Android Central)
(Image credit: Nicholas Sutrich / Android Central)
(Image credit: Nicholas Sutrich / Android Central)
(Image credit: Nicholas Sutrich / Android Central)
I’ve already received Pixel 11 cases from Thinborne, one of Android Central’s favorite case manufacturers, and the changes seen here showcase what we can expect from Pixel Glow. That lip around the camera island is where the subtle LED glow should emit from, and it’s going to give Pixel 11 a unique look among all smartphones.
Elsewhere, we see subtle changes in microphone placement and a slight downward shift of the power and volume buttons on the Pixel 11.
Image 1 of 5
(Image credit: Nicholas Sutrich / Android Central)
(Image credit: Nicholas Sutrich / Android Central)
(Image credit: Nicholas Sutrich / Android Central)
(Image credit: Nicholas Sutrich / Android Central)
(Image credit: Nicholas Sutrich / Android Central)
We expect the Pixel 11 Pro XL to feature the same built-in MagSafe-compatible Pixelsnap magnets, so you won’t need a case to use the best MagSafe accessories for Android phones.
Get the latest news from Android Central, your trusted companion in the world of Android
Based on rumors, we’re not expecting any major changes to the Pixel 11 Pro XL’s display, although it may receive a slight peak brightness bump as Pixels have in the past. Google has been good about introducing new display accessibility features, like Comfort Filters and last year’s “sensitive eyes” feature, so I’m hoping to be pleasantly surprised by the PWM dimming rate at the August 12 event.
Google Pixel 11 Pro XL vs. Pixel 10 Pro XL: Battery life, performance, and specs
(Image credit: Nicholas Sutrich / Android Central)
All signs point to the Pixel 11 Pro XL being the most efficient phone in Pixel history. The more efficient Tensor G6 and the new MediaTek modem inside the Pixel 11 Pro XL are said to bring a 20-30% improvement in efficiency. This, plus a slight improvement in battery capacity, should be a great upgrade over any previous Pixel phone.
The Tensor G6 processor expected to power the Pixel 11 Pro XL should be manufactured on a 2nm process, resulting in performance gains of around 15% in daily use. Google is also said to be using a newer PowerVR GPU that’s compatible with Vulkan 1.4, so mobile games will look and run better than on the Pixel 10 Pro XL.
Swipe to scroll horizontally
Category
Google Pixel 11 Pro XL (rumored)
Google Pixel 10 Pro XL
Display
6.8-inch Super Actua QHD+ OLED, 120Hz
6.8-inch Super Actua QHD+ OLED, 120Hz
OS
Android 17
Android 16 (upgradable to Android 17)
Processor
Tensor G6
Tensor G5
RAM
12GB / 16GB
12GB / 16GB
Storage
256GB / 512GB / 1TB
256GB / 512GB / 1TB
Rear Camera 1
50 MP, f/1.7, 25mm (wide)
50 MP, f/1.7, 25mm (wide)
Rear Camera 2
48 MP, f/1.7 (ultrawide)
48 MP, f/1.7 (ultrawide)
Rear Camera 3
48 MP, f/2.8, 5x (periscope telephoto)
48 MP, f/2.8, 5x (periscope telephoto)
Front Camera
42 MP, f/2.2
42 MP, f/2.2
Ingress Protection
IP68
IP68
Connectivity
5G (sub-6GHz, mmWave), Wi-Fi 7, UWB, Bluetooth 6.0, eSIM only (in U.S.)
5G (sub-6GHz, mmWave), Wi-Fi 7, UWB, Bluetooth 6.0, eSIM only (in U.S.)
Battery
5,000mAh
4,870mAh
Charging
45W wired, 25W wireless Qi2
45W wired, 25W wireless Qi2
Dimensions
162.8 x 76.6 x 8.5 mm
162.8 x 76.6 x 8.5 mm
Weight
TBA
232 grams
Google Pixel 11 Pro XL vs. Pixel 10 Pro XL: Camera and software
(Image credit: Nicholas Sutrich / Android Central)
Despite some awesome new features, I was largely unimpressed with the Pixel 10 Pro XL’s camera last year. While it still did a great job of capturing objects in motion (like kids and pets), I found the telephoto camera strangely unreliable.
Hopefully, Google fixes these problems in the Pixel 11 Pro XL and gets back to that top-tier Pixel camera experience. Google still needs to work on its video recording quality, which was substantially improved with the Pixel 10 Pro XL, but continues to lag behind rivals like Apple and Samsung.
(Image credit: Nicholas Sutrich / Android Central)
I fully expect the Pixel 11 Pro XL to launch with some exclusive features, but Google is usually good about bringing those features to older Pixel phones after some time. So while Pixel 10 Pro XL users may have to wait to get any fancy new features announced in August, it’s almost certain they won’t miss out.
Google Pixel 11 Pro XL vs. Pixel 10 Pro XL: Which should you buy?
(Image credit: Nicholas Sutrich / Android Central)
I’m going to hedge my bets and say the Pixel 10 Pro XL will be a better buy given the price increases we’re seeing on this year’s new smartphones. Undoubtedly, the Pixel 11 Pro XL’s new processor, GPU, larger battery, and fancy new lights on the back will be great reasons to upgrade, but I’m not sure they’ll make the gulf in price worthwhile for most people.
The past few weeks have been nonstop leak after leak for Samsung’s next foldables. We’re expecting there to be three new models. The main upgrade across the foldables should be Samsung’s Flex Titanium technology, which both strengthens the durability of the screens and reduces the visibility of the crease on the inner screen.
The new Galaxy Z Flip 8 should be the successor to last year’s Z Flip 7. WinFuture has shared product images and what it claims are full details for the new flip-style foldable. While I was hoping for a thinner device, it looks like the Z Flip 8 will be marginally thicker, though it should be lighter at 180g versus the Z Flip 7’s 188g. Otherwise, we’re looking at more or less the same features, but with a newer Exynos 2600 chip. According to WinFuture, the Z Flip 8 will have a 6.9-inch Dynamic AMOLED 2X inner screen with 120Hz refresh rate, a 4.1-inch Super AMOLED cover screen, three cameras (a 50-megapixel main and a 12-megapixel ultrawide on the outside and a 10-megapixel selfie lens on the inside), the same 4,300mAh battery as before but now with faster 45W charging, and storage options of 256GB or 512GB paired with 12GB of RAM.
The middle foldable is expected to be the new shorter and wider Galaxy Z Fold 8. This is supposed to be Samsung’s answer to Apple’s upcoming foldable iPhone. We’ve been staring at leaked images of the Z Fold 8 for weeks, but now we have full specs, also hailing from WinFuture. When unfolded, the Z Fold 8 is said to measure 4.5mm thick, and the whole thing weighs 201g. The report says the Z Fold 8 has a 7.6-inch inner Dynamic AMOLED 2X screen with 120Hz, a 5.5-inch cover screen, dual rear cameras (both 50 megapixels), and two 10-megapixel hole-punch cameras (one on the cover display and one on the inner screen). It should be powered by a Qualcomm Snapdragon 8 Elite Gen 5 for Galaxy and have options for 256GB of storage (with 12GB of RAM) or 512GB and 1TB (with 16GB of RAM). Battery capacity is said to clock in at 4,800mAh, which would be pretty respectable.
On the high-end, we’re expecting to see the Galaxy Z Fold 8 Ultra. As its name suggests, it’s projected to have the better cameras (200-megapixel main camera, 50-megapixel ultrawide, and 10-megapixel 3x telephoto) and longer battery life (5,000mAh). WinFuture’s leak claims the foldable will slim down by 1mm (from 4.2mm to 4.1mm), but gain 3g (from 215g to 218g). The screen aspect ratios will match the Z Fold 7’s closely, with an 8-inch inner screen and 6.5-inch cover screen, both with 120Hz refresh rates. Chipset, storage, and RAM configurations appear to be the same as the Z Fold 8.
On the Samsung smartwatches front, we should be looking at two new models: the Galaxy Watch Ultra 2 and the Galaxy Watch 9. They’re both said to be thinner and lighter than before and use Qualcomm’s latest Snapdragon Wear Elite chip with 2GB of RAM, according to WinFuture.
The Galaxy Watch Ultra 2 will reportedly have an 800mAh battery, which would be a significant jump up from the 590mAh one in the first-gen Watch Ultra. Leaked specs include a titanium case with 10ATM water resistance, a 1.5-inch screen, Bluetooth 6.0, NFC, and LTE.
The Galaxy Watch 9 is expected to come in two sizes again: 40mm with a 1.3-inch screen and 44mm with a 1.5-inch display. Compared to the Galaxy Watch Ultra 2, the water resistance for the Galaxy Watch 9 could be lower at 5ATM. Battery life improvements could be more minimal year-over-year, too: the same 325mAh on the smaller model and a 445mAh for the larger version (a 100mAh bump up from the Galaxy Watch 8’s 435mAh).
It appears Samsung won’t have a new version of the Galaxy Watch 8 Classic, which returned last year with a physical rotating bezel. Maybe the bulkier smartwatch wasn’t popular at all.
More Galaxy AI
One thing that I am certain that Samsung will announce more of is additions to Galaxy AI, its own suite of artificial intelligence features. Whether it’s features from the Galaxy S26 Ultra being brought to the new foldable phones or smartwatches, Samsung has used every Unpacked in recent years to squeeze AI into its apps. It wouldn’t surprise me to see more predictive AI, automations using agentic AI, and generative AI for photo editing. Whether you’ll find them useful is a different question.
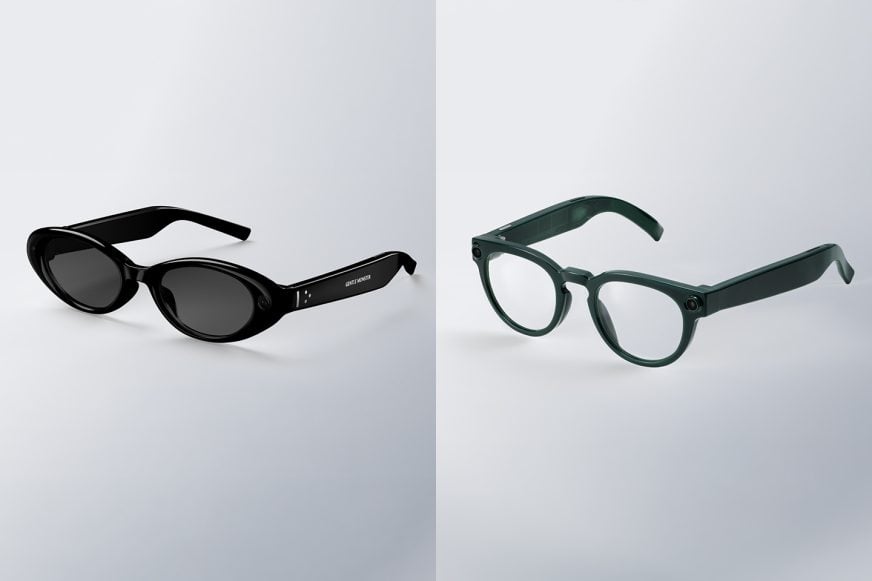
It’s a big year for smart glasses, and Samsung has been very tight-lipped about its plans. Other than a partnership with Google that announced “intelligent eyewear” created with Gentle Monster and Warby Parker at Google I/O this past May, there’s been little additional info. We know that both models have built-in cameras for photos and videos and speakers for music, calls, and audio notifications, which sounds exactly like Meta’s AI glasses. But how much will they cost and what kind of privacy policies will be in place? We have no clue. The latter is especially important considering how Meta keeps making it feel gross to wear any of its smart glasses.
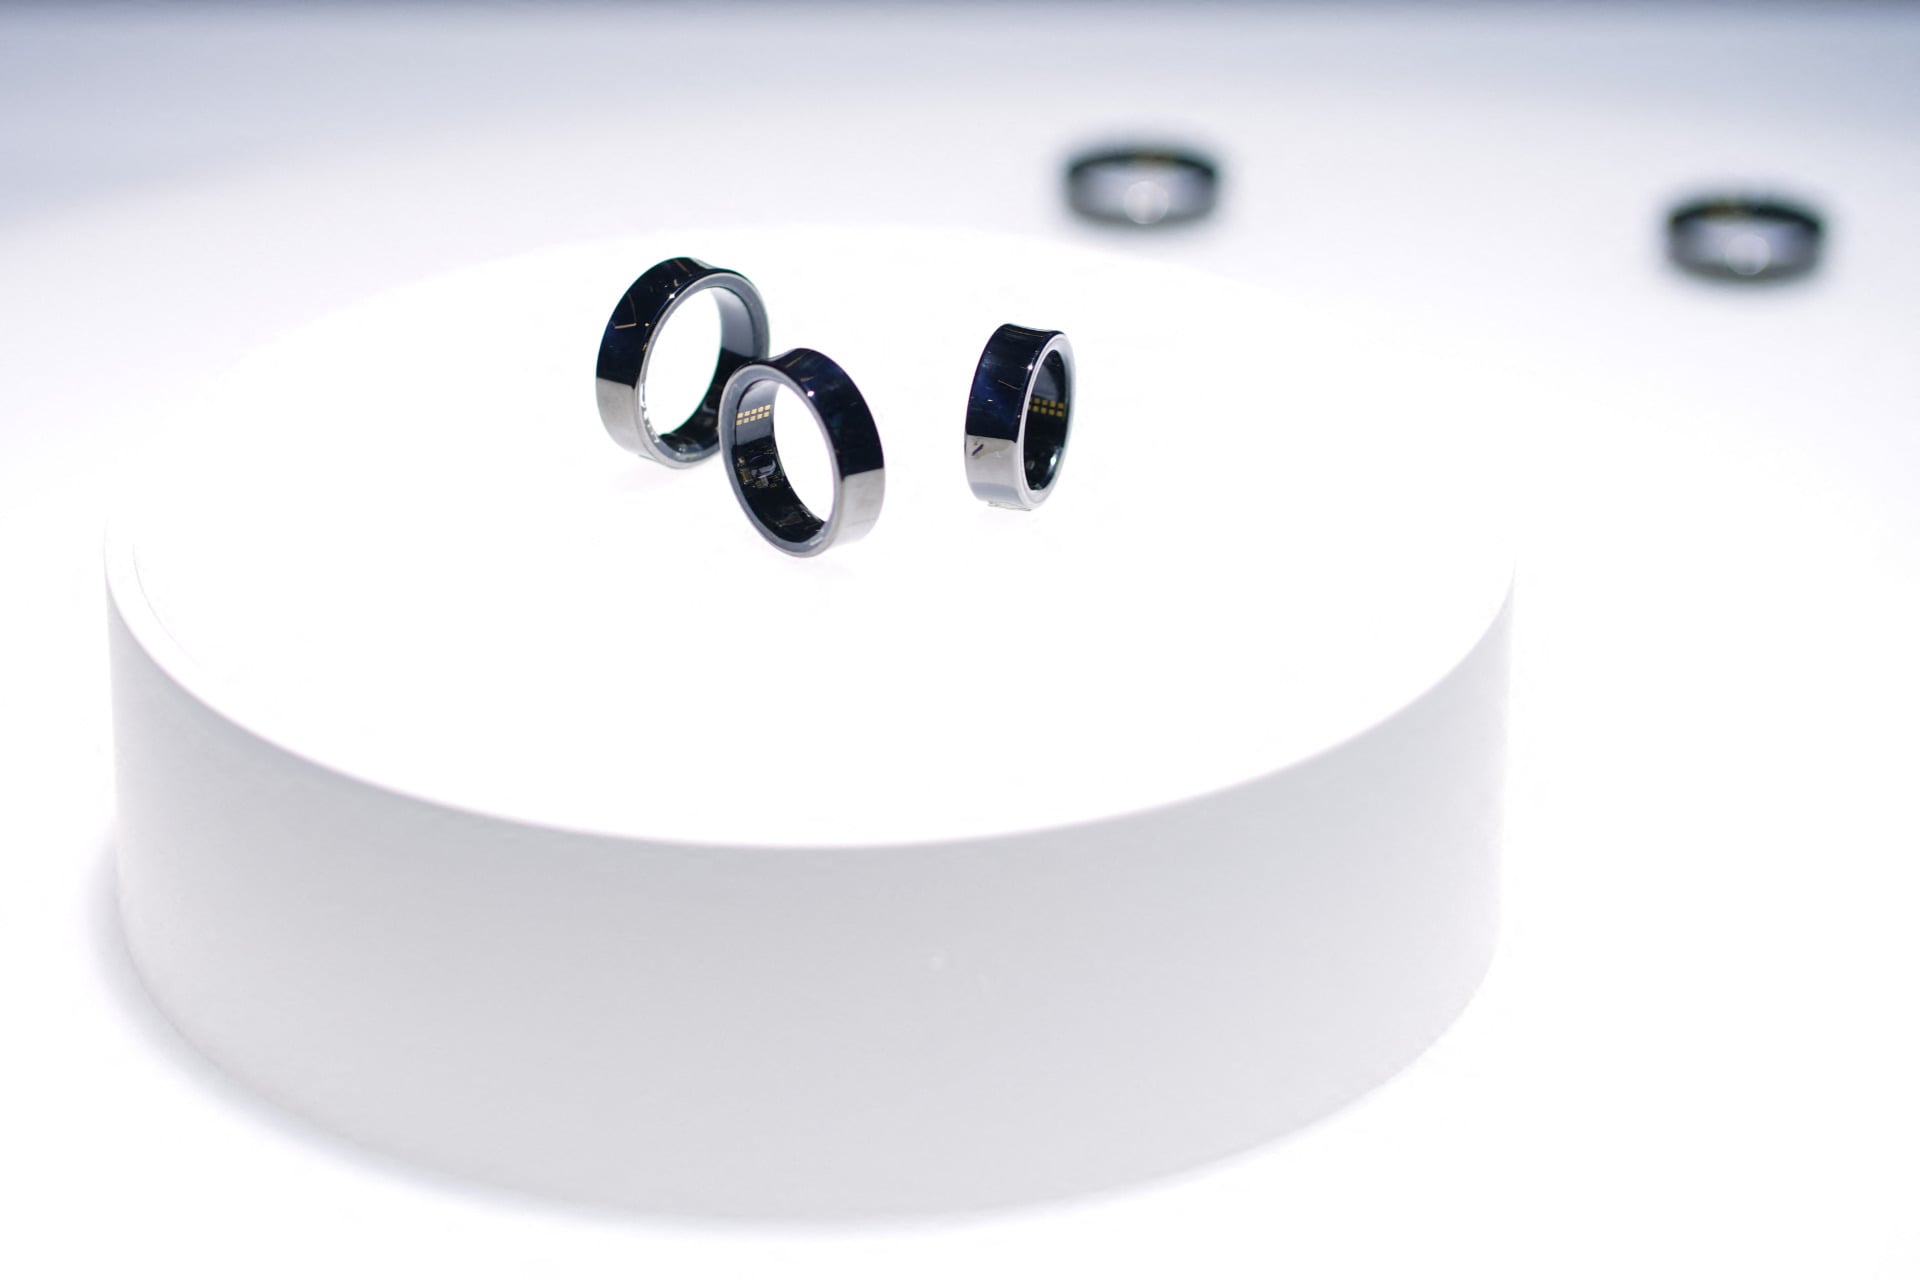
Then, there’s the smart ring. Might we get a tease for a Galaxy Ring 2? It’s been two years since the Galaxy Ring came out. Oura now has a slimmer and longer-lasting Oura Ring 5 and Vital Signals’ Signal Ring could be a game-changer, replacing traditional blood pressure cuffs. What’s next for Samsung’s smart ring?
The latter resulted in Bleszinski being hospitalised in March this year, in the aftermath of which he gave up drinking. It’s been during his sobriety that Bleszinski says he rediscovered his love for games—and the desire to make them:
“At the end of the day, I want to create characters and worlds,” Bleszinski explained to journalist Brian Crecente. “I want to make stuff that people will cosplay and get tattooed on their bodies.”
Bleszinski has already returned to game development in an advisory role—having consulted on a horror game called Soul Walker. This experience appears to have been positive for him, as he’s now pondering a full-time comeback. “So maybe I’ll eventually get my full foot back in the business and hopefully not get pushed into the pool.”
Bleszinski didn’t go into detail about what kind of game he wants to make during the interview. But he did discuss what he won’t be making, namely PvP multiplayer games like those created by Boss Key:
Keep up to date with the most important stories and the best deals, as picked by the PC Gamer team.
“Good luck to anyone in that space,” he said. “I’m more of a fan of PvE these days. Horde mode saved Gears 2, and I believe that space is evergreen because players just want to hop online with friends and shoot some stuff, no frills, no questions asked.”
Nonetheless, it seems like Bleszinski has an idea he wants to pursue, even if he didn’t vocalise it. “I’m nowhere near sharing anything specific (about a new game), beyond that, I can’t walk into a Home Depot without seeing a full arsenal at every turn,” he said, adding that “There’s so much more than just chainsaws.”
PvP or not, I’d certainly be up for playing a new Bleszinski-led game. While LawBreakers failed to find an audience, as a multiplayer shooter it was thoroughly entertaining. Radical Heights had promise too, though it never got a chance to develop into something substantial.
Of course, I’d be most interested in a spiritual successor to Gears. That space has been left fallow for a long time, and Pragmata recently showed there’s a big appetite for that style of game. But all of this is contingent on whether Bleszinski actually comes back, which isn’t guaranteed. In 2020, Bleszinski said he felt an urge to make “a little game”. But for whatever reason that didn’t transpire, at least not publicly.
Think of a professional athlete. What separates elite performers is what happens between games: continuous refinement, adjusting to new opponents and sharpening skills based on what the last game exposed.
Agentic AI works the same way. A model is no longer asked for an answer. It’s given a goal and has to keep adapting as environments shift, edge cases emerge and tools change. Unlike a generative model responding to a prompt, an agentic model must plan, use different tools and recover from problems it encounters mid-run.
That’s why post-training, the phase that refines a model after initial training on raw data, is no longer a one-time finishing step. It’s continuous, because the environment that agentic models operate in shifts fast. The tools an agent uses can change week to week. Edge cases surface in production that no test set anticipated. Each deployment brings its own codebase, policies and environment.
Post-training runs loop back from production as new problems surface. The compute footprint grows not because any single run is larger, but because the runs never stop. Agentic AI introduces a new compute pattern for post-training, making it the central workload of the agentic era and the primary driver of intelligence per dollar.
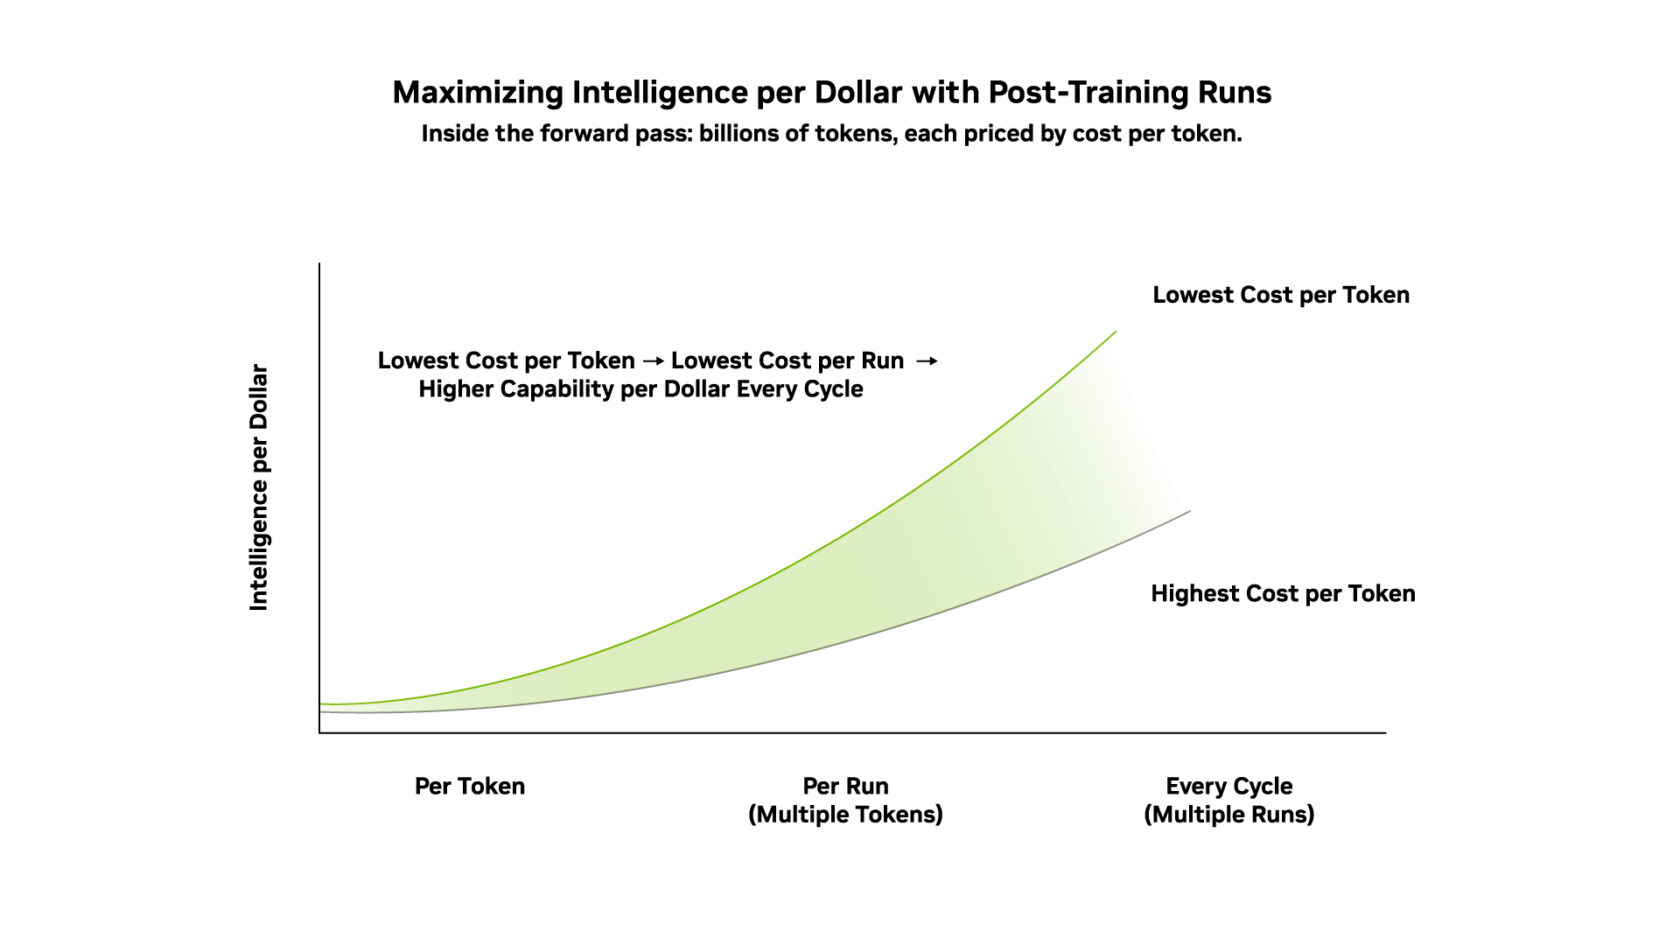
The goal of post-training is to maximize intelligence per dollar by maximizing the yield of every forward and backward pass in the continuous learning cycle. The forward pass — inference — is measured in cost per token. That means that every improvement to cost per token flows directly into intelligence per dollar.
Agentic Post-Training Demystified
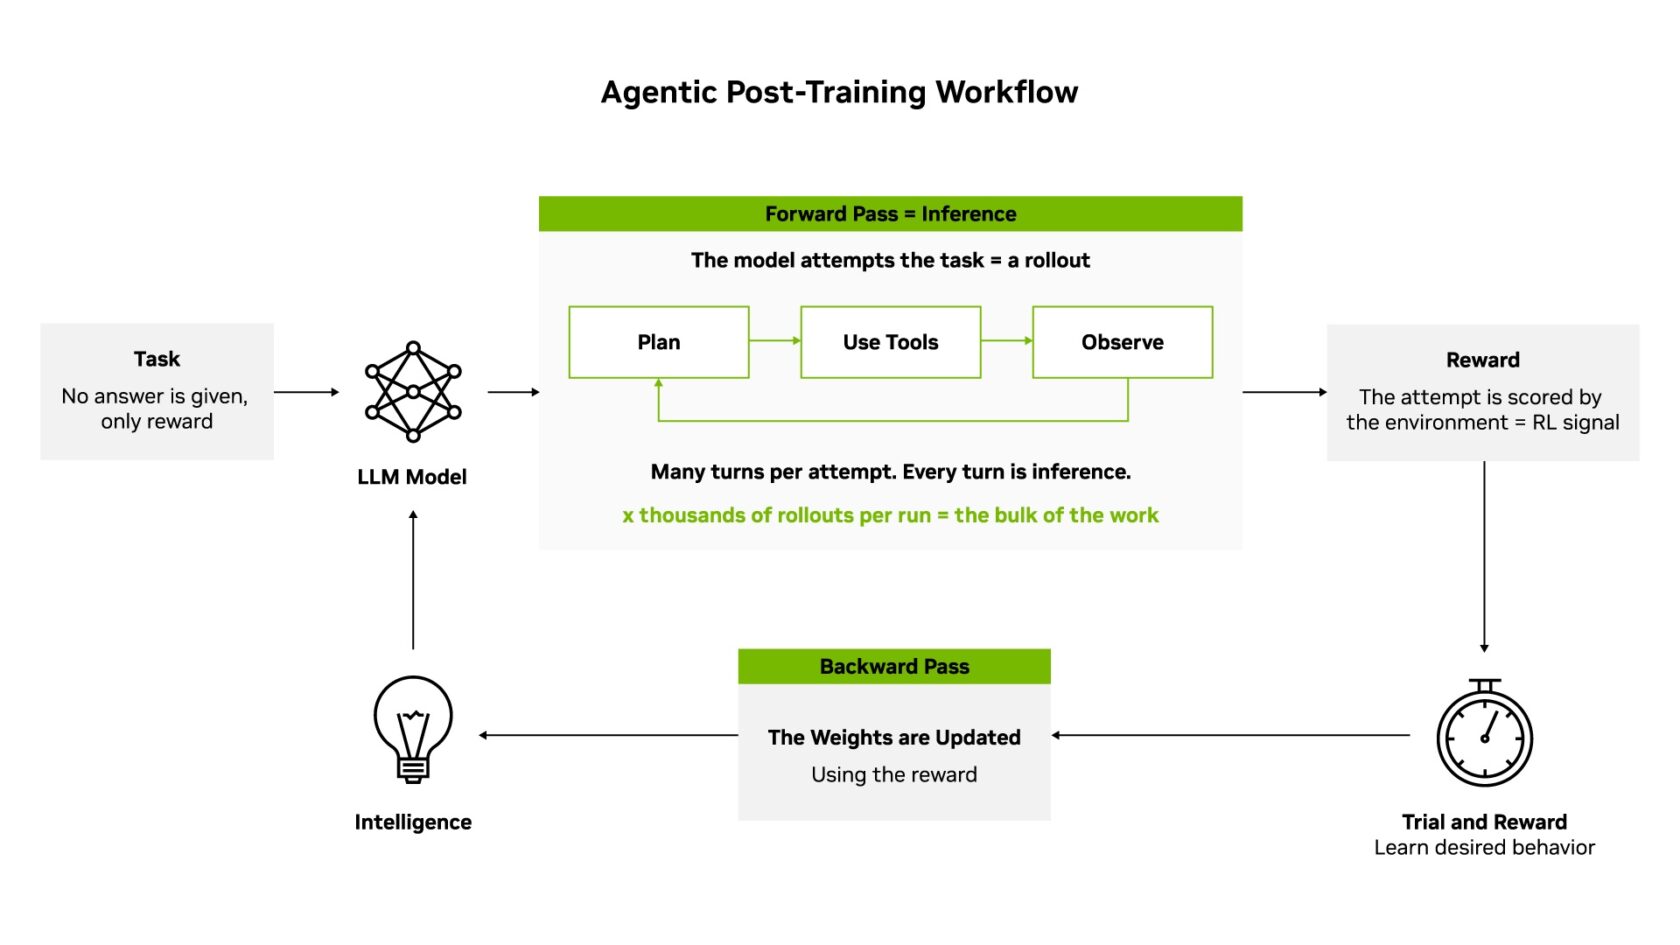
Post-training is where intelligence is built. In pretraining, the model learns to predict the next token, which gives it fluency but not intelligence. Post-training is where it learns to write code, plan a multistep task, use a search tool and recover when something goes wrong. Inference is what comes after: the model working on the job, priced in cost per token.
Because there’s no answer key to memorize, only a reward, the model learns by reinforcement learning (RL) techniques. When given a task, it writes out an attempt — the forward pass — the same work it does on the job. The attempt is scored, and the lesson updates the model’s weights — the backward pass. Across millions of attempts, intelligence grows.
Each step is compute intensive, and running this loop at scale is an orchestration problem: thousands of environments generating rollouts in parallel, rewards being verified and updated weights flowing back into training with accelerators fully utilized. NVIDIA NeMo open libraries, such as NeMo Gym for training environments and NeMo RL for distributed post-training, turn post-training from bespoke research code into repeatable infrastructure.
Why Intelligence per Dollar Extends Cost per Token
If inference is the revenue engine, post-training is the multiplier: the more capable the model, the higher the value of every token served.
Cost per token is the key metric for the inference factory: the all-in cost of delivering 1 million tokens. Intelligence per dollar sits one layer up, answering a different question: what does it cost to build a model worth serving, and keep it worth serving as its environment changes?
The two are nested, not competing. AI infrastructure that lowers cost per token also lowers the cost of every point of intelligence built into the model. And every point of intelligence built in raises the value of every token the inference factory serves.
In other words, cost per token measures operating yield; intelligence per dollar measures whether the investment in model intelligence is paying off.
Maximizing Intelligence per Dollar: Post-Training Nemotron 3 Ultra
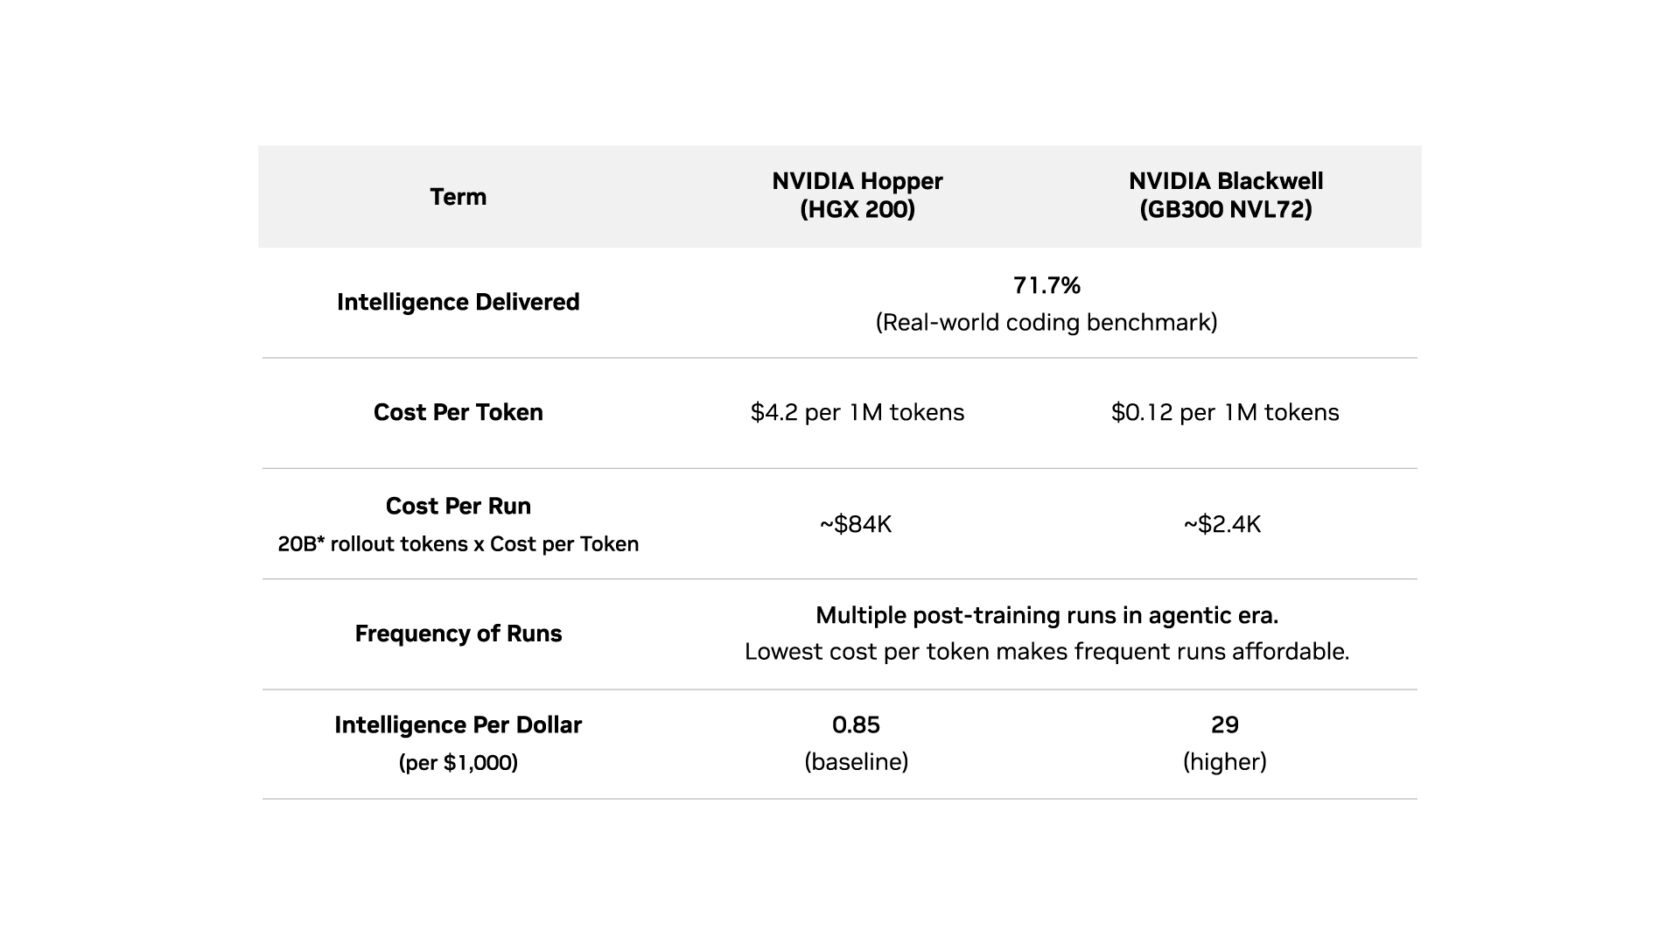
NVIDIA Nemotron 3 Ultra — an open weight, 550-billion-parameter mixture-of-experts (MoE) model, offers verifiable benchmarks and a fully disclosed post-training recipe run on NeMo RL. It scored 71.7% on a standard real-world coding benchmark, SWE-bench verified, where it produced a working fix for roughly seven in 10 real software bugs from open source projects, each one checked against the project’s own tests.
Illustrative 20 billion rollout tokens, based on prior-generation Nemotron 3 Super’s ~1.2 million rollouts at ~10,000 tokens each, scaled up for the larger Ultra model. Intelligence per dollar between platforms is independent of this assumption; the absolute values scale with the token count.
The NVIDIA Blackwell platform lowers cost per run and makes the frequent post-training the agentic era demands economically viable. That intelligence is reaped across every token served.
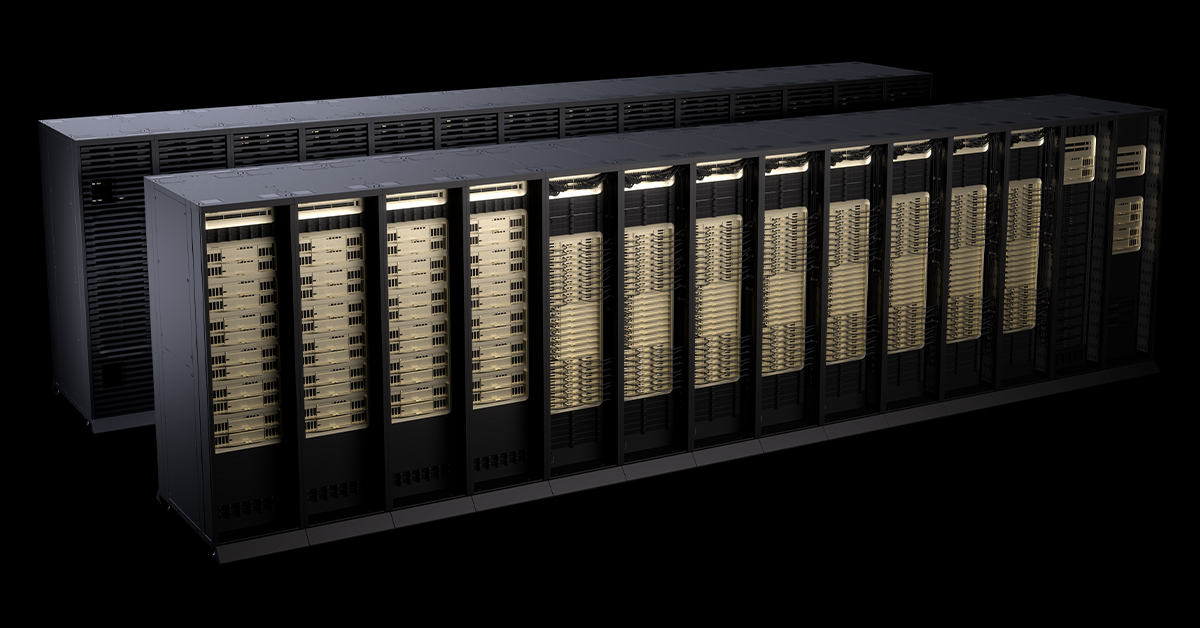
The NVIDIA Vera Rubin platform extends the trajectory further, training the largest models with one-fourth the GPUs of the Blackwell generation. It was codesigned from end to end to maximize intelligence per dollar for the agentic post-training load: more rollouts per run, more environments in play and post-training cycles that never stop.
Post-Training Workflows in Action
Prime Intellect’s Lab continuously post-trains frontier open models on NVIDIA Blackwell and uses NVIDIA Dynamo for inference orchestration. With Vera Rubin, Prime Intellect plans to scale reinforcement learning environments, generate more rollouts per run and accelerate training-to-inference iteration loops to maximize intelligence per dollar for businesses.
Prime Intellect has optimized its sandbox infrastructure to integrate with NVIDIA Vera CPUs, enabling low-latency, energy-efficient reinforcement learning. Open source tools and models such as NVIDIA Nemotron and NVIDIA NeMo Gym are also integrated into its software stack. When comparing realistic RL sandbox workloads against alternative x86 architectures, Prime Intellect found that Vera delivers, on average, 30% greater throughput per CPU.
Perplexity’s RL post-training stack runs asynchronously across hundreds of NVIDIA GPUs, with an RDMA-based weight transfer engine that syncs trillion-parameter models in under two seconds between training and inference compute nodes. The resulting post-trained Qwen3 235B models are then served on NVIDIA GB200 NVL72 systems.
Together AI provides post-training as a service, including supervised fine-tuning, RL and direct preference optimization. The service is delivered via a feature-rich application programming interface and software development kit that supports the full range of post-training on its AI Native Cloud platform. It has been running on NVIDIA’s platform and optimized kernel libraries, and is looking to harness the Vera Rubin platform next.
Learn more about NVIDIA Vera Rubin, the platform for AI factories to maximize intelligence per dollar across workloads. And explore NVIDIA’s full-stack platform for training frontier models.
The smart speakers above are our current favorites, but you still have other options if you’re looking for something specific in audio performance. Options that didn’t make this list include:
Apple HomePod: I really like the HomePod’s sound, which is possibly the best in the business, but it’s simply too expensive for the average budget at over $250 to $300 — which is why Apple released a mini version. The smaller HomePod doesn’t have quite the same incredible sound, but it’s a whole lot more affordable, which is why it ended up on the list.
Echo Dot 4: I really like this Echo Dot and use it in my house, but it’s starting to become an older model and I’m not sure how much longer Amazon is going to sell it since there are new models like the Echo Dot Max.
Echo Show 11: This smart display offers surprisingly good sound with its updated design, but it’s more focused on the 11-inch screen, which is why it ended up on my picks for best smart displays instead.
Sonos Era 100: The Sonor Era 100 has incredible sound for its $199 price, but if you really want an elite model, why not go all the way and get the better Sonos Era 300? I chose the highest-end Sonos option for this list if your budget isn’t a problem, but the 100 is still an option for those who like Sonos features but want a lower cost.
Bose SoundLink Home: Bose’s home speaker sounds great but the “Home” moniker is a bit misleading. This is a portable Bluetooth speaker that doesn’t have any smart capabilities and can’t even link with the Bose app, so it’s a thumbs down for this list.
Wiim Pro: The Wiim Pro is an interesting smart speaker receiver if you already have speakers you like and want to give Alexa/Google/Siri capabilities, but it’s not actually a smart speaker itself, so it didn’t make this list. I’m also waiting on the Wiim Sound, which is its own standalone smart speaker and could win a spot if it tests well.
Google Nest Audio: The Google Nest Audio is Nest’s latest larger smart speaker attempt. There’s nothing wrong with it, especially with its $100 price tag, but I liked the design and sound of other larger smart speakers if you want to go big. For Nest fans, it’s still a viable option. Ultimately, I chose the smaller Nest Mini as a great desk side companion.
Denon Home 150: I chose the more versatile Sonos over the A/V-friendly Denon brand for this list. However, if your home entertainment system uses Denon products and you’re very happy with them, it’s well worth investigating this $199 smart speaker from the same maker.
Palworld has now hit full release, and whether you’re stepping onto Palpagos for the first time or returning after a long break, there’s a lot to get your head around. Underneath the chaos, monster-catching, base-building, and occasional legal drama, Palworld is still a survival game at heart. That means preparation matters.
To help you get off to a strong start in Palworld 1.0, we’ve put together some practical beginner tips covering world settings, base building, Pal catching, gear, travel, and a few easy mistakes to avoid.
Check Your World Settings First
Before you properly dive in, take a minute to look through your world settings. Palworld gives you a surprising amount of control over how forgiving, grindy, or chaotic your world can be.
You can adjust things like experience gain, resource gathering, damage, stamina, and what happens when you die. If you don’t want to spend hours farming basic materials, or you’d rather focus on exploring and catching Pals, there’s no shame in tuning the experience to suit you.
The best part is that you can adjust many settings after creating a world, as long as you do it before loading back in. So if the game starts feeling too slow, too punishing, or too easy, tweak it rather than forcing yourself through a version you’re not enjoying.
Returning Players Should Check Mods And Saves
If you’re coming back for Palworld 1.0 and previously used mods, take extra care before loading an old world. Major updates can break outdated mods, and Pocketpair has specifically warned players to remove incompatible mods before playing the new version.
It’s also worth backing up your save before jumping in, especially if you’ve spent dozens of hours building bases, breeding Pals, or clearing bosses. A few minutes of caution can save a lot of heartbreak later.
Pick Your Base Location Carefully
Your first base doesn’t need to be perfect, but it should make your life easier. Look for somewhere with nearby resources, enough flat space to build, and a layout that won’t constantly trap your Pals on rocks, cliffs, or awkward terrain.
A good early base location should ideally have access to wood, stone, ore, and open building space. Being close to resources saves time, and time is one of the most valuable things in Palworld. The less you have to sprint back and forth carrying basic materials, the faster you can build, craft, and explore.
Defensibility matters too. Avoid placing your base somewhere too exposed if raids are enabled, and try not to build in a spot where enemies can easily swarm every angle.
Build For Workflow, Not Just Looks
A tidy base is nice, but a functional base is better. Your Pals need to move between beds, food, workstations, storage, and resource nodes without getting stuck or wasting time.
Place storage close to production areas. Keep food accessible. Give your Pals enough room around crafting benches, farms, and mining spots. If workers keep stopping, wandering, or failing to reach tasks, your layout may be the problem rather than the Pals themselves.
As your base grows, think of it less like a house and more like a little production line. The smoother the layout, the less you’ll have to babysit it.
Follow Your Base Missions
If you’re ever unsure what to do next, check your base missions. These objectives are more than a tutorial checklist. Completing them increases your base level, which unlocks more working Pal slots and expands what your settlement can do.
A higher base level means more production, more flexibility, and more room to specialise. It also gives you a clear path through the early game, especially when Palworld starts throwing a dozen possible distractions at you.
When in doubt, progress the missions, improve the base, then head back out stronger.
Catch Plenty Of Pals
Yes, you should absolutely catch loads of Pals. Different Pals have different elements, work suitabilities, passive traits, and partner skills, so variety is incredibly useful.
Catching duplicates is also worthwhile. Extra catches can provide experience bonuses, give you better passive skill options, and help you find stronger workers or fighters. Even if you already have one of a species, another might have better traits or be more useful for breeding later.
Try to build a team that covers different elements and roles. You’ll want combat Pals, base workers, mounts, gatherers, miners, kindling specialists, and more. The broader your collection, the easier it is to respond to whatever the game throws at you.
Learn The Element Matchups
Palworld’s elemental system matters, especially once fights start getting tougher. Pals and attacks have elemental strengths and weaknesses, so bringing the right team can make a huge difference.
You don’t need to memorise everything immediately, but you should start paying attention to what works. If a boss or wild Pal is giving you trouble, swap in Pals with a better elemental matchup rather than brute-forcing the same fight over and over.
A balanced team will save you resources, reduce failed captures, and make boss fights far less stressful.
Upgrade Your Gear Regularly
Your Pals will do a lot of fighting, but you still need to look after yourself. Better armour can improve survivability, and some gear offers protection against environmental hazards like heat or cold.
Weapons matter too. Even if you prefer letting your Pals handle combat, your own damage can help finish fights, weaken targets for capture, or save you when things go sideways. Keep an eye on new crafting options as you unlock technology, and don’t forget to repair or replace gear before heading into dangerous areas.
A good rule is simple: if you’re entering a new biome or fighting stronger enemies, check your equipment first.
Travel Smart
Palworld’s map is big, and walking everywhere gets old quickly. Early on, activate every fast travel statue you find. Even if you don’t need it immediately, you’ll thank yourself later when you need to return to an area for resources, bosses, dungeons, or rare Pals.
Mounts are just as important. A reliable ground mount makes exploration faster, while a flying mount can completely change how you move through the world. Once you have access to rideable Pals, prioritise the ones you’ll actually use and craft the relevant saddle.
The less time you spend trudging across familiar ground, the more time you can spend doing the fun stuff.
Don’t Hoard Technology Points Blindly
Technology points unlock new structures, weapons, gear, saddles, and base tools, but not every unlock is equally useful right away. Prioritise upgrades that solve immediate problems.
Need better movement? Unlock a saddle for a Pal you actually own. Struggling with production? Unlock better workstations. Taking too much damage? Look at armour. Running out of food? Improve farming and cooking.
It’s easy to unlock something just because it looks shiny, but practical upgrades usually pay off faster.
Prepare Before Bosses And Dungeons
Before heading into a boss fight, dungeon, or dangerous new area, do a quick checklist. Bring food, repair your gear, rest your Pals, check your ammo or weapon durability, and make sure your team has sensible elemental coverage.
Palworld can go from peaceful resource gathering to absolute disaster very quickly. A little preparation makes those disasters much easier to survive.
Final Thoughts
Palworld gives you a lot of freedom, and that’s part of the fun. You can build a cosy production hub, chase rare Pals, optimise your team, explore every corner of the map, or simply cause a bit of creative chaos.
The best beginner advice is to make the game work for you. Adjust the settings, build somewhere practical, catch more Pals than you think you need, and keep upgrading your base, gear, and travel options. Do that, and your first steps into Palworld’s full release should be much smoother.
Jason Coles
Jason likes to focus on roguelikes and co-op games; in a dream world he’d make a living writing about Dark Souls. As well as being a writer he also does personal training and accounting and can occasionally be seen on other people’s streams. Being a big fan of fluffy things means he has two cats, both of whom refuse to let him sleep, but at least they are cute.
Remember that photo which stirred all sorts of talk about Amazon’s upcoming God of War TV series? Well, the show won’t look like that anymore—the role of Kratos is set to be recast since actor Ryan Hurst tore a bicep on set, according to Deadline. Anonymous sources in that story claim Hurst has had surgery and is recovering.
As Deadline points out, this comes after Hurst “underwent a physical transformation” and put on 40 pounds of muscle specifically to play Kratos. But for such a physical role and with a child actor (who’s in every scene with the character, one assumes) to consider, it seems starting over is the simplest way forward for Amazon.
Production paused right after the injury and is planned to restart by mid-October with someone new in the role. In other words, any scenes that have already been shot will have to be redone—with four episodes already wrapped, that’s a huge reset. After a mixed reaction to that initial photo, Hurst won’t get the chance to prove his naysayers wrong in the end.
Latest Videos From
Hurst is also in Christopher Nolan’s new Odyssey movie as Mentor, and theater-avoidant gamers may know him as Thor in God of War: Ragnarok or Beta in AMC’s Walking Dead series. It’s not clear who will take his place, but given the reported production schedule, we won’t be waiting long to find out.
Setbacks aside, at least the show will be easier to experience on your PC than God of War Laufey, which seems likely to forego the PC.
Keep up to date with the most important stories and the best deals, as picked by the PC Gamer team.